
Grow Bean Sprouts at Home – it’s easier than you think, and I’m here to show you how! Forget those pricey, pre-packaged sprouts from the grocery store. Imagine having a constant supply of fresh, crunchy bean sprouts right at your fingertips, ready to add a nutritious boost to your salads, stir-fries, and sandwiches.
Sprouting beans has a rich history, dating back thousands of years, particularly in Asian cultures where they’re prized for their nutritional value and ease of cultivation. They were a staple during long winters, providing essential vitamins and minerals when fresh produce was scarce. Think of it as a tiny, edible time capsule of ancient wisdom!
But why should you learn to grow bean sprouts at home? Well, beyond the cost savings and historical connection, it’s incredibly rewarding! In today’s world, where we’re all looking for ways to eat healthier and be more self-sufficient, this simple DIY project is a game-changer. Plus, it’s a fantastic way to introduce kids to the magic of gardening and where their food comes from. I’ll guide you through the entire process, from choosing the right beans to harvesting your delicious sprouts, ensuring you have a thriving little sprout farm in your kitchen in no time!
Grow Your Own Bean Sprouts: A Simple DIY Guide
Hey there, fellow DIY enthusiasts! Ever thought about growing your own bean sprouts? It’s surprisingly easy, incredibly rewarding, and a fantastic way to add fresh, crunchy goodness to your meals. Plus, you don’t need a garden or any fancy equipment. I’m going to walk you through the whole process, step-by-step, so you can enjoy delicious, homegrown bean sprouts in just a few days. Let’s get started!
What You’ll Need
Before we dive in, let’s gather our supplies. The beauty of this project is that you probably already have most of these things lying around your kitchen.
* Bean Seeds: Mung beans are the most common and easiest to sprout, but you can also use adzuki beans, lentils, or even chickpeas. Make sure they are specifically labeled for sprouting or food use, not treated for planting. About 1/2 cup of dry beans is a good starting point.
* A Wide-Mouth Jar: A quart-sized mason jar works perfectly.
* Sprouting Lid or Cheesecloth: You’ll need something to cover the jar that allows for drainage and airflow. A sprouting lid is ideal, but a piece of cheesecloth secured with a rubber band works just as well.
* A Bowl or Stand: To angle the jar upside down for drainage.
* Water: Clean, filtered water is best.
* A Dark Place: A cupboard or pantry will do the trick.
Step-by-Step Sprouting Guide
Okay, now for the fun part! Here’s how to grow your own bean sprouts:
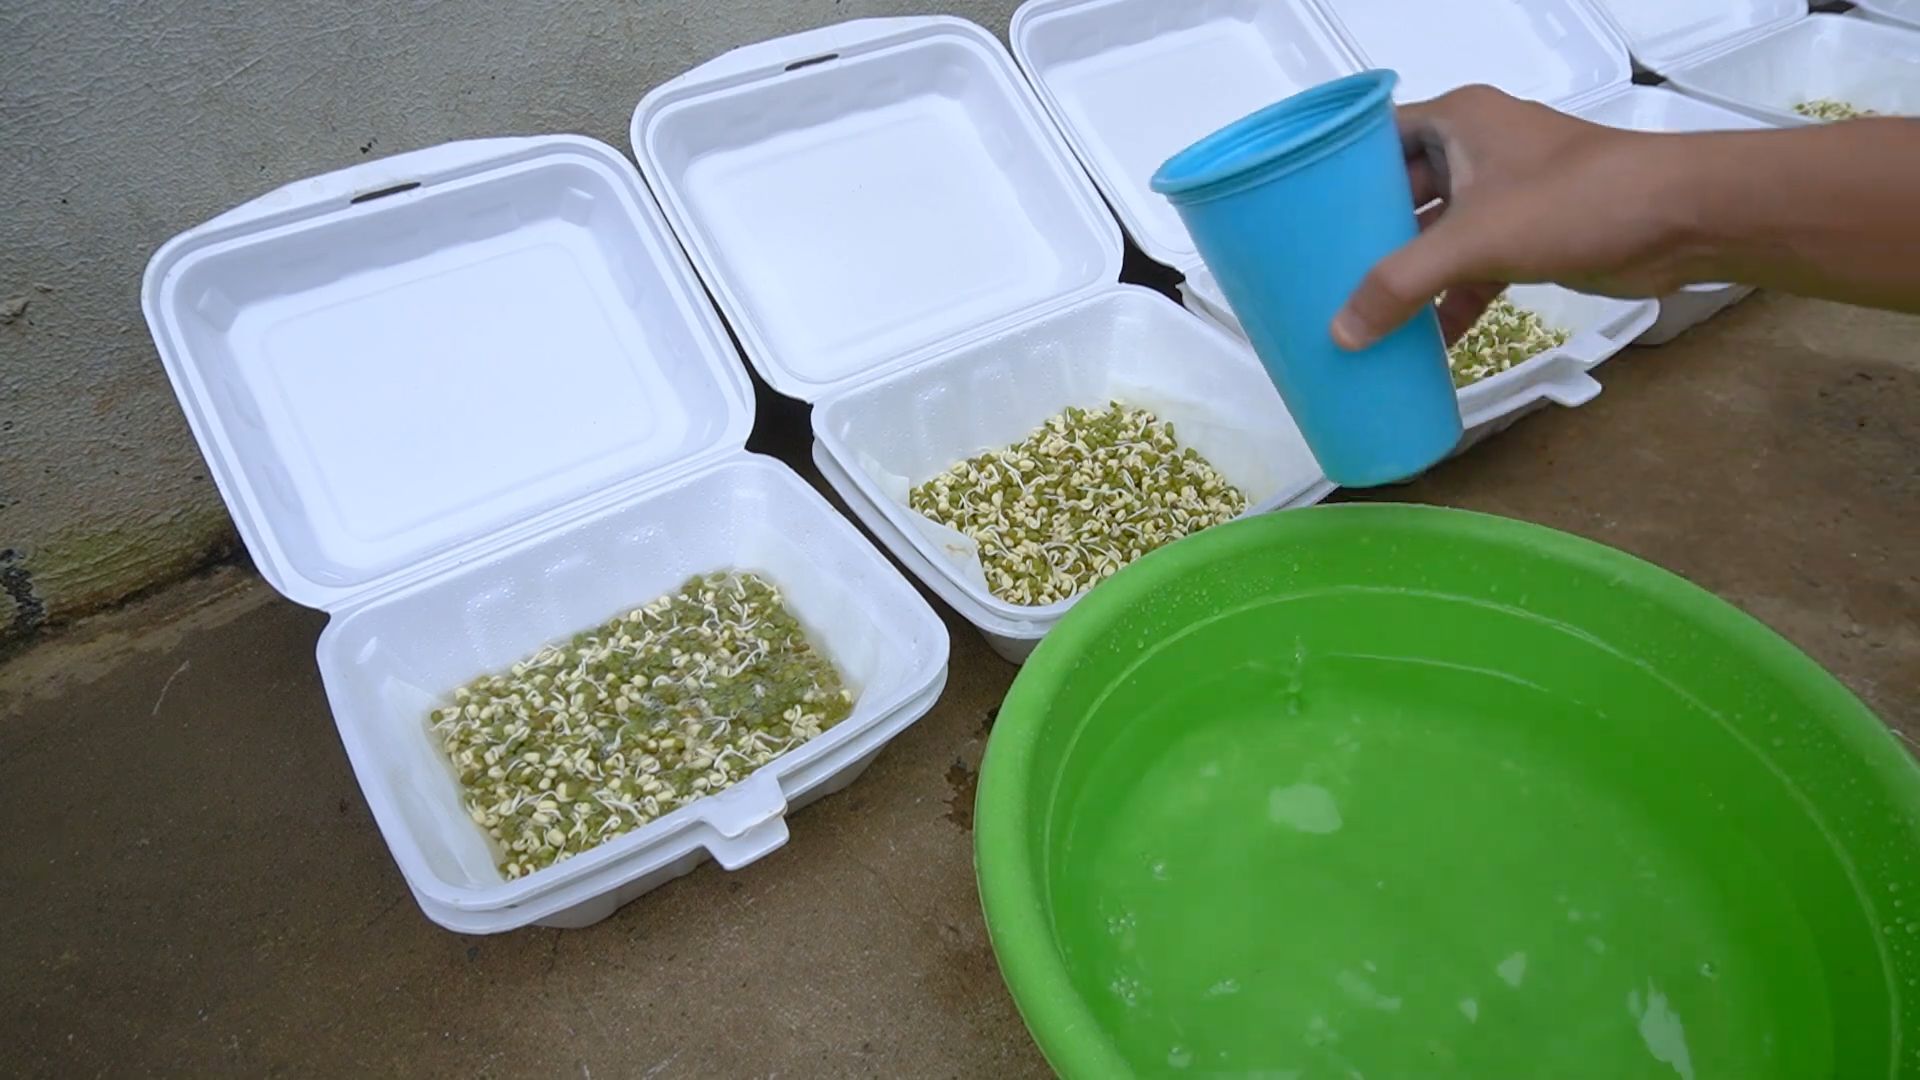
1. Rinse the Beans: Place your 1/2 cup of dry beans in the jar and cover them with plenty of cool water. Swirl them around to remove any debris or dust. Drain the water completely. This initial rinse is crucial for removing any surface contaminants.
2. Soak the Beans: Refill the jar with fresh, cool water, ensuring the beans are fully submerged. They will expand significantly during soaking, so give them plenty of room. The soaking process hydrates the beans and starts the germination process.
3. Soaking Time: Let the beans soak for 8-12 hours, or even overnight. I usually soak mine before I go to bed and drain them in the morning. This gives them ample time to absorb the water they need to sprout.
4. Drain and Rinse (First Sprout): After soaking, drain the water completely using your sprouting lid or cheesecloth. Rinse the beans thoroughly with fresh, cool water. This is important to prevent mold and bacteria growth.
5. Invert and Drain: Place the jar upside down in a bowl or on a stand at an angle. This allows excess water to drain out while still allowing air to circulate. Proper drainage is key to preventing your sprouts from becoming soggy and moldy.
6. Darkness is Key: Place the jar in a dark, well-ventilated place, like a cupboard or pantry. Bean sprouts prefer darkness, as light can cause them to become bitter.
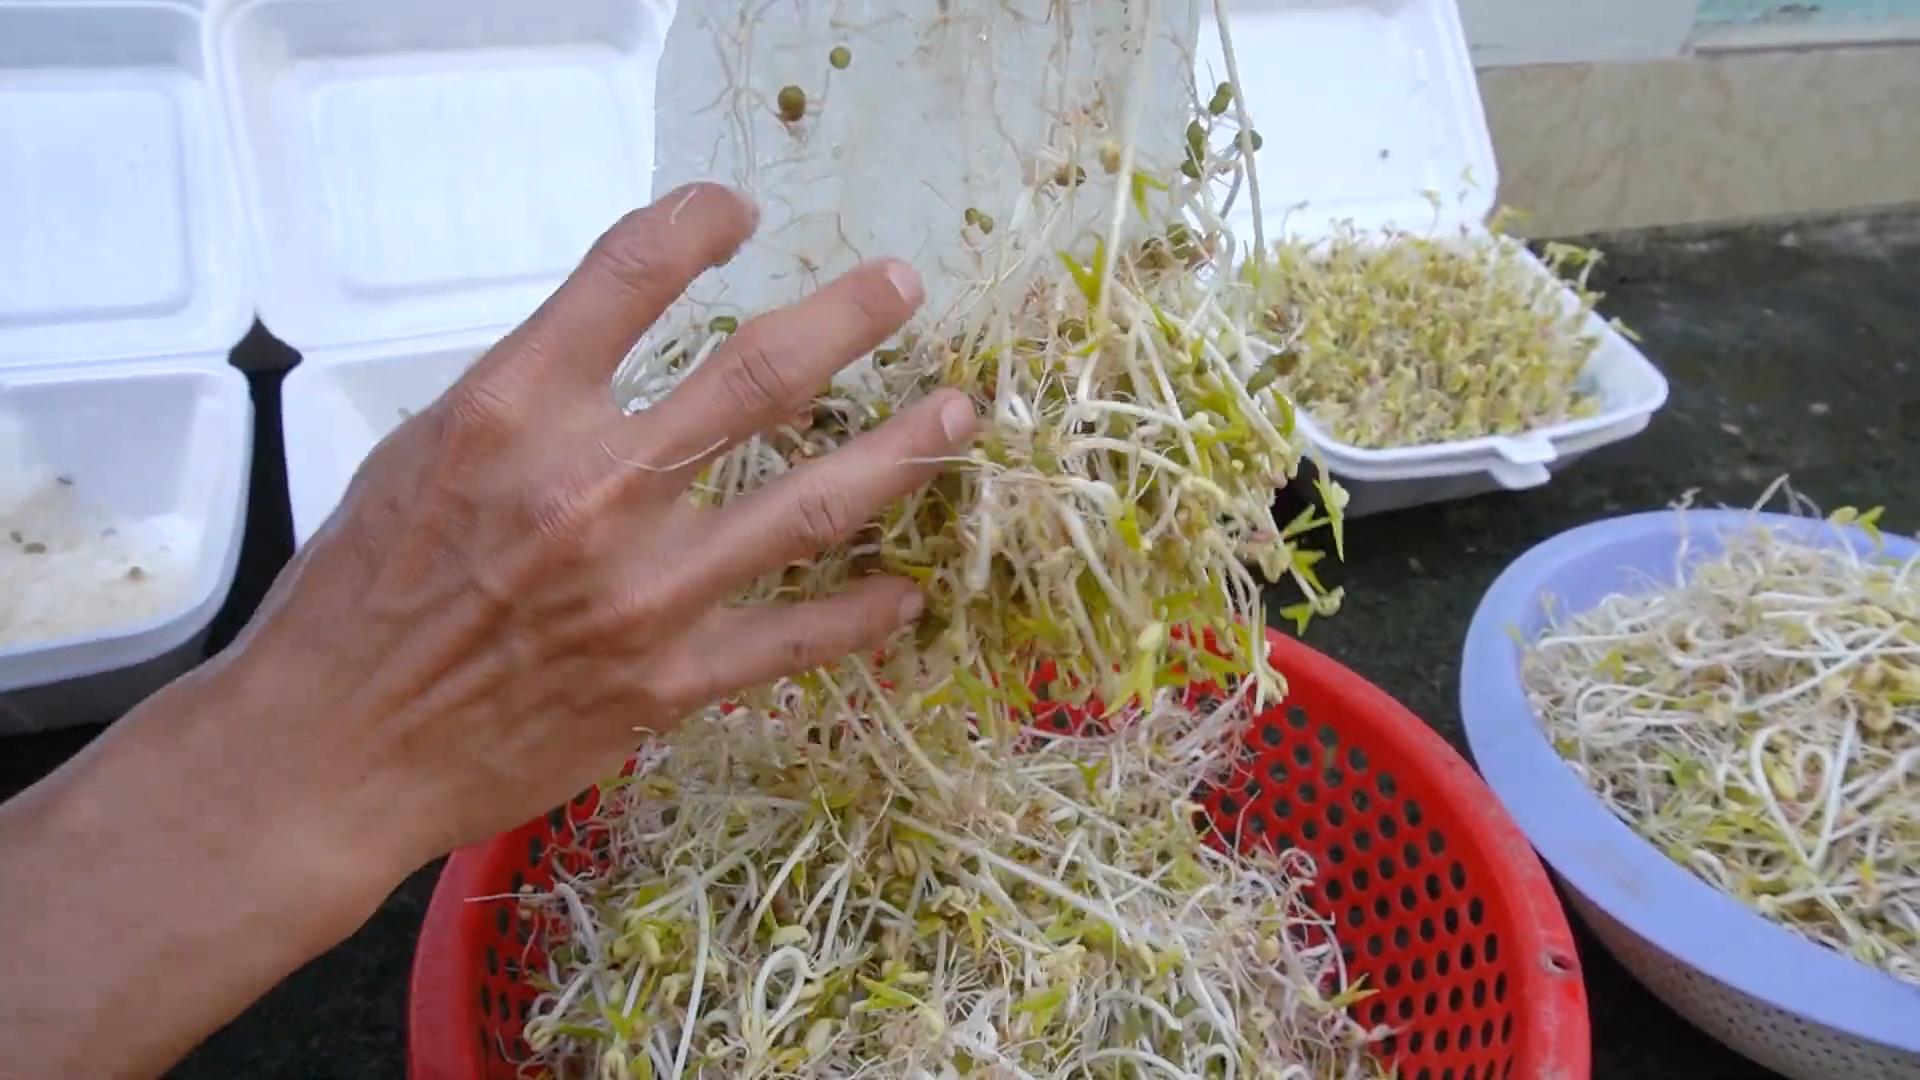
7. Rinse and Drain (Daily Routine): This is the most important part of the process! Rinse and drain the sprouts 2-3 times per day with fresh, cool water. This keeps them hydrated and prevents mold growth. Make sure to drain the water completely after each rinse. I usually do this in the morning, afternoon, and before bed.
8. Observe and Adjust: Check your sprouts daily. You should see them starting to sprout within 12-24 hours. If they seem dry, increase the frequency of rinsing. If they seem soggy, make sure they are draining properly.
9. Harvest Time: Your bean sprouts will be ready to harvest in 3-5 days, depending on your preference. They should be about 1-2 inches long. I like mine when they have a nice, crunchy texture.
10. Final Rinse: Before eating, give your bean sprouts a final rinse. You can also remove the bean hulls (the outer skins) if you prefer, but it’s not necessary. Some people find the hulls a bit bitter.
11. Storage: Store your bean sprouts in an airtight container in the refrigerator. They should last for about a week.
Troubleshooting Tips
Even with the best instructions, things can sometimes go awry. Here are a few common problems and how to fix them:
* Mold Growth: If you see any signs of mold (fuzzy white or black spots), discard the entire batch. Mold is a sign that the sprouts are not draining properly or are not being rinsed frequently enough. To prevent mold, ensure proper drainage and rinse the sprouts 2-3 times per day.
* Slow Sprouting: If your sprouts are not sprouting as quickly as you expect, it could be due to the temperature. Bean sprouts prefer a temperature of around 70-75°F (21-24°C). If your kitchen is cooler, try placing the jar in a slightly warmer location. Also, make sure your beans are fresh and specifically intended for sprouting.
* Bitter Taste: If your bean sprouts taste bitter, it could be due to exposure to light. Make sure they are kept in a dark place during the sprouting process.
* Rotting Smell: A rotting smell indicates that the sprouts are not draining properly and are starting to decompose. Discard the batch and start over, ensuring better drainage and more frequent rinsing.
Beyond Mung Beans: Exploring Other Sprouting Options
While mung beans are the easiest to start with, don’t be afraid to experiment with other types of beans and seeds! Here are a few ideas:
* Adzuki Beans: These have a slightly sweeter flavor than mung beans.
* Lentils: Lentil sprouts are a great source of protein and fiber.
* Chickpeas: Chickpea sprouts have a nutty flavor and a satisfying crunch.
* Alfalfa Seeds: Alfalfa sprouts are delicate and have a mild, grassy flavor.
* Broccoli Seeds: Broccoli sprouts are packed with nutrients and have a slightly spicy flavor.
The sprouting process is generally the same for all of these, but soaking times may vary. Do a little research to find the optimal soaking time for each type of bean or seed.
Using Your Homegrown Bean Sprouts
Now that you have a batch of fresh, homegrown bean sprouts, it’s time to enjoy them! Here are a few ideas:
* Salads: Add bean sprouts to your favorite salads for a crunchy and nutritious boost.
* Sandwiches and Wraps: Bean sprouts add a refreshing crunch to sandwiches and wraps.
* Stir-fries: Toss bean sprouts into stir-fries for a quick and easy way to add vegetables.
* Soups: Add bean sprouts to soups just before serving to retain their crunch.
* Spring Rolls: Bean sprouts are a classic ingredient in spring rolls.
* As a Garnish: Sprinkle bean sprouts on top of your favorite dishes as a garnish.
Why Grow Your Own?
You might be wondering, “Why bother growing my own bean sprouts when I can just buy them at the store?” Well, there are several compelling reasons:
* Freshness: Homegrown bean sprouts are incredibly fresh and flavorful.
* Cost-Effective: Growing your own bean sprouts is much cheaper than buying them at the store.
* Control: You have complete control over the growing process, ensuring that your sprouts are free from pesticides and other harmful chemicals.
* Sustainability: Growing your own food is a sustainable way to reduce your environmental impact.
* It’s Fun! Sprouting beans is a fun and rewarding activity that you can do with your family.
A Few Extra Tips for Sprouting Success
* Use High-Quality Beans: Start with fresh, high-quality beans specifically intended for sprouting. Avoid using beans that are old or damaged.
* Maintain Hygiene: Keep your sprouting equipment clean to prevent mold and bacteria growth. Wash your jar and sprouting lid thoroughly between batches.
* Don’t Overcrowd: Don’t overcrowd the jar with too many beans. This can lead to poor drainage and increased risk of mold growth.
* Be Patient: Sprouting takes time, so be patient and don’t get discouraged if your first batch isn’t perfect.
* Experiment: Don’t be afraid to experiment with different types of beans and seeds to find your favorites.
Growing your own bean sprouts is a simple, rewarding, and delicious way to add fresh, nutritious food to your diet. With a little practice, you’ll be enjoying homegrown bean sprouts in no time! Happy sprouting!
Conclusion
So, there you have it! Growing your own bean sprouts at home is not only incredibly easy and cost-effective, but it also provides you with a constant supply of fresh, nutritious ingredients right at your fingertips. Forget those limp, sad-looking sprouts from the grocery store – with this simple DIY method, you’ll be enjoying crisp, flavorful bean sprouts in salads, stir-fries, and sandwiches in just a few days.
This method is a must-try for several reasons. First, you have complete control over the quality of your sprouts. You know exactly where they came from and how they were grown, ensuring they are free from harmful chemicals and pesticides. Second, it’s significantly cheaper than buying pre-packaged sprouts, especially if you consume them regularly. A small bag of dried beans can yield a surprisingly large amount of sprouts. Third, it’s incredibly rewarding to watch your little sprouts grow from tiny seeds to crunchy, edible delights. It’s a mini-gardening project that even those with the brownest thumbs can successfully accomplish.
Beyond the Basics: Variations and Suggestions
While the method outlined above is a great starting point, feel free to experiment and personalize your bean sprout growing experience. Here are a few ideas to get you started:
* Different Bean Varieties: While mung beans are the most common choice for sprouting, you can also try sprouting other types of beans, such as adzuki beans, lentils, or even chickpeas. Each variety will have a slightly different flavor and texture, so experiment to find your favorites. Remember to research the specific sprouting times and requirements for each bean type.
* Sprouting Jars vs. Bags: We’ve focused on the jar method, but you can also use a sprouting bag made of breathable fabric. Sprouting bags can be hung, allowing for better air circulation and drainage.
* Adding Flavor: Some people like to add a touch of flavor to their sprouts by rinsing them with a diluted solution of lemon juice or vinegar during the sprouting process. This can help to prevent mold growth and add a subtle tang.
* Sunlight Exposure: While sprouts don’t need direct sunlight, exposing them to indirect light for a few hours each day can help them develop chlorophyll, resulting in greener and more nutritious sprouts. Be careful not to overexpose them to sunlight, as this can cause them to dry out.
* Using a Sprouting Tray: For larger quantities, consider investing in a multi-tiered sprouting tray. These trays provide excellent drainage and air circulation, making it easier to grow a large batch of sprouts at once.
Embrace the Sprout Life!
We wholeheartedly encourage you to give this DIY trick a try. It’s a simple, sustainable, and satisfying way to add fresh, healthy ingredients to your diet. Plus, it’s a fun project for the whole family!
Once you’ve mastered the art of growing bean sprouts at home, we’d love to hear about your experience. Share your tips, tricks, and variations in the comments below. Let’s build a community of sprout enthusiasts and spread the word about this amazing DIY technique. Happy sprouting!
Frequently Asked Questions (FAQ)
Here are some of the most common questions people have about growing bean sprouts at home:
Q: What kind of beans can I use to grow bean sprouts?
A: Mung beans are the most popular and readily available choice for sprouting. However, you can also sprout other types of beans, such as adzuki beans, lentils, chickpeas, and even some types of peas. Just be sure to research the specific sprouting times and requirements for each bean type, as they may vary. Avoid sprouting kidney beans, as they contain toxins that are only destroyed by thorough cooking.
Q: How long does it take to grow bean sprouts?
A: The sprouting time depends on the type of bean and the environmental conditions, such as temperature and humidity. Generally, mung beans will sprout in 3-5 days. Adzuki beans may take a bit longer, around 4-6 days. Keep in mind that warmer temperatures will speed up the sprouting process, while cooler temperatures will slow it down.
Q: What is the best temperature for growing bean sprouts?
A: The ideal temperature for sprouting beans is between 70°F and 75°F (21°C and 24°C). Avoid exposing your sprouts to extreme temperatures, as this can inhibit their growth or even kill them.
Q: How often should I rinse my bean sprouts?
A: You should rinse your bean sprouts at least twice a day, preferably three times a day, with fresh, cool water. This helps to keep them hydrated, prevents mold growth, and removes any accumulated waste products.
Q: How do I prevent mold from growing on my bean sprouts?
A: Mold growth is a common concern when sprouting beans. To prevent mold, ensure that your sprouts have adequate drainage and air circulation. Rinse them frequently with fresh water, and avoid overcrowding the sprouting container. You can also add a tablespoon of vinegar to the rinsing water to help inhibit mold growth. If you do notice any mold, discard the affected sprouts immediately.
Q: How do I know when my bean sprouts are ready to eat?
A: Bean sprouts are typically ready to eat when they have reached a length of about 1-2 inches and have developed small, leafy sprouts. The exact length is a matter of personal preference. Some people prefer shorter, crunchier sprouts, while others prefer longer, more developed sprouts.
Q: How long do bean sprouts last in the refrigerator?
A: Freshly grown bean sprouts will last for about 3-5 days in the refrigerator. To store them, rinse them thoroughly and pat them dry with a paper towel. Store them in a sealed container or plastic bag in the crisper drawer of your refrigerator.
Q: Can I eat the bean sprout roots?
A: Yes, the roots of bean sprouts are perfectly edible. They are often quite crunchy and flavorful.
Q: Are bean sprouts safe to eat raw?
A: While bean sprouts are often eaten raw, there is a small risk of foodborne illness associated with consuming raw sprouts. This is because sprouts are grown in warm, moist conditions, which can be conducive to bacterial growth. To minimize the risk, purchase your beans from a reputable source, rinse them thoroughly before sprouting, and keep your sprouting equipment clean. If you are concerned about food safety, you can cook your bean sprouts before eating them.
Q: Can I grow bean sprouts without a jar?
A: Yes, you can grow bean sprouts without a jar. You can use a sprouting bag, a multi-tiered sprouting tray, or even a colander lined with cheesecloth. The key is to provide adequate drainage and air circulation.
Q: My bean sprouts are not growing. What am I doing wrong?
A: There are several reasons why your bean sprouts may not be growing. Make sure that you are using fresh, viable beans. Also, ensure that the temperature is within the ideal range (70°F to 75°F). Overcrowding, insufficient rinsing, or poor drainage can also inhibit growth. Finally, make sure that your sprouts are not exposed to direct sunlight, which can dry them out.
Q: Can I use tap water to rinse my bean sprouts?
A: Yes, you can use tap water to rinse your bean sprouts, as long as your tap water is safe to drink. If you are concerned about the quality of your tap water, you can use filtered water instead.
Q: What are the nutritional benefits of bean sprouts?
A: Bean sprouts are a good source of vitamins, minerals, and fiber. They are low in calories and fat, and they are a good source of protein. They are also rich in antioxidants, which can help to protect your body against damage from free radicals. Incorporating this DIY trick into your routine is a great way to boost your nutrient intake.

Leave a Comment