
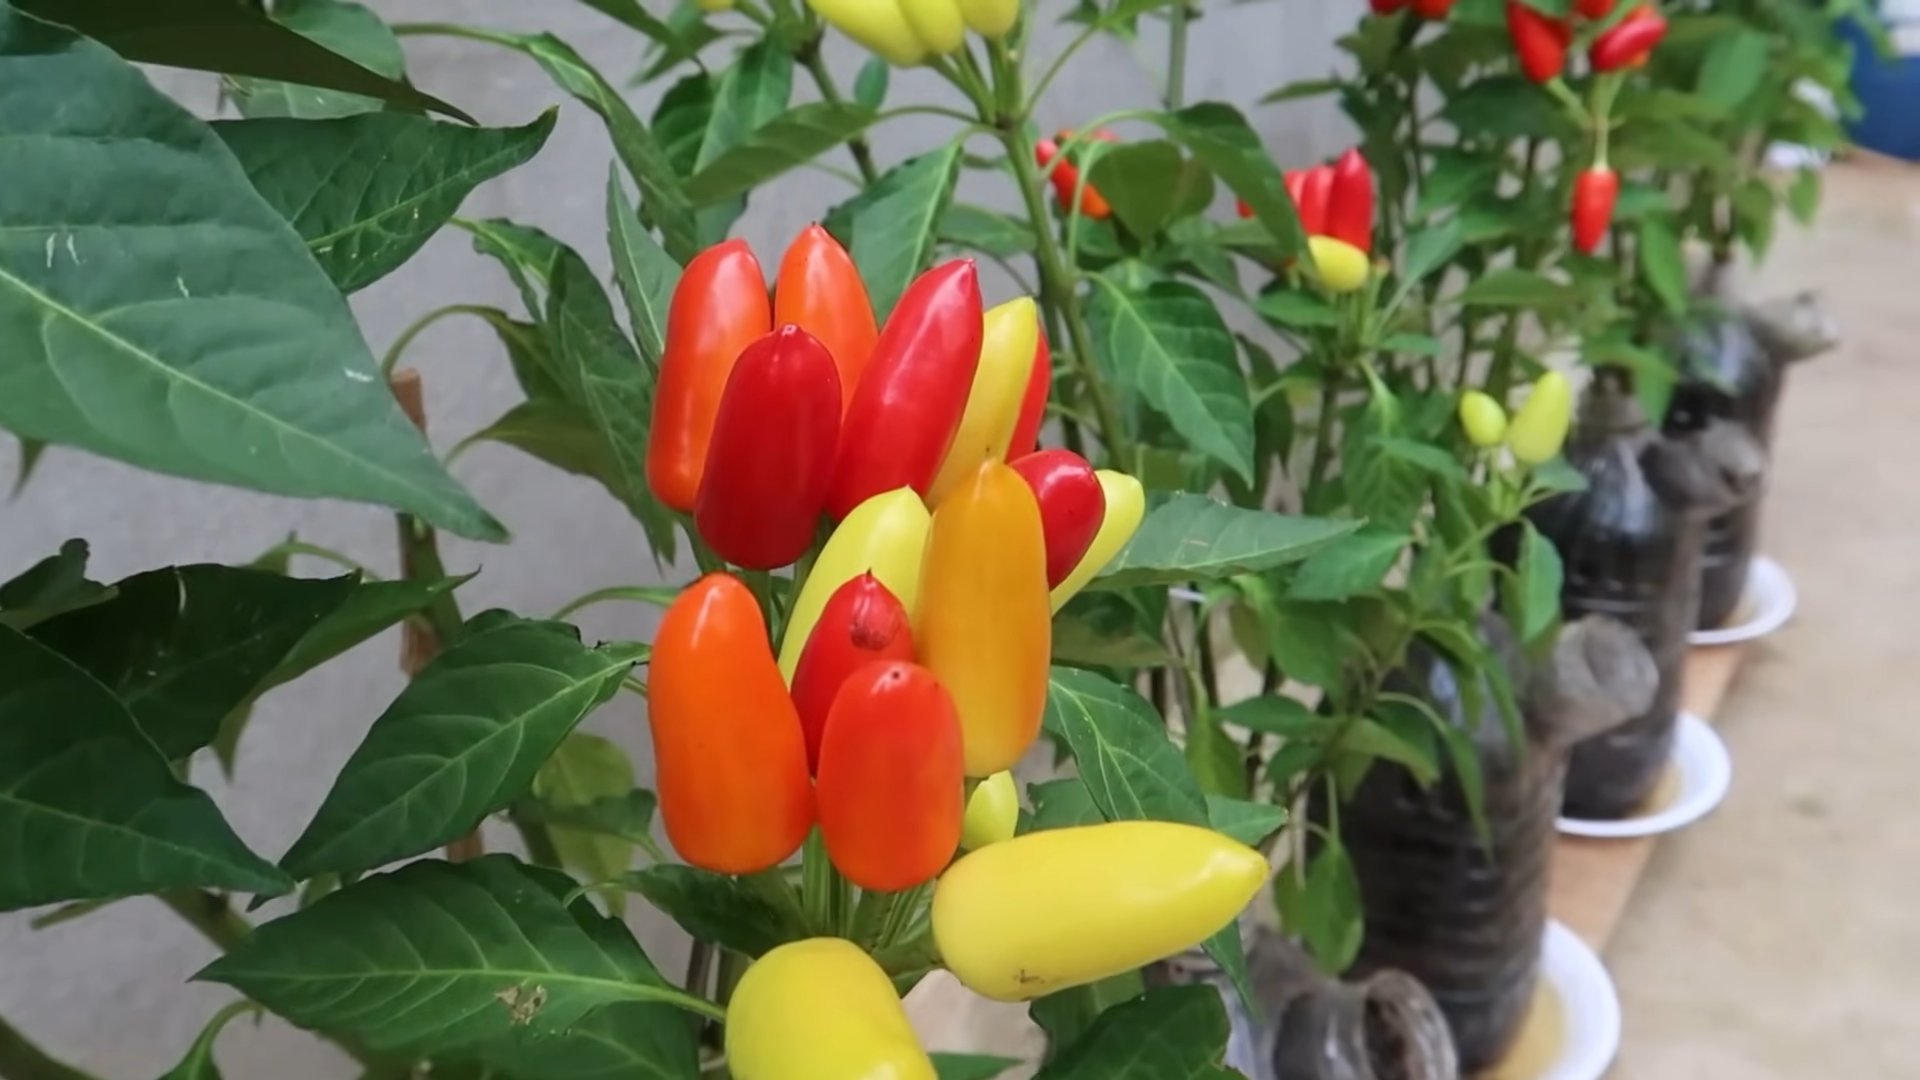
Growing Peppers in Bottles: Sounds a little crazy, right? But trust me, this ingenious DIY trick is about to revolutionize your gardening game! Forget sprawling gardens and back-breaking weeding; we’re taking pepper cultivation vertical and compact. Imagine vibrant, juicy peppers bursting forth from repurposed bottles, adding a splash of color and flavor to your balcony, patio, or even your kitchen windowsill.
The concept of container gardening, while not always in bottles, has roots stretching back centuries. From the Hanging Gardens of Babylon to the humble window boxes of Victorian England, people have always found creative ways to cultivate plants in limited spaces. Today, with urban living on the rise and a growing desire for fresh, locally sourced food, the need for innovative gardening solutions is greater than ever. That’s where growing peppers in bottles comes in!
Why should you embrace this quirky yet effective method? Well, for starters, it’s incredibly space-saving. Perfect for apartment dwellers or anyone with limited outdoor space. Plus, it’s a fantastic way to recycle those plastic bottles that would otherwise end up in a landfill. But the real magic lies in the control you gain over your pepper plants. You can easily move them to chase the sun, protect them from frost, and tailor the soil to their specific needs. I’m excited to show you how easy it is to get started!
Growing Peppers in Bottles: A Fun and Space-Saving DIY Project
Hey there, fellow gardening enthusiasts! Are you short on space but dreaming of a bountiful pepper harvest? Or maybe you just want a quirky and unique way to grow your favorite spicy treats? Well, you’ve come to the right place! I’m going to walk you through how to grow peppers in bottles – it’s easier than you think, super rewarding, and a fantastic way to recycle. Let’s get started!
What You’ll Need
Before we dive in, let’s gather our supplies. This is a pretty low-cost project, which is always a win in my book!
* Plastic Bottles: The star of the show! 2-liter soda bottles or larger water bottles work best. Make sure they’re clean and free of any sticky residue. I usually rinse mine out with soapy water and let them dry completely.
* Pepper Seeds or Seedlings: Choose your favorite pepper varieties! Bell peppers, jalapenos, habaneros – the possibilities are endless. If you’re starting from seeds, you’ll need to germinate them first (more on that later). If you’re using seedlings, make sure they’re healthy and have a good root system.
* Potting Mix: Use a high-quality potting mix that’s well-draining. Avoid using garden soil, as it can compact in the bottles and hinder drainage. I prefer a mix that contains peat moss, perlite, and vermiculite.
* Scissors or a Utility Knife: For cutting the bottles. Be careful!
* Drill or Nail: To create drainage holes.
* Watering Can or Spray Bottle: For watering your peppers.
* Fertilizer: A balanced liquid fertilizer to feed your pepper plants. I like to use a fertilizer specifically formulated for vegetables.
* Optional:
* Gravel or small rocks for drainage.
* Twine or wire for hanging the bottles (if you want to hang them).
* Gloves to protect your hands.
Preparing the Bottles
This is where we transform those empty bottles into mini pepper paradises!
1. Clean the Bottles: As I mentioned before, make sure your bottles are squeaky clean. Remove any labels and rinse them thoroughly.
2. Cut the Bottles: There are a couple of ways to do this, depending on how you want to set up your bottles.
* Option 1: Hanging Bottles: Cut the bottle in half horizontally. You’ll be using the bottom half as the planter and the top half as a sort of mini-greenhouse (optional).
* Option 2: Standing Bottles: Cut a large rectangular opening in the side of the bottle, leaving the bottom intact. This creates a “trough” for your pepper plant.
* Option 3: Stacked Bottles: Cut the bottom off one bottle and the top off another. Invert the top bottle into the bottom bottle, creating a self-watering system. This is a bit more advanced, but it can be really effective!
I personally prefer the hanging bottle method, as it saves space and looks really cool.
3. Create Drainage Holes: This is crucial! Peppers don’t like soggy roots. Use a drill or nail to create several drainage holes in the bottom of the bottle. If you’re using the stacked bottle method, you’ll also need to drill holes in the bottom of the inverted top bottle.
4. Optional: Add Drainage Layer: To further improve drainage, you can add a layer of gravel or small rocks to the bottom of the bottle before adding the potting mix. This helps prevent the roots from sitting in water.
Planting Your Peppers
Now for the fun part – getting those peppers planted!
1. Fill the Bottle with Potting Mix: Fill the bottle with potting mix, leaving about an inch or two of space at the top. Don’t pack the soil down too tightly.
2. Plant Your Seeds or Seedlings:
* From Seeds: If you’re starting from seeds, make a small indentation in the soil and sow a few seeds. Cover them lightly with potting mix and water gently. Keep the soil moist but not soggy. You can cover the bottle with the top half (if you cut it off) to create a mini-greenhouse effect.
* From Seedlings: Gently remove the seedling from its container and loosen the roots slightly. Dig a hole in the potting mix large enough to accommodate the root ball. Place the seedling in the hole and backfill with potting mix. Water thoroughly.
3. Water Thoroughly: After planting, water your peppers thoroughly. Make sure the water drains out of the drainage holes.
4. Label Your Bottles: This is especially important if you’re growing multiple varieties of peppers! Use a permanent marker to label each bottle with the pepper variety.
Caring for Your Pepper Plants
This is where the real work begins, but it’s also the most rewarding part!
1. Sunlight: Peppers need plenty of sunlight – at least 6-8 hours per day. Place your bottles in a sunny location, such as a windowsill, balcony, or patio. If you don’t have enough natural sunlight, you can supplement with grow lights.
2. Watering: Water your peppers regularly, especially during hot weather. Check the soil moisture by sticking your finger into the soil. If the top inch of soil is dry, it’s time to water. Avoid overwatering, as this can lead to root rot.
3. Fertilizing: Peppers are heavy feeders, so you’ll need to fertilize them regularly. Use a balanced liquid fertilizer diluted to half strength. Fertilize every 2-3 weeks.
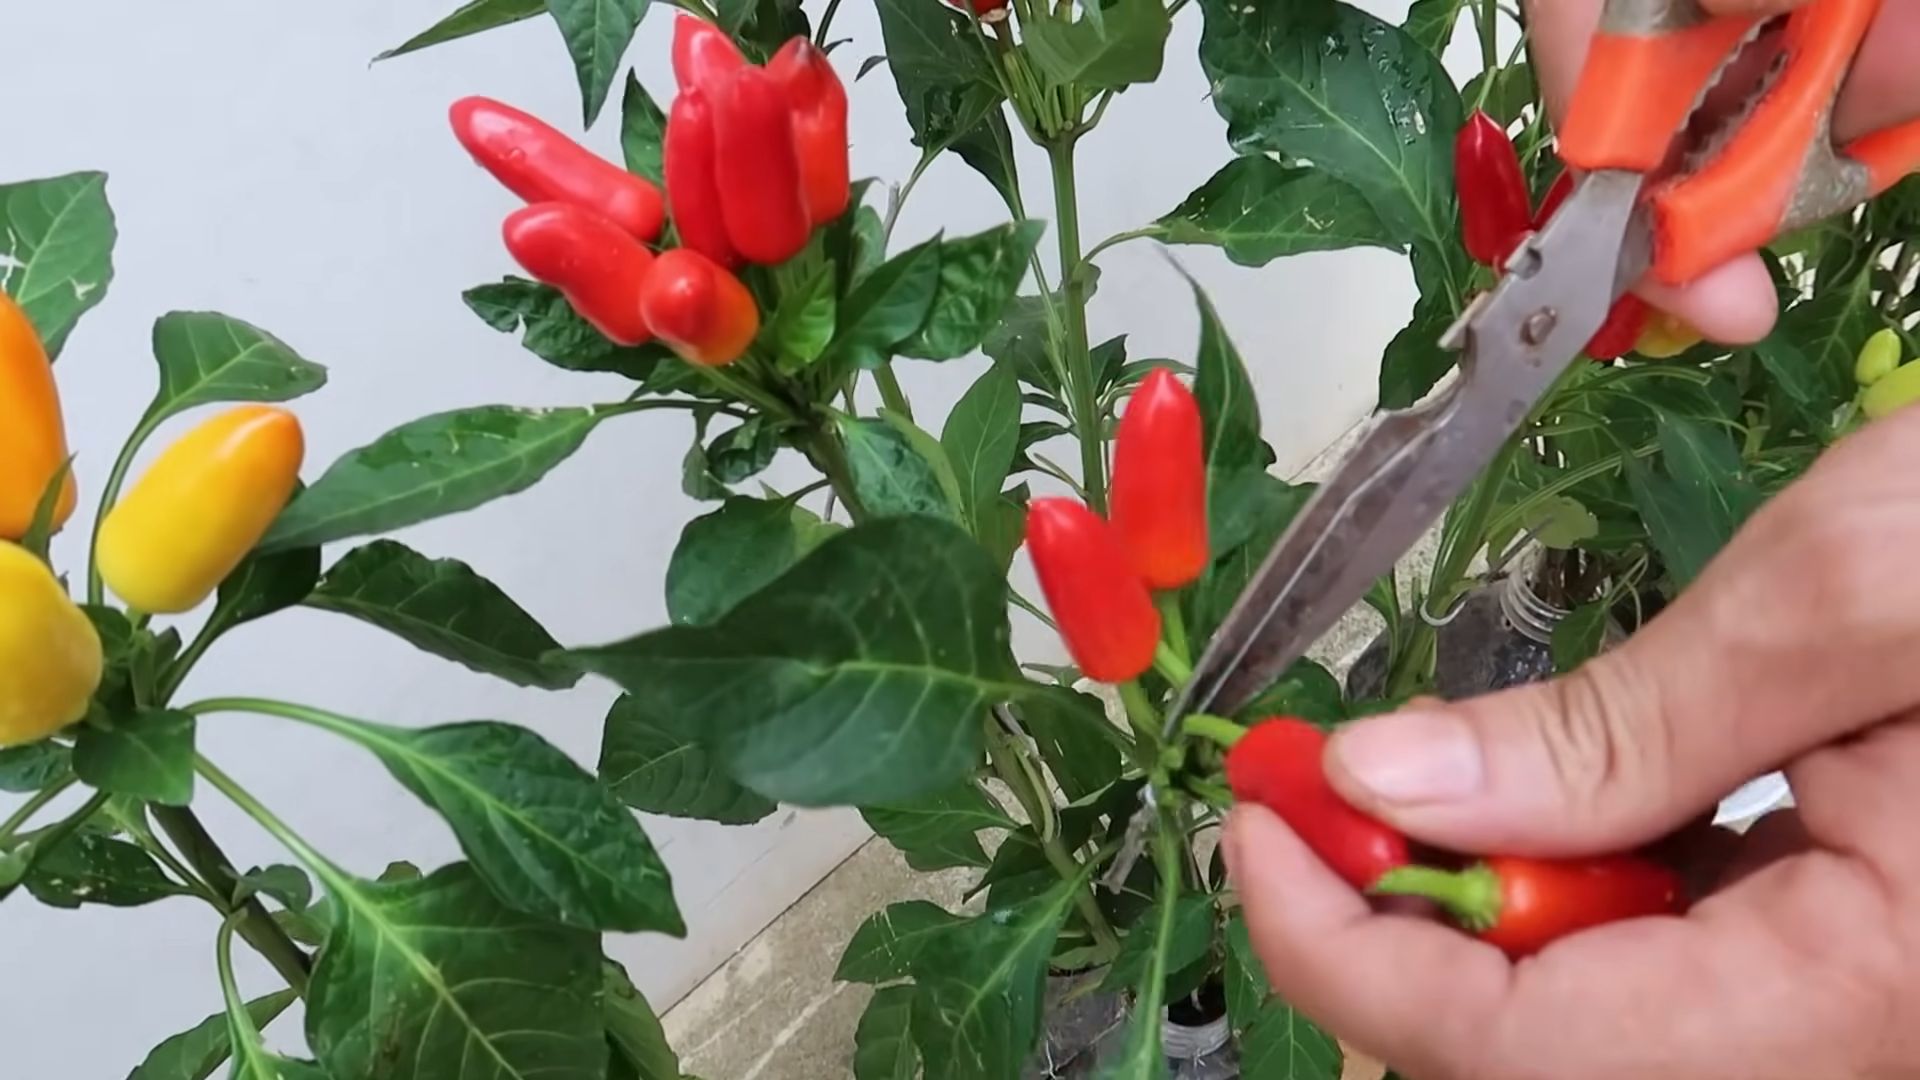
4. Pruning: Pruning can help encourage bushier growth and more peppers. Pinch off any suckers (small shoots that grow between the main stem and the branches). You can also prune off any yellowing or dead leaves.
5. Pest Control: Keep an eye out for pests, such as aphids, whiteflies, and spider mites. If you spot any pests, you can try spraying them with insecticidal soap or neem oil.
6. Support: As your pepper plants grow, they may need some support. You can use stakes or twine to support the stems and prevent them from breaking.
7. Pollination: Peppers are self-pollinating, but you can help them along by gently shaking the plants or using a small paintbrush to transfer pollen from one flower to another. This is especially important if you’re growing peppers indoors.
Germinating Pepper Seeds (If You’re Starting from Seed)
If you’re starting from seed, you’ll need to germinate them first. Here’s how I do it:
1. Soak the Seeds: Soak the pepper seeds in warm water for 24 hours. This helps soften the seed coat and speeds up germination.
2. Prepare a Seed Starting Tray: Fill a seed starting tray with seed starting mix. Moisten the mix thoroughly.
3. Sow the Seeds: Sow the pepper seeds about 1/4 inch deep in the seed starting mix.
4. Cover the Tray: Cover the seed starting tray with a clear plastic lid or plastic wrap. This helps create a humid environment.
5. Provide Warmth: Pepper seeds need warmth to germinate. Place the seed starting tray in a warm location, such as on top of a refrigerator or on a heat mat. The ideal temperature for germination is around 80-85°F (27-29°C).
6. Keep the Soil Moist: Keep the seed starting mix moist but not soggy.
7. Wait for Germination: Pepper seeds can take anywhere from 7 to 21 days to germinate, depending on the variety and the temperature.
8. Provide Light: Once the seeds have germinated, remove the plastic lid or plastic wrap and provide them with plenty of light. Place the seed starting tray under grow lights or in a sunny location.
9. Transplant the Seedlings: Once the seedlings have developed a few sets of true leaves, they’re ready to be transplanted into your bottles.
Troubleshooting
Even with the best care, you might encounter some problems along the way. Here are a few common issues and how to address them:
* Yellowing Leaves: This could be a sign of overwatering, underwatering, nutrient deficiency, or pest infestation. Check the soil moisture, fertilize your plants, and inspect them for pests.
* Blossom End Rot: This is a condition where the bottom of the pepper turns black and rotten. It’s usually caused by a calcium deficiency. You can prevent blossom end rot by adding calcium to the soil or using a calcium-rich fertilizer.
* Lack of Peppers: This could be due to insufficient sunlight, poor pollination, or nutrient deficiency. Make sure your plants are getting enough sunlight, hand
Conclusion
So, there you have it! Growing peppers in bottles isn’t just a quirky gardening experiment; it’s a genuinely effective and rewarding way to cultivate these vibrant vegetables, especially if you’re short on space or looking for a creative gardening project. We’ve explored the ins and outs of this method, highlighting its benefits, from space-saving efficiency to improved drainage and pest control.
The beauty of this DIY trick lies in its simplicity and adaptability. You don’t need a sprawling garden or expensive equipment to enjoy fresh, homegrown peppers. A few recycled bottles, some quality potting mix, and a sunny spot are all you need to embark on this exciting gardening adventure.
But the benefits extend beyond mere convenience. By growing peppers in bottles, you’re creating a micro-environment that promotes healthy growth. The controlled drainage prevents waterlogging, a common problem in traditional gardens, while the enclosed space offers some protection from pests and diseases. Plus, the bottles can act as mini-greenhouses, warming the soil and extending the growing season, especially in cooler climates.
Don’t be afraid to experiment with different pepper varieties. From the fiery heat of habaneros to the sweet crunch of bell peppers, the possibilities are endless. You can also try using different types of bottles, such as larger water cooler bottles for bigger pepper plants or smaller soda bottles for compact varieties. Consider painting the bottles a light color to reflect sunlight and prevent the soil from overheating in hot weather. Adding a layer of mulch to the top of the soil can also help retain moisture and suppress weeds.
Furthermore, this method is incredibly eco-friendly. By repurposing plastic bottles, you’re reducing waste and giving these materials a new lease on life. It’s a sustainable way to garden that aligns with environmentally conscious practices.
Growing peppers in bottles is a must-try for any gardener, regardless of experience level. It’s a fun, affordable, and effective way to enjoy fresh, homegrown peppers, even in the most limited spaces.
We encourage you to give this DIY trick a try and share your experience with us. Let us know what pepper varieties you’re growing, what challenges you’ve encountered, and what successes you’ve celebrated. Your feedback will help us refine this method and inspire other gardeners to embrace the joys of bottle gardening. Share your photos and stories in the comments below – we can’t wait to see your bottle pepper gardens flourish! Happy gardening!
Frequently Asked Questions (FAQ)
What type of bottles are best for growing peppers?
The best bottles for growing peppers are generally clear or translucent plastic bottles, such as those used for water, soda, or juice. The size of the bottle will depend on the pepper variety you’re growing. Smaller bottles (1-2 liters) are suitable for compact pepper plants, while larger bottles (3-5 liters or even larger water cooler bottles) are better for larger varieties like bell peppers or jalapeños. Ensure the bottles are clean and free of any residue before using them. Avoid using dark-colored bottles, as they can absorb too much heat and damage the roots.
How do I prepare the bottles for planting?
Preparing the bottles is a crucial step. First, thoroughly clean the bottles with soap and water to remove any lingering residue. Rinse them well to ensure no soap remains. Next, create drainage holes in the bottom of the bottle. You can use a drill, a hot nail, or a sharp knife to make several holes. These holes are essential for preventing waterlogging, which can lead to root rot. Finally, consider cutting off the top of the bottle to create a wider opening for planting and watering. This also improves air circulation around the plant.
What type of soil should I use?
The ideal soil for growing peppers in bottles is a well-draining potting mix. Avoid using garden soil, as it can be too heavy and compact, hindering drainage and root growth. A good potting mix will provide the necessary nutrients and aeration for healthy pepper plant development. You can also amend the potting mix with compost or other organic matter to further improve its fertility and drainage. Consider adding perlite or vermiculite to the mix to enhance drainage and aeration.
How often should I water my pepper plants in bottles?
Watering frequency depends on several factors, including the weather, the size of the bottle, and the pepper variety. Generally, you should water your pepper plants when the top inch of soil feels dry to the touch. Avoid overwatering, as this can lead to root rot. Ensure the water drains freely from the drainage holes at the bottom of the bottle. During hot weather, you may need to water more frequently. Check the soil moisture regularly and adjust your watering schedule accordingly.
How much sunlight do pepper plants need?
Pepper plants thrive in full sunlight, requiring at least 6-8 hours of direct sunlight per day. Choose a location that receives ample sunlight throughout the day. If you’re growing peppers indoors, place them near a sunny window or use grow lights to supplement natural light. Insufficient sunlight can lead to leggy growth and reduced fruit production. Rotate the bottles regularly to ensure all sides of the plant receive adequate sunlight.
Do I need to fertilize my pepper plants in bottles?
Yes, fertilizing is essential for healthy pepper plant growth and abundant fruit production. Use a balanced fertilizer specifically formulated for vegetables. Follow the instructions on the fertilizer packaging for application rates and frequency. You can also use organic fertilizers, such as compost tea or fish emulsion. Fertilize regularly throughout the growing season, especially during flowering and fruiting. Avoid over-fertilizing, as this can damage the plants.
How do I protect my pepper plants from pests and diseases?
While growing peppers in bottles can offer some protection from pests and diseases, it’s still important to monitor your plants regularly. Check for signs of pests, such as aphids, spider mites, or whiteflies. If you detect pests, treat them with insecticidal soap or neem oil. To prevent fungal diseases, ensure good air circulation around the plants and avoid overwatering. Remove any diseased leaves or stems promptly. You can also use a fungicide if necessary.
Can I grow peppers in bottles indoors?
Yes, you can grow peppers in bottles indoors, especially if you have limited outdoor space. However, you’ll need to provide adequate sunlight or use grow lights to ensure healthy growth. Choose a sunny window that receives at least 6-8 hours of direct sunlight per day. If natural light is insufficient, use grow lights to supplement the light. Ensure good air circulation around the plants and monitor them regularly for pests and diseases.
What pepper varieties are best suited for growing in bottles?
Many pepper varieties can be successfully grown in bottles, but some are better suited than others. Compact varieties, such as chili peppers, jalapeños, and smaller bell peppers, are generally easier to manage in bottles. However, you can also grow larger varieties, such as bell peppers or banana peppers, in larger bottles. Experiment with different varieties to see what works best for you. Consider the size of the plant and the size of the bottle when choosing a pepper variety.
How do I transplant my pepper seedlings into bottles?
When your pepper seedlings are large enough to handle (typically after they have developed several sets of true leaves), you can transplant them into the prepared bottles. Gently remove the seedlings from their original containers, being careful not to damage the roots. Create a hole in the potting mix in the bottle and place the seedling in the hole. Backfill with potting mix and gently firm the soil around the base of the plant. Water thoroughly after transplanting.
How long does it take for peppers to grow in bottles?
The time it takes for peppers to grow in bottles depends on several factors, including the pepper variety, the growing conditions, and the climate. Generally, it takes about 60-90 days from transplanting for peppers to mature and be ready for harvest. Provide adequate sunlight, water, and nutrients to promote healthy growth and accelerate the ripening process. Monitor the peppers regularly and harvest them when they reach their desired size and color.
Can I reuse the bottles for growing peppers again next year?
Yes, you can reuse the bottles for growing peppers again next year, but it’s important to clean and sanitize them thoroughly before reusing them. Remove any remaining soil and plant debris from the bottles. Wash them with soap and water and rinse them well. You can also disinfect them with a solution of bleach and water (1 part bleach to 9 parts water). Rinse the bottles thoroughly after disinfecting them. Store the clean and sanitized bottles in a dry place until you’re ready to use them again.

Leave a Comment