
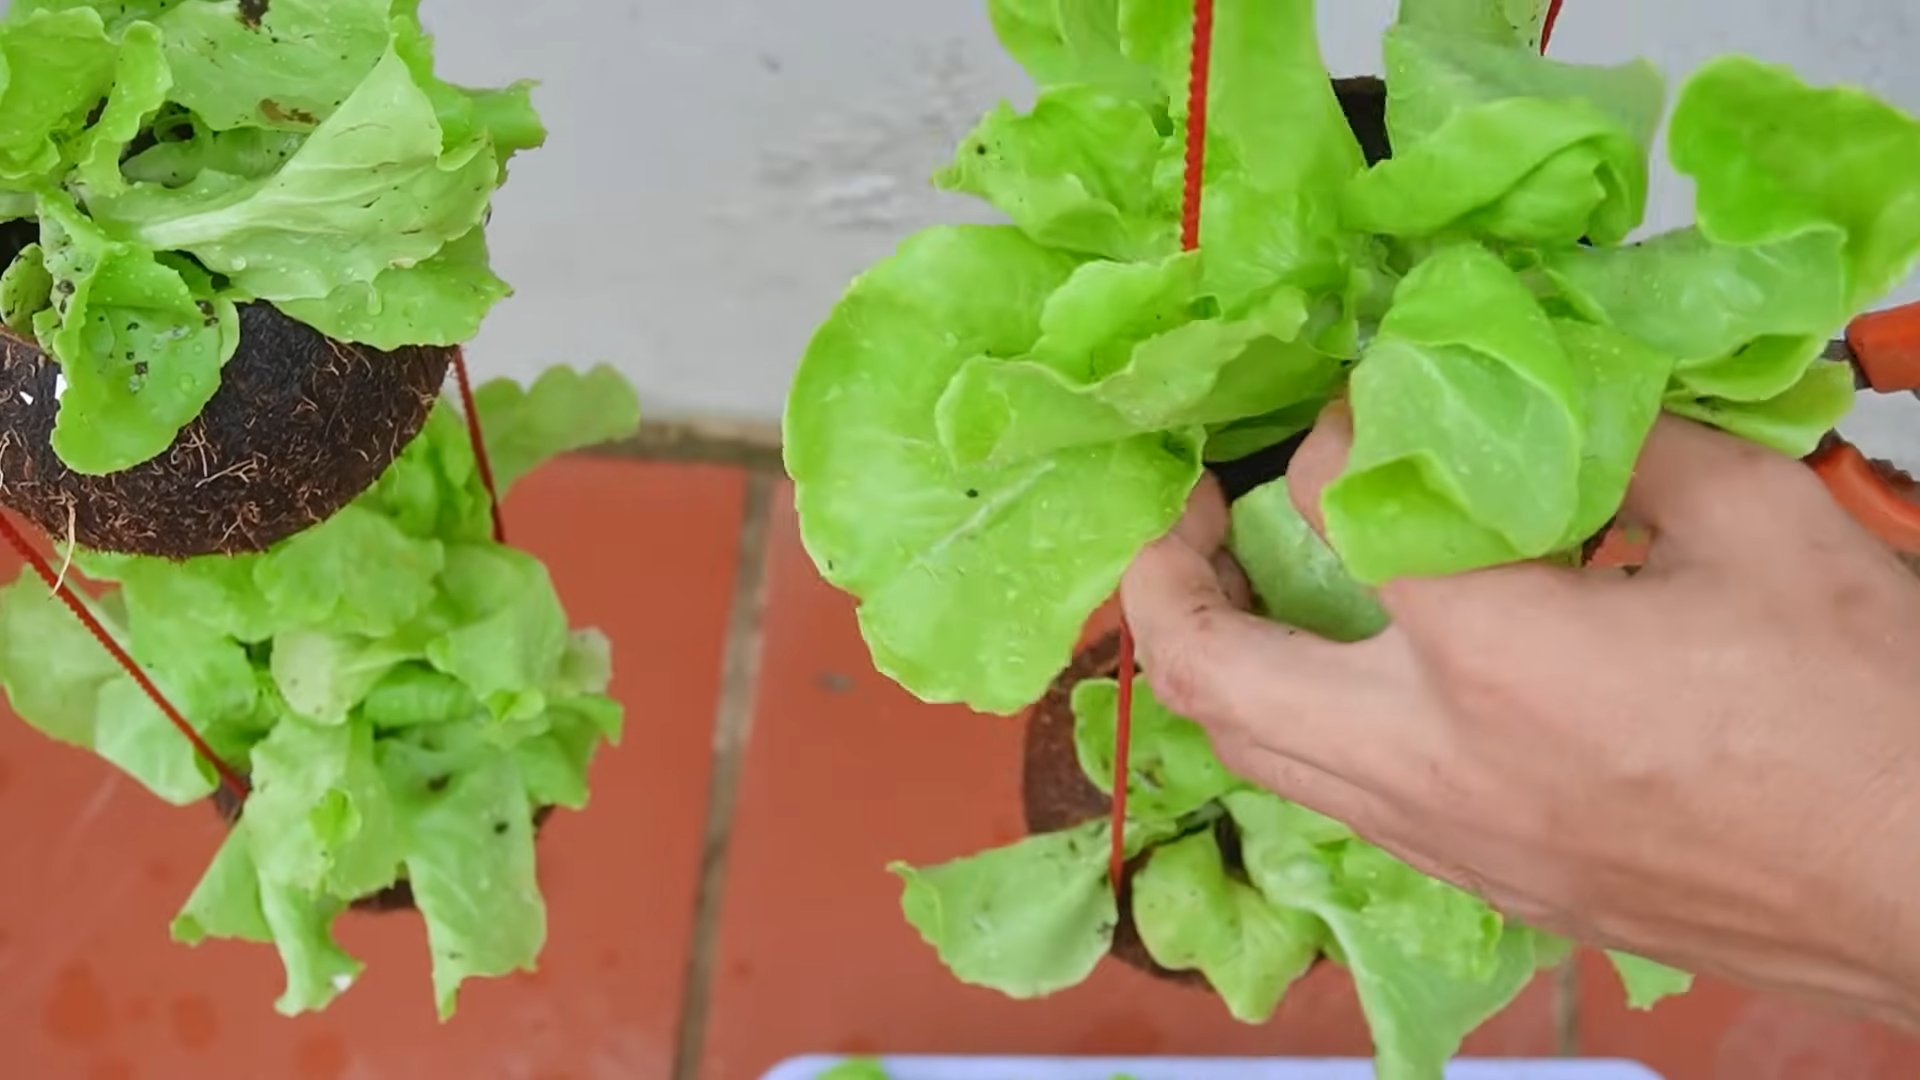
Growing Lettuce in Coconut Shells: Sounds intriguing, right? I know, it might seem a little out there, but trust me, this DIY project is not only incredibly rewarding but also a fantastic way to add a touch of tropical charm to your home garden! For centuries, resourceful gardeners around the world have been finding innovative ways to repurpose materials, and this is just a modern twist on that age-old tradition.
Imagine this: instead of boring plastic pots, you have vibrant, green lettuce bursting forth from rustic coconut shells. It’s a conversation starter, a space-saver, and a testament to your commitment to sustainable gardening. Plus, who doesn’t love the idea of reducing waste and giving a new life to something that would otherwise end up in the trash?
But beyond the aesthetic appeal, growing lettuce in coconut shells offers some practical benefits. The coconut coir, the fibrous material of the shell, provides excellent drainage and aeration for your lettuce roots, promoting healthy growth. And let’s be honest, in today’s busy world, we’re all looking for ways to simplify our lives and make gardening more accessible. This DIY trick is perfect for apartment dwellers, balcony gardeners, or anyone who wants to add a unique and eco-friendly touch to their green space. So, let’s dive in and discover how you can transform humble coconut shells into thriving lettuce gardens!
Growing Lettuce in Coconut Shells: A Fun and Eco-Friendly DIY Project
Hey there, fellow gardening enthusiasts! I’m super excited to share a fun and sustainable DIY project with you: growing lettuce in coconut shells! Not only is this a great way to reuse those leftover coconut shells from your delicious tropical treats, but it also adds a unique and charming touch to your garden or windowsill. Plus, who doesn’t love fresh, homegrown lettuce? Let’s dive in!
What You’ll Need
Before we get started, let’s gather all the necessary materials. This will make the process smoother and more enjoyable. Here’s what you’ll need:
* Coconut Shells: The stars of the show! You’ll need at least one, but the more, the merrier. Make sure they’re clean and dry.
* Lettuce Seeds: Choose your favorite variety! I personally love Romaine and Butterhead for this project.
* Potting Soil: A good quality potting mix is essential for healthy lettuce growth.
* Drill (Optional): If your coconut shells don’t have drainage holes, you’ll need a drill to create some.
* Small Stones or Gravel: For drainage at the bottom of the shells.
* Watering Can or Spray Bottle: For gentle watering.
* Gloves (Optional): To keep your hands clean.
* Small Trowel or Spoon: For handling the soil.
* Sandpaper (Optional): To smooth out any rough edges on the coconut shells.
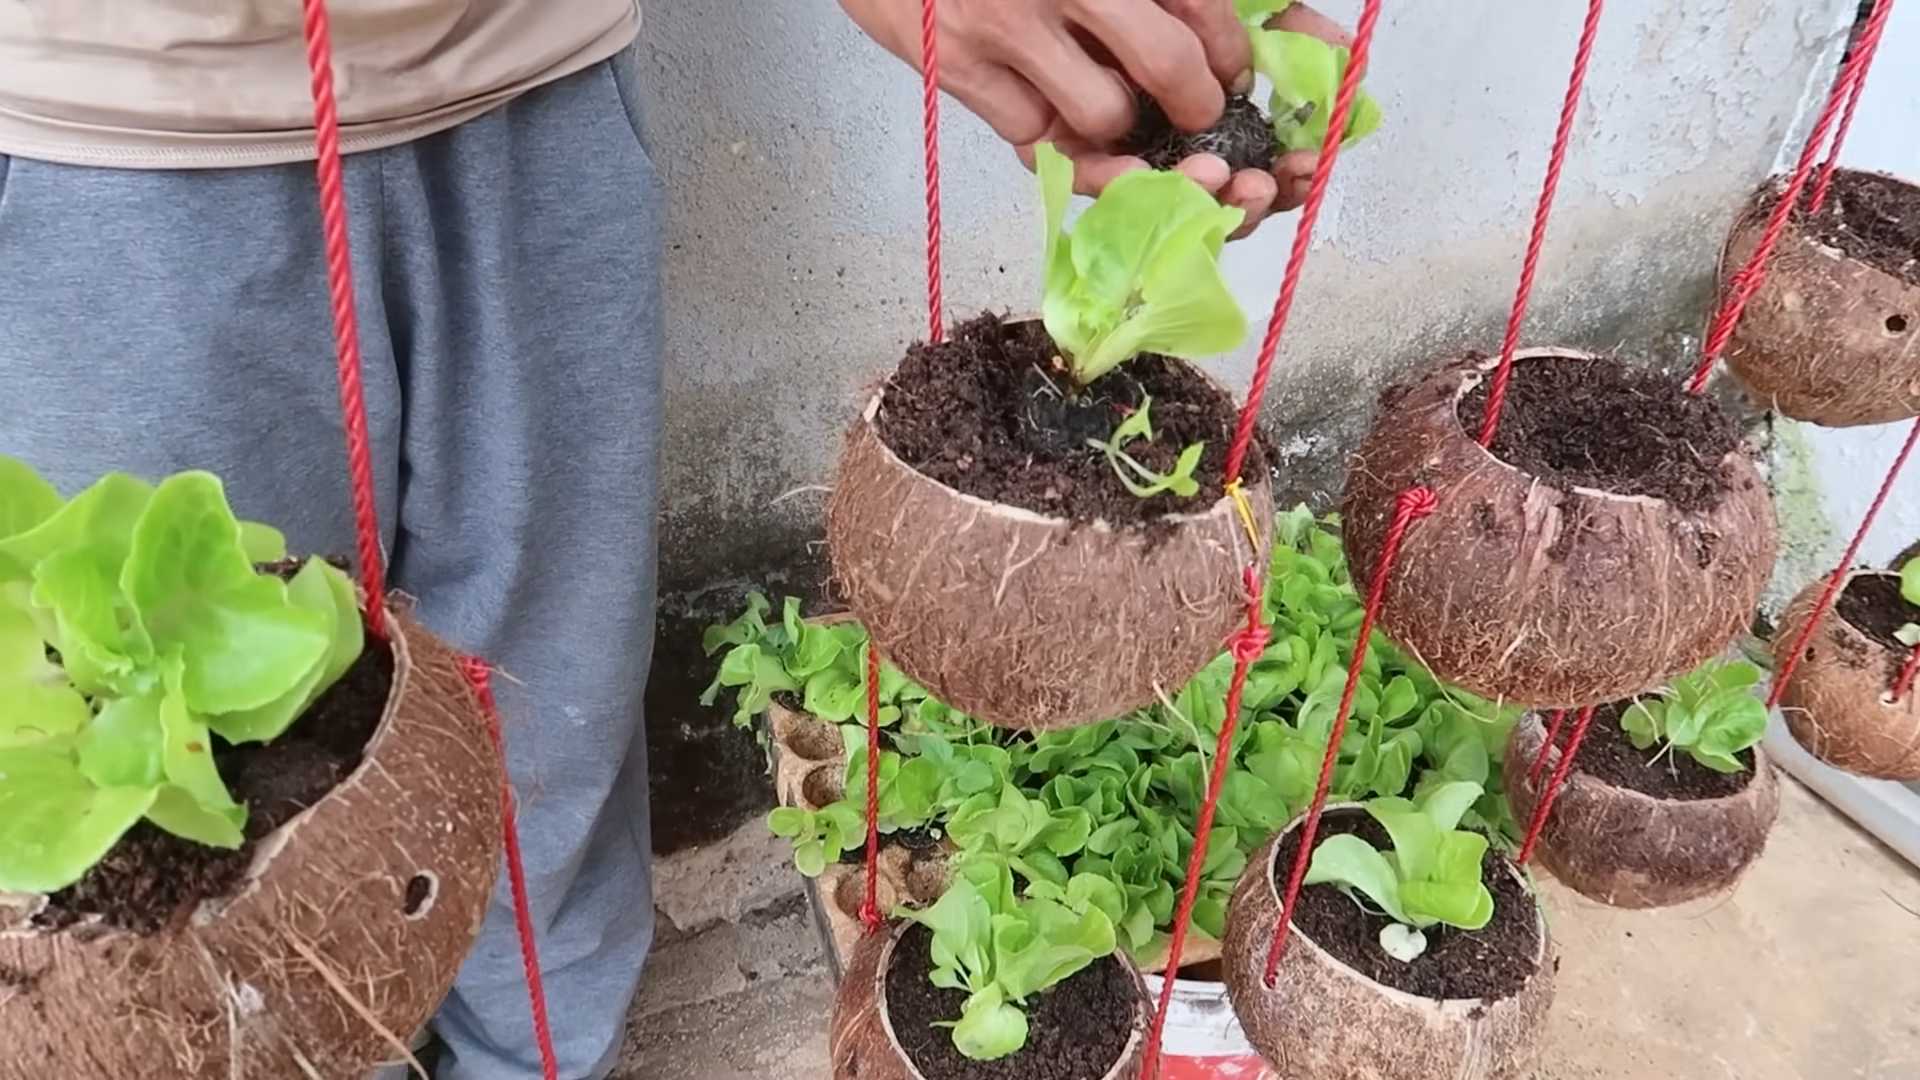
Preparing the Coconut Shells
This is a crucial step to ensure your lettuce has a healthy and happy home.
1. Cleaning the Shells: If you’re using fresh coconut shells, make sure to remove any remaining coconut flesh. You can use a spoon or knife to scrape it out. Rinse the shells thoroughly with water and let them dry completely. If you’re using shells that have been sitting around for a while, give them a good scrub to remove any dirt or debris.
2. Sanding (Optional): If the edges of your coconut shells are rough, you can use sandpaper to smooth them out. This will make them easier to handle and prevent any accidental cuts. I usually just give them a quick once-over with some medium-grit sandpaper.
3. Creating Drainage Holes: This is super important! Lettuce needs good drainage to prevent root rot. If your coconut shells don’t already have drainage holes, you’ll need to drill some. I usually drill 3-4 holes in the bottom of each shell, using a drill bit that’s about 1/4 inch in diameter. Be careful when drilling, and wear safety glasses to protect your eyes. If you don’t have a drill, you can try using a hammer and nail, but be extra cautious.
Planting the Lettuce Seeds
Now for the fun part – planting the seeds!
1. Adding Drainage Material: Place a layer of small stones or gravel at the bottom of each coconut shell. This will help improve drainage and prevent the soil from becoming waterlogged. I usually add about an inch or two of stones.
2. Filling with Potting Soil: Fill the coconut shells with potting soil, leaving about an inch of space at the top. Gently pat down the soil to remove any air pockets.
3. Sowing the Seeds: Sprinkle the lettuce seeds evenly over the surface of the soil. Don’t overcrowd the seeds, as this can lead to stunted growth. I usually aim for about 5-10 seeds per shell.
4. Covering the Seeds: Lightly cover the seeds with a thin layer of potting soil. You can also use vermiculite or perlite.
5. Watering: Gently water the soil using a watering can or spray bottle. Be careful not to overwater, as this can wash away the seeds. The soil should be moist but not soggy.
Caring for Your Lettuce
Now that your lettuce is planted, it’s time to provide it with the care it needs to thrive.
1. Location: Place your coconut shell planters in a location that receives at least 6 hours of sunlight per day. Lettuce prefers full sun, but it can also tolerate partial shade. If you’re growing your lettuce indoors, you may need to supplement with artificial light.
2. Watering: Water your lettuce regularly, keeping the soil consistently moist but not soggy. Check the soil moisture by sticking your finger into the soil. If the top inch of soil feels dry, it’s time to water. Avoid overwatering, as this can lead to root rot.
3. Fertilizing: Lettuce is a relatively light feeder, but it can benefit from occasional fertilization. You can use a balanced liquid fertilizer, diluted to half strength. Fertilize every 2-3 weeks.
4. Thinning (Optional): If your lettuce seedlings are overcrowded, you may need to thin them out. This will give the remaining plants more room to grow. To thin, simply snip off the weaker seedlings at the base of the stem.
5. Pest Control: Keep an eye out for pests, such as aphids and slugs. If you notice any pests, you can try spraying them with insecticidal soap or neem oil. You can also handpick them off the plants.
Harvesting Your Lettuce
The best part!
1. When to Harvest: You can start harvesting your lettuce when the leaves are about 4-6 inches long. The exact time will depend on the variety of lettuce you’re growing.
2. How to Harvest: There are two main ways to harvest lettuce:
* Cut-and-Come-Again: This method involves harvesting the outer leaves of the plant, leaving the inner leaves to continue growing. This allows you to harvest lettuce multiple times from the same plant.
* Head Harvest: This method involves harvesting the entire head of lettuce at once. This is typically done when the head is fully formed and firm.
3. Harvesting Technique: To harvest lettuce, use a sharp knife or scissors to cut the leaves or head at the base of the stem. Be careful not to damage the remaining leaves or plant.
4. Enjoying Your Harvest: Wash your harvested lettuce thoroughly and enjoy it in salads, sandwiches, or wraps. Freshly harvested lettuce is incredibly flavorful and nutritious!
Troubleshooting
Even with the best care, you might encounter some challenges. Here are a few common issues and how to address them:
* Yellowing Leaves: This could be a sign of overwatering, underwatering, or nutrient deficiency. Check the soil moisture and adjust your watering accordingly. You may also need to fertilize your lettuce.
* Leggy Growth: This is usually caused by insufficient sunlight. Move your lettuce to a sunnier location or supplement with artificial light.
* Root Rot: This is caused by overwatering and poor drainage. Make sure your coconut shells have adequate drainage holes and avoid overwatering.
* Pest Infestations: As mentioned earlier, keep an eye out for pests and take action promptly.
Extra Tips and Tricks
* Succession Planting: To ensure a continuous supply of lettuce, plant new seeds every 2-3 weeks.
* Companion Planting: Plant lettuce alongside other beneficial plants, such as carrots, radishes, and onions. These plants can help deter pests and improve soil health.
* Coconut Coir: You can mix coconut coir with your potting soil to improve drainage and water retention.
* Decorating Your Coconut Shells: Get creative and decorate your coconut shells with paint, markers, or other embellishments. This will add a personal touch to your garden.
* Repurposing Other Materials: If you don’t have coconut shells, you can use other repurposed materials, such as yogurt containers, plastic bottles, or tin cans. Just make sure to create drainage holes.
Why I Love This Project
I absolutely adore this DIY project because it’s not only fun and rewarding but also incredibly sustainable. It’s a fantastic way to reuse materials that would otherwise end up in the trash, and it allows you to grow your own fresh, healthy food. Plus, the coconut shell planters add a unique and tropical vibe to any space.
So, what are you waiting for? Gather your supplies and get started on your own coconut shell lettuce garden! I promise you’ll love it. Happy gardening!
Conclusion
So, there you have it! Growing lettuce in coconut shells isn’t just a quirky gardening trend; it’s a genuinely effective and rewarding way to cultivate fresh, delicious greens right at your fingertips. We’ve explored the numerous benefits, from the eco-friendly repurposing of coconut shells to the naturally nutrient-rich environment they provide for your lettuce. This method offers superior drainage, prevents soil compaction, and even adds a touch of tropical charm to your garden or windowsill.
But the real magic lies in the simplicity and accessibility of this DIY project. You don’t need a sprawling garden or expensive equipment to enjoy the taste of homegrown lettuce. A few coconut shells, some potting mix, lettuce seeds, and a little bit of sunshine are all you need to embark on this exciting gardening adventure.
Why is this a must-try? Because it’s sustainable, space-saving, cost-effective, and incredibly satisfying. Imagine the pride you’ll feel as you harvest crisp, vibrant lettuce leaves from your very own coconut shell planters. Plus, it’s a fantastic conversation starter and a unique way to introduce children to the wonders of gardening.
Looking to personalize your coconut shell lettuce garden? Consider these variations:
* Herb Garden Hybrid: Plant other leafy greens like spinach, arugula, or even herbs like basil and parsley alongside your lettuce in the same coconut shell. This creates a diverse and flavorful mini-garden.
* Vertical Gardening: Hang your coconut shell planters from a balcony railing or create a vertical garden wall. This maximizes space and adds a visually stunning element to your outdoor area.
* Painted Shells: Get creative and paint your coconut shells with vibrant colors and designs. This adds a personal touch and transforms them into eye-catching decorative pieces.
* Succession Planting: Plant new lettuce seeds every few weeks to ensure a continuous harvest throughout the growing season. This way, you’ll always have fresh lettuce on hand.
* Different Lettuce Varieties: Experiment with different types of lettuce, such as romaine, butterhead, or loose-leaf varieties, to discover your favorites. Each variety offers a unique flavor and texture.
We are confident that you’ll find growing lettuce in coconut shells to be a delightful and rewarding experience. It’s a simple yet effective way to connect with nature, reduce waste, and enjoy the taste of fresh, homegrown produce.
Now it’s your turn! Grab some coconut shells, gather your supplies, and get ready to grow your own delicious lettuce. We encourage you to try this DIY trick and share your experiences with us. Post photos of your coconut shell lettuce gardens on social media using #CoconutShellLettuce and let us know what you think. We can’t wait to see your creations and hear about your success stories! Happy gardening!
Frequently Asked Questions (FAQ)
What kind of lettuce grows best in coconut shells?
Almost any type of lettuce can be successfully grown in coconut shells, but some varieties tend to thrive more than others. Loose-leaf varieties like Black Seeded Simpson, Salad Bowl, and Red Sails are particularly well-suited for container gardening due to their compact size and quick growth. Butterhead varieties like Buttercrunch and Tom Thumb are also excellent choices. Romaine lettuce can be grown, but may require a slightly larger coconut shell or more frequent watering. Experiment with different varieties to find your personal favorites and what grows best in your specific climate and conditions.
How often should I water my lettuce growing in coconut shells?
Watering frequency depends on several factors, including the climate, the type of potting mix you’re using, and the size of the coconut shell. Generally, you should water your lettuce whenever the top inch of soil feels dry to the touch. In hot, sunny weather, this may be every day, while in cooler, cloudier weather, it may be every other day. Be sure to water thoroughly, allowing excess water to drain out of the drainage holes in the coconut shell. Avoid overwatering, as this can lead to root rot. A good rule of thumb is to check the soil moisture regularly and adjust your watering schedule accordingly.
What type of potting mix is best for growing lettuce in coconut shells?
A well-draining potting mix is essential for growing healthy lettuce in coconut shells. Avoid using garden soil, as it can be too heavy and compact, leading to poor drainage and root problems. A good potting mix should be lightweight, airy, and rich in organic matter. You can purchase a pre-made potting mix specifically designed for container gardening, or you can create your own by combining equal parts of peat moss, perlite, and vermiculite. Adding compost to your potting mix will provide additional nutrients for your lettuce plants.
How much sunlight does lettuce need when grown in coconut shells?
Lettuce thrives in full sun to partial shade. Ideally, your coconut shell lettuce garden should receive at least 4-6 hours of direct sunlight per day. However, in hot climates, providing some afternoon shade can help prevent the lettuce from bolting (going to seed prematurely). If you’re growing your lettuce indoors, place it near a sunny window or use grow lights to provide adequate light. Rotate your coconut shells regularly to ensure that all sides of the lettuce plants receive even sunlight.
How do I fertilize lettuce growing in coconut shells?
Lettuce is a relatively light feeder, but it still benefits from regular fertilization. You can use a liquid fertilizer diluted to half strength every 2-3 weeks, or you can incorporate a slow-release fertilizer into your potting mix at planting time. Choose a fertilizer that is specifically formulated for leafy greens, or one that is high in nitrogen. Avoid over-fertilizing, as this can lead to leggy growth and bitter-tasting lettuce. Organic options like compost tea or worm castings are also excellent choices for fertilizing your coconut shell lettuce garden.
How do I prevent pests and diseases from affecting my lettuce?
Growing lettuce in coconut shells can actually help reduce the risk of pests and diseases, as it elevates the plants off the ground and improves air circulation. However, it’s still important to take preventative measures. Regularly inspect your lettuce plants for signs of pests like aphids, slugs, and snails. Handpick any pests you find, or use organic pest control methods like insecticidal soap or neem oil. To prevent fungal diseases, avoid overwatering and ensure good air circulation. Remove any dead or diseased leaves promptly. Companion planting with herbs like basil or marigolds can also help deter pests.
How long does it take for lettuce to grow in coconut shells?
The time it takes for lettuce to grow to harvestable size depends on the variety, the growing conditions, and the size of the lettuce you want to harvest. Generally, you can start harvesting loose-leaf lettuce varieties in as little as 3-4 weeks after planting. Butterhead and romaine varieties may take 6-8 weeks to mature. You can harvest lettuce leaves as needed, starting with the outer leaves and working your way inwards. This allows the plant to continue producing new leaves throughout the growing season.
Can I reuse the coconut shells after harvesting the lettuce?
Yes, you can definitely reuse the coconut shells! After harvesting your lettuce, simply remove the old potting mix and clean the shells thoroughly. You can then refill them with fresh potting mix and plant new lettuce seeds or seedlings. Coconut shells are quite durable and can last for several growing seasons. You can also use them for other container gardening projects, such as growing herbs, flowers, or even small vegetables.
What do I do if my lettuce starts to bolt (go to seed)?
Bolting is a common problem with lettuce, especially in hot weather. When lettuce bolts, it sends up a tall flower stalk and the leaves become bitter. To prevent bolting, choose heat-tolerant lettuce varieties, provide afternoon shade, and water regularly. If your lettuce starts to bolt, you can still harvest the leaves, but they may not taste as good. You can also let the plant go to seed and collect the seeds for future planting.
Is growing lettuce in coconut shells organic?
Growing lettuce in coconut shells can be organic if you use organic potting mix, organic fertilizer, and organic pest control methods. Choose potting mixes and fertilizers that are certified organic by a reputable organization. Avoid using synthetic pesticides or herbicides. By using organic practices, you can ensure that your lettuce is free from harmful chemicals and is grown in a sustainable and environmentally friendly way.
Leave a Comment