
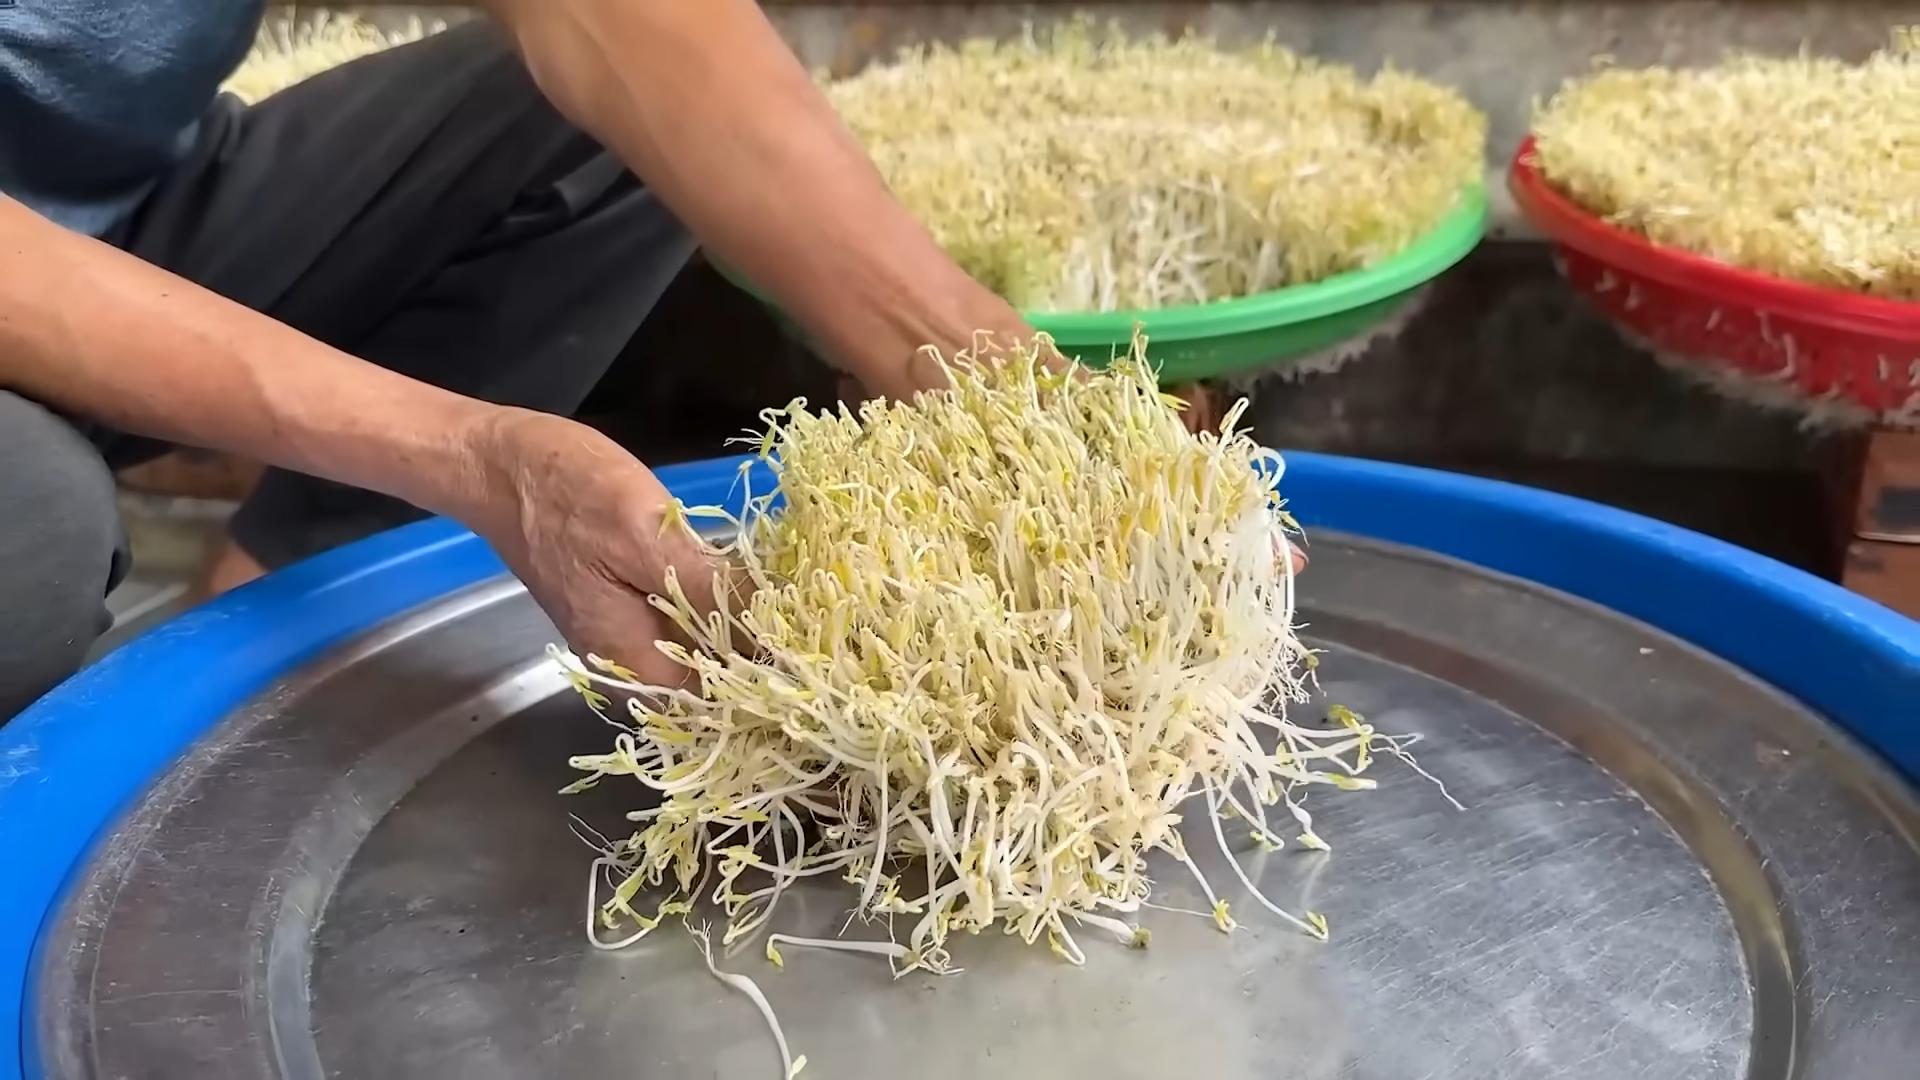
Bean Sprouts DIY Home Growing: Ever dreamt of having fresh, crunchy bean sprouts right at your fingertips, ready to add a burst of flavor and nutrition to your meals? Forget those limp, store-bought sprouts – I’m going to show you how incredibly easy it is to cultivate your own vibrant batch, right in your kitchen!
Sprouting beans has a rich history, dating back thousands of years in Asian cultures, where they were valued not only for their taste but also for their nutritional benefits, especially during times of scarcity. Think of it as a miniature, indoor garden that provides a constant supply of fresh greens, no matter the season.
Why should you embark on this bean sprout adventure? Well, for starters, it’s incredibly cost-effective! A handful of dried beans can yield a surprising amount of sprouts. Plus, you’ll know exactly what’s going into your food – no pesticides or questionable additives. In today’s world, where we’re all striving for healthier, more sustainable lifestyles, mastering bean sprouts DIY home growing is a simple yet powerful step towards achieving that goal. I’m excited to share these simple tricks and hacks that will have you enjoying delicious, homegrown bean sprouts in just a few days!
Grow Celery Indoors: A Beginner’s Guide
Hey there, fellow plant enthusiasts! Ever thought about growing your own celery? It’s surprisingly easy to do indoors, and nothing beats the fresh, crisp taste of homegrown celery. Plus, it’s a fantastic way to reduce food waste and have a constant supply of this versatile veggie. I’m going to walk you through the whole process, step-by-step, so you can enjoy your own indoor celery garden in no time!
What You’ll Need
Before we dive in, let’s gather our supplies. This is a pretty low-cost project, which is always a win!
* **Celery Stalk:** The star of the show! Choose a healthy-looking celery stalk from the grocery store. Make sure the base (where the stalks are connected) is firm and not mushy. Organic is always a good choice if you can find it.
* **Shallow Dish or Bowl:** Something to hold water and the celery base. A pie plate, a small bowl, or even a plastic container lid will work perfectly.
* **Water:** Tap water is fine, but filtered water is even better.
* **Potting Soil:** A good quality potting mix is essential for healthy growth.
* **Pot with Drainage Holes:** Choose a pot that’s at least 6-8 inches in diameter. Drainage is crucial to prevent root rot.
* **Sunny Location:** Celery needs plenty of sunlight, so a spot near a sunny window is ideal. A south-facing window is best, but east or west will also work.
* **Spray Bottle (Optional):** For misting the celery leaves.
* **Grow Light (Optional):** If you don’t have a sunny window, a grow light can provide the necessary light.
Section 1: Regrowing Celery from a Base
This is the fun part – turning kitchen scraps into new plants!
1. **Prepare the Celery Base:** Carefully cut off the celery stalks about 2 inches from the base. You want to keep the base intact, as this is where the new growth will emerge. Don’t throw away the stalks you cut off! You can use them in soups, salads, or as a healthy snack.
2. **Place the Base in Water:** Put the celery base in your shallow dish or bowl and add enough water to cover the bottom inch or so. Make sure the cut end is submerged, but the top of the base remains above the water line.
3. **Find a Sunny Spot:** Place the dish with the celery base in a sunny location. Change the water every 1-2 days to keep it fresh and prevent bacteria growth.
4. **Observe and Wait:** Over the next few days, you should start to see small roots emerging from the bottom of the base and new leaves sprouting from the top. This usually takes about 5-7 days, but it can vary depending on the temperature and light conditions. Be patient!
5. **Monitor Water Levels:** Keep an eye on the water level and add more as needed to ensure the base stays moist.
Section 2: Planting Your Celery
Once your celery base has developed roots and new leaves, it’s time to move it to a pot with soil.
1. **Prepare the Pot:** Fill your pot with potting soil, leaving about an inch of space at the top. Gently pat down the soil to remove any air pockets.
2. **Create a Hole:** Use your finger or a small trowel to create a hole in the center of the pot, large enough to accommodate the celery base and its roots.
3. **Carefully Transplant:** Gently remove the celery base from the water and carefully place it in the hole. Make sure the roots are spread out and not tangled.
4. **Cover with Soil:** Fill the hole with soil, gently pressing it around the celery base to secure it in place. The top of the base should be just above the soil line.
5. **Water Thoroughly:** Water the soil thoroughly until water drains out of the drainage holes. This will help settle the soil and provide the celery with the moisture it needs.
Section 3: Caring for Your Indoor Celery
Now that your celery is planted, it’s time to provide it with the care it needs to thrive.
1. **Sunlight:** Celery needs at least 6 hours of sunlight per day. Place your pot in a sunny location, such as a windowsill. If you don’t have enough natural light, you can use a grow light to supplement.
2. **Watering:** Keep the soil consistently moist, but not soggy. Water when the top inch of soil feels dry to the touch. Avoid overwatering, as this can lead to root rot.
3. **Humidity:** Celery prefers a humid environment. You can increase humidity by misting the leaves with a spray bottle, placing a tray of water near the pot, or using a humidifier.
4. **Fertilizing:** Feed your celery with a balanced liquid fertilizer every 2-3 weeks. Follow the instructions on the fertilizer label.
5. **Pest Control:** Keep an eye out for pests, such as aphids and spider mites. If you notice any pests, you can treat them with insecticidal soap or neem oil.
6. **Temperature:** Celery prefers temperatures between 60-70°F (15-21°C). Avoid exposing your celery to extreme temperatures.
Section 4: Harvesting Your Celery
Harvesting your celery is the most rewarding part of the process!
1. **When to Harvest:** You can start harvesting celery stalks when they are about 6-8 inches long.
2. **How to Harvest:** To harvest, simply cut off the outer stalks near the base of the plant. Leave the inner stalks to continue growing.
3. **Continuous Harvest:** You can continue to harvest celery stalks as needed, allowing the plant to produce new growth.
4. **Enjoy Your Harvest:** Use your homegrown celery in salads, soups, stews, or as a healthy snack.
Troubleshooting Tips
Even with the best care, you might encounter some challenges along the way. Here are a few common problems and how to fix them:
* **Yellowing Leaves:** This could be a sign of overwatering, underwatering, or nutrient deficiency. Check the soil moisture and adjust your watering schedule accordingly. If the soil is consistently moist, reduce watering. If the soil is dry, water more frequently. You can also try fertilizing your celery with a balanced liquid fertilizer.
* **Slow Growth:** This could be due to insufficient sunlight, poor soil, or lack of nutrients. Make sure your celery is getting enough sunlight and that the soil is well-draining and nutrient-rich. You can also try fertilizing your celery with a balanced liquid fertilizer.
* **Root Rot:** This is caused by overwatering and can be fatal to your celery. Make sure your pot has drainage holes and avoid overwatering. If you suspect root rot, you can try repotting your celery in fresh soil.
* **Pests:** Aphids and spider mites are common pests that can attack celery. You can treat them with insecticidal soap or neem oil.
Extra Tips for Success
* Choose the Right Celery: Opt for organic celery whenever possible. It’s less likely to have been treated with pesticides.
* Be Patient: Growing celery from a base takes time and patience. Don’t get discouraged if you don’t see results immediately.
* Experiment: Try different varieties of celery to see which ones grow best in your indoor environment.
* Enjoy the Process: Growing your own celery is a rewarding experience. Take the time to enjoy the process and appreciate the fresh, homegrown flavor.
* Consider Companion Planting: While you’re focused on celery, think about other plants that thrive alongside it. Marigolds, for example, can help deter pests. Basil is another great companion plant.
* Don’t Overcrowd: If you’re planting multiple celery bases in one pot, make sure they have enough space to grow. Overcrowding can lead to stunted growth and disease.
* Rotate Your Crops: If you’re growing celery in the same pot year after year, consider rotating your crops to prevent soil depletion.
* Use Rainwater: If possible, use rainwater to water your celery. Rainwater is naturally soft and contains beneficial nutrients.
* Keep a Journal: Keep a journal of your celery growing journey. This will help you track your progress, identify any problems, and learn from your mistakes.
Growing celery indoors is a fun and rewarding project that anyone can do. With a little patience and care, you can enjoy fresh, homegrown celery all year round. So, grab a celery stalk, gather your supplies, and get started today! Happy gardening!
Conclusion
So, there you have it! Growing your own bean sprouts at home is not only incredibly easy and cost-effective, but it also provides you with a constant supply of fresh, crunchy goodness. Forget those limp, sad-looking sprouts from the grocery store; with this simple DIY method, you’ll be enjoying vibrant, flavorful bean sprouts in just a few days.
Why is this a must-try? Because it’s a game-changer for anyone who loves fresh ingredients and appreciates the satisfaction of creating something delicious from scratch. Think about it: you control the quality, you eliminate the plastic packaging, and you have a readily available source of protein and nutrients right in your kitchen. It’s a win-win-win!
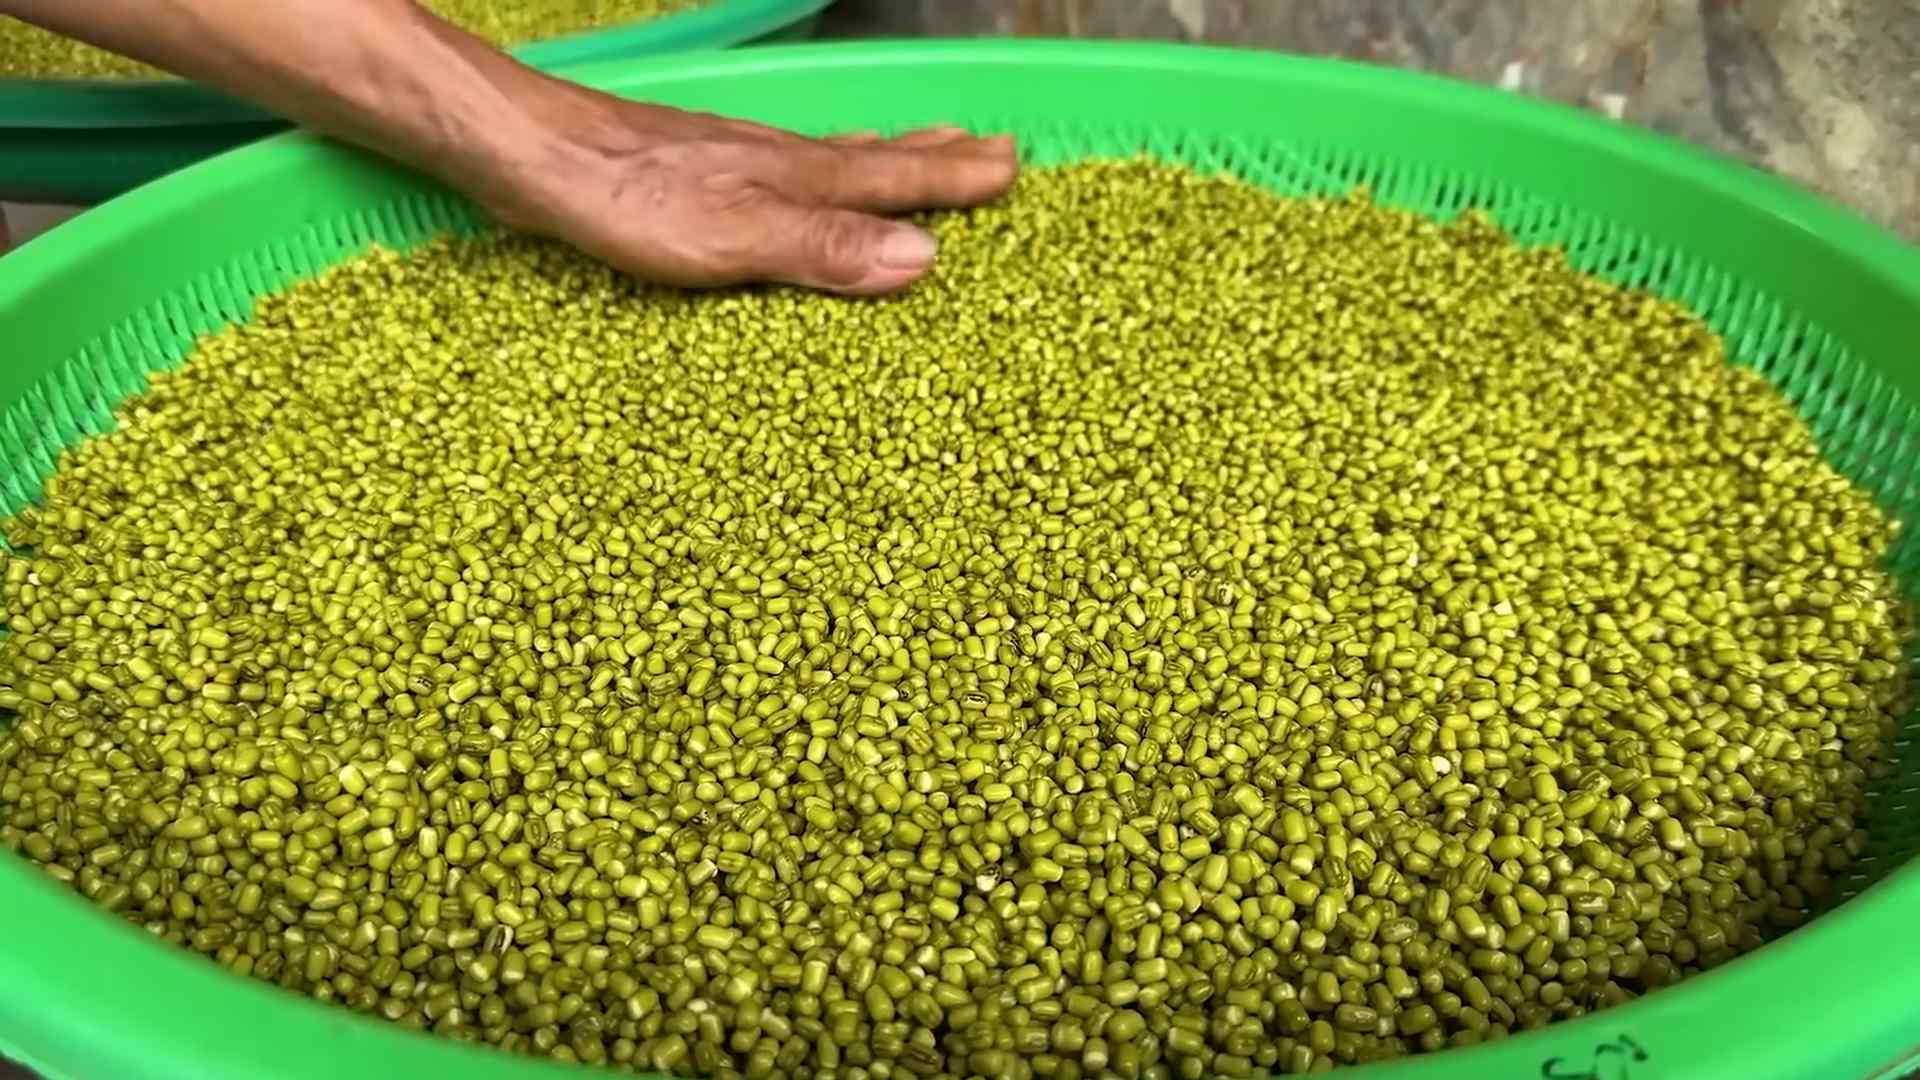
But don’t stop there! Once you’ve mastered the basic technique, feel free to experiment. Try different types of beans – mung beans are the classic choice, but adzuki beans, lentils, and even chickpeas can be sprouted. Each will offer a slightly different flavor and texture. You can also play around with the sprouting environment. Some people prefer a dark, cool space, while others find that a little indirect light enhances the flavor.
Consider adding your home-grown bean sprouts to a variety of dishes. They’re fantastic in stir-fries, salads, sandwiches, and spring rolls. They can also be lightly steamed or blanched for a softer texture. For a spicy kick, try adding a pinch of chili flakes to the sprouting water. Or, for a more savory flavor, add a dash of soy sauce. The possibilities are endless!
The key to successful **bean sprouts DIY home growing** is consistency. Remember to rinse and drain your sprouts regularly to prevent mold and ensure even growth. And don’t be discouraged if your first batch isn’t perfect. Like any new skill, it takes a little practice to get it just right.
We are confident that once you experience the joy of growing your own bean sprouts, you’ll never go back to store-bought again. It’s a simple, rewarding, and delicious way to add a healthy boost to your diet.
So, what are you waiting for? Gather your beans, grab a jar, and get sprouting! We’d love to hear about your experience. Share your photos, tips, and variations in the comments below. Let’s create a community of home sprouting enthusiasts! Happy sprouting!
Frequently Asked Questions (FAQ)
What types of beans work best for sprouting?
Mung beans are the most commonly used and generally considered the easiest to sprout. They have a mild flavor and sprout quickly. However, you can also sprout adzuki beans, lentils, chickpeas, and even some types of peas. Just be sure to use beans specifically intended for sprouting or cooking, not ornamental beans, as some ornamental varieties can be toxic. Avoid using split beans, as they won’t sprout properly. Experiment to find your favorite!
How long does it take to grow bean sprouts?
Typically, it takes between 3 to 5 days to grow bean sprouts to a usable size. The exact time will depend on the type of bean, the temperature, and the humidity. Warmer temperatures generally speed up the sprouting process, while cooler temperatures slow it down. Keep an eye on your sprouts and harvest them when they reach your desired length and crunchiness.
What kind of container should I use for sprouting?
A wide-mouth glass jar is ideal for sprouting. It’s easy to clean, allows for good air circulation, and lets you monitor the progress of your sprouts. You can also use a sprouting tray or a specialized sprouting container. Whatever you choose, make sure it’s clean and allows for adequate drainage. A cheesecloth or sprouting lid secured with a rubber band works well for covering the jar and allowing water to drain.
How often should I rinse the bean sprouts?
Rinsing is crucial for preventing mold and ensuring healthy growth. You should rinse your bean sprouts at least twice a day, preferably three times, with fresh, cool water. Make sure to drain them thoroughly after each rinse. This helps to remove any build-up of bacteria and keeps the sprouts hydrated.
What if my bean sprouts start to smell bad?
A foul odor is a sign of bacterial growth or mold. If your bean sprouts start to smell bad, it’s best to discard them. To prevent this, ensure you’re rinsing them frequently and thoroughly, and that they have adequate drainage. Avoid overcrowding the jar, as this can also contribute to bacterial growth.
Can I eat the bean sprout roots?
Yes, the roots of bean sprouts are perfectly edible. They are part of the sprout and contain nutrients. Some people prefer to trim the roots for aesthetic reasons, but it’s not necessary.
How should I store bean sprouts?
Once your bean sprouts are ready, store them in the refrigerator in a sealed container lined with a paper towel. The paper towel will help absorb excess moisture and keep the sprouts fresh for longer. They should last for up to a week in the refrigerator.
Are there any health benefits to eating bean sprouts?
Yes, bean sprouts are a good source of vitamins, minerals, and fiber. They are low in calories and fat and contain antioxidants. They are also a good source of protein, making them a healthy addition to your diet.
Can I grow bean sprouts in direct sunlight?
While bean sprouts don’t need direct sunlight, a little indirect light can actually enhance their flavor and color. Avoid placing them in direct sunlight, as this can overheat them and cause them to dry out. A spot with indirect light or even a dimly lit area is ideal.
What if my bean sprouts aren’t sprouting?
If your bean sprouts aren’t sprouting, there could be a few reasons. First, make sure your beans are viable and intended for sprouting. Old beans may not sprout well. Second, ensure the temperature is warm enough. Bean sprouts prefer a temperature between 70-75°F (21-24°C). Third, make sure you’re rinsing them frequently enough. And finally, be patient! Sometimes it just takes a little longer for them to sprout.
Can I use tap water for sprouting?
Yes, you can use tap water for sprouting, as long as it’s safe to drink. If you’re concerned about the quality of your tap water, you can use filtered water instead. Avoid using water that is heavily chlorinated, as this can inhibit sprouting.
How do I prevent mold from growing on my bean sprouts?
The key to preventing mold is good hygiene and proper drainage. Make sure your jar and sprouting equipment are clean before you start. Rinse the sprouts frequently and thoroughly, and ensure they have adequate drainage. Avoid overcrowding the jar, and store the sprouts in a cool, well-ventilated area. If you see any signs of mold, discard the entire batch.
Is it safe to eat raw bean sprouts?
While bean sprouts are often eaten raw, there is a small risk of foodborne illness associated with eating raw sprouts. This is because the warm, moist environment required for sprouting can also be conducive to bacterial growth. To minimize the risk, purchase sprouts from a reputable source, rinse them thoroughly before eating, and consider lightly cooking them before adding them to your dishes. People with weakened immune systems, pregnant women, and young children should avoid eating raw sprouts.
Can I grow different types of sprouts together?
It’s generally not recommended to grow different types of sprouts together, as they may have different sprouting times and requirements. This can make it difficult to manage the sprouting process and increase the risk of mold or bacterial growth. It’s best to sprout each type of bean separately.
What do I do with the bean sprout hulls?
The hulls of the beans will naturally separate from the sprouts during the rinsing process. You can either pick them out or leave them in. They are edible, but some people prefer to remove them for aesthetic reasons. You can also compost the hulls.

Leave a Comment