
Shining glass cleaning tips – who doesn’t want sparkling, streak-free windows and mirrors that reflect the beauty of the world around them? I know I do! For centuries, people have strived for clarity and brilliance in their glass surfaces, from the ornate stained-glass windows of medieval cathedrals to the sleek, modern skyscrapers that dominate our city skylines. But let’s be honest, achieving that pristine shine can feel like an uphill battle.
Are you tired of battling stubborn streaks, smudges, and water spots every time you try to clean your glass? Do you dream of effortlessly achieving that professional-level sparkle without spending a fortune on expensive cleaning products? Well, you’re in the right place! This article is packed with easy-to-follow DIY tricks and hacks that will transform your glass cleaning routine.
I’m going to share my favorite shining glass cleaning tips that will not only save you time and money but also leave your windows, mirrors, and glass surfaces looking absolutely flawless. Forget harsh chemicals and endless scrubbing – I’ll show you how to achieve a dazzling shine with simple ingredients you probably already have in your pantry. Get ready to say goodbye to frustrating streaks and hello to crystal-clear perfection!

DIY Streak-Free Glass Cleaner: My Secret Weapon!
Okay, friends, let’s talk about something we all struggle with: streaky, smudged glass. Whether it’s windows, mirrors, or shower doors, achieving that crystal-clear shine can feel like an impossible task. But fear not! I’m here to share my tried-and-true DIY glass cleaner recipe and technique that will leave your glass sparkling. Trust me, once you try this, you’ll ditch those expensive store-bought cleaners for good!
What You’ll Need: The Essential Supplies
Before we dive into the mixing and cleaning, let’s gather our supplies. This is a simple recipe, so you probably already have most of these items on hand.
* **Spray Bottle:** A clean, empty spray bottle is a must. I prefer a sturdy one that won’t leak.
* **White Vinegar:** This is the star of our show! Vinegar’s acidity helps cut through grime and hard water stains.
* **Distilled Water:** Using distilled water is crucial to avoid mineral deposits that can cause streaks. Tap water often contains minerals that can leave residue.
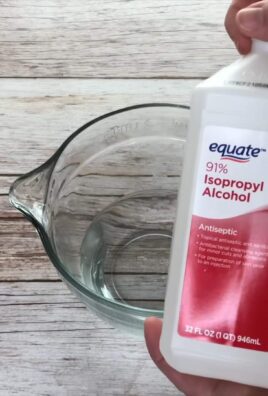
* **Rubbing Alcohol (Isopropyl Alcohol):** This helps the cleaner evaporate quickly, preventing streaks.
* **Essential Oil (Optional):** A few drops of your favorite essential oil can add a pleasant scent and help mask the vinegar smell. I love using lemon, lavender, or tea tree oil.
* **Microfiber Cloths:** These are essential for streak-free cleaning. Avoid using paper towels, as they can leave lint behind.
* **Squeegee (Optional):** For large surfaces like windows or shower doors, a squeegee can be a game-changer.
* **Bucket (Optional):** If you’re cleaning a large area, a bucket of warm water can be helpful for rinsing your microfiber cloths.
Mixing the Magic: The DIY Glass Cleaner Recipe
Now for the fun part! Let’s mix up our streak-free glass cleaner. This recipe is super easy to adjust to your needs.
1. **Combine Ingredients:** In your spray bottle, combine the following:
* 1 cup distilled water
* 1 cup white vinegar
* 1/4 cup rubbing alcohol (isopropyl alcohol)
* 5-10 drops of your favorite essential oil (optional)
2. **Shake Well:** Secure the spray bottle lid and shake well to combine all the ingredients.
3. **Label Your Bottle:** Don’t forget to label your spray bottle so you know what’s inside!
Cleaning Like a Pro: Step-by-Step Instructions
Okay, we’ve got our cleaner, we’ve got our supplies, now let’s get cleaning! This is where the magic happens.
1. **Prepare the Surface:** Before you start spraying, it’s a good idea to wipe down the surface with a dry microfiber cloth to remove any loose dust or debris. This will prevent you from just pushing the dirt around.
2. **Spray the Cleaner:** Generously spray the glass surface with your DIY cleaner. Make sure to cover the entire area you want to clean.
3. **Wipe with a Microfiber Cloth:** Immediately wipe the surface with a clean, dry microfiber cloth. Use a circular motion to loosen any stubborn grime, then switch to a straight, overlapping pattern to remove the cleaner.
4. **Dry with a Clean Microfiber Cloth (or Squeegee):** For smaller surfaces like mirrors, use a second clean, dry microfiber cloth to buff the surface until it’s completely dry and streak-free. For larger surfaces like windows or shower doors, use a squeegee. Overlap each stroke of the squeegee slightly to avoid leaving any gaps. Wipe the squeegee blade clean after each stroke with a clean microfiber cloth.
5. **Repeat if Necessary:** If the glass is particularly dirty, you may need to repeat the process. Don’t be afraid to give it a second go!
Tackling Tough Stains: Extra Tips and Tricks
Sometimes, you’ll encounter stubborn stains that require a little extra effort. Here are a few tips and tricks for tackling those tough spots.
* **Hard Water Stains:** For hard water stains on shower doors, try making a paste of baking soda and water. Apply the paste to the stains, let it sit for a few minutes, then scrub gently with a non-abrasive sponge. Rinse thoroughly and dry with a microfiber cloth.
* **Grease and Grime:** For greasy or grimy surfaces, try adding a few drops of dish soap to your DIY cleaner. Be sure to rinse thoroughly to remove any soap residue.
* **Bug Splatter:** For bug splatter on car windows, try soaking a microfiber cloth in warm water and placing it over the affected area for a few minutes. This will help loosen the bug splatter, making it easier to wipe away.
* **Sticky Residue:** For sticky residue from stickers or tape, try using a hairdryer to warm the adhesive. This will make it easier to peel off. Then, use a bit of rubbing alcohol on a microfiber cloth to remove any remaining residue.
Maintaining the Shine: Preventative Measures
Once you’ve achieved that sparkling clean, you’ll want to keep it that way! Here are a few preventative measures you can take to maintain the shine.
* **Regular Cleaning:** The more often you clean your glass surfaces, the easier it will be to keep them clean. Aim to clean your windows and mirrors at least once a month.
* **Ventilation:** Proper ventilation can help prevent moisture buildup, which can lead to hard water stains and mildew. Be sure to run the exhaust fan in your bathroom while showering.
* **Water Softener:** If you have hard water, consider installing a water softener. This will help prevent mineral deposits on your glass surfaces.
* **Protective Coatings:** There are several protective coatings available that can help repel water and prevent stains. These coatings can be applied to shower doors and other glass surfaces.
Choosing the Right Cloth: Microfiber Magic
I can’t stress enough how important it is to use microfiber cloths for cleaning glass. They are specially designed to trap dirt and grime without leaving behind lint or streaks. Here’s what to look for when choosing microfiber cloths:
* **High Quality:** Invest in high-quality microfiber cloths that are made from a dense weave. These cloths will be more absorbent and durable.
* **Separate Cloths:** Use separate cloths for cleaning and drying. This will prevent you from just spreading the dirt around.
* **Wash Regularly:** Wash your microfiber cloths regularly in warm water with a mild detergent. Avoid using fabric softener, as it can reduce their absorbency.
* **Avoid Bleach:** Do not use bleach when washing your microfiber cloths, as it can damage the fibers.
Why This Works: The Science Behind the Shine
So, what makes this DIY glass cleaner so effective? It’s all about the combination of ingredients and their properties:
* **Vinegar:** The acetic acid in vinegar helps to dissolve mineral deposits, soap scum, and other grime. It’s a natural disinfectant and deodorizer.
* **Rubbing Alcohol:** Rubbing alcohol is a solvent that helps to dissolve grease and grime. It also evaporates quickly, preventing streaks.
* **Distilled Water:** Using distilled water prevents mineral deposits from forming on the glass surface.
* **Essential Oils:** Essential oils add a pleasant scent and can also have antibacterial properties.
Troubleshooting: Common Cleaning Problems and Solutions
Even with the best recipe and technique, you might encounter some cleaning challenges. Here are some common problems and their solutions:
* **Streaks:** If you’re still getting streaks, try using a different microfiber cloth or adjusting the amount of cleaner you’re using. Make sure you’re drying the surface thoroughly.
* **Hazy Film:** A hazy film can be caused by soap residue or hard water deposits. Try rinsing the surface thoroughly with clean water and drying with a microfiber cloth.
* **Smears:** Smears can be caused by using too much cleaner or not wiping the surface thoroughly. Try using less cleaner and wiping the surface with a clean, dry microfiber cloth.
* **Water Spots:** Water spots can be caused by hard water. Try using distilled water in your cleaner and drying the surface immediately after cleaning.
Safety First: Precautions to Take
While this DIY glass cleaner is generally safe, it’s always a good idea to take some precautions:
* **Ventilation:** When cleaning in a small or enclosed space, make sure to have adequate ventilation.
* **Eye Protection:** Wear eye protection, such as safety glasses, to prevent the cleaner from getting into your eyes.
* **Skin Sensitivity:** If you have sensitive skin, wear gloves to protect your hands from the vinegar and rubbing alcohol.
* **Keep Out of Reach of Children and Pets:** Store your DIY glass cleaner in a safe place out of reach of children and pets.
Beyond Windows: Other Uses for Your DIY Cleaner
This DIY glass cleaner isn’t just for windows and mirrors! You can use it to clean a variety of other surfaces, including:
* **Shower Doors:** Keep your shower doors sparkling clean by spraying them with this cleaner after each
Conclusion
So, there you have it! Achieving sparkling, streak-free windows and mirrors doesn’t require expensive, chemical-laden cleaners. This simple, effective, and budget-friendly DIY glass cleaner is a game-changer for anyone looking to maintain a pristine home environment. We’ve shown you how easy it is to create a powerful cleaning solution using ingredients you likely already have in your pantry.
Why is this DIY trick a must-try? Because it’s not just about saving money; it’s about creating a healthier and more sustainable cleaning routine. Commercial glass cleaners often contain harsh chemicals that can irritate your skin, eyes, and respiratory system. By making your own cleaner, you control exactly what goes into it, ensuring a safer environment for you, your family, and your pets. Plus, you’re reducing your reliance on single-use plastic bottles, contributing to a more eco-conscious lifestyle.
Beyond the basic recipe, there’s plenty of room for experimentation and personalization. For a boost of disinfecting power, consider adding a few drops of tea tree oil or eucalyptus oil. These essential oils not only provide antibacterial properties but also leave behind a refreshing, natural scent. If you prefer a stronger vinegar scent, you can slightly increase the vinegar-to-water ratio, but be mindful that too much vinegar can leave a lingering odor. Another variation involves using distilled water instead of tap water, especially if you live in an area with hard water. Distilled water is free of minerals that can sometimes leave spots or streaks on glass surfaces.
For those stubborn, stuck-on messes, pre-treating the area with a paste of baking soda and water can work wonders. Simply apply the paste, let it sit for a few minutes, and then wipe it away before using your DIY glass cleaner. Remember to always test any new cleaning solution in an inconspicuous area first to ensure it doesn’t damage the surface.
We are confident that once you try this shining glass cleaning tips, you’ll be amazed by the results. The clarity and sparkle you’ll achieve will rival that of any store-bought cleaner, and you’ll have the satisfaction of knowing you created it yourself using simple, natural ingredients.
Don’t just take our word for it – give it a try! We encourage you to experiment with the recipe, find what works best for your needs, and most importantly, share your experience with us. Leave a comment below, tell us about your variations, and let us know how this DIY glass cleaner has transformed your cleaning routine. We can’t wait to hear your success stories and learn from your unique experiences. Let’s all embrace a cleaner, greener, and more sparkling home together!
Frequently Asked Questions (FAQ)
1. What type of vinegar is best for making DIY glass cleaner?
White distilled vinegar is the best choice for making DIY glass cleaner. It’s clear, inexpensive, and readily available. Its acidity helps to cut through grease and grime without leaving behind any color or residue. Avoid using other types of vinegar, such as apple cider vinegar or balsamic vinegar, as they may contain sugars or pigments that can leave streaks or stains on your glass surfaces.
2. Can I use this DIY glass cleaner on all types of glass?
Yes, this DIY glass cleaner is generally safe to use on most types of glass, including windows, mirrors, glass shower doors, and glass tabletops. However, it’s always a good idea to test it in an inconspicuous area first, especially if you’re unsure about the surface’s composition or finish. Avoid using it on delicate or antique glass items without consulting a professional.
3. How do I prevent streaks when using this DIY glass cleaner?
Streaks can be frustrating, but they’re usually easy to prevent. Here are a few tips:
* Use a clean microfiber cloth: Microfiber cloths are excellent for cleaning glass because they’re lint-free and highly absorbent. Avoid using paper towels, as they can leave behind lint and streaks.
* Don’t use too much cleaner: A light mist is all you need. Over-saturating the surface can lead to streaks.
* Wipe in one direction: Instead of wiping in circles, wipe in straight, overlapping lines. This helps to ensure even coverage and prevents streaks.
* Dry the surface: After wiping with the cleaner, use a clean, dry microfiber cloth to buff the surface and remove any remaining moisture.
* Use distilled water: As mentioned earlier, hard water can leave mineral deposits that cause streaks. Using distilled water eliminates this issue.
4. How long does this DIY glass cleaner last?
This DIY glass cleaner doesn’t contain any preservatives, so it’s best to use it within a few weeks for optimal effectiveness. Store it in a clean, airtight spray bottle in a cool, dark place. If you notice any changes in color or odor, discard the cleaner and make a fresh batch.
5. Can I add essential oils to this DIY glass cleaner?
Yes, you can add essential oils to this DIY glass cleaner for added fragrance and antibacterial properties. Tea tree oil, eucalyptus oil, lavender oil, and lemon oil are all good choices. Add a few drops (5-10 drops per bottle) to the mixture and shake well before each use. Be cautious when using essential oils around pets, as some can be toxic to animals. Always research the safety of essential oils before using them in your home.
6. Is this DIY glass cleaner safe for pets and children?
This DIY glass cleaner is generally safer than commercial cleaners, as it doesn’t contain harsh chemicals. However, it’s still important to keep it out of reach of children and pets. Vinegar can be irritating if ingested, so avoid spraying it directly around them. If your pet or child accidentally ingests the cleaner, contact your veterinarian or poison control center immediately.
7. Can I use this cleaner on my car windows?
Yes, this DIY glass cleaner can be used on your car windows. However, be careful not to get the cleaner on the car’s paint, as the vinegar can potentially damage the finish over time. Rinse the windows thoroughly with water after cleaning to remove any residue.
8. What if I don’t have vinegar? Can I use something else?
While vinegar is the most effective and readily available option, you can try using lemon juice as a substitute. Lemon juice has similar acidic properties to vinegar and can help to cut through grease and grime. Use the same ratio as you would for vinegar (1 part lemon juice to 1 part water). However, be aware that lemon juice may leave a slight citrus scent.
9. How often should I clean my windows and mirrors?
The frequency of cleaning depends on your personal preferences and the environment. Generally, cleaning your windows and mirrors every few weeks is sufficient to maintain a clean and sparkling appearance. However, if you live in a dusty area or have pets, you may need to clean them more often.
10. What is the best way to clean hard-to-reach windows?
For hard-to-reach windows, consider using an extendable window cleaning tool. These tools typically have a microfiber pad or squeegee attached to a long handle, allowing you to reach high windows without having to climb on a ladder. You can also use a spray bottle with a long nozzle to apply the cleaner to the window.

Leave a Comment