
Grow Melons at Home? Absolutely! Imagine biting into a juicy, sun-ripened melon you nurtured from seed, right in your own backyard. Forget those bland, store-bought melons – we’re talking about flavor explosions that will make your taste buds sing! This isn’t just a dream; it’s an achievable reality with a few clever tricks and DIY hacks.
Melons have a rich history, cultivated for centuries across various cultures. From ancient Egypt, where they were found in tombs, to the vibrant markets of Asia, melons have always been prized for their sweetness and refreshing qualities. Growing your own connects you to this long tradition, allowing you to experience the simple joy of harvesting something delicious you’ve created.
But why should you bother with the effort? Well, besides the superior taste, growing your own melons gives you complete control over what goes into them. No pesticides, no questionable fertilizers – just pure, natural goodness. Plus, let’s be honest, there’s a certain satisfaction that comes from mastering a new skill and showing off your green thumb! In this article, I’m going to share some easy-to-follow DIY tips and tricks that will help you grow melons at home, even if you’re a complete beginner. Get ready to impress your friends and family with your homegrown bounty!
Growing Melons at Home: A Sweet DIY Project
Hey there, fellow gardening enthusiasts! Ever dreamt of biting into a juicy, homegrown melon, bursting with flavor that store-bought ones just can’t match? Well, dream no more! Growing melons at home is totally achievable, even if you don’t have acres of land. I’m going to walk you through everything you need to know to cultivate your own melon patch, from seed to sweet success.
Choosing Your Melon Variety
First things first, let’s talk melons! There are so many delicious varieties to choose from, but some are better suited for home gardens than others. Consider your climate and available space when making your selection.
* **Watermelons:** These are the classic summer treat! Look for “bush” or “icebox” varieties if you have limited space. Sugar Baby and Bush Sugar Baby are popular choices.
* **Cantaloupes:** These fragrant melons are relatively easy to grow. Athena and Hale’s Best Jumbo are reliable options.
* **Honeydew Melons:** These smooth, green melons require a longer growing season than cantaloupes. Honeycrisp and Dew Sweet are worth a try.
* **Specialty Melons:** Don’t be afraid to experiment! Consider growing Galia melons (with their unique netted skin) or Charentais melons (known for their intense aroma).
Getting Started: Seeds vs. Seedlings
You have two options for starting your melon plants: seeds or seedlings. Starting from seed is more economical, but it requires a bit more patience. Buying seedlings gives you a head start, but it’s also more expensive.
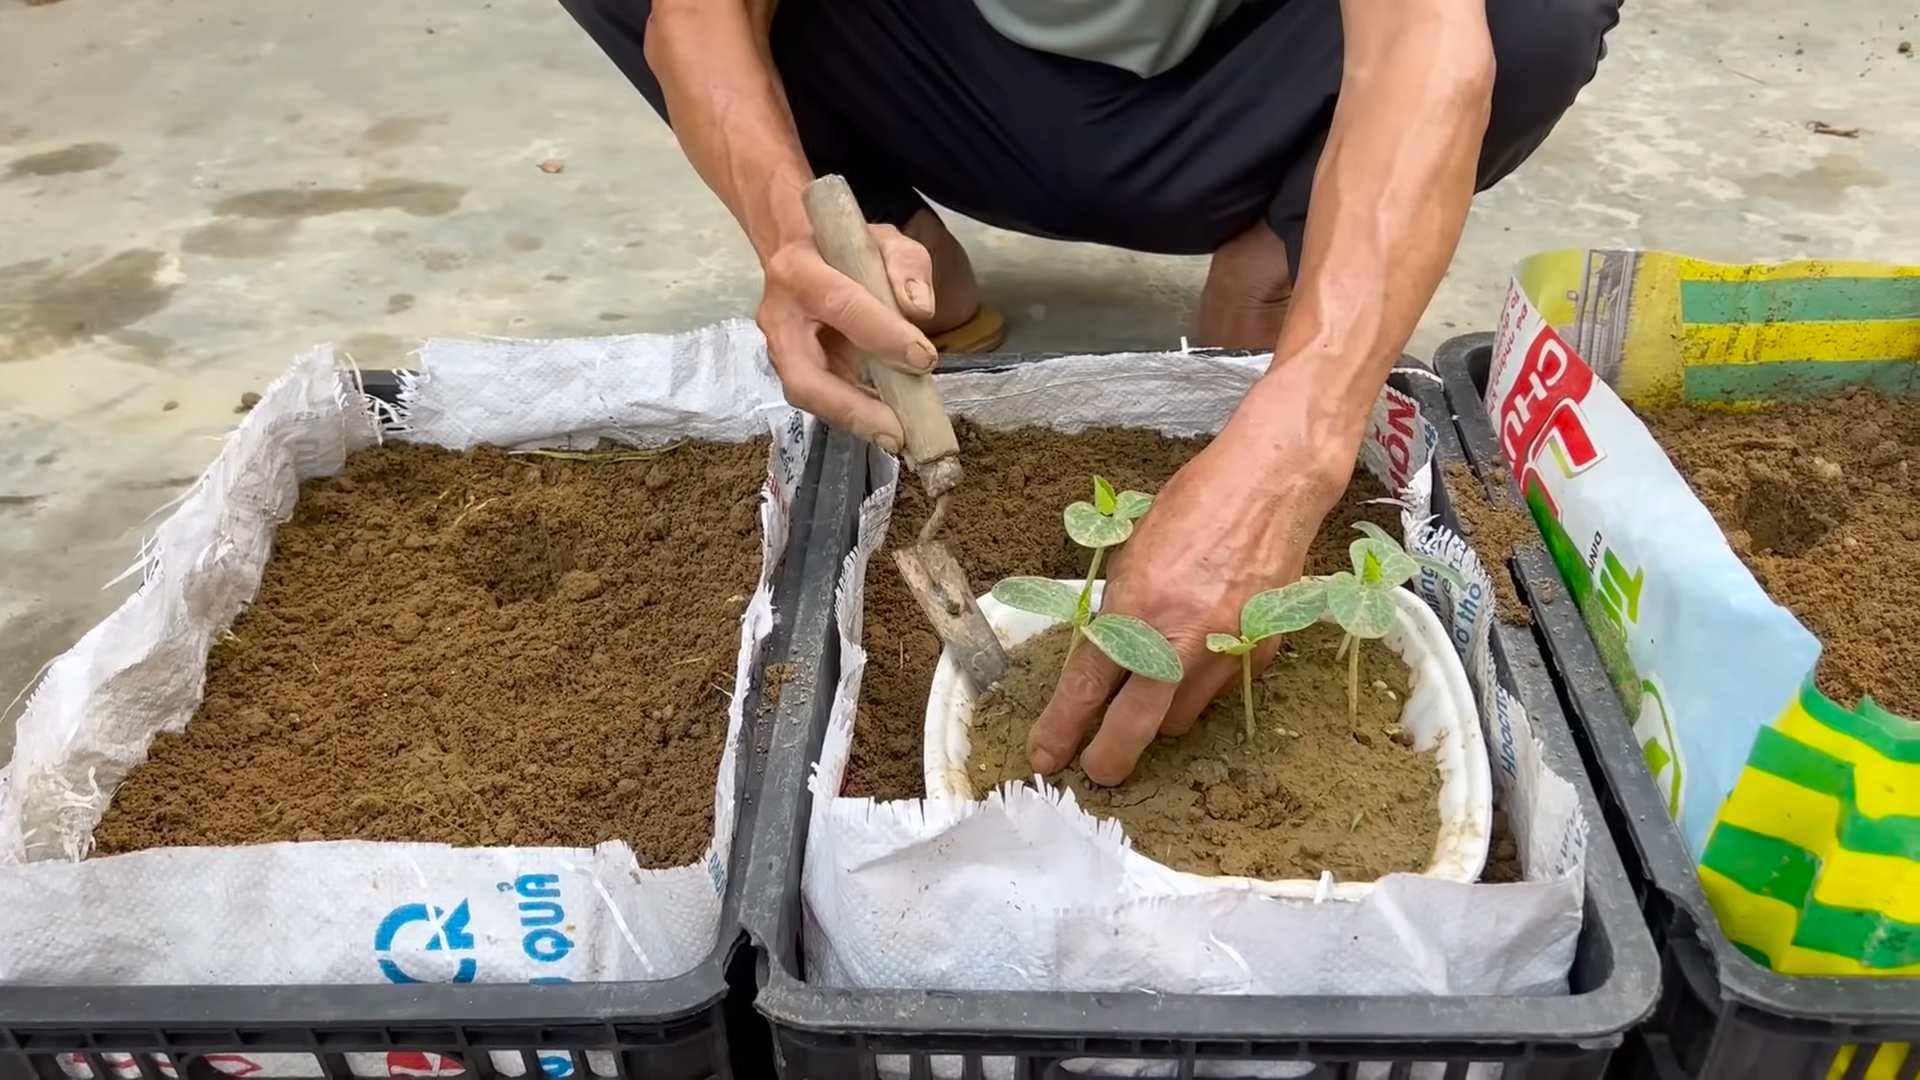
* **Starting from Seed:** I personally love starting from seed because it gives me more control over the entire process. You’ll need to start your seeds indoors about 4-6 weeks before the last expected frost.
* **Buying Seedlings:** If you’re short on time or space, buying seedlings is a great option. Just make sure to choose healthy-looking plants with strong stems and vibrant green leaves.
Preparing Your Melon Patch
Melons are sun-loving, heavy feeders, so preparing your garden bed is crucial for success.
* **Sunlight:** Melons need at least 6-8 hours of direct sunlight per day. Choose a location that gets plenty of sunshine.
* **Soil:** Melons thrive in well-drained, fertile soil. Amend your soil with plenty of compost or well-rotted manure to improve drainage and nutrient content. A slightly acidic soil pH (around 6.0-6.8) is ideal.
* **Spacing:** Give your melon plants plenty of room to spread out. Watermelons need the most space (3-4 feet between plants), while cantaloupes and honeydews can be spaced closer together (2-3 feet).
* **Support:** Some melon varieties, especially smaller ones, can benefit from trellising. This helps to save space and improve air circulation.
Step-by-Step Planting Guide
Alright, let’s get our hands dirty! Here’s a step-by-step guide to planting your melon plants:
1. **Prepare the Soil:** Dig a hole that’s slightly larger than the root ball of your seedling (or the size of your seed starting container).
2. **Amend the Soil (if needed):** If your soil is lacking in nutrients, mix in some compost or fertilizer into the hole. I like to use a slow-release organic fertilizer.
3. **Planting Seedlings:** Gently remove the seedling from its container, being careful not to damage the roots. Place the seedling in the hole, making sure the top of the root ball is level with the surrounding soil. Backfill the hole with soil and gently firm it down.
4. **Planting Seeds:** Sow seeds about 1 inch deep and 2-3 inches apart. Once the seedlings emerge, thin them to the strongest plant.
5. **Water Thoroughly:** Water your newly planted melons thoroughly. This helps to settle the soil and encourages root growth.
6. **Mulch:** Apply a layer of mulch around your melon plants. This helps to retain moisture, suppress weeds, and regulate soil temperature. Straw, wood chips, or shredded leaves are all good options.
Caring for Your Melon Plants
Once your melon plants are in the ground, it’s time to provide them with the care they need to thrive.
* **Watering:** Melons need consistent watering, especially during hot, dry weather. Water deeply and regularly, aiming for about 1-2 inches of water per week. Avoid overhead watering, as this can lead to fungal diseases. Drip irrigation or soaker hoses are ideal.
* **Fertilizing:** Melons are heavy feeders, so you’ll need to fertilize them regularly. Use a balanced fertilizer (e.g., 10-10-10) or a fertilizer specifically formulated for melons. Follow the instructions on the fertilizer label. I prefer to use organic fertilizers like compost tea or fish emulsion.
* **Weeding:** Keep your melon patch free of weeds. Weeds compete with your melon plants for water and nutrients. Hand-pull weeds regularly or use a hoe to cultivate the soil.
* **Pest Control:** Melons can be susceptible to various pests, including aphids, squash bugs, and cucumber beetles. Inspect your plants regularly for signs of pests and take action promptly. Insecticidal soap, neem oil, or hand-picking are effective control methods.
* **Disease Prevention:** Fungal diseases like powdery mildew and downy mildew can be a problem for melons, especially in humid climates. Improve air circulation by spacing your plants properly and pruning any overcrowded foliage. Apply a fungicide if necessary.
* **Pollination:** Melons require pollination to produce fruit. Bees are the primary pollinators, so encourage them to visit your garden by planting flowers nearby. If you’re not seeing enough bee activity, you may need to hand-pollinate your melon flowers. To hand-pollinate, use a small paintbrush to transfer pollen from the male flowers to the female flowers. Female flowers have a small fruit developing behind the flower, while male flowers do not.
Training and Pruning
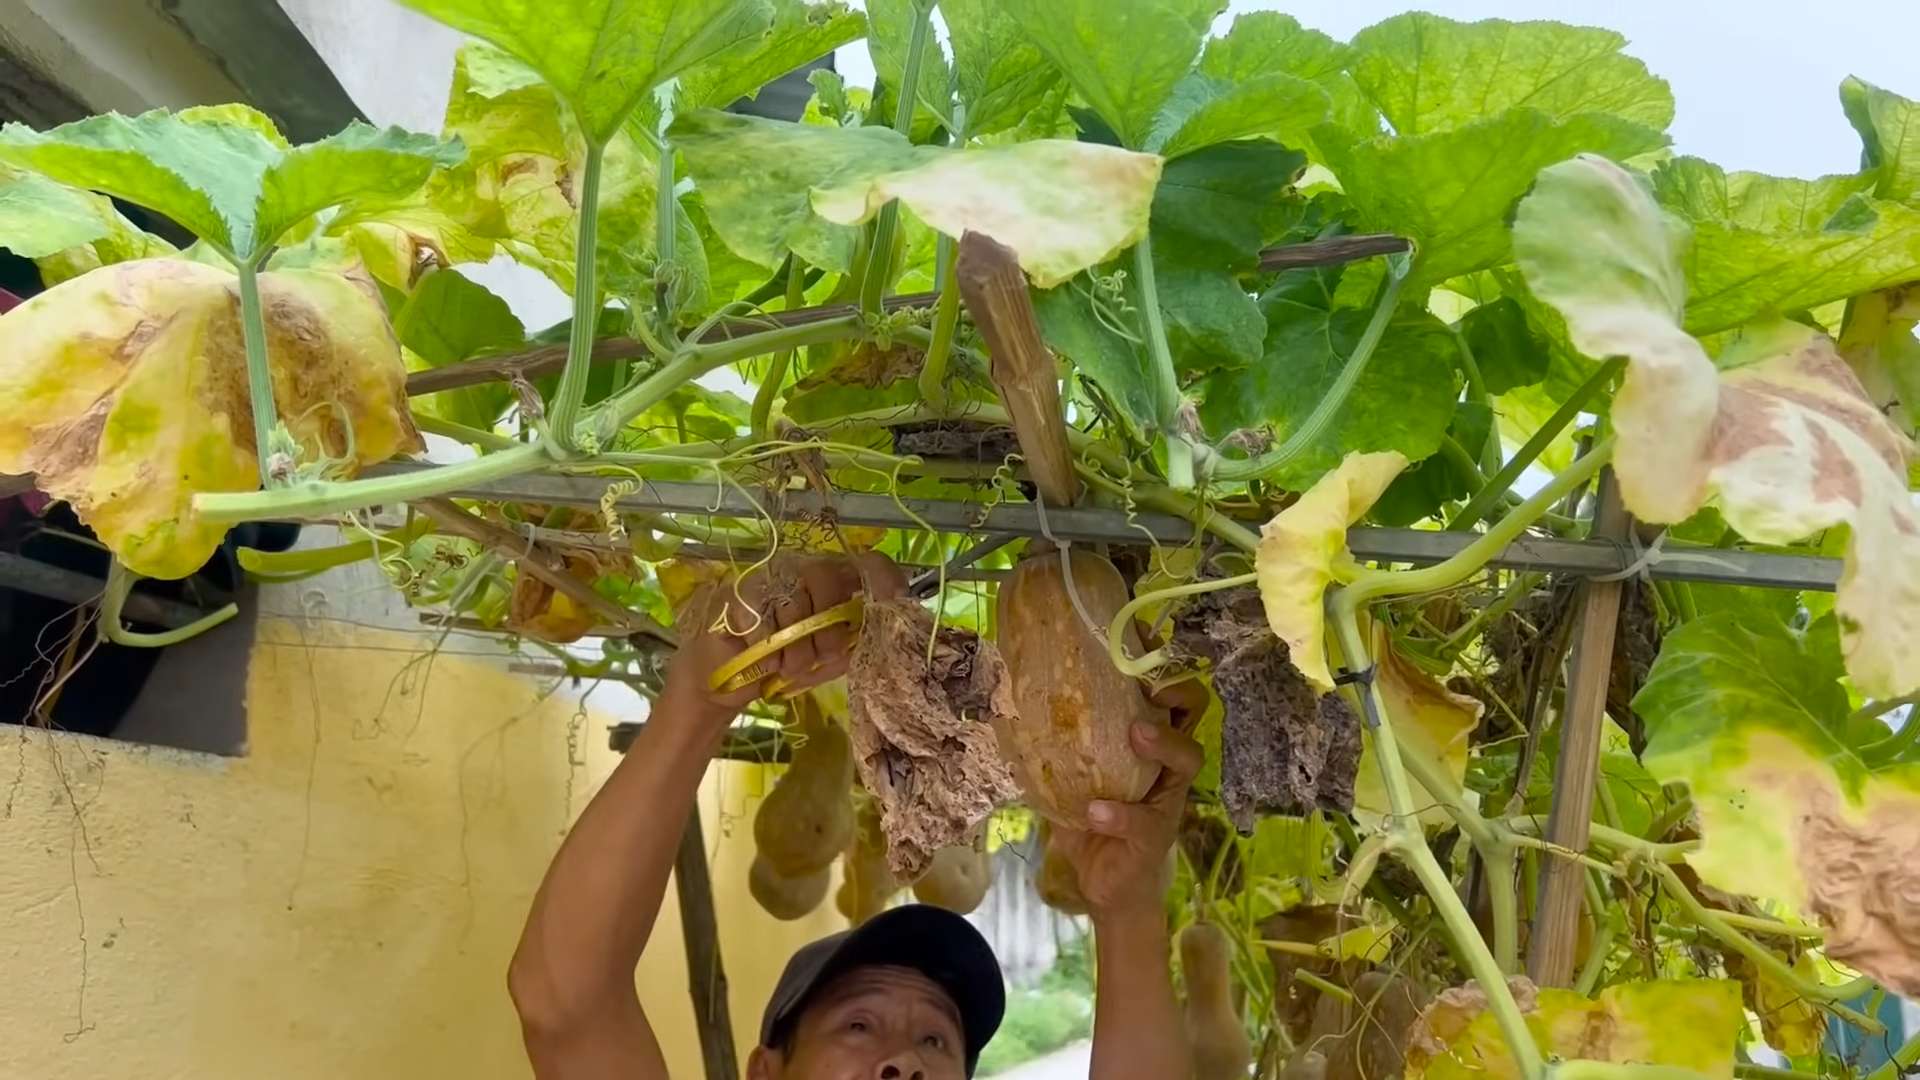
* **Trellising:** If you’re growing your melons on a trellis, you’ll need to train the vines to climb. Gently tie the vines to the trellis using soft twine or plant ties. As the melons develop, you may need to provide additional support to prevent them from falling off the vine. Pantyhose or mesh bags work well for this.
* **Pruning:** Pruning melon vines can help to improve air circulation and encourage fruit production. Remove any dead, diseased, or yellowing leaves. You can also prune the tips of the vines to encourage branching.
Harvesting Your Melons
Harvesting your melons at the right time is crucial for getting the best flavor. Here are some tips for knowing when your melons are ripe:
* **Watermelons:** Look for a dull, rather than shiny, rind. The underside of the melon (where it rests on the ground) should be yellow or cream-colored. Thump the melon – a ripe watermelon will sound hollow. The tendril closest to the melon should be brown and dry.
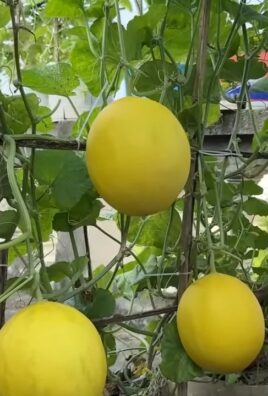
* **Cantaloupes:** The melon should slip easily from the vine with a gentle tug. The skin should have a golden hue and a fragrant aroma.
* **Honeydew Melons:** The skin should be slightly soft to the touch and have a waxy feel. The blossom end (opposite the stem) should be slightly springy.
Once you’ve harvested your melons, store them in a cool, dry place. Watermelons can be stored for up to two weeks, while cantaloupes and honeydews should be eaten within a few days.
Troubleshooting Common Problems
Even with the best care, you may encounter some problems while growing melons. Here are some common issues and how to address them:
* **Poor Fruit Set:** This can be caused by a lack of pollination, extreme temperatures, or nutrient deficiencies. Hand-pollinate your melons, provide shade during hot weather, and fertilize regularly.
* **Cracked Melons:** This is often caused by inconsistent watering. Water your melons deeply and regularly, especially during dry spells.
* **Blossom End Rot:** This is a calcium deficiency that causes the blossom end of the melon to rot. Amend your soil with calcium-rich amendments like bone meal or crushed eggshells.
* **Pest Infestations:** As mentioned earlier, melons can be susceptible to various pests. Inspect your plants regularly and take action promptly.
Enjoying Your Homegrown Melons
Congratulations! You’ve successfully grown your own melons at home. Now it’s time to enjoy the fruits (or rather, melons) of your labor. Slice them up and enjoy them fresh, add them to salads, or blend them into smoothies. The possibilities are endless!
Growing melons at home is a rewarding experience that allows you to enjoy fresh, flavorful produce straight from your garden. With a little planning and care, you can have a bountiful harvest of delicious melons to share with family and friends. Happy gardening!
Conclusion
So, there you have it! Growing melons at home, while it might seem daunting at first, is entirely achievable with a little planning, patience, and this simple DIY trick. We’ve shown you how to bypass some of the common pitfalls and create an environment where your melon vines can truly thrive. This isn’t just about saving money; it’s about experiencing the unparalleled satisfaction of harvesting a juicy, sun-ripened melon that you nurtured from seed to fruit. The flavor difference between a store-bought melon and one you’ve grown yourself is simply astounding – a burst of sweetness and freshness that will redefine your understanding of what a truly delicious melon should taste like.
This DIY method, focusing on [mention the specific DIY trick discussed in the main article, e.g., “raised beds with integrated watering systems” or “vertical trellising with support slings”], offers a significant advantage in terms of space optimization, water conservation, and overall plant health. By implementing this technique, you’re not only increasing your chances of a successful harvest but also minimizing the risk of common melon diseases and pest infestations. Think of it as giving your melon plants a head start and a competitive edge in the race to produce the sweetest, most flavorful fruit.
But don’t stop there! Experiment with different melon varieties to discover your personal favorites. Try growing cantaloupe, honeydew, watermelon, or even some of the more exotic melon types. Each variety has its unique flavor profile and growing requirements, so you can tailor your approach to suit your specific preferences and climate. Consider adding companion plants like marigolds or basil to deter pests and attract beneficial insects. You can also adjust the soil composition and fertilization schedule to optimize growth and fruit production. The possibilities are endless!
We wholeheartedly encourage you to give this DIY trick a try. It’s a rewarding experience that will connect you with nature and provide you with a delicious and healthy treat. Don’t be afraid to get your hands dirty and embrace the challenges that come with gardening. Remember, even experienced gardeners encounter setbacks, but the key is to learn from your mistakes and keep experimenting.
And most importantly, we want to hear about your experiences! Share your photos, tips, and stories with us in the comments section below. Let us know which melon varieties you’re growing, what challenges you’ve faced, and what successes you’ve achieved. Your feedback will not only help us improve this guide but also inspire other gardeners to embark on their own melon-growing adventures. Let’s create a community of passionate melon growers who are dedicated to sharing their knowledge and helping each other succeed. So go ahead, get planting, and let’s grow some amazing melons together! Remember, mastering the art of how to grow melons at home is a journey, not a destination. Enjoy the process, savor the fruits of your labor, and share the joy with others.
Frequently Asked Questions (FAQ)
What are the best melon varieties to grow for beginners?
For beginners, we recommend starting with easier-to-grow varieties like cantaloupe or honeydew. These melons are generally more forgiving and less susceptible to common diseases than some of the more demanding watermelon varieties. Look for varieties that are specifically bred for your climate and growing conditions. Bush-type watermelons are also a good option for smaller gardens as they take up less space. Check your local nursery or seed supplier for recommendations on varieties that thrive in your area. Remember to choose disease-resistant varieties whenever possible to minimize potential problems.
How much space do I need to grow melons?
Melons, especially watermelon, can be quite space-intensive. However, with the DIY trick of [mention the specific DIY trick again, e.g., “vertical trellising”], you can significantly reduce the amount of ground space required. If you’re growing melons on the ground, allow at least 4-6 feet between plants. For vertical trellising, you can space plants closer together, but make sure to provide adequate support for the developing fruits. Consider the mature size of the melon variety you’re growing when determining spacing. Bush varieties require less space than vining varieties.
How often should I water my melon plants?
Melon plants need consistent watering, especially during hot weather and fruit development. Water deeply and regularly, aiming to keep the soil consistently moist but not waterlogged. Avoid overhead watering, as this can promote fungal diseases. The frequency of watering will depend on your climate, soil type, and the size of your plants. Check the soil moisture regularly and water when the top inch or two feels dry. Using a soaker hose or drip irrigation system can help deliver water directly to the roots and minimize water waste.
What kind of fertilizer should I use for my melon plants?
Melon plants benefit from regular fertilization, especially during the early stages of growth and fruit development. Use a balanced fertilizer with a higher phosphorus content to promote strong root growth and abundant flowering. You can also supplement with compost or other organic matter to improve soil fertility and drainage. Avoid over-fertilizing, as this can lead to excessive foliage growth at the expense of fruit production. Follow the instructions on the fertilizer label carefully and adjust the amount based on the size and needs of your plants.
How do I know when my melons are ripe?
Determining when a melon is ripe can be tricky, but there are a few telltale signs to look for. For cantaloupe, the stem should slip easily from the vine when the melon is ripe. The skin should also have a distinct aroma and a slightly softened texture. For watermelon, look for a dull thud when you tap the melon. The underside of the melon, where it rests on the ground, should also turn from white to yellow. Honeydew melons will develop a creamy yellow color and a slightly waxy feel when ripe. Experience is the best teacher, so pay attention to the subtle cues and learn from each harvest.
What are some common pests and diseases that affect melon plants?
Common pests that affect melon plants include aphids, squash bugs, and vine borers. Diseases include powdery mildew, fusarium wilt, and anthracnose. Regularly inspect your plants for signs of pests or diseases and take action promptly to prevent them from spreading. Use organic pest control methods whenever possible, such as insecticidal soap or neem oil. Choose disease-resistant varieties and practice good sanitation to minimize the risk of disease. Crop rotation can also help prevent soilborne diseases from building up.
Can I grow melons in containers?
Yes, you can grow melons in containers, but you’ll need to choose a large container (at least 20 gallons) and select a compact or bush-type variety. Make sure the container has good drainage and use a high-quality potting mix. Container-grown melons will need more frequent watering and fertilization than those grown in the ground. Provide support for the vines as they grow. Container gardening is a great option for those with limited space or poor soil conditions.
How can I prevent my melons from rotting on the vine?
Melon rot can be caused by several factors, including excessive moisture, fungal diseases, and insect damage. To prevent rot, avoid overhead watering and ensure good air circulation around the plants. Use a mulch to keep the fruits from coming into direct contact with the soil. Regularly inspect your melons for signs of damage or disease and remove any affected fruits promptly. Consider using a fungicide if necessary, but always follow the instructions on the label carefully.
What is the best way to store harvested melons?
Store harvested melons in a cool, dry place. Whole melons can be stored at room temperature for a few days, but they will last longer in the refrigerator. Cut melons should be stored in an airtight container in the refrigerator and consumed within a few days. Avoid storing melons near ethylene-producing fruits like apples or bananas, as this can cause them to ripen too quickly and spoil.
Leave a Comment