
Grow mushrooms indoors? Absolutely! Imagine harvesting fresh, delicious mushrooms right from your own home, adding a gourmet touch to your meals without ever stepping foot in a grocery store. It sounds like something out of a fairytale, doesn’t it? But trust me, it’s more achievable than you think, and this DIY guide will show you exactly how.
For centuries, cultivating mushrooms has been a revered practice in many cultures, from ancient China where they were prized for their medicinal properties to European traditions where foraging for wild mushrooms was a cherished family activity. While foraging can be fun, it can also be risky. That’s where the beauty of indoor mushroom growing comes in – you get all the benefits of fresh, flavorful fungi without the uncertainty of the wild.
In today’s world, where we’re all looking for ways to connect with nature, reduce our carbon footprint, and enjoy healthier, more sustainable food options, learning to grow mushrooms indoors is a game-changer. Plus, with rising food costs, wouldn’t it be amazing to have a readily available source of protein and essential nutrients right at your fingertips? This DIY project is not only fun and rewarding, but it’s also a practical skill that can enhance your culinary adventures and contribute to a more self-sufficient lifestyle. So, let’s dive in and unlock the secrets to successful indoor mushroom cultivation!
Growing Mushrooms Indoors: A Beginner’s Guide
Okay, so you want to grow mushrooms indoors? Awesome! It’s a surprisingly rewarding hobby, and you get delicious, fresh mushrooms out of it. I’m going to walk you through a simple method that’s perfect for beginners, using a mushroom grow kit. It’s the easiest way to get started and learn the basics before diving into more complex techniques.
What You’ll Need
Before we get started, let’s gather our supplies. This is what I recommend for a smooth and successful first grow:
* Mushroom Grow Kit: This is the heart of the operation. You can find these online or at some garden centers. Make sure it’s a kit for a beginner-friendly species like oyster mushrooms, shiitake, or lion’s mane. These are generally more forgiving.
* Spray Bottle: You’ll need this to mist your mushrooms and maintain the right humidity.
* Clean Water: Tap water is usually fine, but if your tap water is heavily chlorinated, let it sit out for 24 hours to allow the chlorine to dissipate.
* A Clean, Well-Lit Area: Not direct sunlight, but a spot with ambient light. A kitchen counter, a shelf in a spare room, or even a basement corner can work.
* Optional: Humidity Tent or Plastic Bag: Some kits come with these, but if yours doesn’t, a clear plastic bag can help maintain humidity. Just make sure it’s big enough to cover the kit without touching the mushrooms directly.
* Optional: Thermometer/Hygrometer: This isn’t essential, but it can help you monitor temperature and humidity levels, especially if you’re having trouble.
Preparing Your Grow Kit
Most grow kits come pretty much ready to go, but there are a few things we need to do to get them ready for fruiting.
1. Open the Kit: Carefully open the box and remove the contents. You’ll usually find a block of substrate (the growing medium), a bag or tent, and instructions. Read the instructions that came with your specific kit! They might have slight variations.
2. Prepare the Substrate: This step varies depending on the kit. Some kits require you to score the substrate block with a knife to create openings for the mushrooms to grow. Others might have pre-cut holes. Follow the instructions provided with your kit. If you need to score it, use a clean knife and make shallow cuts in a grid pattern.
3. Hydrate the Substrate: This is crucial! The substrate needs to be moist for the mushrooms to fruit. Some kits require you to soak the entire block in water for a certain period (usually a few hours). Others might just need a thorough misting. Again, follow the kit’s instructions. If soaking, make sure the water is clean and cool. After soaking, drain any excess water.
Creating the Ideal Environment
Mushrooms are a bit picky about their environment. They need the right balance of humidity, temperature, and light.
1. Humidity: This is probably the most important factor. Mushrooms need high humidity to thrive. If your kit came with a humidity tent or bag, place the substrate block inside. If not, you can use a clear plastic bag. Make sure the bag doesn’t touch the substrate directly, as this can cause the mushrooms to rot. You can use skewers or small sticks to prop the bag up.
2. Misting: Mist the inside of the bag (or the substrate directly if you’re not using a bag) with your spray bottle 2-3 times a day. The goal is to keep the humidity high without making the substrate soggy. You should see condensation on the inside of the bag. If you don’t, mist more frequently. If there’s too much condensation, open the bag for a short period to allow some air circulation.
3. Temperature: Most mushroom species prefer temperatures between 60-75°F (15-24°C). Avoid placing your kit in direct sunlight or near a heat source, as this can dry it out. A cool, dark place is generally better than a hot, sunny one.
4. Light: Mushrooms don’t need a lot of light, but they do need some. Indirect sunlight or ambient light is sufficient. Avoid placing your kit in a completely dark room.
Monitoring and Maintenance
Now comes the waiting game! But don’t just forget about your kit. You need to keep an eye on it and make sure the environment is still right.
1. Daily Checks: Check your kit at least once a day, preferably twice. Look for signs of growth, such as small “pins” (baby mushrooms) forming on the substrate. Also, check the humidity level and mist if necessary.
2. Air Circulation: While mushrooms need high humidity, they also need some air circulation. Open the bag or tent for a few minutes each day to allow fresh air to circulate. This will help prevent mold growth.
3. Troubleshooting: If you see any signs of mold (usually green, black, or white fuzzy patches), try to remove it carefully with a clean knife or cotton swab. Increase air circulation and reduce humidity slightly. If the mold persists, it might be necessary to discard the kit.
Harvesting Your Mushrooms
This is the most exciting part! Harvesting your mushrooms at the right time is crucial for getting the best flavor and texture.
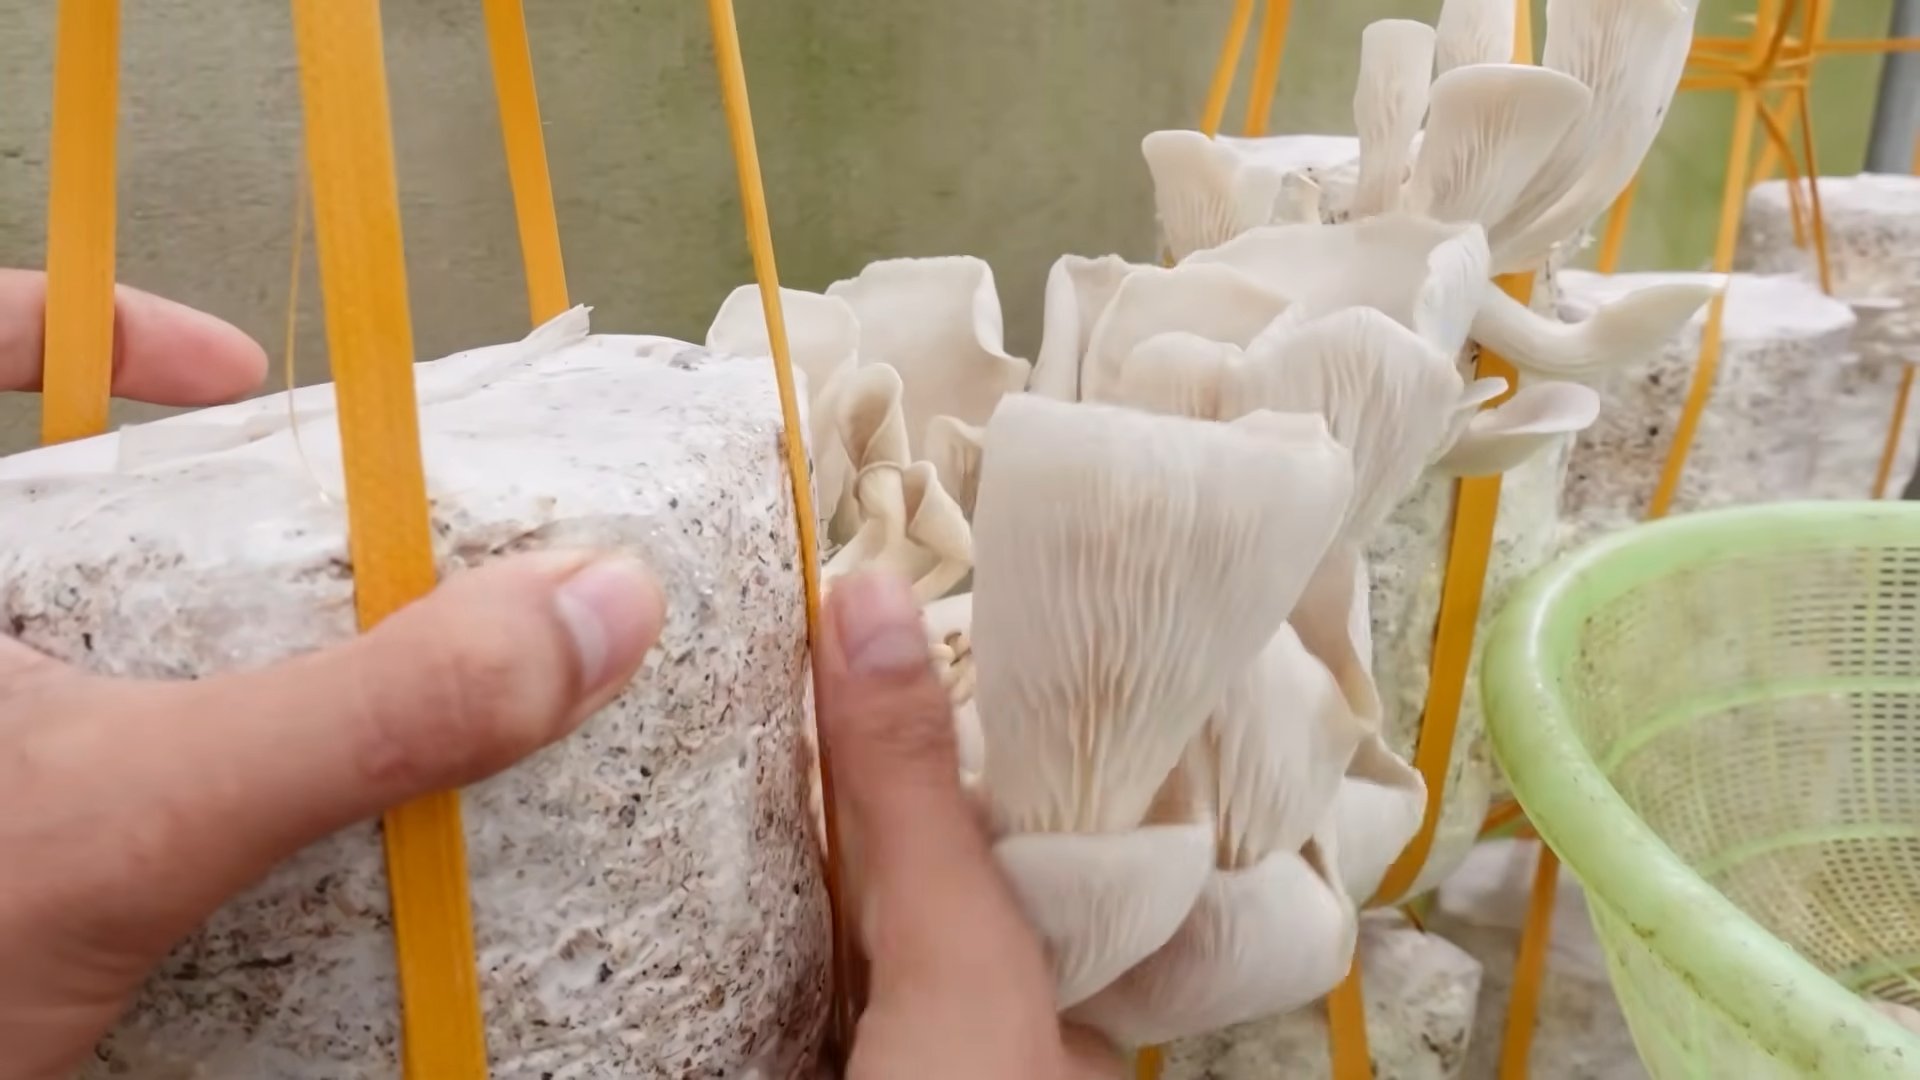
1. Timing: The timing of the harvest depends on the species of mushroom. Oyster mushrooms are usually ready to harvest when the caps are fully formed and the edges are still slightly curled under. Shiitake mushrooms are ready when the caps have opened up and the gills are visible. Lion’s mane mushrooms are ready when the “teeth” are fully developed and starting to dry out slightly.
2. Harvesting Technique: Gently twist and pull the mushrooms from the substrate. Avoid cutting them, as this can leave behind a stump that can rot. You can also use a clean knife to cut them at the base.
3. Storage: Store your harvested mushrooms in a paper bag in the refrigerator. They should last for several days.
Second Flush (and Beyond!)
Many mushroom grow kits will produce multiple flushes of mushrooms. After harvesting your first flush, you can encourage a second flush by:
1. Soaking the Substrate: Soak the substrate block in water again for a few hours. This will rehydrate it and stimulate new growth.
2. Repeating the Process: Place the substrate back in the bag or tent and repeat the misting and monitoring process.
You might get fewer mushrooms in subsequent flushes, but it’s still worth trying!
Common Problems and Solutions
Even with the best care, things can sometimes go wrong. Here are some common problems and how to fix them:
* Mushrooms are drying out: Increase humidity by misting more frequently.
* Mushrooms are rotting: Reduce humidity and increase air circulation.
* No mushrooms are growing: Make sure the substrate is properly hydrated and the temperature is within the ideal range. Be patient! It can sometimes take a few weeks for mushrooms to start growing.
* Mold is growing: Remove the mold carefully and increase air circulation. If the mold is widespread, it might be necessary to discard the kit.
Choosing the Right Mushroom Grow Kit
Not all mushroom grow kits are created equal. Here’s what I look for when choosing a kit:
* Species: Choose a species that’s easy to grow and tha
Okay, so you want to grow mushrooms indoors? Awesome! It’s a surprisingly rewarding hobby, and you get delicious, fresh mushrooms out of it. I’m going to walk you through a simple method that’s perfect for beginners, using a mushroom grow kit. It’s the easiest way to get started and learn the basics before diving into more complex techniques.
What You’ll Need
Before we get started, let’s gather our supplies. This is what I recommend for a smooth and successful first grow:
* Mushroom Grow Kit: This is the heart of the operation. You can find these online or at some garden centers. Make sure it’s a kit for a beginner-friendly species like oyster mushrooms, shiitake, or lion’s mane. These are generally more forgiving.
* Spray Bottle: You’ll need this to mist your mushrooms and maintain the right humidity.
* Clean Water: Tap water is usually fine, but if your tap water is heavily chlorinated, let it sit out for 24 hours to allow the chlorine to dissipate.
* A Clean, Well-Lit Area: Not direct sunlight, but a spot with ambient light. A kitchen counter, a shelf in a spare room, or even a basement corner can work.
* Optional: Humidity Tent or Plastic Bag: Some kits come with these, but if yours doesn’t, a clear plastic bag can help maintain humidity. Just make sure it’s big enough to cover the kit without touching the mushrooms directly.
* Optional: Thermometer/Hygrometer: This isn’t essential, but it can help you monitor temperature and humidity levels, especially if you’re having trouble.
Preparing Your Grow Kit
Most grow kits come pretty much ready to go, but there are a few things we need to do to get them ready for fruiting.
1. Open the Kit: Carefully open the box and remove the contents. You’ll usually find a block of substrate (the growing medium), a bag or tent, and instructions. Read the instructions that came with your specific kit! They might have slight variations.
2. Prepare the Substrate: This step varies depending on the kit. Some kits require you to score the substrate block with a knife to create openings for the mushrooms to grow. Others might have pre-cut holes. Follow the instructions provided with your kit. If you need to score it, use a clean knife and make shallow cuts in a grid pattern.
3. Hydrate the Substrate: This is crucial! The substrate needs to be moist for the mushrooms to fruit. Some kits require you to soak the entire block in water for a certain period (usually a few hours). Others might just need a thorough misting. Again, follow the kit’s instructions. If soaking, make sure the water is clean and cool. After soaking, drain any excess water.
Creating the Ideal Environment
Mushrooms are a bit picky about their environment. They need the right balance of humidity, temperature, and light.
1. Humidity: This is probably the most important factor. Mushrooms need high humidity to thrive. If your kit came with a humidity tent or bag, place the substrate block inside. If not, you can use a clear plastic bag. Make sure the bag doesn’t touch the substrate directly, as this can cause the mushrooms to rot. You can use skewers or small sticks to prop the bag up.
2. Misting: Mist the inside of the bag (or the substrate directly if you’re not using a bag) with your spray bottle 2-3 times a day. The goal is to keep the humidity high without making the substrate soggy. You should see condensation on the inside of the bag. If you don’t, mist more frequently. If there’s too much condensation, open the bag for a short period to allow some air circulation.
3. Temperature: Most mushroom species prefer temperatures between 60-75°F (15-24°C). Avoid placing your kit in direct sunlight or near a heat source, as this can dry it out. A cool, dark place is generally better than a hot, sunny one.
4. Light: Mushrooms don’t need a lot of light, but they do need some. Indirect sunlight or ambient light is sufficient. Avoid placing your kit in a completely dark room.
Monitoring and Maintenance
Now comes the waiting game! But don’t just forget about your kit. You need to keep an eye on it and make sure the environment is still right.
1. Daily Checks: Check your kit at least once a day, preferably twice. Look for signs of growth, such as small “pins” (baby mushrooms) forming on the substrate. Also, check the humidity level and mist if necessary.
2. Air Circulation: While mushrooms need high humidity, they also need some air circulation. Open the bag or tent for a few minutes each day to allow fresh air to circulate. This will help prevent mold growth.
3. Troubleshooting: If you see any signs of mold (usually green, black, or white fuzzy patches), try to remove it carefully with a clean knife or cotton swab. Increase air circulation and reduce humidity slightly. If the mold persists, it might be necessary to discard the kit.
Harvesting Your Mushrooms
This is the most exciting part! Harvesting your mushrooms at the right time is crucial for getting the best flavor and texture.
1. Timing: The timing of the harvest depends on the species of mushroom. Oyster mushrooms are usually ready to harvest when the caps are fully formed and the edges are still slightly curled under. Shiitake mushrooms are ready when the caps have opened up and the gills are visible. Lion’s mane mushrooms are ready when the “teeth” are fully developed and starting to dry out slightly.
2. Harvesting Technique: Gently twist and pull the mushrooms from the substrate. Avoid cutting them, as this can leave behind a stump that can rot. You can also use a clean knife to cut them at the base.
3. Storage: Store your harvested mushrooms in a paper bag in the refrigerator. They should last for several days.
Second Flush (and Beyond!)
Many mushroom grow kits will produce multiple flushes of mushrooms. After harvesting your first flush, you can encourage a second flush by:
1. Soaking the Substrate: Soak the substrate block in water again for a few hours. This will rehydrate it and stimulate new growth.
2. Repeating the Process: Place the substrate back in the bag or tent and repeat the misting and monitoring process.
You might get fewer mushrooms in subsequent flushes, but it’s still worth trying!
Common Problems and Solutions
Even with the best care, things can sometimes go wrong. Here are some common problems and how to fix them:
* Mushrooms are drying out: Increase humidity by misting more frequently.
* Mushrooms are rotting: Reduce humidity and increase air circulation.
* No mushrooms are growing: Make sure the substrate is properly hydrated and the temperature is within the ideal range. Be patient! It can sometimes take a few weeks for mushrooms to start growing.
* Mold is growing: Remove the mold carefully and increase air circulation. If the mold is widespread, it might be necessary to discard the kit.
Choosing the Right Mushroom Grow Kit
Not all mushroom grow kits are created equal. Here’s what I look for when choosing a kit:
* Species: Choose a species that’s easy to grow and that you enjoy eating. Oyster mushrooms, shiitake, and lion’s mane are all good choices for beginners.
* Substrate: Make sure the substrate is made from high-quality materials. Look for kits that use hardwood sawdust, straw, or other natural materials.
* Instructions: The kit should come with clear and detailed instructions.
* Reviews: Read reviews from other customers to see what their experience has been like.
Beyond the Kit: Exploring More Advanced Techniques
Once you’ve successfully grown mushrooms with a kit, you might want to explore more advanced techniques, such as:
* Growing from Spores: This involves starting from scratch with mushroom spores and creating your own substrate. It’s more challenging but also more rewarding.
* Growing on Logs: This is a more natural method that involves inoculating logs with mushroom spawn.
* Outdoor Mushroom Cultivation: This involves growing mushrooms outdoors in a garden or wooded area.
But for now, stick with the kit. It’s the perfect way to get your feet wet and learn the basics of mushroom cultivation. Good luck, and happy growing!

Conclusion
So, there you have it! Growing mushrooms indoors might seem like a daunting task reserved for seasoned mycologists, but with this simple DIY trick, you can cultivate your own delicious and nutritious fungi right in the comfort of your home. Forget expensive store-bought mushrooms that lack the vibrant flavor and freshness of homegrown varieties. This method offers a sustainable, cost-effective, and incredibly rewarding way to enjoy a constant supply of your favorite edible mushrooms.
Why is this DIY trick a must-try? Because it empowers you to take control of your food source, reduces your environmental footprint, and provides a fascinating glimpse into the world of fungi. Imagine the satisfaction of harvesting your own oyster mushrooms for a creamy pasta sauce, or adding freshly grown shiitakes to a savory stir-fry. The possibilities are endless!
But the benefits extend beyond just culinary delights. Growing mushrooms indoors is a fantastic educational experience, especially for children. It teaches them about the life cycle of fungi, the importance of sustainable practices, and the joy of nurturing something from start to finish. Plus, it’s a great conversation starter!
Looking for variations? Absolutely! While this guide focuses on a specific method, feel free to experiment with different substrates. Coffee grounds, straw, and even cardboard can be used as growing mediums, each offering unique benefits and challenges. You can also explore different mushroom varieties. Oyster mushrooms are a great starting point due to their ease of cultivation, but once you’ve mastered the basics, consider branching out to shiitakes, lion’s mane, or even wine caps. Remember to research the specific requirements of each variety to ensure optimal growth.
Another exciting variation is to incorporate this DIY trick into a larger aquaponics or hydroponics system. The spent mushroom substrate can be used as a nutrient-rich amendment for your plants, creating a closed-loop system that minimizes waste and maximizes resource utilization. This is a fantastic way to further enhance the sustainability of your indoor gardening efforts.
We encourage you to embrace your inner mycologist and give this DIY trick a try. Don’t be afraid to experiment, learn from your mistakes, and most importantly, have fun! The world of fungi is vast and fascinating, and this is just the beginning of your journey.
Once you’ve successfully harvested your first batch of homegrown mushrooms, we’d love to hear about your experience! Share your photos, tips, and challenges in the comments section below. Let’s build a community of indoor mushroom growers and learn from each other. Together, we can unlock the secrets of the fungal kingdom and enjoy the delicious rewards of our labor. So, grab your supplies, roll up your sleeves, and get ready to embark on a mushroom-growing adventure! You won’t regret it.
Frequently Asked Questions (FAQ)
What kind of mushrooms are easiest to grow indoors for beginners?
Oyster mushrooms are generally considered the easiest type of mushroom to grow indoors for beginners. They are relatively fast-growing, tolerant of a wide range of conditions, and produce abundant yields. Their aggressive mycelium also makes them less susceptible to contamination compared to other varieties. Shiitake mushrooms are another popular choice, although they require a bit more patience and attention to detail. Avoid more demanding varieties like morels or truffles until you have gained more experience.
What is the best substrate to use for growing mushrooms indoors?
The best substrate depends on the type of mushroom you are growing. For oyster mushrooms, straw, coffee grounds, and even cardboard can be used successfully. Shiitake mushrooms typically require a hardwood substrate, such as oak or maple sawdust. It’s crucial to properly pasteurize or sterilize the substrate before inoculation to eliminate competing microorganisms. Research the specific substrate requirements of the mushroom variety you choose to ensure optimal growth.
How do I prevent contamination when growing mushrooms indoors?
Contamination is a common challenge in indoor mushroom cultivation. To minimize the risk of contamination, maintain a clean and sterile environment. Pasteurize or sterilize your substrate thoroughly before inoculation. Use sterile tools and gloves when handling the substrate and spawn. Ensure proper ventilation to prevent the buildup of moisture, which can promote mold growth. Regularly inspect your growing containers for signs of contamination, such as unusual colors or odors. If contamination occurs, remove the affected area immediately to prevent it from spreading.
How much light do mushrooms need to grow indoors?
Mushrooms do not require direct sunlight to grow. In fact, direct sunlight can be harmful. They thrive in low-light conditions. A dimly lit room or a shaded area is usually sufficient. Some mushrooms may benefit from a small amount of indirect light to stimulate pinning (the formation of baby mushrooms). However, excessive light can inhibit growth and cause discoloration.
How long does it take to grow mushrooms indoors?
The time it takes to grow mushrooms indoors varies depending on the variety, substrate, and environmental conditions. Oyster mushrooms typically fruit within 1-2 weeks after colonization. Shiitake mushrooms may take several months to fruit. Factors such as temperature, humidity, and ventilation can also affect the growth rate. Be patient and monitor your mushrooms regularly for signs of pinning.
What is mushroom spawn, and where can I get it?
Mushroom spawn is a material that has been inoculated with mushroom mycelium (the vegetative part of the fungus). It is used to introduce the desired mushroom culture to the substrate. Spawn can be purchased from reputable online retailers, local mushroom farms, or specialty gardening stores. Choose a spawn that is specifically designed for the mushroom variety you are growing.
How do I know when my mushrooms are ready to harvest?
The ideal time to harvest mushrooms depends on the variety. Oyster mushrooms are typically harvested when the caps are fully expanded but before they start to release spores. Shiitake mushrooms are harvested when the caps have flattened out and the edges have begun to curl upwards. Observe your mushrooms closely and harvest them when they reach their peak maturity.
What do I do with the spent mushroom substrate after harvesting?
Spent mushroom substrate is a valuable resource that can be used in a variety of ways. It is rich in nutrients and organic matter, making it an excellent soil amendment for gardens and potted plants. It can also be composted or used as a mulch. Alternatively, you can use it as a substrate for growing other types of plants, such as herbs or vegetables.
Can I grow mushrooms indoors year-round?
Yes, you can grow mushrooms indoors year-round, provided you can maintain the appropriate environmental conditions. Temperature and humidity are the most critical factors. Use a humidifier or a spray bottle to maintain adequate humidity levels. A temperature-controlled room or a heating/cooling system can help regulate the temperature.
Is it safe to eat mushrooms grown indoors?
Yes, it is generally safe to eat mushrooms grown indoors, provided you have properly identified the species and followed safe cultivation practices. Only consume mushrooms that you are 100% certain are edible. Avoid eating mushrooms that show signs of contamination or spoilage. If you are unsure about the edibility of a mushroom, consult with a mycologist or a knowledgeable mushroom expert.


Leave a Comment