
Planting Cauliflower in Your Backyard might seem daunting, but trust me, it’s incredibly rewarding! Imagine harvesting your own crisp, white heads of cauliflower, knowing exactly where they came from and what went into growing them. Forget those bland, overpriced heads at the grocery store – we’re talking about fresh, flavorful cauliflower bursting with nutrients, straight from your garden to your table.
Cauliflower has a rich history, dating back to ancient times in the Mediterranean region. It was a prized vegetable among the Romans and has since become a staple in cuisines worldwide. But beyond its culinary appeal, growing your own cauliflower offers a unique connection to the earth and a sense of accomplishment that’s hard to beat.
Why should you try planting cauliflower in your backyard? Well, for starters, it’s a fantastic way to ensure you’re eating healthy, organic produce. Plus, it’s a great stress reliever! Getting your hands dirty in the garden is a proven way to unwind and reconnect with nature. And let’s be honest, who doesn’t love the bragging rights that come with serving a dish made with ingredients you grew yourself? This DIY guide will walk you through every step, from choosing the right variety to troubleshooting common problems, ensuring you have a bountiful cauliflower harvest. Let’s get started!
Planting Cauliflower in Your Backyard: A Beginner’s Guide
Hey there, fellow garden enthusiasts! I’m so excited to share my experience with growing cauliflower in my backyard. It might seem intimidating at first, but trust me, with a little planning and effort, you can harvest your own delicious, homegrown cauliflower. Let’s dive in!
Choosing the Right Cauliflower Variety
Before we get our hands dirty, it’s crucial to pick the right cauliflower variety for your climate and growing season. Different varieties mature at different rates, so consider your local weather patterns.
* Early Varieties: These are great for shorter growing seasons. Think ‘Snowball’ or ‘Early White Vienna’. They mature in about 50-60 days.
* Mid-Season Varieties: These take a bit longer, around 70-80 days. ‘Self-Blanche’ is a popular choice.
* Late-Season Varieties: These need a longer growing season, typically 80-100 days. ‘Giant of Naples’ is a good option if you have the time.
* Colored Varieties: Don’t forget about the fun ones! Purple, orange, and green cauliflower varieties add a splash of color to your garden and plate. ‘Graffiti’ (purple) and ‘Cheddar’ (orange) are worth checking out.
Preparing the Soil
Cauliflower is a heavy feeder, meaning it needs nutrient-rich soil to thrive. Proper soil preparation is key to a successful harvest.
* Soil Type: Cauliflower prefers well-drained, fertile soil with a pH between 6.0 and 7.0.
* Sunlight: Choose a location that receives at least 6 hours of direct sunlight per day.
* Soil Testing: It’s always a good idea to test your soil before planting. You can purchase a soil testing kit at your local garden center or send a sample to your county extension office.
* Amending the Soil: Based on your soil test results, amend the soil with compost, well-rotted manure, or other organic matter. This will improve drainage, fertility, and water retention. I usually add a generous amount of compost a few weeks before planting.
* Fertilizing: Incorporate a slow-release fertilizer into the soil before planting. Look for a fertilizer with a balanced NPK ratio (nitrogen, phosphorus, and potassium).
Starting Cauliflower Seeds (Optional)
While you can purchase cauliflower seedlings from a nursery, starting your own from seed gives you more control over the varieties you grow.
* Timing: Start seeds indoors 4-6 weeks before the last expected frost in your area.
* Seed Starting Mix: Use a seed starting mix, which is a sterile, lightweight medium that promotes germination.
* Planting: Sow seeds about 1/4 inch deep in seed starting trays or pots.
* Watering: Keep the soil consistently moist but not waterlogged.
* Light: Provide adequate light. A sunny windowsill or grow lights will work.
* Hardening Off: Before transplanting seedlings outdoors, gradually acclimate them to outdoor conditions over a period of 7-10 days. This process is called “hardening off.” Start by placing the seedlings in a sheltered location for a few hours each day, gradually increasing the amount of time they spend outdoors.
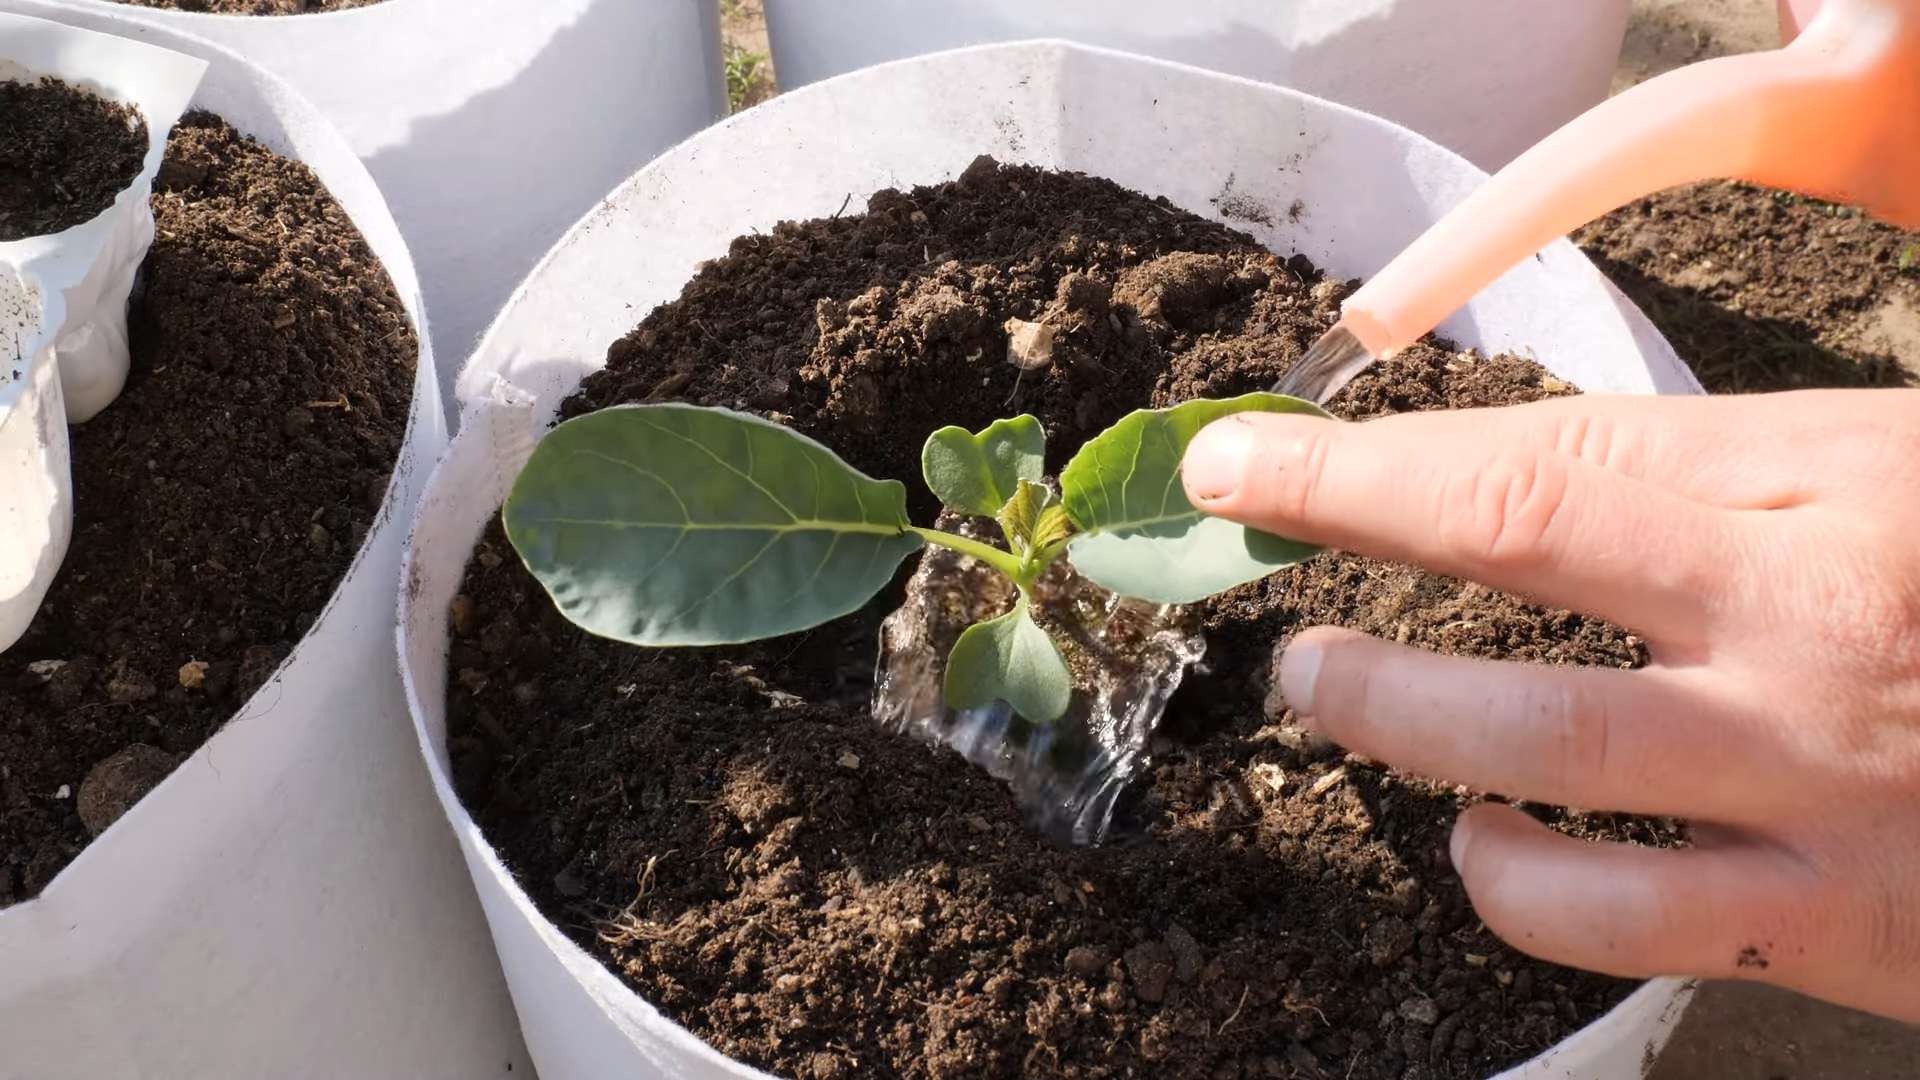
Transplanting Cauliflower Seedlings
Once your seedlings have developed several sets of true leaves and the danger of frost has passed, it’s time to transplant them into your garden.
1. Prepare the Planting Area: Dig holes that are slightly larger than the root balls of your seedlings. Space the holes 18-24 inches apart.
2. Remove Seedlings Carefully: Gently remove the seedlings from their containers, being careful not to damage the roots.
3. Planting Depth: Plant the seedlings at the same depth they were growing in their containers.
4. Water Thoroughly: Water the seedlings thoroughly after planting to help them establish.
5. Mulching: Apply a layer of mulch around the plants to help retain moisture, suppress weeds, and regulate soil temperature. I like to use straw or wood chips.
Caring for Your Cauliflower Plants
Consistent care is essential for healthy cauliflower plants and a bountiful harvest.
* Watering: Cauliflower needs consistent moisture, especially during head formation. Water deeply and regularly, especially during dry spells. Aim for about 1-2 inches of water per week.
* Fertilizing: Side-dress your cauliflower plants with a nitrogen-rich fertilizer every 2-3 weeks. This will help promote leafy growth and head development.
* Weeding: Keep the area around your cauliflower plants free of weeds. Weeds compete with cauliflower for nutrients and water.
* Pest Control: Cauliflower is susceptible to several pests, including cabbage worms, aphids, and flea beetles. Inspect your plants regularly for signs of infestation.
* Cabbage Worms: These green caterpillars can devour cauliflower leaves. Handpick them off the plants or use Bacillus thuringiensis (Bt), a biological insecticide.
* Aphids: These small, sap-sucking insects can weaken plants. Spray them with a strong stream of water or use insecticidal soap.
* Flea Beetles: These tiny beetles can create small holes in cauliflower leaves. Cover your plants with row covers to prevent flea beetle damage.
* Disease Control: Cauliflower can also be affected by diseases such as black rot and clubroot.
* Black Rot: This bacterial disease causes yellowing and browning of leaves. Plant disease-resistant varieties and practice crop rotation to prevent black rot.
* Clubroot: This fungal disease causes swollen, distorted roots. Raise the soil pH to 7.0 or higher and practice crop rotation to prevent clubroot.
Blanching Cauliflower Heads
Blanching is the process of covering the developing cauliflower head to prevent it from turning yellow or brown. This results in a whiter, more appealing head.
1. Timing: When the cauliflower head is about 2-3 inches in diameter, it’s time to blanch it.
2. Method: Gently pull the large outer leaves over the head and secure them with twine, rubber bands, or clothespins.
3. Monitoring: Check the head regularly to ensure it’s not rotting or becoming infested with pests.
4. Colored Varieties: Note that colored cauliflower varieties don’t need to be blanched.
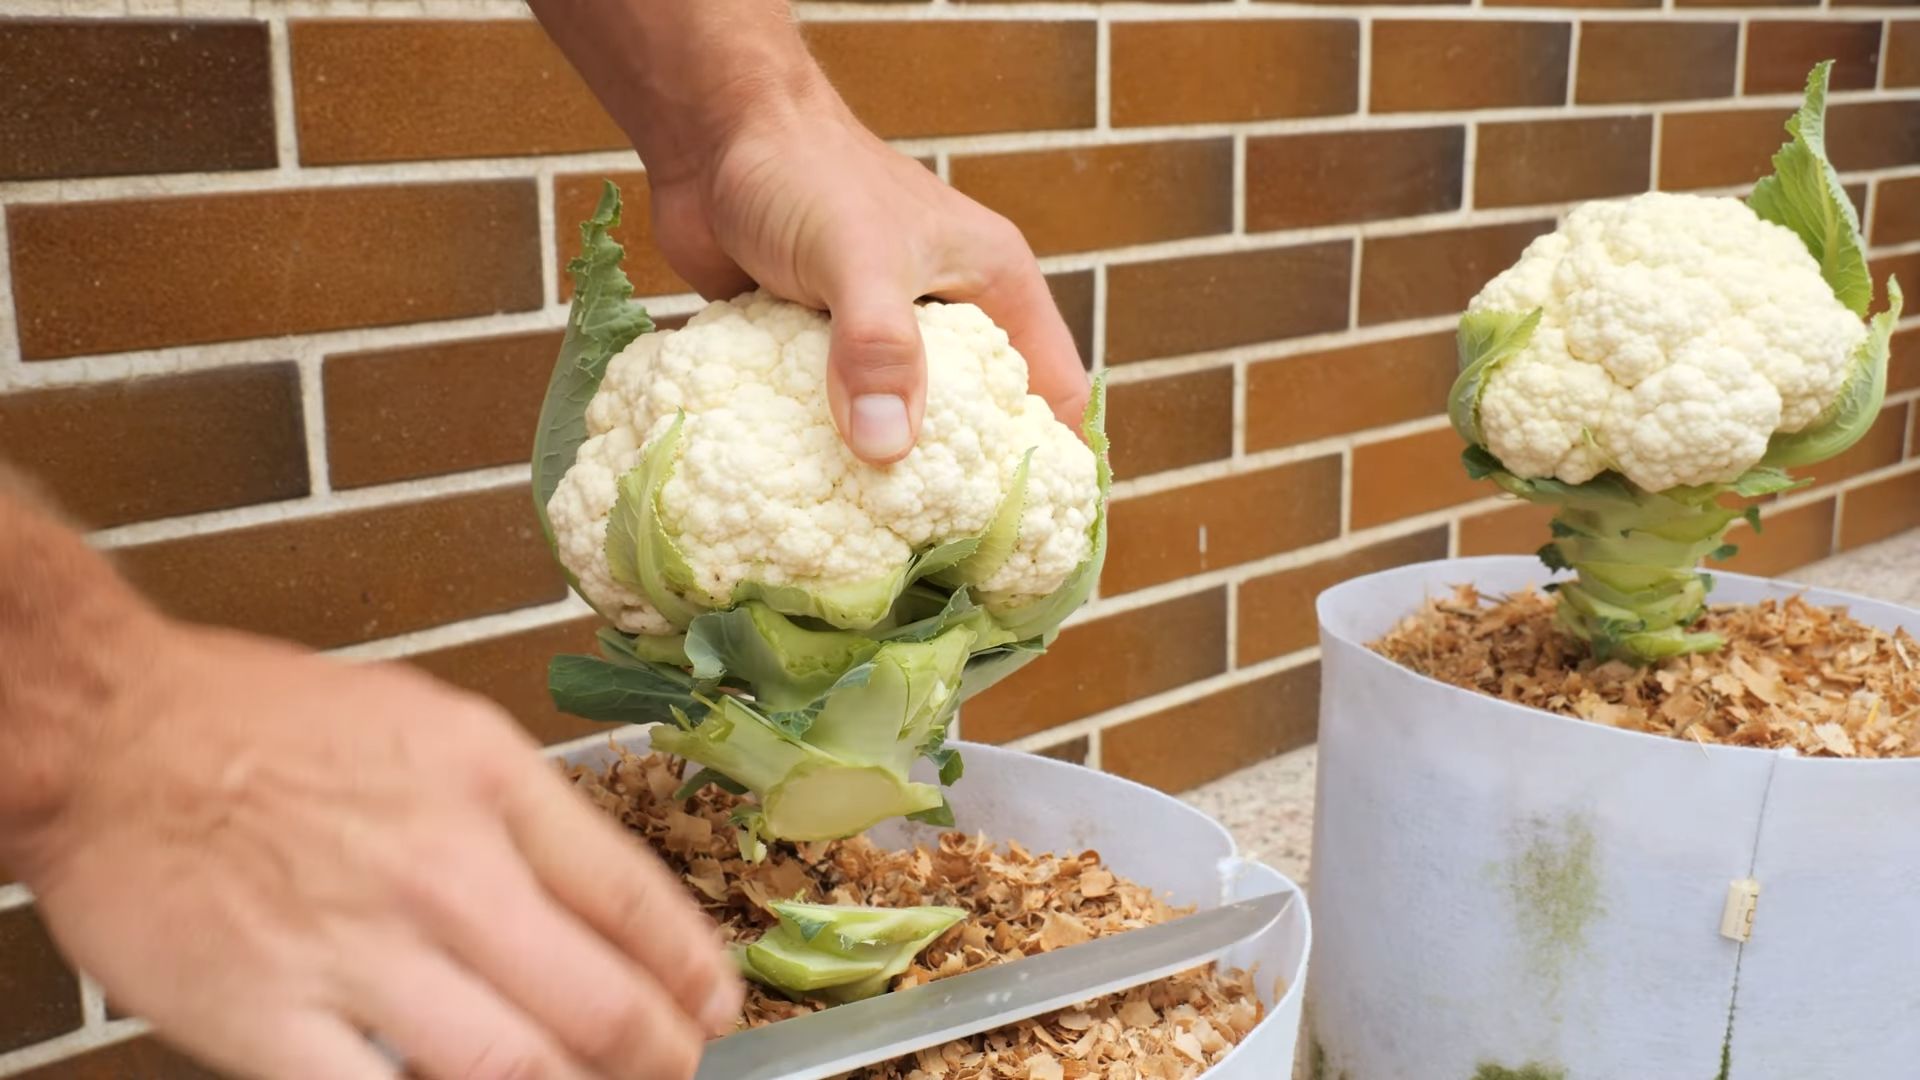
Harvesting Cauliflower
Knowing when to harvest your cauliflower is crucial for getting the best flavor and texture.
1. Timing: Harvest cauliflower when the head is firm, compact, and about 6-8 inches in diameter.
2. Cutting: Use a sharp knife to cut the head from the plant, leaving a few inches of stem attached.
3. Storage: Store cauliflower in the refrigerator for up to a week.
Troubleshooting Common Problems
Even with the best care, you might encounter some challenges when growing cauliflower. Here are a few common problems and how to address them:
* Buttoning: This occurs when the cauliflower head forms prematurely and remains small. It’s often caused by stress, such as lack of water or nutrients. Make sure your plants are getting enough water and fertilizer.
* Ricey Heads: This is when the cauliflower head becomes loose and grainy. It’s often caused by hot weather or inconsistent watering. Try to provide shade for your plants during the hottest part of the day and water them regularly.
* Yellowing Heads: This can be caused by lack of blanching or exposure to sunlight. Blanch your cauliflower heads as described above.
Enjoying Your Homegrown Cauliflower
Congratulations! You’ve successfully grown your own cauliflower. Now it’s time to enjoy the fruits (or rather, vegetables) of your labor.
* Cooking: Cauliflower can be cooked in a variety of ways, including steaming, roasting, boiling, and stir-frying.
* Recipes: There are countless cauliflower recipes available online and in cookbooks. Some popular options include roasted cauliflower, cauliflower mash, cauliflower pizza crust, and cauliflower rice.
* Freezing: If you have more cauliflower than you can eat, you can freeze it for later use. Blanch the cauliflower florets for 3 minutes, then cool them in ice water. Drain well and freeze in a single layer on a baking sheet. Once frozen, transfer the florets to a freezer bag or container.
Additional Tips for Success
* Crop Rotation: Practice crop rotation to prevent soilborne diseases and pests. Don’t plant cauliflower in the same location year after year.
* Companion Planting: Plant cauliflower with companion plants such as rosemary, thyme, and sage to deter pests.
* Succession Planting: Plant cauliflower seeds or seedlings every few weeks to extend your harvest season.
* Record Keeping: Keep a garden journal to track your planting dates,
Conclusion
So, there you have it! Planting cauliflower in your backyard isn’t just a gardening project; it’s an investment in fresh, flavorful, and healthy meals. We’ve walked through the steps, from selecting the right variety to nurturing your plants to harvest. But why should you take the plunge and dedicate a portion of your garden to this cruciferous delight?
Firstly, the taste. Store-bought cauliflower simply can’t compare to the crisp, slightly sweet flavor of a head you’ve grown yourself. The difference is remarkable, and once you’ve tasted homegrown cauliflower, you’ll understand why it’s worth the effort. Secondly, you have complete control over the growing process. You can choose organic methods, avoiding harmful pesticides and herbicides, ensuring that your family is consuming the healthiest possible produce. This is especially important for cauliflower, as it can sometimes be susceptible to pests.
Beyond the basic white cauliflower, consider experimenting with different varieties. Purple cauliflower adds a vibrant splash of color to your plate and boasts higher levels of antioxidants. Romanesco cauliflower, with its fractal florets, is a stunning addition to any garden and offers a unique, nutty flavor. You could even try growing orange cauliflower, which is rich in beta-carotene. The possibilities are endless!
Don’t be afraid to get creative with your cauliflower harvest. Roast it with herbs and spices for a simple yet satisfying side dish. Blend it into a creamy soup for a comforting meal on a chilly evening. Use it as a low-carb alternative to rice or mashed potatoes. Or, pickle it for a tangy and flavorful condiment. The versatility of cauliflower is truly astounding.
Planting cauliflower might seem daunting at first, but with a little planning and care, you can successfully grow your own delicious and nutritious crop. Remember to provide your plants with plenty of sunlight, well-drained soil, and consistent watering. Keep an eye out for pests and diseases, and take action promptly to prevent any problems from escalating.
We encourage you to give this DIY gardening project a try. It’s a rewarding experience that will not only provide you with fresh produce but also connect you with nature and the satisfaction of growing your own food. And most importantly, don’t forget to share your experiences! Post pictures of your cauliflower plants, share your favorite recipes, and let us know what challenges you faced and how you overcame them. Your insights can help other gardeners succeed in their own cauliflower-growing endeavors. Happy gardening!
Frequently Asked Questions (FAQ)
Q: What is the best time of year to plant cauliflower?
A: The best time to plant cauliflower depends on your climate. In regions with mild winters, you can plant cauliflower in the fall for a winter or early spring harvest. In colder climates, start seeds indoors 6-8 weeks before the last expected frost and transplant them outdoors after the danger of frost has passed. Alternatively, you can purchase cauliflower transplants from a local nursery. For a fall harvest in colder climates, start seeds indoors in late spring or early summer.
Q: How much sunlight does cauliflower need?
A: Cauliflower requires at least 6 hours of direct sunlight per day to thrive. Choose a location in your garden that receives ample sunlight throughout the day. If you live in a particularly hot climate, some afternoon shade can be beneficial to prevent the plants from overheating.
Q: What type of soil is best for growing cauliflower?
A: Cauliflower prefers well-drained, fertile soil with a pH between 6.0 and 7.0. Amend your soil with compost or other organic matter to improve drainage and fertility. A soil test can help you determine the pH of your soil and whether any amendments are needed.
Q: How often should I water my cauliflower plants?
A: Cauliflower needs consistent moisture to grow properly. Water your plants deeply and regularly, especially during dry periods. Aim to keep the soil consistently moist but not waterlogged. Mulching around the plants can help retain moisture and suppress weeds.
Q: What are some common pests and diseases that affect cauliflower?
A: Cauliflower can be susceptible to several pests and diseases, including cabbage worms, aphids, flea beetles, clubroot, and black rot. Regularly inspect your plants for signs of pests or diseases and take action promptly to prevent any problems from escalating. Organic pest control methods, such as insecticidal soap or neem oil, can be effective for controlling many common pests. Crop rotation and disease-resistant varieties can help prevent diseases.
Q: How do I know when my cauliflower is ready to harvest?
A: Cauliflower is ready to harvest when the head is firm, compact, and has reached the desired size. The size of the head will vary depending on the variety. The florets should be tightly closed and not starting to separate. Use a sharp knife to cut the head from the plant, leaving a few leaves attached to protect the head.
Q: Can I grow cauliflower in containers?
A: Yes, you can grow cauliflower in containers, but you’ll need to choose a large container (at least 5 gallons) and use a high-quality potting mix. Container-grown cauliflower may require more frequent watering and fertilization than plants grown in the ground. Choose a compact variety that is well-suited for container gardening.
Q: What are some good companion plants for cauliflower?
A: Companion planting can help improve the growth and health of your cauliflower plants. Some good companion plants for cauliflower include herbs like rosemary, thyme, and sage, which can help repel pests. Other beneficial companion plants include marigolds, nasturtiums, and garlic. Avoid planting cauliflower near other members of the brassica family, such as broccoli, cabbage, and kale, as they can attract the same pests and diseases.
Q: How can I prevent my cauliflower from turning yellow?
A: Cauliflower heads can sometimes turn yellow if they are exposed to too much sunlight. To prevent this, you can blanch the heads by tying the outer leaves together over the developing head. This will protect the head from the sun and keep it white. Alternatively, you can choose a self-blanching variety of cauliflower.
Q: Can I freeze cauliflower?
A: Yes, you can freeze cauliflower. To freeze cauliflower, cut it into florets and blanch them in boiling water for 3 minutes. Then, immediately transfer the florets to an ice bath to stop the cooking process. Drain the florets thoroughly and spread them out on a baking sheet to freeze individually. Once frozen, transfer the florets to a freezer bag or container. Frozen cauliflower can be stored in the freezer for up to 12 months.

Leave a Comment