
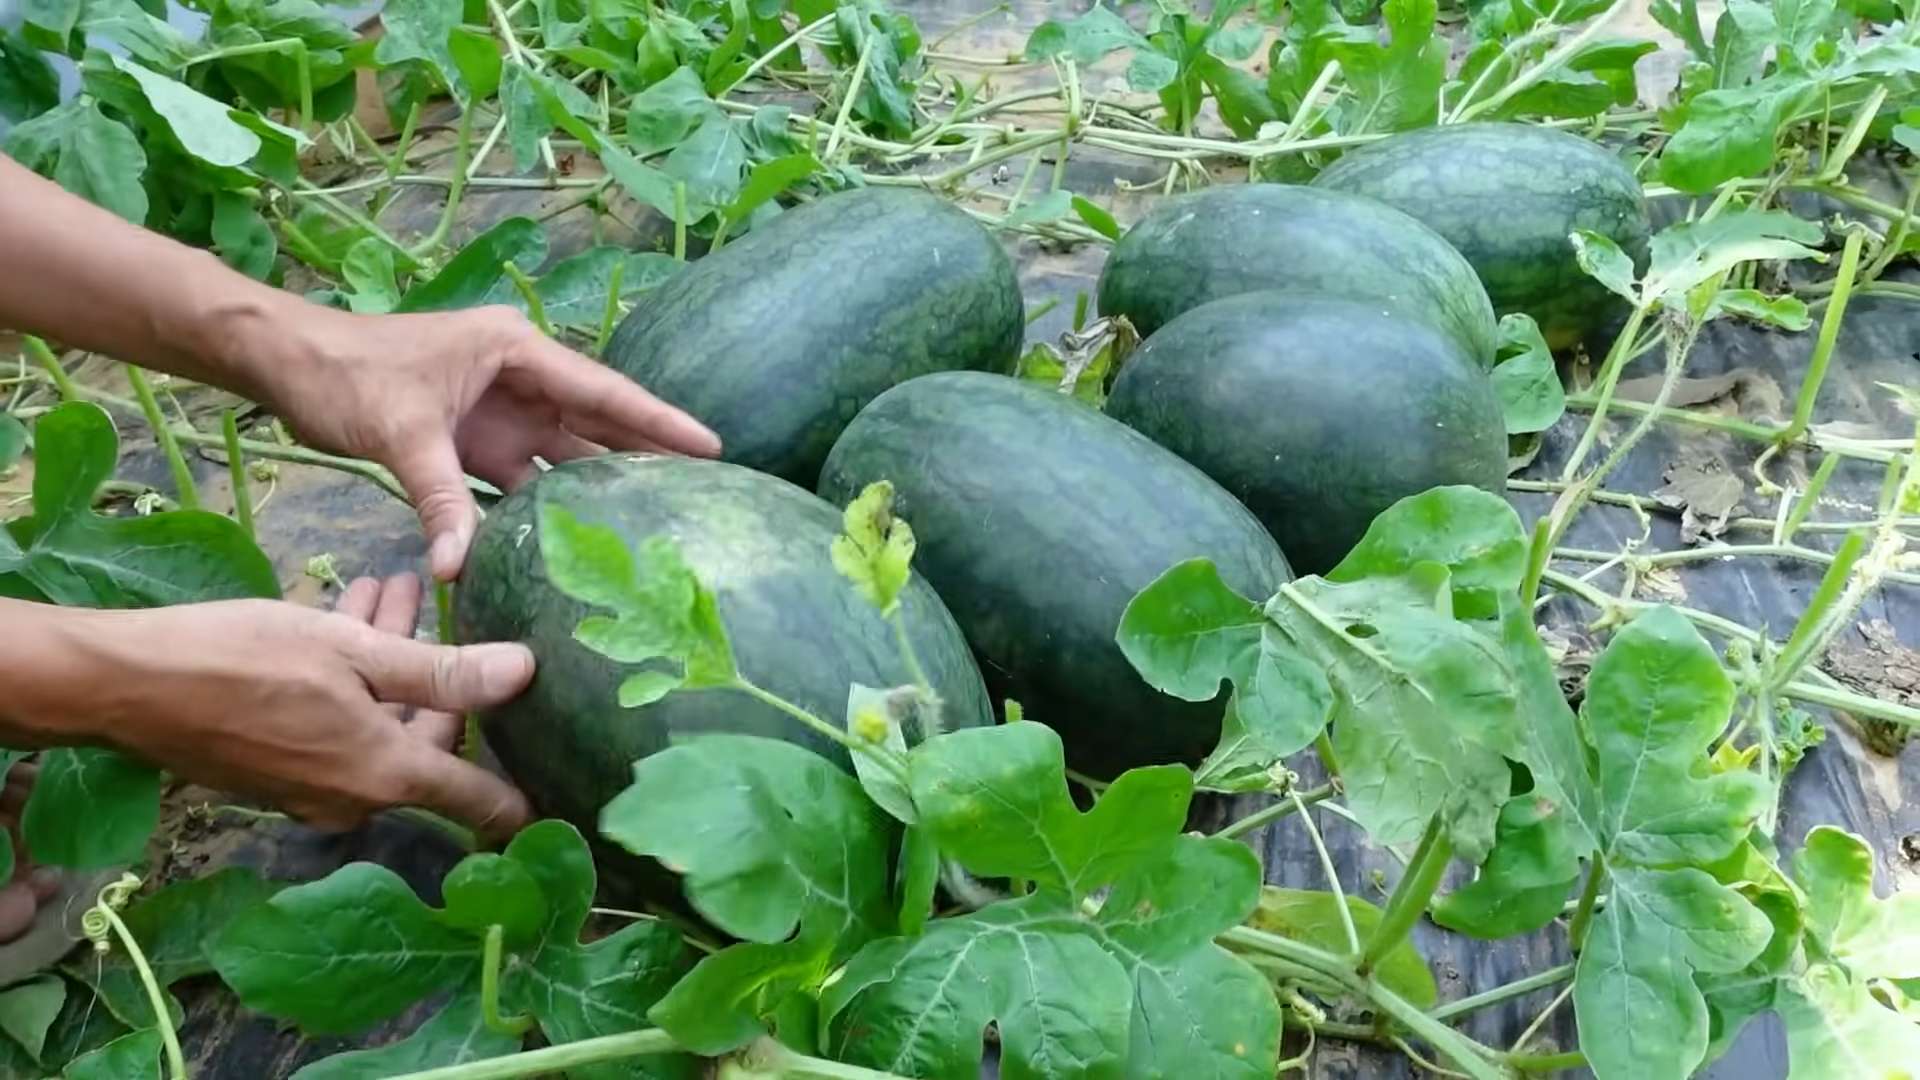
Grow Watermelons Backyard Garden – the very thought conjures images of sunny days, juicy slices, and the sweet taste of summer, doesn’t it? I know I can almost taste it already! But what if I told you that you could cultivate this summertime delight right in your own backyard, even if you’re a beginner gardener?
For centuries, watermelons have been a symbol of abundance and refreshment, enjoyed by cultures around the globe. From ancient Egypt, where they were depicted in hieroglyphics, to modern-day picnics, watermelons hold a special place in our hearts (and stomachs!). But the idea of growing them yourself can seem daunting, right? That’s where this DIY guide comes in!
Let’s face it, store-bought watermelons can sometimes be a gamble. Are they truly ripe? Were they grown with the best practices? By learning how to grow watermelons backyard garden, you gain control over the entire process, ensuring you get the sweetest, most delicious fruit possible. Plus, there’s nothing quite like the satisfaction of harvesting something you’ve nurtured from seed to table. So, ditch the grocery store guesswork and get ready to embark on a fun and rewarding gardening adventure with me! I’m going to share some easy-to-follow tricks and DIY hacks that will have you enjoying homegrown watermelons in no time.
Starting Strawberries From Seed: A Comprehensive Guide
Okay, so you want to grow strawberries from seed? Awesome! It’s a bit more challenging than buying starter plants, but the reward of nurturing those tiny seeds into delicious berries is totally worth it. Plus, you get access to varieties you might not find as starter plants. Let’s dive in!
Why Start Strawberries From Seed?
Before we get our hands dirty, let’s quickly touch on why you might choose to start strawberries from seed:
* Variety: You’ll have access to a wider range of strawberry varieties, including heirloom and alpine types.
* Cost-Effective: Seeds are generally cheaper than starter plants, especially if you’re planning a large strawberry patch.
* Satisfaction: There’s a unique sense of accomplishment in growing plants from seed to harvest.
* Disease-Free Start: Starting from seed can help ensure your plants are free from common strawberry diseases.
What You’ll Need
Here’s a list of everything you’ll need to successfully start your strawberry seeds:
* Strawberry Seeds: Choose a variety that suits your climate and taste preferences. Alpine strawberries are a great option for beginners.
* Seed Starting Trays or Pots: Small cells or pots with drainage holes are ideal.
* Seed Starting Mix: This is a fine-textured, sterile mix that provides good drainage and aeration. Avoid using garden soil.
* Spray Bottle: For gently watering the seeds.
* Clear Plastic Wrap or Humidity Dome: To maintain moisture levels.
* Grow Lights (Optional but Recommended): Provides consistent light for healthy seedling development.
* Heat Mat (Optional): Speeds up germination, especially in cooler climates.
* Small Fan (Optional): To improve air circulation and prevent fungal diseases.
* Labels and a Permanent Marker: To keep track of your different varieties.
* Tweezers (Optional): For handling tiny seeds.
* Vermiculite (Optional): To help retain moisture and prevent damping off.
Stratification: The Key to Germination
Strawberry seeds often require stratification, a period of cold, moist storage that mimics winter conditions. This process breaks dormancy and encourages germination. Don’t skip this step!
1. Prepare the Seeds: Place your strawberry seeds in a small container or zip-top bag.
2. Moisten a Paper Towel: Dampen a paper towel with distilled water. It should be moist but not soaking wet.
3. Wrap the Seeds: Place the seeds on the damp paper towel and fold it over to enclose them.
4. Seal and Label: Place the paper towel with the seeds in a zip-top bag or airtight container. Label the bag with the date and variety of strawberry.
5. Refrigerate: Place the bag in the refrigerator for 4-6 weeks. The ideal temperature is around 35-40°F (2-4°C).
6. Check Periodically: Check the paper towel every week or so to make sure it’s still moist. If it’s drying out, lightly mist it with distilled water.
Sowing the Seeds
After stratification, it’s time to sow your strawberry seeds.
1. Prepare the Seed Starting Trays: Fill your seed starting trays or pots with seed starting mix. Gently tap the trays to settle the mix.
2. Moisten the Soil: Lightly moisten the seed starting mix with a spray bottle. The mix should be damp but not soggy.
3. Sow the Seeds: Strawberry seeds are tiny, so sow them thinly on the surface of the soil. You can use tweezers to help you handle them. Aim for 2-3 seeds per cell or pot.
4. Lightly Cover the Seeds: Strawberry seeds need light to germinate, so only lightly cover them with a thin layer of vermiculite or seed starting mix.
5. Water Gently: Gently mist the surface of the soil with a spray bottle to avoid disturbing the seeds.
6. Cover with Plastic Wrap or Humidity Dome: Cover the trays with clear plastic wrap or a humidity dome to maintain moisture levels.
7. Provide Warmth: Place the trays on a heat mat or in a warm location. The ideal temperature for germination is around 70-75°F (21-24°C).
8. Provide Light: Place the trays under grow lights or in a bright, indirect light location. If using grow lights, keep them a few inches above the trays.
Germination and Early Care
Germination can take anywhere from 1-4 weeks, so be patient!
1. Monitor Moisture Levels: Check the trays daily to make sure the soil is still moist. Mist with a spray bottle as needed.
2. Ventilate: Once you see seedlings emerging, start to ventilate the trays by opening the plastic wrap or humidity dome for a few hours each day. This will help prevent fungal diseases.
3. Remove Plastic Wrap: Once most of the seeds have germinated, remove the plastic wrap or humidity dome completely.
4. Provide Adequate Light: Ensure the seedlings receive adequate light. If using grow lights, adjust the height as the seedlings grow.
5. Thin Seedlings: Once the seedlings have their first true leaves (the second set of leaves), thin them to one seedling per cell or pot. Use small scissors to snip off the weaker seedlings at the soil line.
6. Water Carefully: Water the seedlings carefully, allowing the soil to dry out slightly between waterings. Avoid overwatering, which can lead to root rot.
7. Fertilize Lightly: Once the seedlings have several sets of true leaves, start to fertilize them with a diluted liquid fertilizer. Use a balanced fertilizer (e.g., 10-10-10) diluted to half strength. Fertilize every 2-3 weeks.
8. Air Circulation: Use a small fan to provide gentle air circulation around the seedlings. This will help prevent fungal diseases and strengthen the stems.
Transplanting Seedlings
Once your seedlings have developed a strong root system and are large enough to handle, it’s time to transplant them into larger pots.
1. Prepare the Pots: Fill larger pots (e.g., 4-inch pots) with a good quality potting mix.
2. Gently Remove Seedlings: Gently remove the seedlings from their cells or pots. Be careful not to damage the roots. You can use a small spoon or fork to help you lift them out.
3. Transplant Seedlings: Make a hole in the potting mix in the larger pot and carefully place the seedling in the hole. Gently firm the soil around the seedling.
4. Water Thoroughly: Water the transplanted seedlings thoroughly.
5. Acclimate to Outdoor Conditions: Before planting your strawberry plants outdoors, you’ll need to acclimate them to outdoor conditions. This process is called “hardening off.” Start by placing the plants outdoors in a sheltered location for a few hours each day. Gradually increase the amount of time they spend outdoors over the course of a week or two. Protect them from direct sunlight and strong winds.
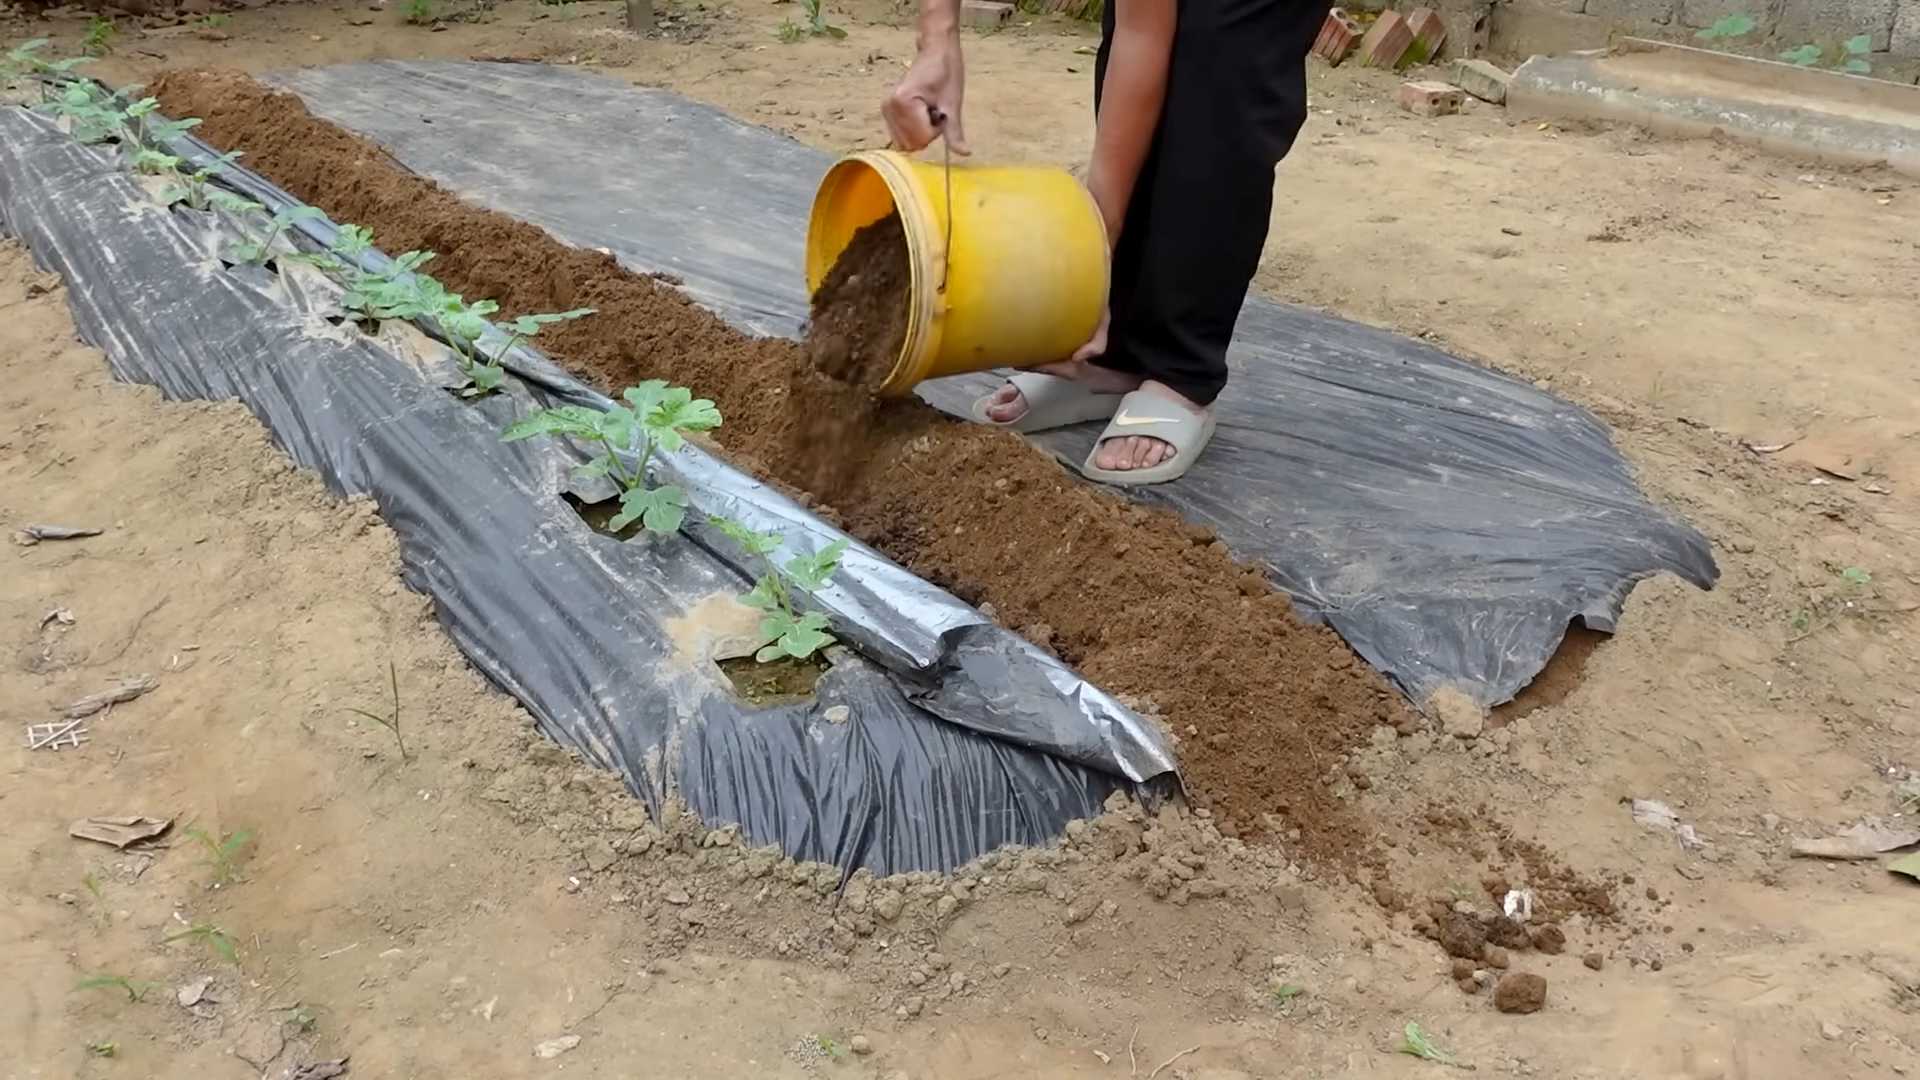
Planting Outdoors
After hardening off, your strawberry plants are ready to be planted in your garden.
1. Choose a Location: Select a sunny location with well-drained soil. Strawberries need at least 6-8 hours of sunlight per day.
2. Prepare the Soil: Amend the soil with compost or other organic matter to improve drainage and fertility.
3. Planting Distance: Space the strawberry plants about 12-18 inches apart in rows that are 3-4 feet apart.
4. Planting Depth: Plant the strawberry plants so that the crown (the point where the roots meet the stem) is at soil level.
5. Water Thoroughly: Water the newly planted strawberry plants thoroughly.
6. Mulch: Mulch around the plants with straw, wood chips, or other organic mulch to help retain moisture, suppress weeds, and keep the berries clean.
Ongoing Care
Once your strawberry plants are established, they’ll need ongoing care to thrive.
* Watering: Water regularly, especially during dry periods. Strawberries need consistent moisture to produce juicy berries.
* Fertilizing: Fertilize your strawberry plants in the spring with a balanced fertilizer. Avoid over-fertilizing, which can lead to excessive foliage growth and fewer berries.
* Weeding: Keep the area around your strawberry plants free of weeds. Weeds compete with strawberries for nutrients and water.
* Pest and Disease Control: Monitor your strawberry plants for pests and diseases. Common strawberry pests include slugs, snails, and aphids. Common strawberry diseases include powdery mildew and gray mold. Take action to control pests and diseases as needed.
* Renovating: After the
Conclusion
So, there you have it! Turning your backyard into a watermelon wonderland is not only achievable but incredibly rewarding. This DIY guide to grow watermelons in your backyard garden isn’t just about saving money; it’s about connecting with nature, understanding the growing process, and savoring the unparalleled taste of a homegrown, sun-ripened watermelon. Forget the bland, mass-produced melons from the grocery store – imagine sinking your teeth into a juicy, sweet watermelon that you nurtured from seed to fruit.
This method, focusing on maximizing space and utilizing readily available resources, makes watermelon cultivation accessible even for those with limited gardening experience. The satisfaction of harvesting your first watermelon is a feeling that’s hard to beat. It’s a testament to your hard work and a delicious reward for your efforts.
But the fun doesn’t stop there! Feel free to experiment with different watermelon varieties. Perhaps you’d like to try growing a smaller, personal-sized watermelon like a Sugar Baby, or maybe you’re feeling adventurous and want to cultivate a yellow or orange-fleshed variety. Consider companion planting to further enhance your garden’s ecosystem. Marigolds can help deter pests, while basil can improve the flavor of your watermelons.
Another variation to consider is vertical gardening. If space is truly limited, train your watermelon vines to grow up a trellis or fence. This not only saves space but also improves air circulation, reducing the risk of fungal diseases. Just be sure to provide adequate support for the heavy fruits as they develop.
Don’t be afraid to get your hands dirty and embrace the learning process. Gardening is all about experimentation and adapting to your specific environment. Pay attention to your plants, observe their growth patterns, and adjust your techniques as needed.
We are confident that with a little patience and dedication, you’ll be enjoying the fruits (or rather, the melons!) of your labor in no time. The key is to start small, learn as you go, and most importantly, have fun!
We encourage you to try this DIY trick for growing watermelons in your backyard garden. Share your experiences with us! Post pictures of your watermelon plants, tell us about any challenges you faced, and let us know which varieties you decided to grow. Your insights can help other aspiring watermelon gardeners and contribute to a thriving community of homegrown food enthusiasts. Let’s transform backyards everywhere into watermelon havens!
Frequently Asked Questions (FAQ)
What is the best time to start growing watermelons?
The ideal time to start growing watermelons depends on your climate. Watermelons are warm-season crops and require a long growing season of at least 70-90 days. In general, you should start seeds indoors about 6-8 weeks before the last expected frost. If you live in a warmer climate with a longer growing season, you can direct sow seeds into the ground after the soil has warmed up to at least 70°F (21°C). Check your local frost dates and adjust your planting schedule accordingly. Starting seeds indoors gives you a head start and protects young seedlings from pests and harsh weather conditions.
How much space do watermelons need to grow?
Watermelons are sprawling plants and require a significant amount of space. Each plant needs at least 6-8 feet of space in all directions. If you’re growing multiple plants, space them at least 3-4 feet apart in rows that are 8-10 feet apart. However, as mentioned in the conclusion, you can also train watermelon vines to grow vertically on a trellis or fence to save space. This method requires providing adequate support for the heavy fruits as they develop. Consider using slings or netting to support the watermelons as they grow.
What kind of soil is best for growing watermelons?
Watermelons thrive in well-drained, sandy loam soil that is rich in organic matter. The soil should have a pH between 6.0 and 6.8. Before planting, amend the soil with compost, aged manure, or other organic materials to improve drainage and fertility. Avoid heavy clay soils, as they can retain too much moisture and lead to root rot. If you have clay soil, consider growing watermelons in raised beds or containers filled with a well-draining potting mix.
How often should I water my watermelon plants?
Watermelons need consistent moisture, especially during fruit development. Water deeply and regularly, aiming for about 1-2 inches of water per week. Water at the base of the plants to avoid wetting the foliage, which can increase the risk of fungal diseases. During hot, dry weather, you may need to water more frequently. Check the soil moisture regularly and adjust your watering schedule accordingly. Mulching around the plants can help retain moisture and suppress weeds.
What are some common pests and diseases that affect watermelons?
Watermelons are susceptible to several pests and diseases, including aphids, squash bugs, vine borers, powdery mildew, and fusarium wilt. Regularly inspect your plants for signs of pests or diseases. Use organic pest control methods, such as insecticidal soap or neem oil, to control aphids and squash bugs. Protect your plants from vine borers by wrapping the base of the stems with aluminum foil or netting. To prevent powdery mildew, ensure good air circulation and avoid overhead watering. Choose disease-resistant watermelon varieties to minimize the risk of fusarium wilt.
How do I know when my watermelons are ripe?
Determining when a watermelon is ripe can be tricky, but there are several indicators to look for. First, check the tendril closest to the watermelon stem. When this tendril turns brown and dries out, it’s a sign that the watermelon is nearing ripeness. Second, look at the spot where the watermelon rests on the ground. This spot, called the ground spot, should turn from white to a creamy yellow color. Finally, thump the watermelon with your knuckles. A ripe watermelon will sound hollow and deep. With practice, you’ll develop a feel for identifying ripe watermelons.
Can I grow watermelons in containers?
Yes, you can grow watermelons in containers, but you’ll need a large container with good drainage. Choose a container that is at least 24 inches in diameter and 24 inches deep. Fill the container with a well-draining potting mix that is rich in organic matter. Select a compact or bush-type watermelon variety that is suitable for container gardening. Water regularly and fertilize every 2-3 weeks with a balanced fertilizer. Provide support for the vines as they grow. Container-grown watermelons may require more frequent watering and fertilization than those grown in the ground.
What kind of fertilizer should I use for watermelons?
Watermelons benefit from regular fertilization, especially during the early stages of growth and fruit development. Use a balanced fertilizer with equal amounts of nitrogen, phosphorus, and potassium (e.g., 10-10-10) at planting time. Once the plants start to flower, switch to a fertilizer that is higher in phosphorus and potassium to promote fruit production (e.g., 5-10-10). Follow the instructions on the fertilizer label for application rates. Avoid over-fertilizing, as this can lead to excessive foliage growth and reduced fruit production. You can also supplement with organic fertilizers, such as compost tea or fish emulsion.

Leave a Comment