
Hanging melon growing – sounds a bit like something out of a fairytale, doesn’t it? Imagine lush, juicy melons dangling gracefully from your balcony or patio, a vibrant green spectacle that’s both beautiful and bountiful. Forget sprawling vines taking over your garden; we’re taking melon cultivation to new heights, literally!
For centuries, gardeners have sought innovative ways to maximize space and yield. While the exact origins of hanging gardens are shrouded in mystery (think the legendary Hanging Gardens of Babylon!), the principle of vertical gardening has been around for ages. Today, with smaller living spaces becoming increasingly common, the need for clever gardening solutions is greater than ever. That’s where hanging melon growing comes in.
Let’s face it, traditional melon growing can be a real space hog. Those sprawling vines need room to roam, and not everyone has a sprawling garden to offer. But what if you could enjoy the sweet, refreshing taste of homegrown melons without sacrificing precious square footage? That’s the magic of this DIY trick! I’m going to show you how to create a simple, effective hanging system that will allow you to grow delicious melons, even if you only have a small balcony or patio. Get ready to impress your friends and neighbors with your innovative gardening skills – and enjoy a delicious harvest in the process!
DIY Hanging Melon Garden: From Seed to Sweetness!
Hey there, fellow gardeners! Are you short on space but dreaming of juicy, homegrown melons? Well, I’ve got just the project for you: a DIY hanging melon garden! It’s a fun, space-saving way to grow these delicious fruits, and trust me, the results are worth the effort. I’ve successfully grown cantaloupe and smaller watermelons this way, and I’m excited to share my secrets with you.
Choosing Your Melon Variety
Before we dive into the construction, let’s talk melons. Not all melons are created equal when it comes to hanging gardens. You’ll want to choose varieties that are naturally smaller and lighter.
* Cantaloupe: These are a great option because they’re relatively small and have a manageable weight. Look for varieties like ‘Minnesota Midget’ or ‘Sugar Baby’.
* Watermelon: While full-sized watermelons are a no-go, some smaller “icebox” varieties are perfect. ‘Sugar Baby’ is a popular choice, as is ‘Bush Sugar Baby’.
* Honeydew: Similar to cantaloupe, smaller honeydew varieties can thrive in hanging baskets.
* Other considerations: Check the seed packet or plant description for the mature size and weight of the melon. Aim for varieties that weigh no more than 5-7 pounds when fully grown.
Materials You’ll Need
Okay, let’s gather our supplies. Here’s what you’ll need to create your hanging melon oasis:
* Hanging Baskets: Choose sturdy baskets that are at least 14-16 inches in diameter. Wire baskets with coco coir liners are a good option, as they provide good drainage and aeration. I prefer the ones with three or four strong chains.
* Potting Mix: Use a high-quality potting mix that’s well-draining and rich in nutrients. Avoid using garden soil, as it can become compacted in containers. I like to mix in some compost for extra fertility.
* Water-Absorbing Polymer Crystals (Optional): These crystals help retain moisture in the soil, which is especially helpful in hanging baskets that tend to dry out quickly.
* Slow-Release Fertilizer: Melons are heavy feeders, so a slow-release fertilizer will provide them with a steady supply of nutrients throughout the growing season.
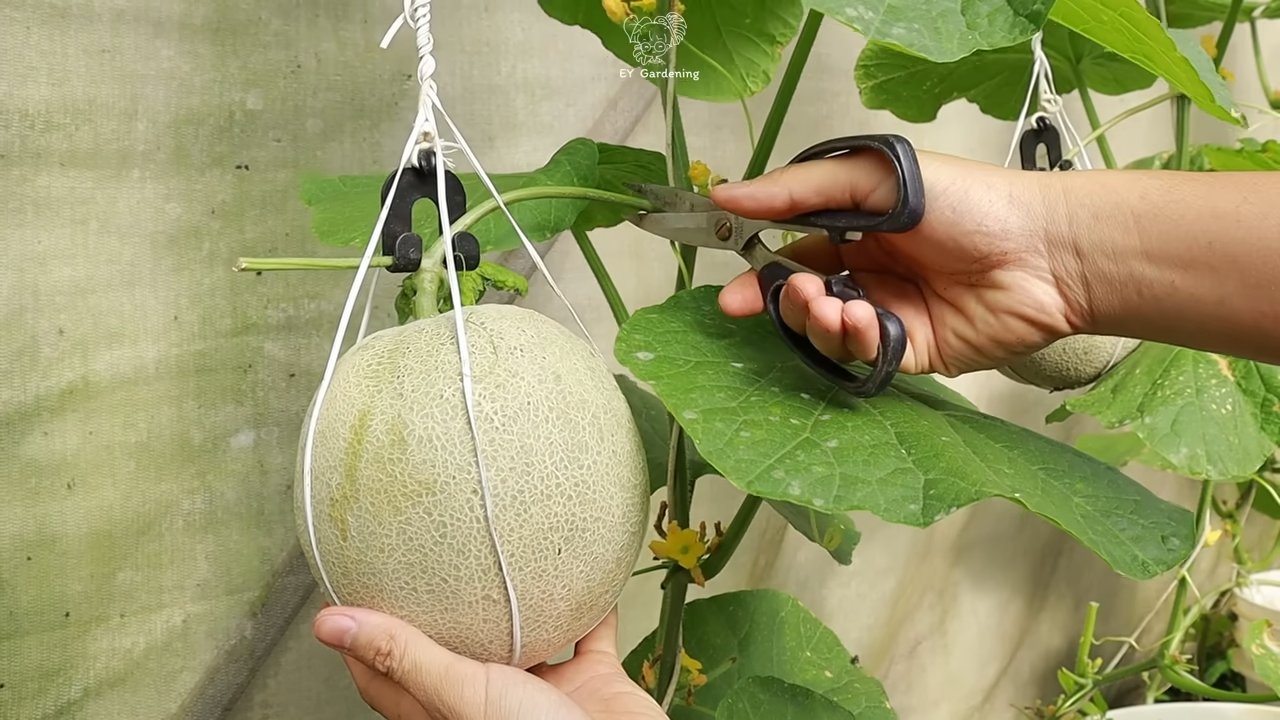
* Twine or Netting: This is crucial for supporting the growing melons and preventing them from falling off the vine.
* Scissors or Pruning Shears: For trimming vines and netting.
* Gloves: To protect your hands.
* Watering Can or Hose: For watering your melons.
* Melon Seeds or Seedlings: Of course!
* A strong hook or support: To hang your basket from. Make sure it can handle the weight of a mature melon plant.
Step-by-Step Instructions: Building Your Hanging Melon Garden
Alright, let’s get our hands dirty! Here’s how to assemble your hanging melon garden:
1. Prepare the Hanging Basket
* Line the basket: If you’re using a wire basket with a coco coir liner, make sure the liner is securely in place. If you’re using a plastic basket, you might want to add a layer of landscape fabric to improve drainage.
* Add potting mix: Fill the basket about two-thirds full with your potting mix.
* Mix in water-absorbing crystals (optional): If you’re using them, sprinkle the water-absorbing crystals evenly over the potting mix and mix them in thoroughly. Follow the instructions on the package for the correct amount to use.
* Incorporate slow-release fertilizer: Add the slow-release fertilizer according to the package directions. Gently mix it into the top layer of the potting mix.
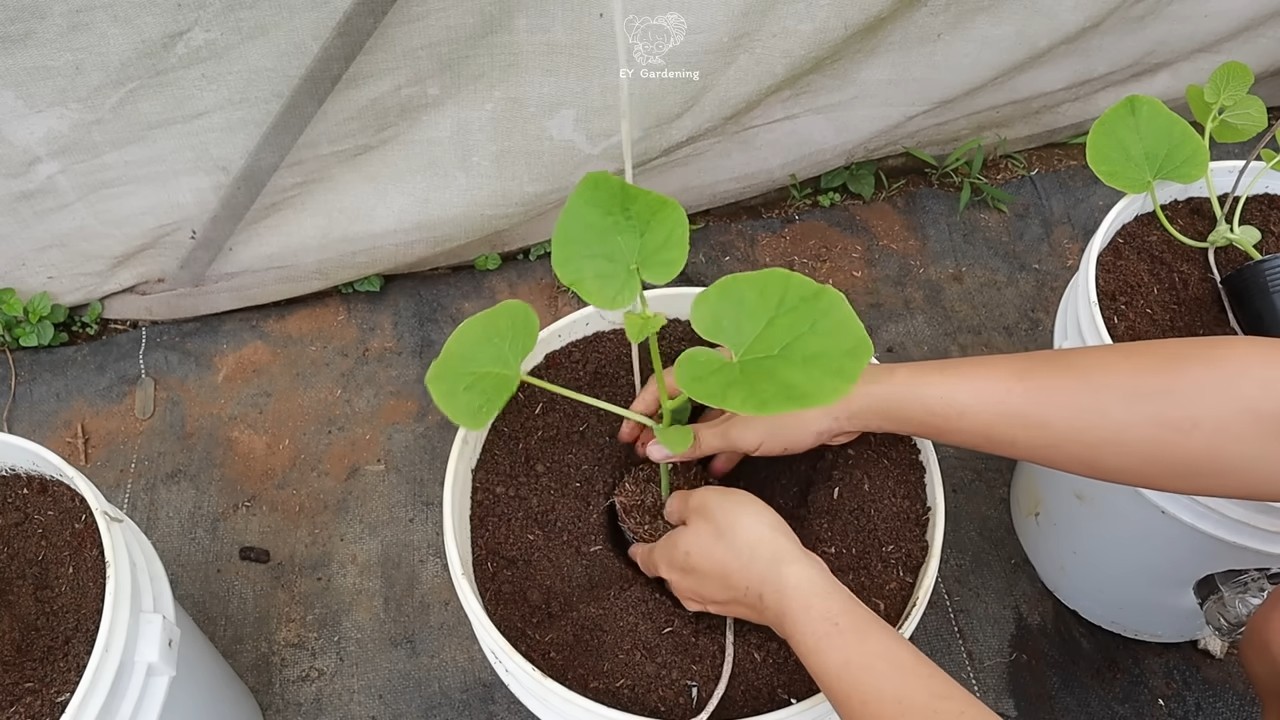
2. Planting Your Melon Seeds or Seedlings
* Starting from seed: If you’re starting from seed, sow 2-3 seeds in the center of the basket, about 1 inch deep. Water gently and keep the soil moist until the seeds germinate. Once the seedlings emerge, thin them to one strong plant.
* Planting seedlings: If you’re using seedlings, gently remove them from their containers and plant them in the center of the basket. Make sure the top of the root ball is level with the surface of the potting mix.
* Water thoroughly: After planting, water the basket thoroughly until water drains out of the bottom.
3. Setting Up Support for the Melons
This is a crucial step! As the melons grow, they’ll need support to prevent them from breaking off the vine.
* Install netting or twine: Once the melon vines start to grow, create a sling or hammock around each developing melon using twine or netting.
* Secure the support: Tie the ends of the twine or netting securely to the basket’s chains or frame. Make sure the support is strong enough to hold the weight of the mature melon.
* Adjust as needed: As the melons grow, you may need to adjust the support to accommodate their increasing size and weight.
4. Hanging Your Melon Garden
* Choose a sunny location: Melons need at least 6-8 hours of direct sunlight per day to thrive. Choose a location that gets plenty of sun.
* Hang the basket securely: Use a strong hook or support to hang the basket. Make sure the support can handle the weight of a mature melon plant, which can be surprisingly heavy.
* Consider wind protection: If your area is prone to strong winds, choose a location that’s sheltered from the wind. Strong winds can damage the vines and knock the melons off the plant.
Caring for Your Hanging Melon Garden
Now that your hanging melon garden is set up, here’s how to keep your plants happy and healthy:
1. Watering
* Water regularly: Hanging baskets tend to dry out quickly, so you’ll need to water your melons regularly, especially during hot, dry weather.
* Check the soil moisture: Stick your finger into the soil to check the moisture level. If the top inch of soil is dry, it’s time to water.
* Water deeply: When you water, water deeply until water drains out of the bottom of the basket.
* Avoid overwatering: Overwatering can lead to root rot, so be careful not to water too much.
2. Fertilizing
* Supplement with liquid fertilizer: In addition to the slow-release fertilizer, you may need to supplement with a liquid fertilizer every 2-3 weeks.
* Choose a fertilizer for fruiting plants: Look for a fertilizer that’s specifically formulated for fruiting plants, as it will have a higher phosphorus content, which is essential for fruit development.
* Follow the instructions on the package: Be sure to follow the instructions on the package for the correct amount of fertilizer to use.
3. Pruning
* Pinch off suckers: Suckers are small shoots that grow from the base of the plant. Pinching them off will encourage the plant to focus its energy on producing fruit.
* Trim excess vines: If the vines become too long and unruly, you can trim them back to keep the plant manageable.
* Remove dead or yellowing leaves: Remove any dead or yellowing leaves to prevent the spread of disease.
4. Pest and Disease Control
* Inspect plants regularly: Check your plants regularly for signs of pests or diseases.
* Common pests: Common melon pests include aphids, squash bugs, and cucumber beetles.
* Common diseases: Common melon diseases include powdery mildew and fusarium wilt.
Hey there, fellow gardeners! Are you short on space but dreaming of juicy, homegrown melons? Well, I’ve got just the project for you: a DIY hanging melon garden! It’s a fun, space-saving way to grow these delicious fruits, and trust me, the results are worth the effort. I’ve successfully grown cantaloupe and smaller watermelons this way, and I’m excited to share my secrets with you.
Choosing Your Melon Variety
Before we dive into the construction, let’s talk melons. Not all melons are created equal when it comes to hanging gardens. You’ll want to choose varieties that are naturally smaller and lighter.
* Cantaloupe: These are a great option because they’re relatively small and have a manageable weight. Look for varieties like ‘Minnesota Midget’ or ‘Sugar Baby’.
* Watermelon: While full-sized watermelons are a no-go, some smaller “icebox” varieties are perfect. ‘Sugar Baby’ is a popular choice, as is ‘Bush Sugar Baby’.
* Honeydew: Similar to cantaloupe, smaller honeydew varieties can thrive in hanging baskets.
* Other considerations: Check the seed packet or plant description for the mature size and weight of the melon. Aim for varieties that weigh no more than 5-7 pounds when fully grown.
Materials You’ll Need
Okay, let’s gather our supplies. Here’s what you’ll need to create your hanging melon oasis:
* Hanging Baskets: Choose sturdy baskets that are at least 14-16 inches in diameter. Wire baskets with coco coir liners are a good option, as they provide good drainage and aeration. I prefer the ones with three or four strong chains.
* Potting Mix: Use a high-quality potting mix that’s well-draining and rich in nutrients. Avoid using garden soil, as it can become compacted in containers. I like to mix in some compost for extra fertility.
* Water-Absorbing Polymer Crystals (Optional): These crystals help retain moisture in the soil, which is especially helpful in hanging baskets that tend to dry out quickly.
* Slow-Release Fertilizer: Melons are heavy feeders, so a slow-release fertilizer will provide them with a steady supply of nutrients throughout the growing season.
* Twine or Netting: This is crucial for supporting the growing melons and preventing them from falling off the vine.
* Scissors or Pruning Shears: For trimming vines and netting.
* Gloves: To protect your hands.
* Watering Can or Hose: For watering your melons.
* Melon Seeds or Seedlings: Of course!
* A strong hook or support: To hang your basket from. Make sure it can handle the weight of a mature melon plant.
Step-by-Step Instructions: Building Your Hanging Melon Garden
Alright, let’s get our hands dirty! Here’s how to assemble your hanging melon garden:
1. Prepare the Hanging Basket
* Line the basket: If you’re using a wire basket with a coco coir liner, make sure the liner is securely in place. If you’re using a plastic basket, you might want to add a layer of landscape fabric to improve drainage.
* Add potting mix: Fill the basket about two-thirds full with your potting mix.
* Mix in water-absorbing crystals (optional): If you’re using them, sprinkle the water-absorbing crystals evenly over the potting mix and mix them in thoroughly. Follow the instructions on the package for the correct amount to use.
* Incorporate slow-release fertilizer: Add the slow-release fertilizer according to the package directions. Gently mix it into the top layer of the potting mix.
2. Planting Your Melon Seeds or Seedlings
* Starting from seed: If you’re starting from seed, sow 2-3 seeds in the center of the basket, about 1 inch deep. Water gently and keep the soil moist until the seeds germinate. Once the seedlings emerge, thin them to one strong plant.
* Planting seedlings: If you’re using seedlings, gently remove them from their containers and plant them in the center of the basket. Make sure the top of the root ball is level with the surface of the potting mix.
* Water thoroughly: After planting, water the basket thoroughly until water drains out of the bottom.
3. Setting Up Support for the Melons
This is a crucial step! As the melons grow, they’ll need support to prevent them from breaking off the vine.
* Install netting or twine: Once the melon vines start to grow, create a sling or hammock around each developing melon using twine or netting.
* Secure the support: Tie the ends of the twine or netting securely to the basket’s chains or frame. Make sure the support is strong enough to hold the weight of the mature melon.
* Adjust as needed: As the melons grow, you may need to adjust the support to accommodate their increasing size and weight.
4. Hanging Your Melon Garden
* Choose a sunny location: Melons need at least 6-8 hours of direct sunlight per day to thrive. Choose a location that gets plenty of sun.
* Hang the basket securely: Use a strong hook or support to hang the basket. Make sure the support can handle the weight of a mature melon plant, which can be surprisingly heavy.
* Consider wind protection: If your area is prone to strong winds, choose a location that’s sheltered from the wind. Strong winds can damage the vines and knock the melons off the plant.
Caring for Your Hanging Melon Garden
Now that your hanging melon garden is set up, here’s how to keep your plants happy and healthy:
1. Watering
* Water regularly: Hanging baskets tend to dry out quickly, so you’ll need to water your melons regularly, especially during hot, dry weather.
* Check the soil moisture: Stick your finger into the soil to check the moisture level. If the top inch of soil is dry, it’s time to water.
* Water deeply: When you water, water deeply until water drains out of the bottom of the basket.
* Avoid overwatering: Overwatering can lead to root rot, so be careful not to water too much.
2. Fertilizing
* Supplement with liquid fertilizer: In addition to the slow-release fertilizer, you may need to supplement with a liquid fertilizer every 2-3 weeks.
* Choose a fertilizer for fruiting plants: Look for a fertilizer that’s specifically formulated for fruiting plants, as it will have a higher phosphorus content, which is essential for fruit development.
* Follow the instructions on the package: Be sure to follow the instructions on the package for the correct amount of fertilizer to use.
3. Pruning
* Pinch off suckers: Suckers are small shoots that grow from the base of the plant. Pinching them off will encourage the plant to focus its energy on producing fruit.
* Trim excess vines: If the vines become too long and unruly, you can trim them back to keep the plant manageable.
* Remove dead or yellowing leaves: Remove any dead or yellowing leaves to prevent the spread of disease.
4. Pest and Disease Control
* Inspect plants regularly: Check your plants regularly for signs of pests or diseases.
* Common pests: Common melon pests include aphids, squash bugs, and cucumber beetles.
* Common diseases: Common melon diseases include powdery mildew and fusarium wilt.
* Treat promptly: If you find any pests or diseases, treat them promptly with an appropriate insecticide or fungicide. Organic options are always a good first choice!
5. Pollination
* Hand-pollination may be necessary: Melons require pollination to produce fruit. If you’re not seeing any fruit develop, you may need to hand-pollinate the flowers.
* How to hand-pollinate: Use a small paintbrush to transfer pollen from the male flowers to the female flowers. Male flowers have a long, thin stem, while female flowers have a small, immature melon at the base.
Harvesting Your Melons
The moment we’ve all been waiting for! Here’s how to know when your melons are ripe and ready to harvest:
* Check the tendril: The tendril closest to the melon should be dry and brown.
* Check the ground spot: The spot where the melon rests on the ground (or in your netting) should be a creamy yellow color.
* Thump the melon: A ripe melon will have a deep, hollow sound when you thump it.
* Smell the melon: A ripe melon will have a sweet, fragrant aroma.
* Harvest carefully
Conclusion
So, there you have it! Hanging your melons isn’t just a quirky gardening trend; it’s a game-changer that can lead to healthier, more abundant harvests. We’ve explored the myriad benefits, from improved air circulation and reduced pest pressure to the sheer joy of watching your melons dangle like ornaments in your garden. This simple yet effective technique addresses common challenges faced by melon growers, especially those dealing with limited space or persistent ground-dwelling pests.
Think about it: no more rotting undersides, no more struggling to find the perfect spot on the ground, and no more battling slugs and squash bugs vying for a taste of your precious fruit. By embracing this method, you’re not just growing melons; you’re cultivating a healthier, more resilient garden ecosystem.
But the beauty of this DIY trick lies in its adaptability. Feel free to experiment with different types of supports. While pantyhose are a readily available and cost-effective option, consider using burlap sacks for larger melons or creating custom slings from durable fabric. You can even repurpose old t-shirts or towels, giving them a new lease on life while supporting your growing gourds. The key is to ensure the support is strong enough to bear the weight of the developing melon and breathable enough to prevent moisture buildup.
For those growing smaller melon varieties like cantaloupe or personal-sized watermelons, you might even consider hanging them from sturdier tomato cages or trellises. This can provide additional support and stability, especially in windy conditions. Remember to regularly inspect your supports and adjust them as needed to accommodate the growing fruit.
Don’t be afraid to get creative with your hanging system. The goal is to provide adequate support and protection while allowing your melons to thrive. And remember, proper watering and fertilization are still crucial for optimal growth, even when your melons are hanging.
We understand that trying something new can be daunting, but we wholeheartedly encourage you to give this DIY trick a try. The rewards are well worth the effort. Imagine the satisfaction of harvesting perfectly ripe, blemish-free melons that you’ve nurtured from seed to table.
This hanging melon growing technique is a must-try for any gardener looking to maximize their yield and minimize common melon-growing problems. It’s a simple, effective, and surprisingly rewarding way to cultivate these delicious fruits.
So, grab your pantyhose, your burlap sacks, or whatever creative support you can conjure up, and get ready to hang those melons! We’re confident that you’ll be amazed by the results.
And most importantly, we want to hear about your experiences! Share your photos, tips, and tricks in the comments below. Let’s create a community of hanging melon enthusiasts and learn from each other’s successes (and even our failures!). Together, we can unlock the full potential of this innovative gardening technique and enjoy a bountiful harvest of delicious, homegrown melons. Happy gardening!
Frequently Asked Questions (FAQ)
What types of melons are best suited for hanging?
While many melon varieties can benefit from hanging, smaller to medium-sized melons like cantaloupe, honeydew, and personal-sized watermelons are generally the easiest to manage. Larger watermelon varieties can be hung, but require significantly stronger support systems. Consider the mature weight of the melon when choosing your support method. Varieties that naturally have thicker skins also tend to do better, as they are less prone to damage from rubbing against the support. Ultimately, experimentation is key to finding what works best in your specific garden environment.
How do I know when my hanging melon is ripe?
Determining ripeness for hanging melons is similar to determining ripeness for ground-grown melons, but with a few added considerations. Look for the following signs:
* **Color Change:** The skin color should change from a pale green to a more vibrant, mature color characteristic of the specific melon variety.
* **Stem Detachment:** The stem should begin to dry and crack near the point where it attaches to the melon. In some cases, the melon may even detach from the vine on its own when ripe.
* **Sound:** Gently tap the melon. A ripe melon will typically have a deeper, hollow sound compared to an unripe one.
* **Aroma:** A ripe melon will often have a sweet, fragrant aroma, especially near the stem end.
* **Tendril Condition:** The tendril closest to the melon should be brown and dry.
Remember that these are general guidelines, and the specific indicators of ripeness may vary slightly depending on the melon variety.
What kind of support should I use for hanging my melons?
The best support depends on the size and weight of the melon. Pantyhose are a popular and inexpensive option for smaller melons. Burlap sacks, old t-shirts, or towels can be used for larger melons. You can also create custom slings from durable fabric. Ensure the support is strong enough to bear the weight of the developing melon and breathable enough to prevent moisture buildup. Tomato cages or trellises can provide additional support for smaller varieties. Regularly inspect your supports and adjust them as needed.
Will hanging my melons affect their taste?
Hanging melons should not negatively affect their taste. In fact, many gardeners believe that it can actually improve the flavor by promoting better air circulation and preventing soil-borne diseases that can impact the fruit’s quality. The key is to ensure the melons receive adequate sunlight, water, and nutrients throughout their growing cycle.
How often should I water hanging melons?
Watering frequency depends on the climate, soil type, and melon variety. Generally, hanging melons will dry out faster than ground-grown melons due to increased air circulation. Check the soil moisture regularly and water when the top inch or two feels dry. Avoid overwatering, as this can lead to root rot. Consider using a soaker hose or drip irrigation system to deliver water directly to the roots.
Are there any downsides to hanging melons?
While hanging melons offers numerous benefits, there are a few potential downsides to consider:
* **Support Strength:** Ensuring the support system is strong enough to bear the weight of the melon is crucial. Failure to do so can result in the melon falling and being damaged.
* **Wind Damage:** In windy areas, hanging melons may be more susceptible to damage. Consider providing additional support or shelter to protect them from strong winds.
* **Accessibility:** Hanging melons may be slightly less accessible for harvesting compared to ground-grown melons.
* **Initial Setup:** Setting up the hanging system requires some initial effort and planning.
However, the benefits of hanging melons generally outweigh these potential downsides, especially for gardeners dealing with limited space or pest problems.
Can I hang all my melons at once, or should I wait until they reach a certain size?
It’s best to wait until the melons are a few inches in diameter before hanging them. This allows the vine to establish a strong connection with the fruit and reduces the risk of the melon detaching prematurely. Gently lift the melon into the support, ensuring it’s snug but not too tight.
What if my hanging melon falls?
If a hanging melon falls, it’s important to assess the damage. If the melon is still relatively unripe and has sustained significant damage, it’s unlikely to ripen properly. However, if the melon is close to maturity and has only minor bruising, it may still be salvageable. Store the melon in a cool, dry place and monitor it closely for signs of spoilage.
Does hanging melons help with pest control?
Yes, hanging melons can significantly reduce pest pressure, especially from ground-dwelling pests like slugs, snails, and squash bugs. By elevating the melons off the ground, you make them less accessible to these pests. However, it’s still important to monitor your plants regularly for other pests and diseases and take appropriate action if necessary.
Is hanging melon growing suitable for all climates?
Hanging melon growing can be adapted to various climates, but it’s particularly beneficial in humid climates where ground-grown melons are prone to rotting. In hotter climates, providing shade for the hanging melons can prevent them from overheating. In colder climates, starting melons indoors and transplanting them to a hanging system after the last frost can extend the growing season.


Leave a Comment