
Grow Yacon at Home: Unlock the secrets to cultivating this fascinating and healthy root vegetable right in your own backyard! Have you ever dreamt of harvesting your own naturally sweet, low-calorie treat? Well, dream no more! This DIY guide will walk you through every step, from selecting the right variety to enjoying a bountiful harvest.
Yacon, also known as the Peruvian ground apple, has a rich history rooted in the Andes Mountains, where it has been cultivated for centuries. Indigenous cultures valued it not only for its delicious flavor but also for its medicinal properties. Now, you can bring a piece of that ancient tradition to your own garden.
Why should you learn to grow Yacon at home? In today’s world, where healthy eating and sustainable living are more important than ever, Yacon offers a fantastic alternative to processed sweeteners. Plus, it’s incredibly rewarding to nurture a plant from start to finish and enjoy the fruits (or rather, roots!) of your labor. Imagine the satisfaction of sharing your homegrown Yacon with friends and family, knowing you’ve provided them with a delicious and nutritious treat. Let’s get started and transform your garden into a Yacon haven!
Growing Yacon at Home: A Beginner’s Guide
Hey there, fellow gardening enthusiasts! Ever heard of yacon? It’s this amazing South American root vegetable that’s naturally sweet and packed with prebiotics – good for your gut! I’ve been growing it for a few years now, and I’m excited to share my experience and guide you through the process of growing your own yacon at home. It’s easier than you might think!
What is Yacon, Anyway?
Before we dive in, let’s talk a little about what yacon actually is. Yacon (Smallanthus sonchifolius) is a perennial plant related to sunflowers and Jerusalem artichokes. The part we eat are the large, tuberous roots, which have a crisp, juicy texture and a mildly sweet flavor, often compared to apples or pears. The sweetness comes from fructooligosaccharides (FOS), a type of sugar that our bodies don’t fully digest, making yacon a great option for people watching their sugar intake.
Why Grow Yacon?
* Delicious and Healthy: As I mentioned, yacon is naturally sweet and full of prebiotics.
* Easy to Grow: It’s relatively low-maintenance and can thrive in various climates.
* Unique Crop: Impress your friends and family with this unusual and tasty vegetable!
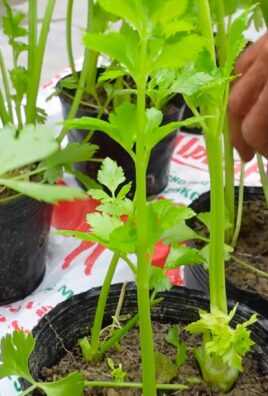
* Beautiful Plant: The plant itself is quite attractive, with large, green leaves and small, daisy-like flowers.
Getting Started: What You’ll Need
Before you start, gather these essential supplies:
* Yacon Crowns or Rhizomes: This is the most important part! You can usually find these online or at specialty nurseries. Make sure they look healthy and firm.
* Well-Draining Soil: Yacon doesn’t like soggy feet. A mix of garden soil, compost, and perlite or sand works well.
* Large Pots or Garden Bed: Yacon plants get quite large, so you’ll need plenty of space.
* Compost or Aged Manure: To enrich the soil and provide nutrients.
* Watering Can or Hose: For regular watering.
* Gardening Gloves: To protect your hands.
* Shovel or Trowel: For planting.
* Mulch (optional): To help retain moisture and suppress weeds.
Step-by-Step Guide to Growing Yacon
Okay, let’s get our hands dirty! Here’s how to grow yacon at home:
1. Choosing the Right Time to Plant
Timing is key for successful yacon growing. I’ve found that the best time to plant is in the spring, after the last frost. This gives the plants plenty of time to grow and mature before the first frost in the fall.
* For warmer climates: You can plant yacon in early spring (March-April).
* For cooler climates: Wait until late spring (May-June) to avoid frost damage.
2. Preparing the Soil
Yacon thrives in well-draining soil that’s rich in organic matter. Here’s how I prepare my soil:
1. Choose your location: Select a spot in your garden that receives at least 6-8 hours of sunlight per day.
2. Clear the area: Remove any weeds, rocks, or debris from the planting area.
3. Amend the soil: Dig in plenty of compost or aged manure to improve drainage and fertility. I usually add a layer of about 2-3 inches.
4. Loosen the soil: Use a garden fork or tiller to loosen the soil to a depth of at least 12 inches. This will make it easier for the yacon roots to grow.
3. Planting the Yacon Crowns or Rhizomes
Now comes the exciting part – planting!
1. Inspect the crowns/rhizomes: Before planting, check your yacon crowns or rhizomes for any signs of damage or disease. Discard any that look unhealthy.
2. Dig the holes: Dig holes that are about 4-6 inches deep and 18-24 inches apart. This spacing allows the plants to spread out and develop healthy roots.
3. Plant the crowns/rhizomes: Place the yacon crowns or rhizomes in the holes with the buds (the little “eyes” that will sprout) facing upwards.
4. Cover with soil: Gently cover the crowns/rhizomes with soil and pat it down lightly.
5. Water thoroughly: Water the newly planted yacon well to help settle the soil and encourage root growth.
4. Caring for Your Yacon Plants
Once your yacon plants are in the ground, it’s important to provide them with the care they need to thrive.
1. Watering: Yacon needs consistent moisture, especially during hot, dry weather. Water deeply whenever the top inch of soil feels dry. Avoid overwatering, as this can lead to root rot.
2. Fertilizing: Yacon benefits from regular feeding with a balanced fertilizer. I usually fertilize every 4-6 weeks during the growing season. You can use a liquid fertilizer or a slow-release granular fertilizer.
3. Weeding: Keep the area around your yacon plants free of weeds. Weeds compete with the yacon for nutrients and water.
4. Mulching: Apply a layer of mulch around your yacon plants to help retain moisture, suppress weeds, and regulate soil temperature. I like to use straw, wood chips, or shredded leaves.
5. Staking (optional): As yacon plants grow tall, they may need staking to prevent them from falling over, especially in windy areas.
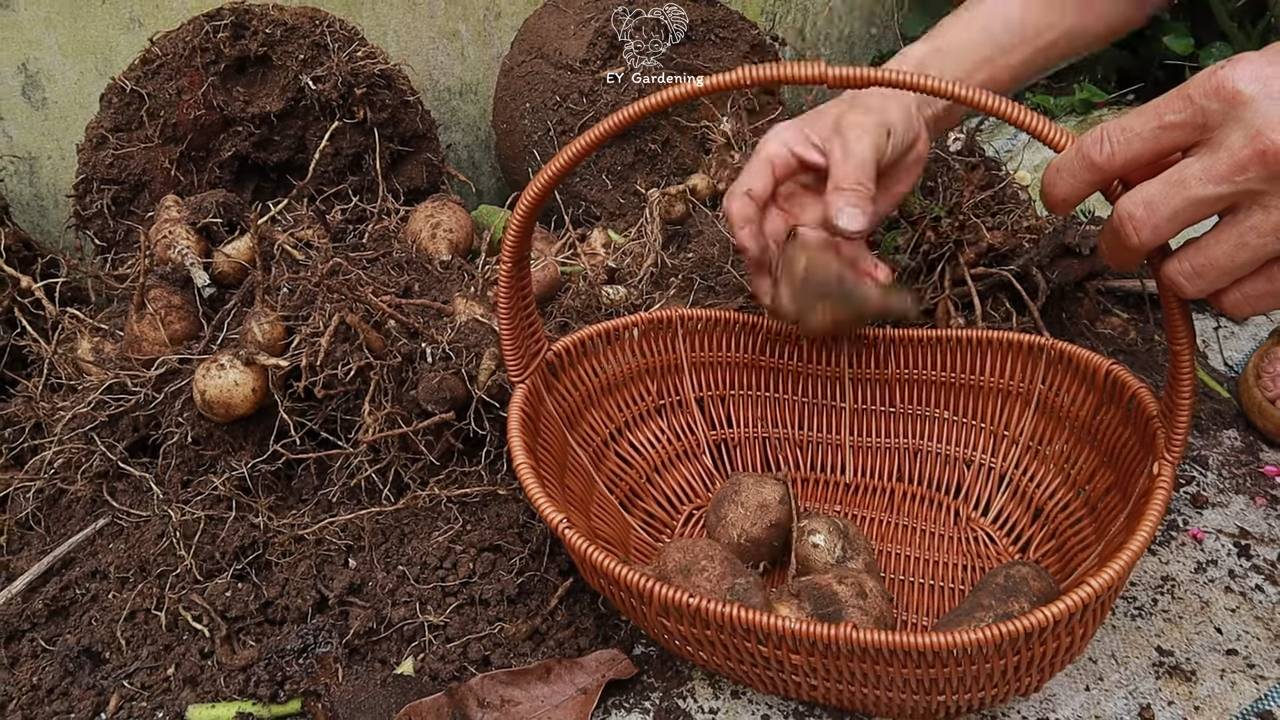
5. Harvesting Your Yacon Roots
The moment we’ve all been waiting for – harvesting! Yacon roots are typically ready to harvest in the late fall, after the first frost. The frost signals the plant to stop growing and start storing energy in the roots.
1. Wait for the frost: As I mentioned, wait until after the first frost to harvest your yacon roots.
2. Cut back the foliage: Before digging up the roots, cut back the foliage to about 6 inches above the ground.
3. Dig carefully: Use a garden fork or shovel to carefully dig around the yacon plant, being careful not to damage the roots.
4. Lift the plant: Gently lift the plant out of the ground, being sure to support the roots.
5. Separate the roots: Separate the edible tuberous roots from the rhizomes (the part you’ll use to grow more plants next year).
6. Cure the roots: Cure the roots by leaving them in the sun for a few days. This will help to sweeten them up.
6. Storing Your Yacon Roots
After harvesting and curing, it’s important to store your yacon roots properly to keep them fresh and delicious.
1. Clean the roots: Gently brush off any dirt from the roots.
2. Store in a cool, dark place: Store the roots in a cool, dark, and well-ventilated place, such as a root cellar or basement.
3. Layer with sawdust or sand: Layer the roots in boxes or containers with sawdust or sand to help prevent them from drying out.
4. Check regularly: Check the roots regularly for any signs of spoilage. Discard any that are soft or moldy.
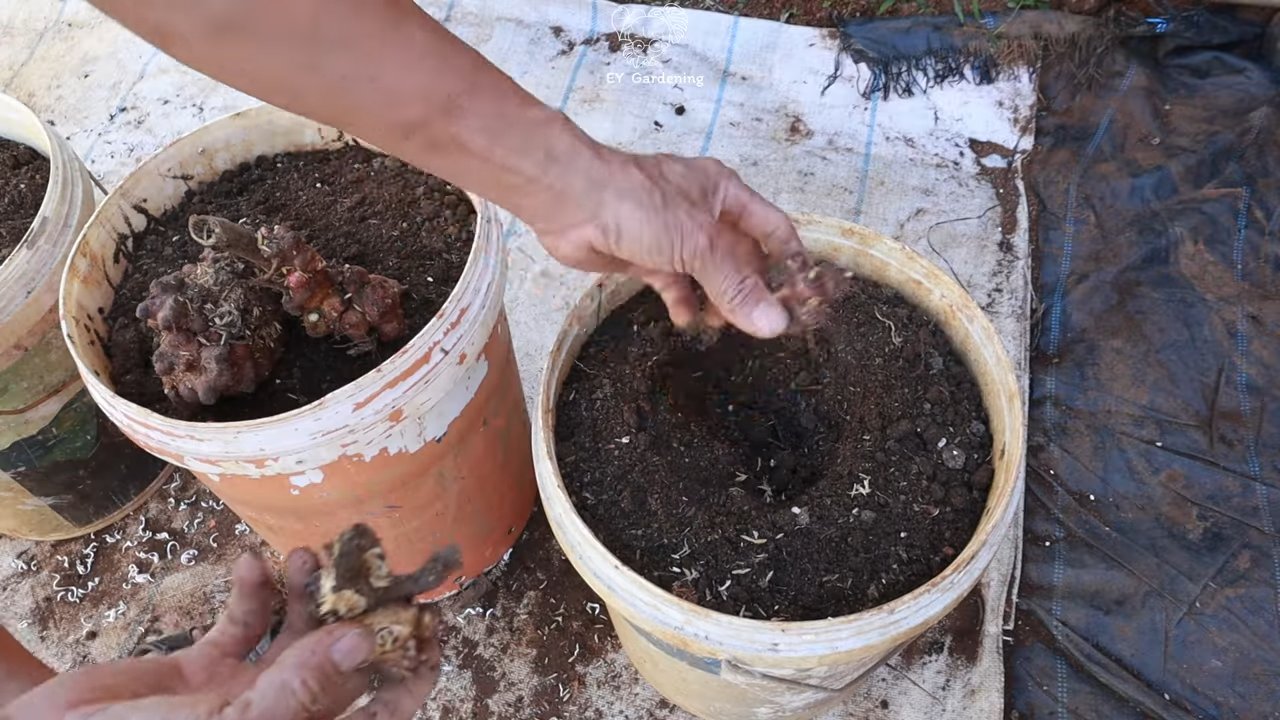
7. Saving Yacon Rhizomes for Next Year
Don’t forget to save some of the rhizomes to plant next year!
1. Select healthy rhizomes: Choose healthy, firm rhizomes with plenty of buds.
2. Store in a cool, dark place: Store the rhizomes in a cool, dark, and slightly moist place, such as a refrigerator or a cool basement.
3. Wrap in damp paper towels: Wrap the rhizomes in damp paper towels to prevent them from drying out.
4. Check regularly: Check the rhizomes regularly for any signs of spoilage. Discard any that are soft or moldy.
Troubleshooting Common Yacon Problems
Even with the best care, you might encounter some problems while growing yacon. Here are a few common issues and how to deal with them:
* Pests: Yacon is generally pest-resistant, but slugs and snails can sometimes be a problem. Use organic pest control methods, such as beer traps or diatomaceous earth, to keep them at bay.
* Diseases: Root rot can be a problem if the soil is too wet. Make sure your soil is well-draining and avoid overwatering.
* Lack of Sunlight: Yacon needs plenty of sunlight to thrive. If your plants aren’t getting enough sun, they may not produce as many roots.
* Poor Soil: Yacon needs rich, fertile soil to grow well. Amend your soil
Conclusion
So, there you have it! Growing yacon at home is not only achievable but also a deeply rewarding experience. From the initial thrill of planting the crown to the satisfaction of harvesting those crisp, juicy tubers, every step of the process connects you to the earth and provides a tangible link to your food source. We’ve walked you through the essentials, from selecting the right variety and preparing your soil to nurturing your plants and understanding the nuances of harvesting.
But why is this DIY trick a must-try? Beyond the obvious benefit of having fresh, organic yacon readily available, growing your own offers a unique opportunity to control the entire process. You know exactly what goes into your soil, what (if any) pest control measures are used, and when your yacon is perfectly ripe for harvesting. This level of control translates to a superior product, bursting with flavor and packed with nutrients. Plus, let’s be honest, there’s a certain undeniable pride that comes with serving a dish featuring ingredients you’ve cultivated yourself.
Furthermore, growing yacon at home is a sustainable practice. By reducing your reliance on commercially grown produce, you’re minimizing your carbon footprint and supporting a more localized food system. You’re also contributing to biodiversity by cultivating a less common crop in your own backyard.
Don’t be afraid to experiment with variations! Try growing yacon in raised beds for improved drainage, or explore different companion planting strategies to deter pests and enhance growth. Some gardeners have even successfully grown yacon in large containers, making it accessible even for those with limited space. Consider adding a layer of mulch around your plants to retain moisture and suppress weeds. You can also try different methods of curing your yacon tubers after harvesting to enhance their sweetness.
The possibilities are endless, and the journey is just as enjoyable as the destination. We encourage you to embrace the challenge, get your hands dirty, and discover the joy of growing yacon at home. It’s a project that offers both immediate rewards and long-term benefits, enriching your diet, your garden, and your connection to the natural world.
Now is the perfect time to start planning your yacon garden. Research local nurseries for yacon crowns or purchase them online from reputable suppliers. Prepare your soil, gather your tools, and get ready to embark on a truly fulfilling gardening adventure.
We’re confident that you’ll find growing yacon at home to be a worthwhile endeavor. But don’t just take our word for it – try it yourself! And when you do, we’d love to hear about your experience. Share your tips, your triumphs, and even your challenges in the comments below. Let’s build a community of yacon enthusiasts and learn from each other’s successes. Happy gardening!
Frequently Asked Questions (FAQ)
What exactly is yacon, and what does it taste like?
Yacon (Smallanthus sonchifolius) is a perennial plant native to the Andes region of South America. It’s cultivated for its crisp, sweet tubers, which are often compared to a cross between an apple and a watermelon. The sweetness comes from fructooligosaccharides (FOS), a type of sugar that the human body doesn’t fully digest, making yacon a lower-calorie alternative to other sweeteners. The texture is crunchy and refreshing, making it a versatile ingredient for salads, snacks, and even desserts.
Where can I buy yacon crowns to start growing?
Yacon crowns can be purchased from a variety of sources, including local nurseries, online gardening retailers, and specialty seed companies. When selecting your crowns, look for healthy, firm specimens with visible buds or sprouts. Avoid crowns that are soft, mushy, or show signs of mold or decay. Reputable suppliers will often provide information about the specific variety of yacon they are selling, which can help you choose the best option for your climate and growing conditions. Check online reviews and ratings before making a purchase to ensure you’re dealing with a reliable vendor.
What kind of soil is best for growing yacon?
Yacon thrives in well-drained, fertile soil that is rich in organic matter. Amend your soil with compost, aged manure, or other organic amendments to improve its structure and nutrient content. Yacon prefers a slightly acidic to neutral soil pH (around 6.0 to 7.0). Conduct a soil test to determine your soil’s pH and nutrient levels, and adjust accordingly. Avoid heavy clay soils, as they can become waterlogged and lead to root rot. If you have clay soil, consider growing yacon in raised beds or containers to improve drainage.
How much sunlight does yacon need?
Yacon requires at least six hours of direct sunlight per day to thrive. Choose a planting location that receives ample sunlight throughout the growing season. If you live in a particularly hot climate, some afternoon shade may be beneficial to prevent the plants from overheating. Monitor your plants closely and adjust their location if necessary to ensure they are receiving adequate sunlight.
How often should I water my yacon plants?
Yacon plants need consistent moisture, especially during hot, dry weather. Water deeply and regularly, ensuring that the soil remains consistently moist but not waterlogged. Avoid overhead watering, as this can promote fungal diseases. Use a soaker hose or drip irrigation system to deliver water directly to the roots. Mulching around your plants can help retain moisture and reduce the need for frequent watering.
When is the best time to harvest yacon?
Yacon is typically harvested in the fall, after the first frost has killed back the foliage. The tubers will continue to sweeten and mature after the frost. Carefully dig up the tubers, being careful not to damage them. Gently brush off any excess soil and allow the tubers to cure in a cool, dry place for a week or two before storing or consuming them. Curing helps to convert some of the starches into sugars, enhancing the sweetness of the tubers.
How do I store yacon tubers after harvesting?
After curing, yacon tubers can be stored in a cool, dark, and well-ventilated place, such as a root cellar or unheated garage. Wrap the tubers individually in newspaper or store them in a container filled with slightly damp sawdust or peat moss to prevent them from drying out. Check the tubers periodically for signs of spoilage and discard any that are soft or rotten. Properly stored yacon tubers can last for several months.
Are there any common pests or diseases that affect yacon?
Yacon is generally a relatively pest-resistant plant, but it can be susceptible to certain pests and diseases, such as slugs, snails, aphids, and fungal diseases like powdery mildew. Monitor your plants regularly for signs of infestation or disease and take appropriate action if necessary. Use organic pest control methods, such as hand-picking pests, applying insecticidal soap, or using neem oil. Ensure good air circulation around your plants to prevent fungal diseases.
Can I grow yacon in containers?
Yes, yacon can be successfully grown in containers, making it a great option for gardeners with limited space. Choose a large container (at least 20 gallons) with good drainage holes. Use a high-quality potting mix that is rich in organic matter. Water regularly and fertilize every few weeks with a balanced fertilizer. Place the container in a sunny location that receives at least six hours of direct sunlight per day.
What are some ways to use yacon in cooking?
Yacon is a versatile ingredient that can be used in a variety of culinary applications. It can be eaten raw, sliced into salads, or used as a crunchy snack. It can also be cooked, roasted, grilled, or added to soups and stews. Yacon syrup, made from the juice of the tubers, is a natural sweetener that can be used in place of sugar or honey. The leaves of the yacon plant can also be used to make tea. Experiment with different recipes and find your favorite ways to enjoy this unique and delicious vegetable.


Leave a Comment