
Mushroom Bowl Gardening: Ever dreamt of transforming your kitchen scraps into a thriving miniature garden? I know I have! It’s not just a whimsical idea; it’s a surprisingly simple and rewarding way to bring a touch of nature indoors. Forget those expensive gardening setups – we’re diving into the world of upcycling and creating a beautiful, edible display right in your own home.
The concept of cultivating food in unconventional containers isn’t new. Throughout history, resourceful gardeners have utilized whatever was available, from repurposed tires to old boots, to grow their own sustenance. This ingenuity reflects a deep connection to the earth and a desire to nurture life, even in limited spaces. Think of victory gardens during wartime, or the ancient practice of container gardening in urban environments – it’s all about making the most of what you have!
But why should you try Mushroom Bowl Gardening? Well, for starters, it’s incredibly eco-friendly. You’re reducing waste by giving those mushroom containers a second life. Plus, it’s a fantastic way to introduce children (or even yourself!) to the wonders of gardening. Imagine the joy of watching tiny seedlings sprout and grow, all thanks to your own efforts. Beyond the environmental and educational benefits, it’s simply a beautiful and calming addition to any home. So, let’s get our hands dirty and create something amazing!
Transforming Kitchen Scraps: A Guide to Mushroom Bowl Gardening
Hey there, fellow gardening enthusiasts! Ever thought about turning your kitchen waste into a thriving mushroom farm? Well, get ready to be amazed because I’m going to walk you through the super cool process of mushroom bowl gardening. It’s easier than you think, and the reward of harvesting your own delicious mushrooms is totally worth it. Let’s dive in!
What You’ll Need: The Essential Supplies
Before we get our hands dirty, let’s gather all the necessary materials. This will make the whole process smoother and more enjoyable.
* A Large Bowl: Choose a bowl that’s at least 8 inches in diameter and 4 inches deep. Ceramic, glass, or even a sturdy plastic bowl will work just fine. Just make sure it’s clean!
* Coffee Grounds: Used coffee grounds are the perfect substrate for oyster mushrooms. Save them up for a few days – you’ll need a good amount. Aim for about 2-3 pounds.
* Oyster Mushroom Spawn: This is the key ingredient! You can purchase oyster mushroom spawn online or from a local gardening supply store. Make sure it’s fresh and from a reputable source. I usually go for the pearl oyster variety, but feel free to experiment!
* Cardboard: Plain, corrugated cardboard is your friend. Avoid anything with glossy prints or heavy dyes. Tear it into small pieces, about 1-2 inches square.
* Spray Bottle: For keeping things nice and moist.
* Plastic Wrap or a Clear Plastic Bag: To create a humid environment.
* Rubbing Alcohol: For sanitizing your work area and tools.
* Gloves (Optional): To keep your hands clean.
* A Well-Ventilated Area: Mushrooms need fresh air, so choose a spot that’s not too stuffy.
Step-by-Step Instructions: Creating Your Mushroom Bowl
Alright, let’s get started! Follow these steps carefully, and you’ll be well on your way to harvesting your own homegrown mushrooms.
1. Sanitize Everything: This is crucial to prevent contamination. Wipe down your bowl, spray bottle, and any other tools you’ll be using with rubbing alcohol. Let them air dry completely. Trust me, a little extra sanitation goes a long way!
2. Prepare the Cardboard: Soak the cardboard pieces in hot water for about 15-20 minutes. This will help break them down and make them easier for the mushroom mycelium to colonize. After soaking, squeeze out the excess water. You want them damp, not dripping.
3. Layer the Bowl: Now, we’re going to create layers in the bowl, like a mushroom lasagna! Start with a layer of damp cardboard at the bottom.
4. Add Coffee Grounds: Spread a layer of used coffee grounds over the cardboard. Aim for about an inch thick.
5. Incorporate the Spawn: Sprinkle a generous amount of oyster mushroom spawn over the coffee grounds. Don’t be shy! The more spawn you use, the faster the colonization process will be.
6. Repeat the Layers: Continue layering cardboard, coffee grounds, and spawn until you reach the top of the bowl. Make sure the final layer is a thin layer of coffee grounds.
7. Cover and Incubate: Cover the bowl with plastic wrap or place it inside a clear plastic bag. This will help maintain humidity. Poke a few small holes in the plastic for ventilation.
8. Find the Right Spot: Place the bowl in a dark, cool, and well-ventilated area. A basement, closet, or even under the sink can work well. The ideal temperature is between 65-75°F (18-24°C).
9. Monitor and Mist: Check the bowl every few days. The coffee grounds should stay moist but not soggy. If they seem dry, mist them lightly with water from your spray bottle.
The Waiting Game: Colonization and Pinning
This is where patience comes in. The mushroom mycelium needs time to colonize the substrate.
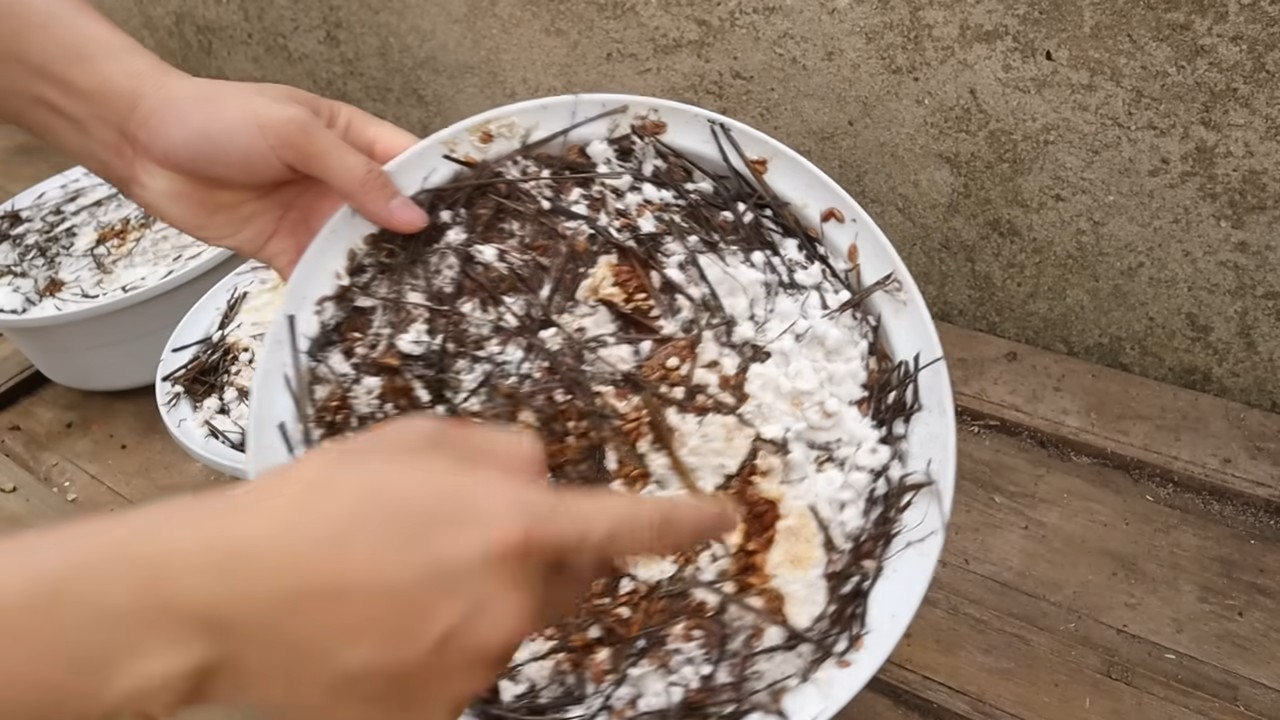
10. Observe Mycelial Growth: After a week or two, you should start to see white, fuzzy growth spreading throughout the coffee grounds and cardboard. This is the mycelium, the vegetative part of the mushroom. It looks like a network of tiny threads.
11. Maintain Humidity: Continue to monitor the moisture levels and mist as needed. The humidity is crucial for successful colonization.
12. Introduce Light: Once the mycelium has fully colonized the bowl (it should be mostly white), it’s time to introduce some light. Move the bowl to a location with indirect sunlight. This will trigger the formation of “pins,” which are tiny baby mushrooms.
Harvest Time: Enjoying Your Homegrown Mushrooms
The moment you’ve been waiting for! Harvesting your own mushrooms is incredibly satisfying.
13. Watch for Pin Formation: Keep an eye out for small, button-like mushrooms (pins) to start forming. These will grow rapidly over the next few days.
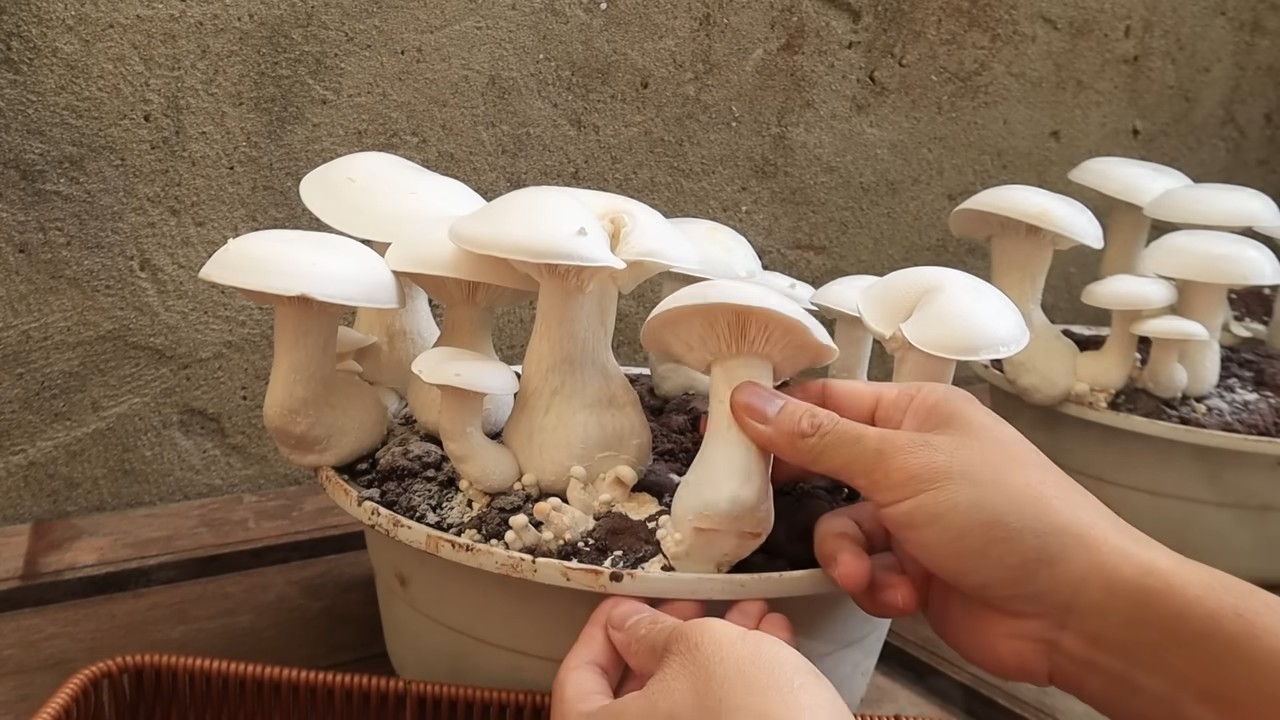
14. Harvest at the Right Time: Harvest the mushrooms when the caps are still slightly curled downwards. This is when they’re at their peak flavor and texture.
15. Harvesting Technique: To harvest, gently twist and pull the mushrooms from the base. Avoid cutting them, as this can leave behind a stump that can rot.
16. Enjoy Your Harvest: Now, the best part! Cook your freshly harvested oyster mushrooms in your favorite recipes. They’re delicious sautéed, grilled, or added to soups and stews.
Troubleshooting: Common Issues and Solutions
Even with the best intentions, things can sometimes go wrong. Here are a few common issues you might encounter and how to fix them.
* Contamination: If you see green, black, or other colored mold growing in your bowl, it’s likely contaminated. Unfortunately, you’ll need to discard the entire batch. Prevention is key – sanitize everything thoroughly!
* Slow Colonization: If the mycelium is growing slowly, it could be due to low temperatures or lack of humidity. Make sure the bowl is in a warm, humid environment.
* No Pin Formation: If the mycelium has colonized the bowl but no pins are forming, it could be due to lack of light or fresh air. Move the bowl to a location with indirect sunlight and ensure good ventilation.
* Dry Substrate: If the coffee grounds are drying out too quickly, mist them more frequently. You can also try covering the bowl with a slightly damp cloth to help retain moisture.
* Fruit Flies: These little pests can be attracted to the coffee grounds. Keep the bowl covered and make sure to clean up any spilled coffee grounds. You can also use a fruit fly trap to control the population.
Extending the Harvest: Subsequent Flushes
The good news is, you can often get multiple harvests (flushes) from your mushroom bowl.
17. Prepare for the Next Flush: After harvesting the first flush, gently remove any remaining mushroom stems from the bowl.
18. Rehydrate the Substrate: Soak the entire bowl in cool water for a few hours. This will rehydrate the coffee grounds and cardboard, providing the mycelium with the moisture it needs to produce another flush.
19. Drain and Repeat: Drain the excess water and place the bowl back in its original location. Repeat the monitoring and misting process.
20. Enjoy More Mushrooms: You should see another flush of mushrooms forming within a few weeks. The subsequent flushes may be smaller than the first, but they’re still a welcome bonus!
Tips and Tricks for Success
Here are a few extra tips and tricks I’ve learned along the way to help you maximize your mushroom growing success:
* Use Fresh Coffee Grounds: The fresher the coffee grounds, the better. They contain more nutrients for the mushrooms.
* Experiment with Different Substrates: While coffee grounds are a great option, you can also experiment with other substrates like straw, sawdust, or even shredded paper.
* Maintain a Clean Environment: Keep your growing area clean and free of debris to minimize the risk of contamination.
* Document Your Progress: Take notes on your process, including the temperature, humidity, and any challenges you encounter. This will help you learn from your mistakes and improve your results in the future.
* Join a Mushroom Growing Community: Connect with other mushroom growers online or in your local area. You can share tips, ask questions, and learn from each other’s experiences.
Beyond the Bowl: Expanding Your Mushroom Growing Adventures
Once you’ve mastered the mushroom bowl technique, you can explore other mushroom growing methods, such as growing mushrooms in logs, straw bales, or even in your garden. The possibilities are endless!
Mushroom bowl gardening is a fun, rewarding, and sustainable way to grow your own food. It’s a great way to reduce waste, learn about the fascinating world of
Conclusion
So, there you have it! Transforming a simple bowl into a thriving mushroom garden is not only surprisingly easy but also incredibly rewarding. Forget those expensive, pre-packaged mushroom kits that often yield disappointing results. With this DIY mushroom bowl gardening trick, you’re in control, from selecting your preferred mushroom variety to nurturing its growth every step of the way.
Why is this a must-try? Because it offers a sustainable, cost-effective, and deeply satisfying way to enjoy fresh, homegrown mushrooms. Imagine the pride of harvesting your own oyster mushrooms for a creamy pasta sauce, or adding shiitakes to a flavorful stir-fry, all cultivated right in your kitchen. This isn’t just about growing food; it’s about connecting with nature, learning about the fascinating world of fungi, and reducing your reliance on store-bought produce.
But the beauty of this method lies in its adaptability. Feel free to experiment with different substrates. While straw and coffee grounds are excellent starting points, you could also try using hardwood sawdust (for certain mushroom species) or even shredded cardboard. Consider adding a small amount of gypsum to your substrate mix to help regulate pH and improve nutrient availability.
Variations abound! If you’re feeling adventurous, try creating a tiered mushroom bowl garden by stacking multiple bowls on top of each other, creating a visually stunning and highly productive growing space. You can also explore different mushroom species beyond oyster and shiitake. Lion’s mane, wine cap, and even some varieties of button mushrooms can be successfully grown using this method, although they may require slightly different conditions.
Don’t be afraid to get your hands dirty and embrace the learning process. Mushroom cultivation can be a bit of a science, but it’s also an art. Pay attention to your mushrooms, observe their growth patterns, and adjust your watering and ventilation accordingly. Remember, patience is key. It may take a few weeks for your mushrooms to start fruiting, but the wait will be well worth it when you harvest your first delicious crop.
We wholeheartedly encourage you to try this DIY mushroom bowl gardening trick. It’s a fun, educational, and ultimately delicious project that will bring a touch of the forest into your home. And most importantly, share your experiences with us! We’d love to hear about your successes, your challenges, and any creative variations you come up with. Post photos of your mushroom bowls on social media using #MushroomBowlGardening and let’s build a community of home mushroom growers. Let’s cultivate a world where fresh, homegrown mushrooms are accessible to everyone!
Frequently Asked Questions (FAQ)
What types of mushrooms are best for bowl gardening?
Oyster mushrooms (Pleurotus ostreatus) are generally considered the easiest and most forgiving for beginners. They are fast-growing, tolerate a wide range of conditions, and produce abundant yields. Shiitake mushrooms (Lentinula edodes) are another popular choice, although they require a slightly more controlled environment and a hardwood-based substrate. Other options to explore include lion’s mane (Hericium erinaceus), wine cap (Stropharia rugosoannulata), and even some varieties of button mushrooms (Agaricus bisporus), but these may require more specialized knowledge and techniques. Always research the specific needs of the mushroom species you choose to ensure optimal growth.
What kind of bowl should I use?
Almost any bowl can work, as long as it’s clean and food-grade. Plastic, ceramic, or even glass bowls are all suitable. The size of the bowl will depend on the amount of substrate you want to use and the desired yield. A bowl with a diameter of 8-12 inches is a good starting point. Make sure the bowl has drainage holes to prevent waterlogging, which can lead to mold and other problems. If your bowl doesn’t have drainage holes, you can drill a few small holes in the bottom.
What is the best substrate for mushroom bowl gardening?
A mixture of pasteurized straw and coffee grounds is a popular and effective substrate for oyster mushrooms. The straw provides a carbon source, while the coffee grounds add nitrogen and other nutrients. You can also use hardwood sawdust, shredded cardboard, or even a combination of these materials. The key is to ensure that the substrate is properly pasteurized to kill any competing organisms that could inhibit mushroom growth. Pasteurization can be achieved by soaking the substrate in hot water (around 160-180°F) for several hours.
How do I pasteurize the substrate?
Pasteurizing the substrate is crucial to eliminate competing molds and bacteria that can hinder mushroom growth. There are several methods you can use:
* **Hot Water Pasteurization:** This is the most common method. Place your substrate (straw, coffee grounds, etc.) in a heat-resistant container. Pour boiling water over the substrate until it’s completely submerged. Let it soak for at least 1-2 hours, or even overnight. Drain the excess water thoroughly before using the substrate.
* **Steam Pasteurization:** If you have a steamer, you can steam the substrate for about 1-2 hours. This method is gentler than hot water pasteurization and can help preserve some of the beneficial nutrients in the substrate.
* **Microwave Pasteurization:** For smaller quantities of substrate, you can microwave it in a microwave-safe container with a small amount of water for a few minutes. Be careful not to overheat the substrate, as this can damage it.
How do I introduce the mushroom spawn to the substrate?
Once the substrate has cooled down to room temperature, it’s time to introduce the mushroom spawn. Break up the spawn into small pieces and mix it thoroughly with the substrate. Aim for a spawn rate of around 5-10% of the total substrate volume. For example, if you have 10 pounds of substrate, you would use 0.5-1 pound of spawn. Pack the inoculated substrate firmly into the bowl, leaving a few inches of space at the top.
What are the ideal growing conditions for mushroom bowl gardening?
Mushrooms generally prefer cool, humid, and dark environments. The ideal temperature range for most oyster mushrooms is between 60-75°F. Maintain a humidity level of 80-90% by misting the substrate regularly with water. Place the bowl in a location that receives indirect light or no light at all. A basement, closet, or even under the sink can be suitable locations.
How often should I water my mushroom bowl?
The frequency of watering will depend on the humidity level and the type of substrate you’re using. Generally, you should mist the substrate with water once or twice a day to keep it moist but not waterlogged. The substrate should feel damp to the touch, but not dripping wet. If you live in a dry climate, you may need to water more frequently.
How long does it take for mushrooms to grow in a bowl garden?
The time it takes for mushrooms to fruit will vary depending on the species, the growing conditions, and the quality of the spawn. Oyster mushrooms typically start fruiting within 1-2 weeks of inoculation, while shiitake mushrooms may take several weeks or even months. Be patient and continue to provide the mushrooms with the ideal growing conditions.
How do I harvest the mushrooms?
Harvest the mushrooms when the caps are fully developed but before they start to release spores. Gently twist or cut the mushrooms off the substrate at the base of the stem. Be careful not to damage the surrounding mycelium, as this can affect future flushes.
Can I get multiple harvests from a mushroom bowl?
Yes, you can typically get multiple harvests, or “flushes,” from a mushroom bowl. After harvesting the first flush, continue to provide the mushrooms with the ideal growing conditions. You may need to rehydrate the substrate by soaking it in water for a few hours. Subsequent flushes may be smaller than the first, but you can often get several harvests from a single bowl.
What if my mushroom bowl gets moldy?
Mold is a common problem in mushroom cultivation, but it doesn’t necessarily mean that your project is ruined. If you see small patches of mold, you can try to remove them with a clean spoon or knife. Increase ventilation and reduce humidity to prevent further mold growth. If the mold is widespread, it’s best to discard the entire bowl and start over.
Where can I buy mushroom spawn?
Mushroom spawn can be purchased from a variety of sources, including online retailers, garden centers, and specialty mushroom suppliers. Make sure to buy spawn from a reputable source to ensure that it is of high quality and free from contaminants.
Is mushroom bowl gardening safe?
Yes, mushroom bowl gardening is generally safe, as long as you follow a few basic precautions. Always use clean materials and equipment to prevent contamination. Wash your hands thoroughly after handling the substrate or mushrooms. And most importantly, only consume mushrooms that you have positively identified as edible. If you are unsure about the identity of a mushroom, do not eat it.
Leave a Comment