
Water-Free Mustard Greens DIY: Imagine harvesting vibrant, peppery mustard greens right from your backyard, even when water is scarce! Sounds like a dream, right? Well, get ready to wake up because this DIY guide is about to make that dream a reality. For centuries, resourceful gardeners have sought ways to cultivate delicious and nutritious crops with minimal resources. From ancient arid farming techniques to modern-day permaculture, the quest for water-wise gardening solutions is deeply rooted in our history.
But why should you care about growing mustard greens without constant watering? In today’s world, water conservation is more crucial than ever. Whether you’re facing drought conditions, aiming to reduce your environmental footprint, or simply looking for a low-maintenance gardening option, this water-free mustard greens DIY method is a game-changer. I’m going to show you a simple, effective technique that allows you to enjoy fresh, flavorful mustard greens with significantly less water than traditional gardening methods. Get ready to ditch the daily watering routine and embrace a more sustainable and rewarding gardening experience!
Growing Mustard Greens Indoors Without Soil: A Water-Free Adventure!
Hey there, fellow gardening enthusiasts! Are you craving fresh, peppery mustard greens but don’t have the space for a traditional garden, or maybe you just want to try something a little different? Well, buckle up because I’m about to share my favorite method for growing mustard greens indoors – completely water-free! Yes, you read that right. We’re ditching the soil and the watering can for this project. It’s surprisingly easy, super rewarding, and a fantastic way to get your daily dose of greens.
This method is perfect for small spaces, apartment dwellers, or anyone who wants a low-maintenance way to grow their own food. Plus, it’s a great conversation starter! So, let’s dive in and get our hands… well, not dirty, but definitely green!
What You’ll Need
Before we get started, let’s gather our supplies. The beauty of this method is that you probably already have most of these items lying around the house.
* Mustard Green Seeds: Choose your favorite variety! I personally love the ‘Red Giant’ for its beautiful color and spicy flavor, but ‘Florida Broadleaf’ is a classic choice too.
* Wide-Mouth Mason Jars: These are our growing containers. I recommend using at least three or four jars so you can stagger your planting and have a continuous harvest.
* Sprouting Lids or Cheesecloth & Rubber Bands: These will cover the jars and allow for drainage and airflow. Sprouting lids are super convenient, but cheesecloth works just as well.
* Spray Bottle: This is our “watering can” for this water-free method. We’ll be misting the seeds and sprouts to keep them hydrated.
* Dark Towel or Cupboard: Mustard greens need darkness to germinate, so we’ll need a way to block out the light for the first few days.
* A Well-Lit Area: Once the seeds sprout, they’ll need plenty of light to grow. A sunny windowsill or a grow light will work perfectly.
* Measuring Spoons: For measuring the seeds.
* Bowl: For pre-soaking the seeds.
Pre-Soaking the Seeds: The Key to Germination
This is a crucial step, so don’t skip it! Soaking the seeds helps to kickstart the germination process and ensures that they sprout evenly.
1. Measure Your Seeds: For each mason jar, I usually use about 1-2 teaspoons of mustard green seeds. You don’t need a ton, as they’ll expand quite a bit.
2. Rinse the Seeds: Place the seeds in a bowl and rinse them thoroughly with cool water. This removes any debris or dust that might be clinging to them.
3. Soak the Seeds: Cover the seeds with fresh, cool water. Make sure the water level is at least twice the height of the seeds, as they’ll absorb a lot of water.
4. Let Them Soak: Let the seeds soak for 8-12 hours. I usually soak them overnight so they’re ready to go in the morning. You’ll notice that the seeds will swell up and become slightly gelatinous. This is perfectly normal!
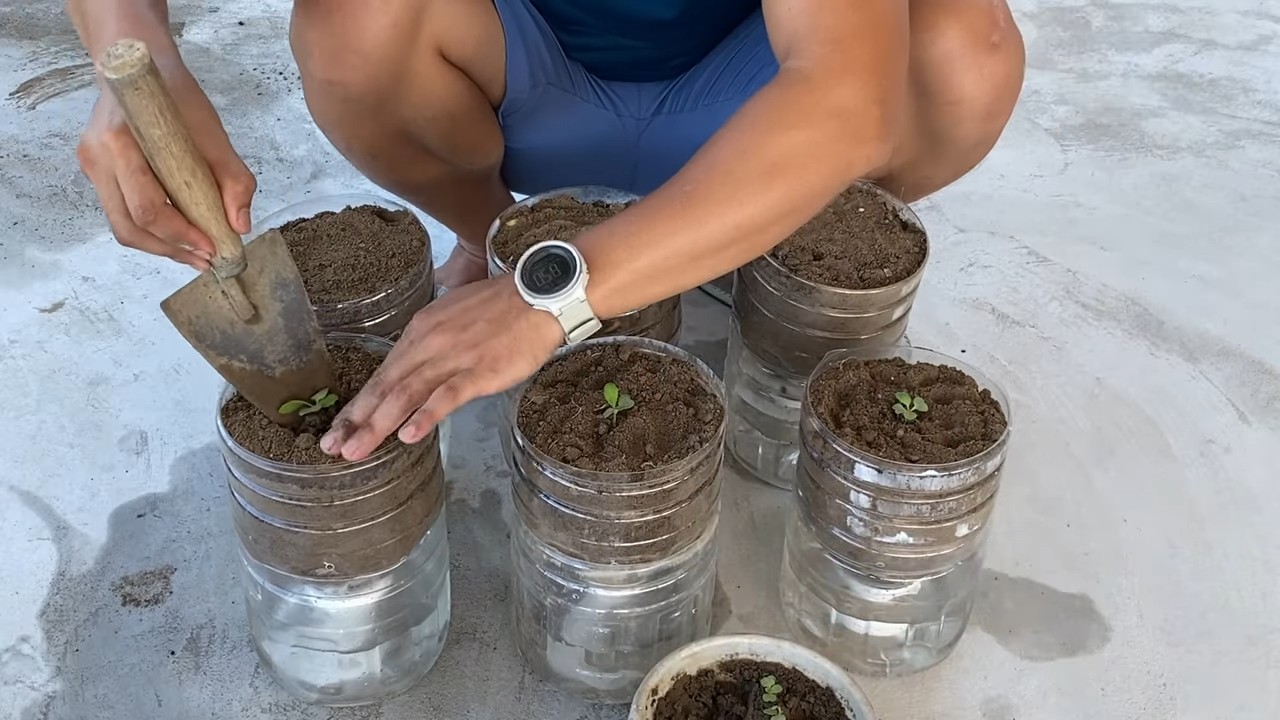
Planting Your Mustard Greens: Setting Up the Jars
Now that our seeds are prepped and ready, it’s time to plant them in our mason jars.
1. Drain the Seeds: After soaking, drain the seeds thoroughly using a fine-mesh sieve or by carefully pouring them through the sprouting lid or cheesecloth.
2. Transfer to Jars: Divide the soaked seeds evenly among your mason jars.
3. Spread the Seeds: Gently spread the seeds around the bottom of the jar. You don’t want them to be too crowded, as this can lead to mold growth.
4. Cover the Jars: Secure the sprouting lids or cheesecloth and rubber bands onto the jars.
5. Rinse Again: Give the seeds one final rinse with cool water. This helps to remove any remaining debris and ensures that they’re properly hydrated.
6. Drain Thoroughly: Drain all the excess water from the jars. This is important to prevent the seeds from rotting.
The Dark Period: Encouraging Germination
Mustard greens, like many seeds, prefer darkness for germination. This mimics the conditions they would experience underground in a traditional garden.
1. Place in Darkness: Place the jars in a dark cupboard or cover them with a dark towel. Make sure they’re in a place where they won’t be disturbed.
2. Mist Twice a Day: This is where the “water-free” part comes in! Instead of soaking the seeds, we’ll be misting them twice a day with our spray bottle. This provides the moisture they need to germinate without overwatering them.
3. Drain After Misting: After misting, make sure to drain any excess water from the jars. Again, we want to avoid standing water.
4. Maintain Darkness: Continue misting and draining twice a day for 2-3 days, or until you see the seeds starting to sprout.
The Light Phase: Promoting Growth
Once the seeds have sprouted, it’s time to introduce them to light! This is when they’ll start to develop their characteristic green color and grow into delicious mustard greens.
1. Move to Light: Move the jars to a well-lit area, such as a sunny windowsill or under a grow light.
2. Continue Misting: Continue misting the sprouts twice a day, making sure to drain any excess water.
3. Rotate the Jars: Rotate the jars regularly to ensure that all sides of the sprouts receive equal light. This will prevent them from becoming leggy and growing towards the light source.
4. Observe and Adjust: Keep an eye on your mustard greens and adjust the misting frequency as needed. If they seem dry, mist them more often. If they seem too wet, mist them less often.
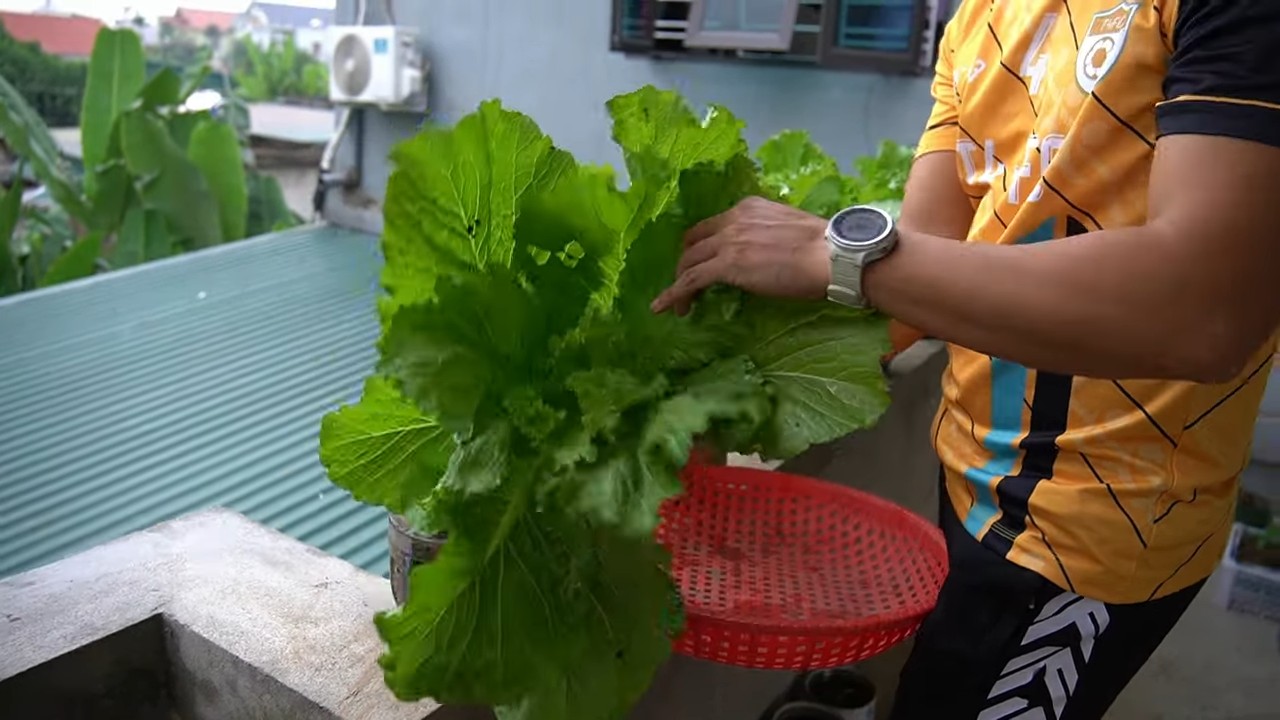
Harvesting Your Mustard Greens: Enjoying the Fruits (or Greens!) of Your Labor
After about 7-14 days, your mustard greens will be ready to harvest! They should be about 2-3 inches tall and have a good amount of leaves.
1. Harvesting Options: You have two main options for harvesting:
* Cut and Come Again: This is my preferred method. Simply snip off the top leaves with scissors, leaving the bottom leaves intact. The plant will continue to grow and produce more leaves, giving you multiple harvests.
* Harvest All at Once: If you prefer, you can harvest all the mustard greens at once by cutting them off at the base.
2. Rinse and Enjoy: Rinse the harvested mustard greens thoroughly with cool water to remove any remaining seed husks.
3. Storage: Store the harvested mustard greens in a sealed container in the refrigerator. They should last for about a week.
4. Enjoy Your Harvest: Now comes the best part – enjoying your homegrown mustard greens! They’re delicious in salads, sandwiches, stir-fries, or as a side dish.
Troubleshooting: Common Issues and Solutions
Even with the best intentions, sometimes things don’t go exactly as planned. Here are a few common issues you might encounter and how to fix them:
* Mold Growth: This is usually caused by overwatering or poor airflow. Make sure you’re draining the jars thoroughly after misting and that the seeds aren’t too crowded. If you see mold, remove the affected seeds and rinse the remaining ones with a diluted hydrogen peroxide solution (1 part hydrogen peroxide to 10 parts water).
* Slow Germination: This could be due to a few factors, such as old seeds, insufficient soaking, or too little warmth. Make sure your seeds are fresh and that you’re soaking them for the recommended amount of time. Also, try placing the jars in a slightly warmer location.
* Leggy Growth: This is usually caused by insufficient light. Make sure your mustard greens are getting plenty of light, either from a sunny windowsill or a grow light. Rotate the jars regularly to ensure that all sides receive equal light.
* Dry Sprouts: If your sprouts seem dry, increase the misting frequency. You may also need to adjust the humidity in your growing area.
Tips and Tricks for Success
Here are a few extra tips and tricks to help you succeed with your water-free mustard green growing adventure:
* Stagger Your Planting: Plant a new batch of seeds every few days to ensure a continuous harvest.
* Experiment with Different Varieties: Try growing different varieties of mustard greens to find your favorites.
* Use Filtered Water: Using filtered water for misting can help to prevent mineral buildup on the sprouts.
* Clean Your Jars Regularly: Wash your mason jars thoroughly between plantings to prevent the buildup of bacteria and mold.
*
Conclusion
So, there you have it! Mastering the art of water-free mustard greens preparation is not just a culinary hack; it’s a game-changer for anyone who loves this vibrant and nutritious vegetable. By sidestepping the traditional boiling method, you unlock a world of flavor and texture that you simply can’t achieve otherwise. Think of it: no more soggy, bland greens leaching their precious nutrients into the cooking water. Instead, you get intensely flavored, slightly crisp, and incredibly healthy mustard greens that are ready to elevate any meal.
This DIY trick is a must-try because it’s not only incredibly simple but also remarkably effective. It preserves the natural bitterness of the mustard greens, which is a key component of their unique flavor profile, while simultaneously mellowing it out to a palatable level. The result is a dish that’s both bold and balanced, a testament to the power of mindful cooking.
But the beauty of this method lies in its versatility. Feel free to experiment with different seasonings and flavor combinations. A splash of rice vinegar and a drizzle of sesame oil can add an Asian-inspired twist. A pinch of red pepper flakes can kick up the heat. Or, for a Southern-style variation, try adding a touch of smoked paprika and a dollop of your favorite hot sauce. You can also incorporate other vegetables like garlic, ginger, or onions for added depth of flavor. Consider adding protein like crumbled bacon, diced ham, or even tofu for a complete and satisfying meal.
The possibilities are truly endless, and that’s what makes this water-free mustard greens technique so exciting. It’s a blank canvas for your culinary creativity, an invitation to explore new flavors and textures.
We wholeheartedly encourage you to give this DIY trick a try. It’s a simple yet profound way to transform your mustard greens from ordinary to extraordinary. And once you’ve experienced the difference, we’re confident that you’ll never go back to the old way of cooking them.
Don’t just take our word for it, though. The real magic happens in your own kitchen. So, gather your ingredients, follow the steps, and prepare to be amazed. And most importantly, we want to hear about your experience! Share your photos, your variations, and your thoughts in the comments below. Let’s create a community of water-free mustard greens enthusiasts and inspire each other with our culinary creations. We can’t wait to see what you come up with!
Frequently Asked Questions (FAQ)
What exactly are water-free mustard greens, and why should I cook them this way?
Water-free mustard greens refer to cooking mustard greens without boiling them in water. Traditional methods often involve boiling, which can leach out nutrients and dilute the flavor. Cooking them without water, typically through steaming, sautéing, or braising in their own juices, concentrates the flavor, preserves nutrients, and results in a more appealing texture. You should cook them this way for a healthier and tastier dish.
What kind of mustard greens work best with this method?
This method works well with most varieties of mustard greens, including curly mustard greens, flat leaf mustard greens, and even the more pungent varieties. The key is to adjust the cooking time and seasonings to your personal preference. If you’re using a particularly strong variety, you might consider adding a touch of sweetness, like a drizzle of honey or maple syrup, to balance the bitterness.
How do I properly wash and prepare the mustard greens before cooking them water-free?
Thoroughly washing your mustard greens is crucial, regardless of the cooking method. Fill a large bowl or sink with cold water. Submerge the greens and gently swish them around to dislodge any dirt or grit. Lift the greens out of the water, leaving the sediment behind. Repeat this process until the water runs clear. Once washed, pat the greens dry with a clean towel or spin them in a salad spinner. Remove any tough stems or discolored leaves. You can chop the greens into smaller pieces for easier cooking and eating, or leave them whole if you prefer.
What are some alternative cooking methods for water-free mustard greens besides steaming?
While steaming is a popular choice, you can also sauté or braise your mustard greens without water. For sautéing, heat a little oil in a large skillet or wok over medium-high heat. Add the greens and stir-fry until they wilt and become tender. For braising, add a small amount of broth or other liquid to the skillet along with the greens, cover, and simmer until tender.
How long should I cook the mustard greens using the water-free method?
The cooking time will vary depending on the method you choose and the tenderness you prefer. Steaming typically takes 5-10 minutes, sautéing takes 3-5 minutes, and braising takes 10-15 minutes. The greens are done when they are tender but still slightly firm. Avoid overcooking, as this can make them mushy.
What seasonings and flavorings go well with water-free mustard greens?
Mustard greens are incredibly versatile and pair well with a wide range of seasonings and flavorings. Garlic, ginger, onions, and shallots are all excellent choices. For a savory flavor, try adding soy sauce, oyster sauce, or fish sauce. For a spicy kick, add red pepper flakes, chili oil, or your favorite hot sauce. A touch of acidity, like vinegar or lemon juice, can also brighten the flavor. Don’t be afraid to experiment and find your own favorite combinations.
Can I add other vegetables to my water-free mustard greens dish?
Absolutely! Adding other vegetables can enhance the flavor and nutritional value of your dish. Some popular choices include garlic, ginger, onions, bell peppers, mushrooms, and tomatoes. You can add these vegetables at the beginning of the cooking process, along with the mustard greens, or add them later for a slightly different texture.
How do I store leftover water-free mustard greens?
Store leftover water-free mustard greens in an airtight container in the refrigerator for up to 3-4 days. Reheat them gently in a skillet or microwave before serving.
Can I freeze water-free mustard greens?
While you can freeze cooked mustard greens, the texture may change slightly upon thawing. To freeze, allow the greens to cool completely, then transfer them to a freezer-safe container or bag. Remove as much air as possible to prevent freezer burn. Frozen mustard greens can be stored for up to 2-3 months.
What are the health benefits of eating mustard greens?
Mustard greens are packed with nutrients, including vitamins A, C, and K, as well as folate, calcium, and fiber. They are also a good source of antioxidants, which can help protect your body against damage from free radicals. Eating mustard greens can help boost your immune system, improve your bone health, and reduce your risk of chronic diseases.
Leave a Comment