
Growing bush beans in pots might sound intimidating, especially if you’re new to gardening, but trust me, it’s easier than you think! Imagine stepping outside your door and harvesting fresh, crisp bush beans for dinner, all grown right on your patio or balcony. No sprawling garden needed!
For centuries, container gardening has allowed people to cultivate food even in the most limited spaces. From ancient rooftop gardens in Babylon to modern urban farming initiatives, the desire to connect with nature and grow our own food is deeply ingrained in human history. And while sprawling fields of beans are beautiful, sometimes all we have is a pot and a dream.
That’s where this DIY guide comes in. Maybe you live in an apartment with limited outdoor space, or perhaps you just want to keep your beans close at hand for easy harvesting. Whatever your reason, growing bush beans in pots is a fantastic way to enjoy fresh, homegrown produce without the commitment of a large garden. I’m going to walk you through everything you need to know, from choosing the right pot and soil to watering and fertilizing, so you can enjoy a bountiful harvest of delicious bush beans. Get ready to get your hands dirty and experience the joy of growing your own food!
Growing Bush Beans in Pots: A Complete DIY Guide
Hey there, fellow gardening enthusiasts! I’m so excited to share my experience growing bush beans in pots. It’s a fantastic way to enjoy fresh, homegrown beans even if you don’t have a sprawling garden. Trust me, it’s easier than you think, and the reward of snapping those crisp, homegrown beans right off the plant is totally worth it. Let’s dive in!
Choosing the Right Pot and Soil
Before we get our hands dirty, let’s talk about the essentials: the pot and the soil. These are crucial for healthy bean plants.
* Pot Size Matters: Bush beans don’t need a ton of space, but they do need enough room for their roots to spread. I recommend a pot that’s at least 12 inches in diameter and 12 inches deep. This gives them ample space to thrive. You can definitely go bigger, but that’s a good starting point.
* Drainage is Key: Make sure your pot has drainage holes! Beans hate sitting in soggy soil, which can lead to root rot. If your pot doesn’t have enough drainage, you can drill a few extra holes in the bottom.
* Choosing the Right Soil: Don’t just grab any old dirt from your backyard. Bush beans need well-draining, nutrient-rich soil. I always use a good quality potting mix specifically designed for containers. These mixes usually contain a blend of peat moss, perlite, and vermiculite, which helps with drainage and aeration. You can also amend your potting mix with compost for added nutrients.
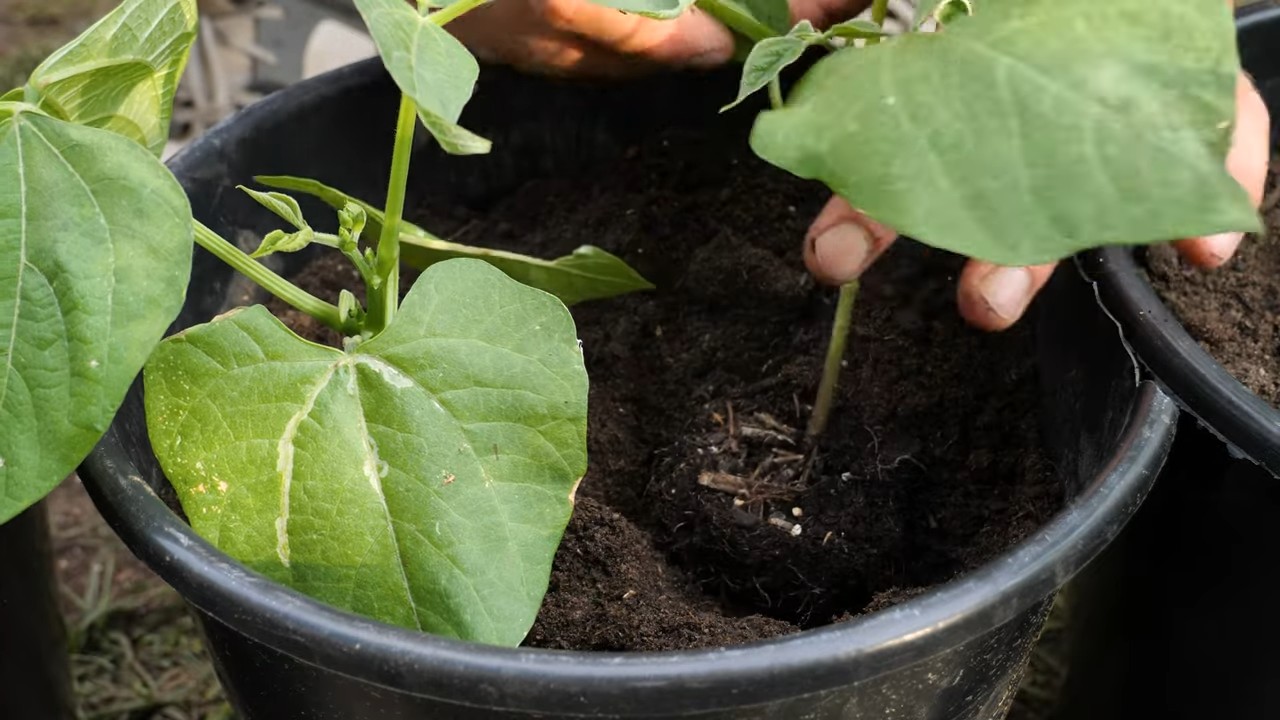
Planting Your Bush Bean Seeds
Now for the fun part – planting! This is where the magic begins.
1. Gather Your Supplies: You’ll need your chosen pot, potting mix, bush bean seeds, a trowel, and a watering can.
2. Fill the Pot: Fill your pot with potting mix, leaving about an inch or two of space at the top. Gently pat the soil down to remove any air pockets.
3. Sow the Seeds: Bush beans are pretty easy to germinate. I usually plant the seeds about 1 inch deep and 2-3 inches apart. You can plant several seeds in a single pot, but don’t overcrowd them. A good rule of thumb is about 4-6 plants in a 12-inch pot.
4. Water Gently: After planting, water the soil gently until it’s evenly moist. Be careful not to overwater, as this can cause the seeds to rot.
5. Find a Sunny Spot: Bush beans need at least 6-8 hours of sunlight per day. Place your pot in a sunny location where it will receive plenty of light. A south-facing balcony or patio is ideal.
Caring for Your Bush Bean Plants
Once your seeds have sprouted, it’s time to provide them with the care they need to grow strong and produce lots of delicious beans.
* Watering: Water your bean plants regularly, especially during hot, dry weather. The soil should be consistently moist, but not soggy. I usually check the soil moisture by sticking my finger about an inch deep. If it feels dry, it’s time to water.
* Fertilizing: Bush beans are relatively light feeders, but they will benefit from occasional fertilization. I like to use a balanced liquid fertilizer diluted to half strength every 2-3 weeks. You can also use a slow-release fertilizer at planting time.
* Support (Optional): Bush beans are generally self-supporting, but if your plants start to get leggy or top-heavy, you can provide them with some support. A small tomato cage or a few stakes will do the trick.
* Pest Control: Keep an eye out for common bean pests like aphids, bean beetles, and spider mites. If you spot any pests, you can try spraying them with insecticidal soap or neem oil. I prefer to use organic pest control methods whenever possible.
* Weeding: Keep your pot free of weeds, as they can compete with your bean plants for nutrients and water. Hand-pull any weeds that pop up.
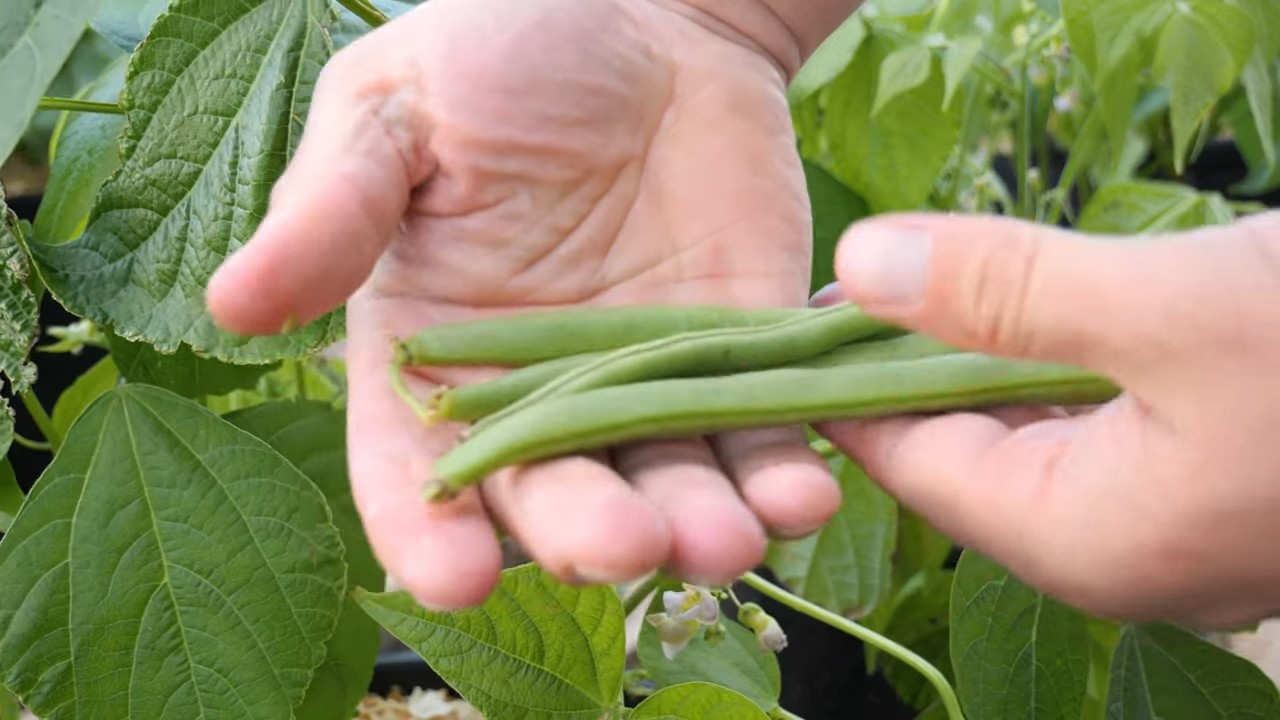
Harvesting Your Bush Beans
This is the moment you’ve been waiting for! Harvesting your homegrown bush beans is incredibly satisfying.
1. Timing is Everything: Bush beans are usually ready to harvest about 50-60 days after planting. The beans should be firm and plump, but not too large or tough.
2. Harvest Regularly: Harvest your beans regularly to encourage continued production. The more you pick, the more they’ll grow!
3. How to Harvest: Gently snap the beans off the plant, being careful not to damage the stems. You can also use scissors or pruning shears to cut the beans off.
4. Enjoy Your Harvest: Freshly harvested bush beans are delicious steamed, sautéed, or added to salads. You can also freeze or can them for later use.
Troubleshooting Common Problems
Even with the best care, you might encounter a few problems along the way. Here are some common issues and how to address them:
* Yellowing Leaves: Yellowing leaves can be a sign of overwatering, underwatering, or nutrient deficiency. Check the soil moisture and adjust your watering accordingly. If the soil is dry, water more frequently. If the soil is soggy, allow it to dry out before watering again. You can also try fertilizing your plants with a balanced fertilizer.
* Lack of Flowers or Beans: If your plants are growing well but not producing flowers or beans, it could be due to a lack of sunlight, poor pollination, or nutrient deficiency. Make sure your plants are getting enough sunlight and consider hand-pollinating the flowers by gently shaking the plants. You can also try fertilizing with a fertilizer that’s higher in phosphorus.
* Pest Infestations: As mentioned earlier, keep an eye out for common bean pests. Treat infestations promptly with insecticidal soap or neem oil.
* Root Rot: Root rot is caused by overwatering and poor drainage. Make sure your pot has drainage holes and avoid overwatering. If you suspect root rot, you can try repotting your plants in fresh potting mix.
Choosing the Right Bush Bean Variety
There are tons of different bush bean varieties to choose from, each with its own unique flavor and characteristics. Here are a few of my favorites:
* Blue Lake Bush: This is a classic bush bean variety that produces long, slender, dark green beans with a delicious flavor. It’s a reliable and productive choice.
* Contender: Contender is an early-maturing bush bean variety that produces stringless, tender beans. It’s a great choice for gardeners who want to harvest beans quickly.
* Provider: Provider is a very productive bush bean variety that produces dark green beans with a slightly nutty flavor. It’s also resistant to several common bean diseases.
* Roma II: Roma II is a bush bean variety that produces flat, wide beans that are similar to Italian Romano beans. They have a rich, buttery flavor and are great for cooking.
* Royal Burgundy: This is a unique bush bean variety that produces beautiful purple beans. The beans turn green when cooked, but they add a pop of color to your garden.
Extending Your Bean Harvest
Want to keep those beans coming all season long? Here are a few tips for extending your harvest:
* Succession Planting: Plant a new batch of bush bean seeds every 2-3 weeks to ensure a continuous harvest.
* Choose Early-Maturing Varieties: Select varieties that mature quickly so you can start harvesting beans sooner.
* Provide Optimal Growing Conditions: Make sure your plants are getting enough sunlight, water, and nutrients to maximize their productivity.
* Harvest Regularly: As mentioned earlier, harvesting your beans regularly will encourage continued production.
Saving Bean Seeds for Next Year
If you want to save money and grow your own seeds, you can easily save bean seeds from your harvest.
1. Choose Healthy Plants: Select healthy, disease-free plants to save seeds from.
2. Allow Beans to Mature: Allow some of the beans to mature fully on the plant. They should become dry and brittle.
3. Harvest the Seeds: Once the beans are dry, harvest them and remove the seeds from the pods.
4. Dry the Seeds: Spread the seeds out on a tray and allow them to dry completely for a few weeks.
5. Store the Seeds: Store the dried seeds in an airtight container in a cool, dark, and dry place. They should be viable for several years.
Bush Beans vs. Pole Beans: Which is Right for You?
Bush beans and pole beans are the two main types of beans. Bush beans are compact and self-supporting, while pole beans are vining and require a trellis or other support. Here’s a quick comparison:
* Bush Beans:
* Compact size, ideal for containers and small gardens
* Self-supporting
Conclusion
So, there you have it! Growing bush beans in pots is not only achievable but also incredibly rewarding. We’ve walked through the entire process, from selecting the right pot and soil to nurturing your plants and harvesting your bounty. But why should you bother with this DIY project?
Simply put, growing your own bush beans offers a unique connection to your food. There’s a profound satisfaction in watching those tiny seeds sprout and transform into vibrant, productive plants. You control the entire process, ensuring your beans are grown without harmful pesticides or chemicals. Plus, freshly harvested bush beans taste infinitely better than anything you can buy at the store. The crispness, the sweetness, the sheer vibrancy of flavor – it’s an experience you won’t soon forget.
Beyond the taste, growing bush beans in pots is a fantastic way to maximize your space. Whether you have a sprawling backyard or a tiny balcony, you can enjoy the benefits of homegrown vegetables. It’s also a great project for beginners, as bush beans are relatively easy to care for and don’t require extensive gardening knowledge.
Ready to take your bean growing to the next level? Consider these variations:
* Succession Planting: Plant new seeds every two to three weeks to ensure a continuous harvest throughout the growing season. This way, you’ll always have fresh beans on hand for your favorite recipes.
* Companion Planting: Enhance your bean’s growth by planting them alongside beneficial companions like marigolds (to deter pests) or nasturtiums (to attract pollinators).
* Vertical Gardening: While bush beans are naturally compact, you can still encourage some vertical growth by providing a small trellis or support. This can help improve air circulation and prevent disease.
* Different Varieties: Experiment with different varieties of bush beans to find your favorites. Some popular choices include Blue Lake, Contender, and Provider. Each variety offers a slightly different flavor and texture.
* Container Size Experimentation: While we recommended a specific pot size, don’t be afraid to experiment. Observe how your plants perform in different sized containers and adjust accordingly for future plantings.
Don’t be intimidated if you’re new to gardening. Growing bush beans in pots is a forgiving process, and even if you make a few mistakes along the way, you’ll still learn valuable lessons. The most important thing is to get started and enjoy the journey.
We are confident that you will find this DIY trick to be a game-changer for your home gardening experience. It’s a simple, effective, and rewarding way to enjoy fresh, homegrown vegetables, regardless of your space constraints.
So, grab your pots, soil, and seeds, and get ready to embark on a bean-growing adventure! We can’t wait to hear about your experiences. Share your photos, tips, and challenges in the comments below. Let’s build a community of bean-growing enthusiasts and inspire others to discover the joys of homegrown produce. Happy gardening!
Frequently Asked Questions (FAQ)
Q1: What is the best time of year to plant bush beans in pots?
The ideal time to plant bush beans is after the last frost of spring, when the soil has warmed up to at least 60°F (15°C). Bush beans are sensitive to cold temperatures, so planting too early can stunt their growth or even kill them. In most regions, this means planting in late spring or early summer. You can also start seeds indoors a few weeks before the last frost and transplant them outdoors once the weather warms up. If you live in a warmer climate with a longer growing season, you may be able to plant a second crop of bush beans in late summer for a fall harvest.
Q2: How often should I water my potted bush beans?
Watering frequency depends on several factors, including the weather, the size of your pot, and the type of soil you’re using. Generally, you should water your bush beans whenever the top inch of soil feels dry to the touch. During hot, dry weather, you may need to water them daily. Be sure to water deeply, allowing the water to drain out of the bottom of the pot. Avoid overwatering, as this can lead to root rot. A good rule of thumb is to water thoroughly and then allow the soil to dry out slightly before watering again. Mulching around the base of the plants can help retain moisture and reduce the need for frequent watering.
Q3: What kind of fertilizer should I use for my bush beans?
Bush beans are relatively light feeders, but they still benefit from regular fertilization. A balanced fertilizer with an N-P-K ratio of 5-10-10 is a good choice. You can also use a fertilizer specifically formulated for vegetables. Apply fertilizer according to the package directions, typically every two to three weeks. Avoid over-fertilizing, as this can lead to excessive foliage growth at the expense of bean production. You can also amend your soil with compost or other organic matter to provide a slow-release source of nutrients.
Q4: How do I deal with pests and diseases on my bush beans?
Bush beans are susceptible to a variety of pests and diseases, including aphids, bean beetles, and fungal infections. To prevent problems, start by choosing disease-resistant varieties and providing good air circulation. Inspect your plants regularly for signs of pests or diseases. If you find any problems, take action immediately. For aphids, you can try spraying the plants with a strong stream of water or using insecticidal soap. For bean beetles, you can handpick them off the plants or use a suitable insecticide. For fungal infections, you can try using a fungicide or removing affected leaves. Companion planting with marigolds can also help deter pests.
Q5: How long does it take for bush beans to mature and be ready for harvest?
Bush beans typically mature in 50 to 60 days from planting. However, this can vary depending on the variety and the growing conditions. You’ll know your beans are ready to harvest when the pods are firm, plump, and easily snap off the plant. Harvest beans regularly to encourage continued production. Overripe beans will become tough and stringy.
Q6: Can I grow bush beans indoors?
While it’s possible to grow bush beans indoors, it can be challenging. Bush beans need at least six hours of direct sunlight per day, which can be difficult to provide indoors. You’ll also need to ensure adequate air circulation and humidity. If you want to try growing bush beans indoors, choose a sunny location and use grow lights to supplement natural light. You may also need to hand-pollinate the flowers to ensure bean production.
Q7: What are some common problems when growing bush beans in pots and how can I fix them?
Some common problems include:
* Yellowing leaves: This can be caused by overwatering, underwatering, nutrient deficiencies, or pests. Check the soil moisture and adjust your watering accordingly. Fertilize with a balanced fertilizer. Inspect the plants for pests.
* Lack of bean production: This can be caused by insufficient sunlight, poor pollination, or over-fertilization. Ensure your plants are getting at least six hours of direct sunlight per day. Hand-pollinate the flowers if necessary. Avoid over-fertilizing.
* Root rot: This is caused by overwatering and poor drainage. Ensure your pots have drainage holes and avoid overwatering. Use a well-draining potting mix.
* Pests: Inspect your plants regularly for pests and take action immediately if you find any.
Q8: Can I save seeds from my bush beans to plant next year?
Yes, you can save seeds from your bush beans, but it’s important to choose open-pollinated varieties. Hybrid varieties will not produce true-to-type seeds. To save seeds, allow some of the bean pods to dry completely on the plant. Once the pods are dry and brittle, remove the seeds and store them in an airtight container in a cool, dry place. Be sure to label the seeds with the variety and date.
Q9: How many bush bean plants can I grow in one pot?
A good rule of thumb is to plant 3-4 bush bean plants in a 12-inch pot. This allows enough space for the plants to grow without overcrowding each other. Overcrowding can lead to reduced yields and increased susceptibility to pests and diseases.
Q10: What is the best soil mix for growing bush beans in pots?
The best soil mix for growing bush beans in pots is a well-draining potting mix that is rich in organic matter. You can use a commercially available potting mix or make your own by mixing equal parts of compost, peat moss, and perlite. Avoid using garden soil, as it can be too heavy and compact for container gardening.

Leave a Comment