
Grow Rutabaga in Raised Beds? Absolutely! And I’m here to tell you it’s easier than you might think. Forget those sprawling fields – we’re bringing the farm to your backyard, one raised bed at a time. Have you ever dreamt of harvesting your own vibrant, earthy rutabagas, ready to roast, mash, or add a unique twist to your soups? Well, stop dreaming and start planting!
Rutabagas, a humble root vegetable with a fascinating history, have been feeding families for centuries. Originating as a cross between a cabbage and a turnip, they’ve been a staple in European diets, particularly during colder months. Think of them as the unsung heroes of the root vegetable world, packed with nutrients and boasting a subtly sweet, slightly peppery flavor. But let’s be honest, growing them in traditional gardens can sometimes be a challenge. That’s where the magic of raised beds comes in!
Why should you consider this DIY trick? Because growing rutabagas in raised beds offers a multitude of benefits. Improved drainage, warmer soil, and better pest control are just a few reasons why this method can lead to a more bountiful harvest. Plus, it’s a fantastic option for those with limited space or less-than-ideal soil conditions. I’m going to guide you through the entire process, from preparing your raised bed to harvesting those beautiful, homegrown rutabagas. Get ready to discover how easy it is to grow rutabaga in raised beds and enjoy the delicious rewards of your labor!
Grow Bountiful Rutabagas in Raised Beds: A DIY Guide
Hey there, fellow gardeners! I’m so excited to share my experience growing rutabagas in raised beds. Honestly, it’s been a game-changer for me. Raised beds offer better drainage, warmer soil, and easier weed control, all of which rutabagas absolutely love. So, if you’re ready to try your hand at growing these delicious root vegetables, let’s get started!
Why Raised Beds are Rutabaga’s Best Friend
Before we dive into the how-to, let’s quickly touch on why raised beds are so beneficial for rutabagas:
* Improved Drainage: Rutabagas hate soggy soil. Raised beds naturally drain better, preventing root rot and other moisture-related issues.
* Warmer Soil: The soil in raised beds warms up faster in the spring, giving your rutabagas a head start.
* Easier Weed Control: Less bending and easier access make weeding a breeze.
* Customizable Soil: You can create the perfect soil mix specifically for rutabagas.
* Better Pest Control: Raised beds can help deter some ground-dwelling pests.
Materials You’ll Need
Okay, let’s gather our supplies. Here’s what you’ll need to build your raised bed and grow your rutabagas:
* Lumber or other materials for the raised bed: Untreated cedar, redwood, or even concrete blocks work well. I personally prefer cedar for its durability and natural resistance to rot.
* Measuring tape: To ensure accurate cuts for your raised bed frame.
* Saw: To cut the lumber to the desired lengths.
* Drill and screws: To assemble the raised bed frame.
* Landscape fabric (optional): To line the bottom of the bed and prevent weeds from growing up from below.
* Soil: A mix of topsoil, compost, and well-rotted manure is ideal. I usually go for a 1:1:1 ratio.
* Rutabaga seeds: Choose a variety that suits your climate and taste. ‘American Purple Top’ is a classic choice.
* Watering can or hose: For watering your seedlings.
* Gardening gloves: To protect your hands.
* Hand trowel or small shovel: For planting the seeds.
* Fertilizer (optional): A balanced fertilizer can give your rutabagas an extra boost.
Building Your Raised Bed (If You Don’t Already Have One)
If you already have a raised bed, feel free to skip this section. But if you’re starting from scratch, here’s a simple guide to building one:
1. Choose a Location: Select a sunny spot in your yard that receives at least 6 hours of direct sunlight per day. Rutabagas need plenty of sunshine to thrive.
2. Determine the Size: Decide on the size of your raised bed. A good starting point is 4 feet wide by 8 feet long and 12 inches deep. This size is manageable and provides ample space for several rutabaga plants.
3. Cut the Lumber: Cut the lumber according to your chosen dimensions. For a 4×8 foot bed, you’ll need two 4-foot pieces and two 8-foot pieces for the sides. You’ll also need additional pieces for corner supports if you want to make the bed more sturdy.
4. Assemble the Frame: Using the drill and screws, assemble the frame by attaching the sides together at the corners. If you’re using corner supports, attach them to the inside corners of the frame.
5. Line the Bed (Optional): Line the bottom of the bed with landscape fabric to prevent weeds from growing up from below. This step is optional, but I highly recommend it.
6. Fill the Bed with Soil: Fill the bed with your prepared soil mix. Make sure the soil is loose and well-draining.
Planting Your Rutabaga Seeds
Now for the fun part – planting!
1. Timing is Key: Rutabagas are a cool-season crop, so the best time to plant them is in late summer or early fall for a fall harvest. In my zone (6a), I aim to plant around July or August. You can also plant them in early spring for a summer harvest, but be aware that they may bolt (go to seed) if the weather gets too hot too quickly.
2. Prepare the Soil: Before planting, rake the soil surface smooth and remove any large clumps or rocks.
3. Sow the Seeds: Sow the seeds about ½ inch deep and 1-2 inches apart in rows that are 12-18 inches apart. I like to use a small hand trowel to create shallow furrows for the seeds.
4. Cover the Seeds: Gently cover the seeds with soil and lightly pat down the surface.
5. Water Thoroughly: Water the soil thoroughly after planting. Keep the soil consistently moist until the seeds germinate.
Caring for Your Rutabaga Plants
Once your rutabaga seedlings emerge, it’s time to provide them with the care they need to thrive.
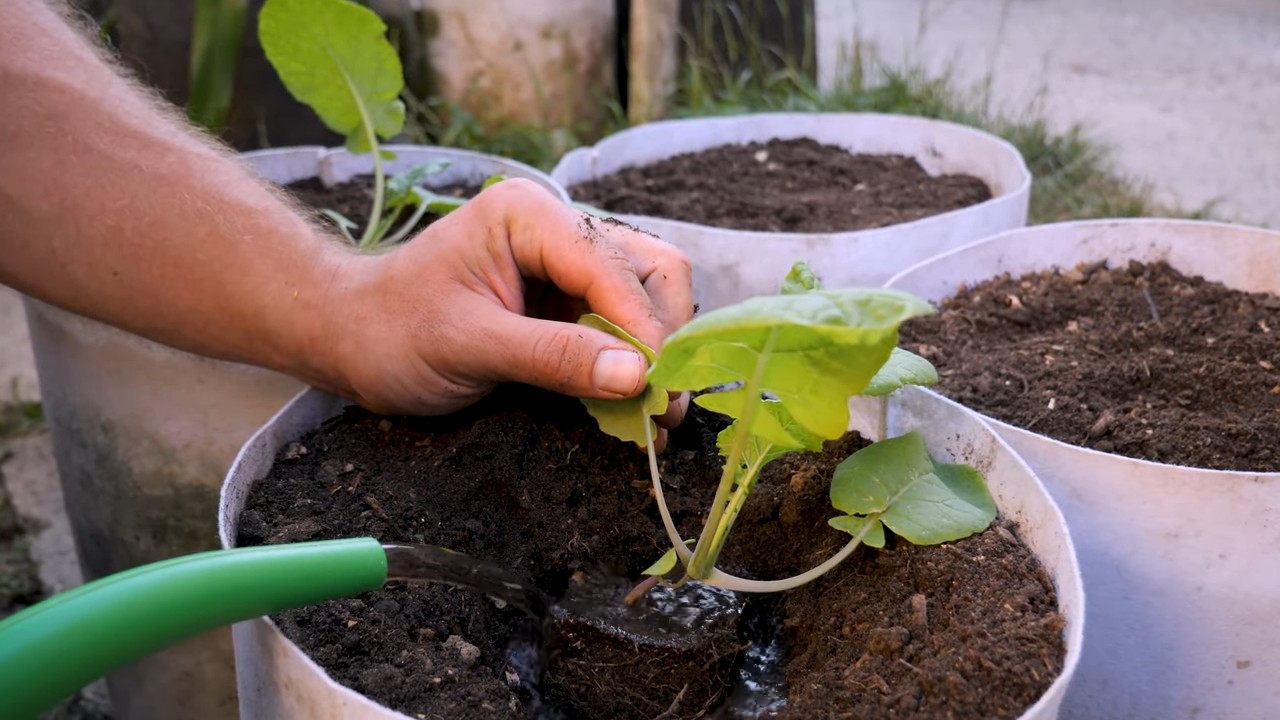
1. Thin the Seedlings: When the seedlings are a few inches tall, thin them to about 6-8 inches apart. This will give them enough space to grow and develop large roots. Don’t just pull them out! I carefully snip the unwanted seedlings at the soil line to avoid disturbing the roots of the remaining plants.
2. Water Regularly: Rutabagas need consistent moisture, especially during dry periods. Water deeply whenever the top inch of soil feels dry to the touch.
3. Weed Regularly: Keep the raised bed free of weeds, which can compete with your rutabagas for nutrients and water. Hand-weeding is the best option to avoid damaging the shallow roots of the rutabaga plants.
4. Fertilize (Optional): If your soil is lacking in nutrients, you can fertilize your rutabagas with a balanced fertilizer. Follow the instructions on the fertilizer package. I prefer to use a slow-release organic fertilizer.
5. Pest Control: Keep an eye out for pests such as flea beetles, aphids, and cabbage worms. If you notice any pests, take action immediately. Insecticidal soap or neem oil can be effective against many common garden pests. I also like to use row covers to protect my plants from pests.
Harvesting Your Rutabagas
The moment we’ve all been waiting for!
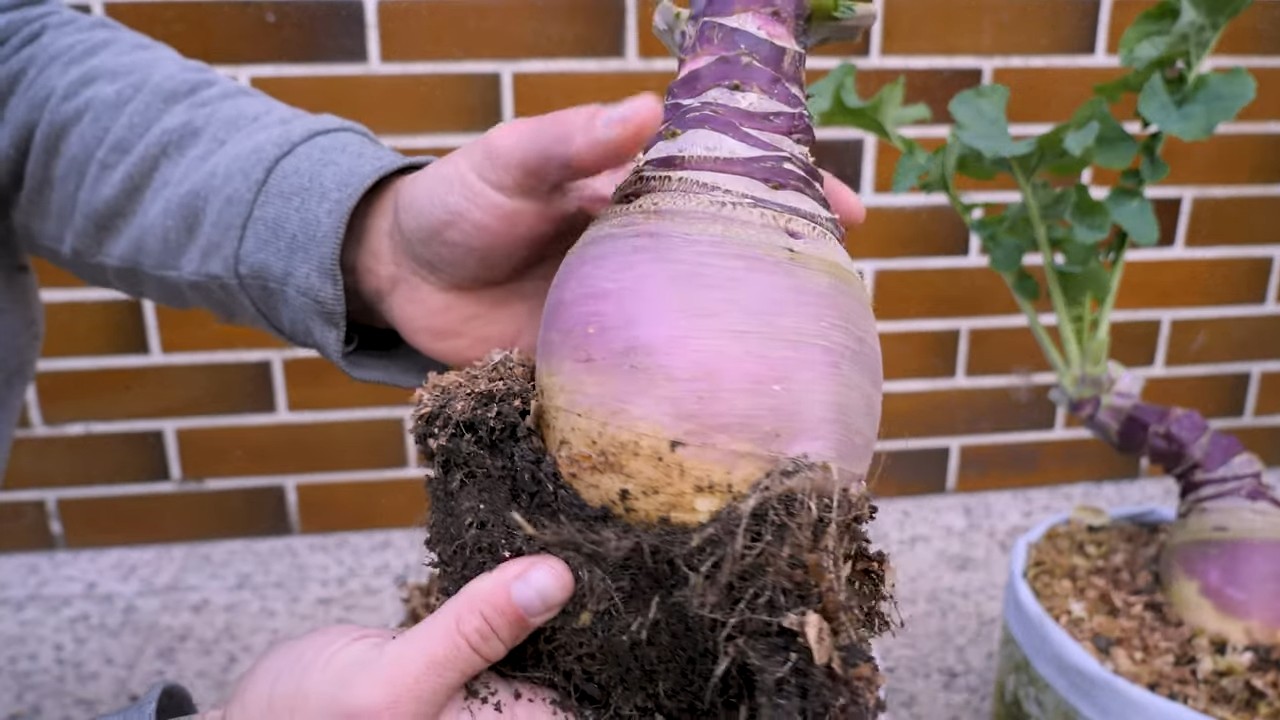
1. Harvest Time: Rutabagas are typically ready to harvest in 90-100 days after planting. The roots should be about 4-6 inches in diameter.
2. Check the Size: Gently dig around the base of a plant to check the size of the root. If it’s the size you want, it’s time to harvest.
3. Loosen the Soil: Use a garden fork or shovel to loosen the soil around the rutabaga plant.
4. Pull the Rutabaga: Gently pull the rutabaga out of the ground, holding it by the base of the leaves.
5. Remove the Leaves: Cut off the leaves, leaving about an inch of stem attached to the root.
6. Clean the Rutabaga: Brush off any excess soil from the rutabaga root.
7. Store Properly: Store your rutabagas in a cool, dark, and humid place, such as a root cellar or refrigerator. They can last for several months if stored properly.
Troubleshooting Common Rutabaga Problems
Even with the best care, you might encounter some challenges along the way. Here are a few common problems and how to address them:
* Root Rot: This is usually caused by overwatering or poor drainage. Make sure your raised bed has good drainage and avoid overwatering.
* Flea Beetles: These tiny beetles can create small holes in the leaves of your rutabaga plants. Use insecticidal soap or neem oil to control them. Row covers can also help prevent flea beetle infestations.
* Aphids: These small, sap-sucking insects can weaken your plants. Spray them with a strong stream of water or use insecticidal soap.
* Cabbage Worms: These green caterpillars can devour the leaves of your rutabaga plants. Handpick them off the plants or use Bacillus thuringiensis (Bt), a natural insecticide.
* Bolting: This occurs when rutabagas are exposed to prolonged periods of hot weather. The plants will send up a flower stalk and the roots will become tough and bitter. To prevent bolting, plant your rutabagas at the right time of year and provide them with plenty of water.
Enjoying Your Homegrown Rutabagas
Now that you’ve harvested your rutabagas, it’s time to enjoy the fruits (or rather, roots) of your labor
Conclusion
So, there you have it! Growing rutabaga in raised beds isn’t just a gardening trend; it’s a game-changer for anyone looking to cultivate these delicious and nutritious root vegetables. We’ve walked through the steps, highlighting how raised beds provide the ideal environment for rutabagas to thrive, from superior drainage and soil control to easier pest management and harvesting.
But why is this DIY trick a must-try? Simply put, it maximizes your chances of a successful and bountiful harvest. Rutabagas, while relatively hardy, are susceptible to issues like waterlogged soil and root maggots. Raised beds mitigate these problems, giving your plants the best possible start and continued support throughout their growth cycle. Imagine pulling up plump, healthy rutabagas, knowing you’ve created the perfect conditions for them to flourish. That’s the reward waiting for you!
Beyond the basics, there’s plenty of room for experimentation. Consider companion planting to further enhance your rutabaga’s growth. Marigolds can deter nematodes, while nasturtiums can attract aphids away from your precious plants. You could also try different soil amendments to tailor the nutrient profile to your specific rutabaga variety. Some gardeners swear by adding bone meal for phosphorus, promoting strong root development.
For those in colder climates, consider using cold frames or row covers over your raised beds to extend the growing season. This allows you to start your rutabagas earlier in the spring or continue harvesting them later into the fall. And if space is a concern, explore vertical gardening techniques to maximize your yield in a smaller area.
Don’t be afraid to get your hands dirty and experiment! Gardening is a journey of learning and discovery. The tips and techniques we’ve discussed are a solid foundation, but the real magic happens when you adapt them to your own unique environment and preferences.
We wholeheartedly encourage you to try growing rutabaga in raised beds. It’s a rewarding experience that will not only provide you with fresh, homegrown vegetables but also connect you with the natural world. And most importantly, we want to hear about your experiences! Share your successes, your challenges, and your tips with us and the wider gardening community. Let’s learn from each other and cultivate a thriving network of rutabaga enthusiasts.
So, grab your tools, prepare your raised beds, and get ready to enjoy the delicious rewards of your labor. Happy gardening!
Frequently Asked Questions (FAQ)
What are the main benefits of growing rutabaga in raised beds compared to traditional in-ground planting?
Raised beds offer several advantages for growing rutabaga. Firstly, they provide superior drainage, which is crucial for preventing root rot, a common problem with rutabagas. The elevated soil warms up faster in the spring, allowing for earlier planting. Raised beds also allow for better soil control, enabling you to create the ideal growing medium specifically tailored to rutabaga’s needs. Furthermore, they make pest management easier, as you can more readily monitor and address any infestations. Finally, harvesting is generally easier and less back-breaking with raised beds.
What type of soil is best for growing rutabaga in raised beds?
Rutabagas thrive in well-drained, fertile soil with a slightly acidic to neutral pH (around 6.0 to 7.0). A good mix would include equal parts of topsoil, compost, and either peat moss or coconut coir. The compost provides essential nutrients and improves soil structure, while the peat moss or coir helps retain moisture. Avoid heavy clay soils, as they can become waterlogged and hinder root development. Amending the soil with aged manure or other organic matter can further enhance its fertility and drainage.
How deep should my raised bed be for growing rutabaga?
A depth of at least 12 inches is recommended for raised beds intended for rutabaga cultivation. This depth allows ample space for the rutabagas to develop their large, round roots. If your raised bed is shallower, the roots may become stunted or misshapen. Consider adding more soil if your existing raised bed is not deep enough.
How often should I water my rutabaga plants in raised beds?
Rutabagas need consistent moisture, especially during the early stages of growth. Water deeply and regularly, aiming to keep the soil consistently moist but not waterlogged. The frequency of watering will depend on the weather conditions and the drainage of your raised bed. Check the soil moisture regularly by sticking your finger a couple of inches into the soil. If it feels dry, it’s time to water. Mulching around the plants can help retain moisture and reduce the need for frequent watering.
What are some common pests and diseases that affect rutabaga, and how can I prevent them in raised beds?
Common pests of rutabaga include root maggots, aphids, flea beetles, and cabbage worms. Diseases can include clubroot and powdery mildew. Raised beds can help prevent some of these problems by improving drainage and allowing for better soil sanitation. Using row covers can protect plants from pests. Companion planting with marigolds can deter nematodes. Regularly inspect your plants for signs of pests or diseases and take appropriate action, such as using insecticidal soap or neem oil for pests, or fungicides for diseases. Crop rotation can also help prevent soilborne diseases.
Can I grow rutabaga in raised beds in containers?
Yes, you can grow rutabaga in containers within a raised bed, provided the containers are large enough to accommodate the root development. Choose containers that are at least 12 inches deep and wide. Use a well-draining potting mix and ensure the containers have drainage holes. Container-grown rutabagas may require more frequent watering and fertilization than those grown directly in the raised bed.
How do I know when my rutabagas are ready to harvest from my raised bed?
Rutabagas are typically ready to harvest 90-100 days after planting. The size of the rutabaga will vary depending on the variety, but generally, they should be about 4-6 inches in diameter. You can also check the top of the rutabaga near the soil line; if it’s starting to emerge and is a good size, it’s likely ready. The best way to be sure is to gently loosen the soil around one rutabaga and pull it up to check its size and maturity.
What are some good companion plants for rutabaga in raised beds?
Good companion plants for rutabaga include:
* **Marigolds:** Deter nematodes.
* **Nasturtiums:** Attract aphids away from rutabaga.
* **Mint:** Repels cabbage moths.
* **Garlic and Onions:** Deter various pests.
* **Legumes (beans, peas):** Fix nitrogen in the soil, benefiting rutabaga growth.
Avoid planting rutabaga near other members of the brassica family (cabbage, broccoli, kale), as they can attract the same pests and diseases.
How can I extend the growing season for rutabaga in raised beds?
To extend the growing season, you can use cold frames or row covers over your raised beds. These structures provide protection from frost and cold temperatures, allowing you to start your rutabagas earlier in the spring or continue harvesting them later into the fall. You can also choose early-maturing rutabaga varieties.
What are some creative ways to use rutabaga in cooking?
Rutabaga is a versatile vegetable that can be used in a variety of dishes. It can be roasted, mashed, boiled, or added to soups and stews. It has a slightly sweet and earthy flavor that pairs well with other root vegetables, meats, and herbs. Try roasting rutabaga with carrots and parsnips, mashing it with potatoes, or adding it to a hearty winter stew. You can also grate raw rutabaga into salads or coleslaw. Don’t forget the leaves are edible too, and can be cooked like spinach or kale.


Leave a Comment