
Grow habaneros at home and unlock a world of fiery flavor right in your own backyard! Have you ever dreamt of adding a serious kick to your meals with peppers you’ve nurtured from tiny seedlings? Well, dream no more! This isn’t just about gardening; it’s about empowering yourself to cultivate intense, delicious heat whenever you crave it. For centuries, chili peppers, including the habanero, have been prized for their culinary and medicinal properties, adding zest to dishes and warmth to cultures around the globe.
But why should you bother with the effort? Let’s be honest, store-bought habaneros can be expensive and sometimes lack that fresh, vibrant flavor. Plus, there’s an unmatched satisfaction in harvesting something you’ve grown yourself. I’m going to share some simple, yet effective, DIY tricks and hacks that will make grow habaneros at home a breeze, even if you don’t have a green thumb. From seed starting secrets to pest control solutions, I’ll guide you through every step of the process, ensuring you have a bountiful harvest of these fiery gems. Get ready to spice up your life – literally!
Growing Habaneros at Home: A Fiery DIY Guide
Hey there, fellow spice enthusiasts! Ever dreamt of harvesting your own blazing hot habaneros right from your backyard (or even your windowsill)? Well, dream no more! I’m going to walk you through the entire process, from seed to salsa, so you can enjoy the satisfaction of growing your own fiery peppers. It’s easier than you think, and the flavor is unbeatable.
Getting Started: Seeds and Supplies
Before we dive into the dirt, let’s gather our supplies. Here’s what you’ll need:
* Habanero Seeds: You can find these online or at your local garden center. Make sure you’re getting seeds from a reputable source to ensure good germination rates.
* Seed Starting Trays or Small Pots: These will be your nurseries for the baby pepper plants.
* Seed Starting Mix: This is a light, sterile soil mix specifically designed for starting seeds. Don’t use regular garden soil; it’s too heavy and can harbor diseases.
* Heat Mat (Optional but Recommended): Habaneros love warmth, and a heat mat will significantly improve germination rates.
* Grow Lights (Optional but Recommended): If you’re starting your seeds indoors, grow lights will provide the necessary light for healthy seedling development.
* Larger Pots (3-5 gallon): These will be the final homes for your pepper plants if you’re growing them in containers.
* Well-Draining Potting Mix: A good quality potting mix is crucial for healthy pepper growth.
* Fertilizer: A balanced fertilizer (e.g., 10-10-10) is a good starting point, but you’ll want to switch to a fertilizer higher in phosphorus and potassium once the plants start flowering.
* Watering Can or Hose: For keeping your plants hydrated.
* Gloves: Trust me, you’ll want these when handling habaneros, especially when harvesting!
* Insecticidal Soap or Neem Oil: For dealing with any potential pests.
Phase 1: Starting Your Seeds Indoors
Habaneros have a long growing season, so starting them indoors is essential, especially if you live in a cooler climate. I usually start my seeds about 8-10 weeks before the last expected frost.
1. Prepare Your Seed Starting Trays: Fill your seed starting trays or small pots with seed starting mix. Gently tap the trays to settle the soil.
2. Sow the Seeds: Plant the habanero seeds about ¼ inch deep. I usually plant 2-3 seeds per cell or pot to increase the chances of germination.
3. Water Gently: Water the soil gently using a spray bottle or watering can with a fine rose. You want to moisten the soil without disturbing the seeds.
4. Provide Warmth: Place the seed starting trays on a heat mat. Habaneros germinate best at temperatures between 80-90°F (27-32°C).
5. Provide Light: If you’re using grow lights, position them a few inches above the seed starting trays. If you’re relying on natural light, place the trays in a sunny south-facing window.
6. Maintain Moisture: Keep the soil consistently moist, but not soggy. You can cover the trays with a clear plastic dome or plastic wrap to help retain moisture. Just make sure to remove the cover once the seeds start to germinate to prevent fungal diseases.
7. Be Patient: Habanero seeds can take anywhere from 1-3 weeks to germinate, so don’t get discouraged if you don’t see sprouts right away.
8. Thin Seedlings: Once the seedlings have developed their first true leaves (the second set of leaves), thin them out, leaving only the strongest seedling in each cell or pot. To thin, simply snip off the weaker seedlings at the soil line with scissors. Don’t try to pull them out, as this can damage the roots of the remaining seedling.
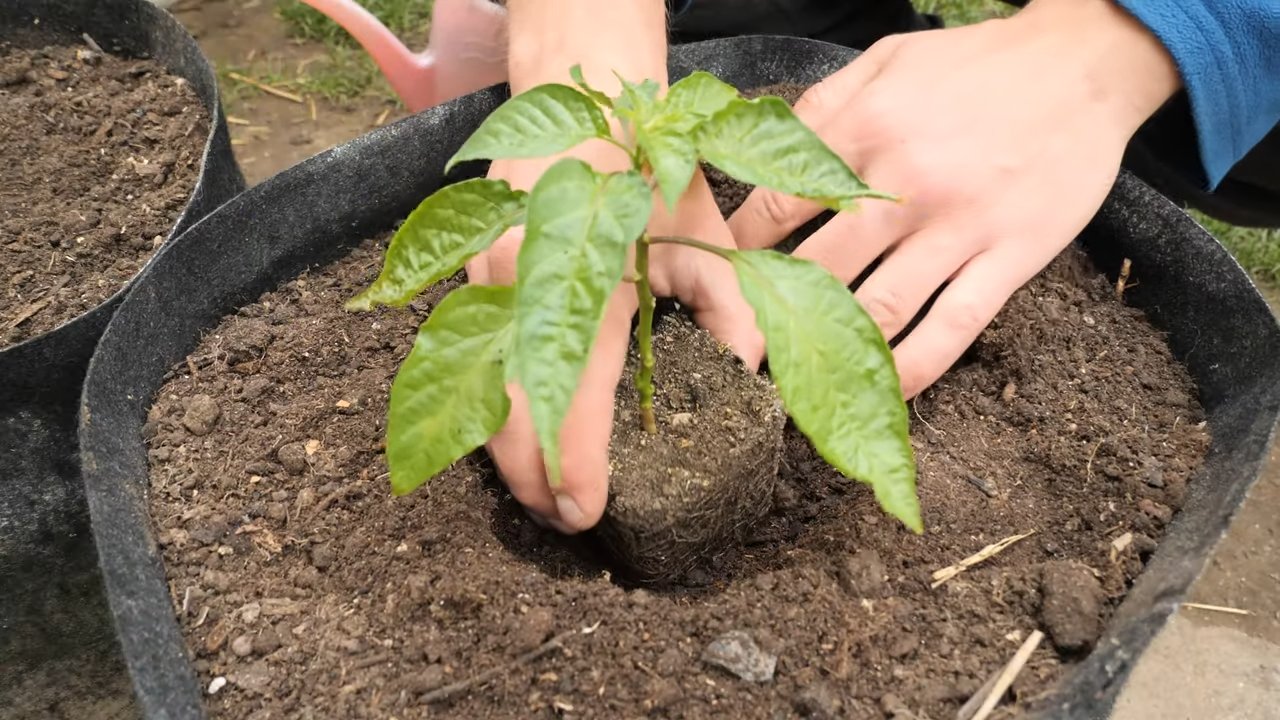
Phase 2: Transplanting Seedlings
Once your seedlings have grown a few inches tall and have developed several sets of true leaves, it’s time to transplant them into larger pots.
1. Harden Off Seedlings: Before transplanting your seedlings outdoors, you need to “harden them off.” This process gradually acclimates them to the outdoor environment, reducing the risk of shock. Start by placing the seedlings outdoors in a sheltered location for an hour or two each day, gradually increasing the amount of time they spend outdoors over the course of a week or two. Protect them from direct sunlight and strong winds during this process.
2. Prepare Larger Pots: Fill your larger pots (3-5 gallon) with well-draining potting mix.
3. Transplant Seedlings: Gently remove the seedlings from their seed starting trays or small pots. Be careful not to damage the roots.
4. Plant Seedlings: Plant the seedlings in the larger pots, burying them slightly deeper than they were in their previous containers. This will encourage the development of a stronger root system.
5. Water Thoroughly: Water the newly transplanted seedlings thoroughly.
6. Provide Support (Optional): If you anticipate your plants getting tall and top-heavy, you can insert a stake or tomato cage into the pot to provide support.
Phase 3: Caring for Your Habanero Plants
Now that your habanero plants are in their final homes, it’s time to provide them with the care they need to thrive.
1. Sunlight: Habaneros need at least 6-8 hours of sunlight per day. Place your plants in a sunny location.
2. Watering: Water your plants regularly, especially during hot, dry weather. Allow the soil to dry out slightly between waterings, but don’t let the plants wilt. Overwatering can lead to root rot.
3. Fertilizing: Fertilize your plants every 2-3 weeks with a balanced fertilizer. Once the plants start flowering, switch to a fertilizer higher in phosphorus and potassium to promote fruit production.
4. Pruning (Optional): Pruning can help to improve air circulation and encourage bushier growth. You can prune away any suckers (small shoots that grow from the base of the plant) or any yellowing or dead leaves.
5. Pest Control: Keep an eye out for pests such as aphids, spider mites, and whiteflies. If you notice any pests, treat your plants with insecticidal soap or neem oil.
6. Temperature: Habaneros thrive in warm temperatures. They can tolerate temperatures as low as 50°F (10°C), but they prefer temperatures between 70-85°F (21-29°C). If you live in a cooler climate, you may need to bring your plants indoors during the winter.
7. Pollination: Habaneros are self-pollinating, but you can improve fruit set by gently shaking the plants or using a small paintbrush to transfer pollen from one flower to another.
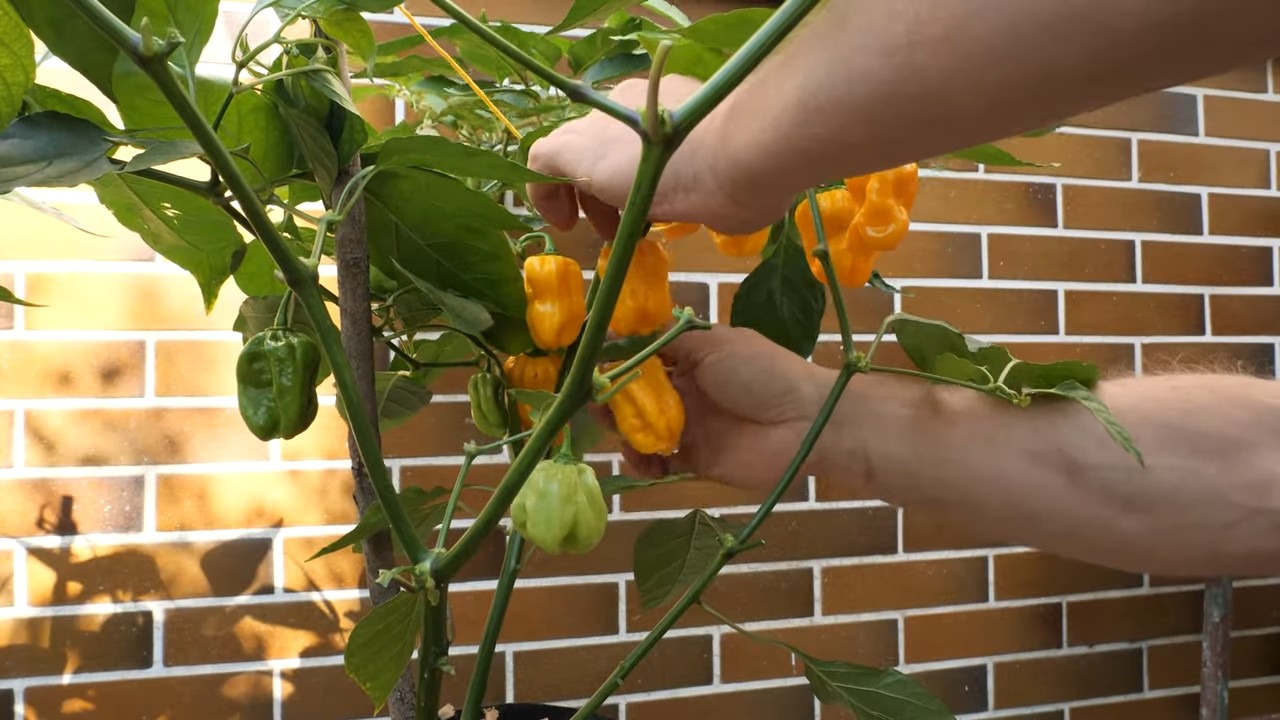
Phase 4: Harvesting Your Habaneros
The moment you’ve been waiting for! Habaneros are typically ready to harvest about 80-90 days after transplanting.
1. Check for Ripeness: Habaneros will change color as they ripen, typically from green to orange or red. The peppers should also feel firm to the touch.
2. Harvest Carefully: Use gloves when harvesting habaneros, as the capsaicin (the compound that makes them hot) can irritate your skin. Cut the peppers from the plant using pruning shears or scissors, leaving a small stem attached.
3. Store Properly: Fresh habaneros can be stored in the refrigerator for up to a week. You can also dry them, freeze them, or pickle them for longer storage.
Troubleshooting
Even with the best care, you might encounter some challenges along the way. Here are a few common problems and how to address them:
* Lack of Germination: If your seeds aren’t germinating, make sure the soil is warm enough and consistently moist. You can also try scarifying the seeds (gently scratching the outer coating) before planting to improve germination rates.
* Yellowing Leaves: Yellowing leaves can be a sign of overwatering, underwatering, nutrient deficiency, or pest infestation. Check the soil moisture and adjust your watering accordingly. Fertilize your plants regularly and inspect them for pests.
* Blossom Drop: Blossom drop (when flowers fall off the plant without producing fruit) can be caused by temperature stress, lack of pollination, or nutrient deficiency. Make sure your plants are getting enough sunlight and water, and fertilize them regularly. You can also try hand-pollinating the flowers.
* Pest Infestation: Pests can weaken your plants and reduce fruit production. Inspect your plants regularly for pests and treat them with insecticidal soap or neem oil as needed.
Enjoying Your
Conclusion
So, there you have it! Growing habaneros at home isn’t just a fun gardening project; it’s a gateway to unlocking a world of flavor and heat right in your own backyard. Forget those bland, store-bought peppers that lack the true fiery kick you crave. With a little patience and the right approach, you can cultivate a thriving habanero plant that yields an abundance of these vibrant, intensely flavored gems.
Why is this DIY trick a must-try? Because it empowers you to control the entire process, from seed to table. You know exactly what goes into your peppers – no mystery chemicals or questionable farming practices. Plus, there’s an undeniable satisfaction in nurturing a plant from a tiny seed into a bountiful producer. Imagine the bragging rights when you serve up a dish featuring habaneros you grew yourself!
But the benefits extend beyond just bragging rights. Homegrown habaneros often boast a superior flavor profile compared to commercially grown varieties. They’re fresher, more vibrant, and packed with that signature fruity-floral aroma that makes habaneros so unique. And let’s not forget the cost savings! Over time, growing your own peppers can significantly reduce your grocery bill, especially if you’re a frequent consumer of spicy food.
Looking for variations? Absolutely! Experiment with different growing mediums, such as hydroponics, for a faster and potentially higher yield. Try different fertilizers to see how they affect the flavor and heat level of your peppers. And don’t be afraid to get creative with your container choices – from repurposed buckets to decorative pots, the possibilities are endless. You can even try cross-pollinating your habaneros with other pepper varieties to create your own unique hybrid! Just be aware that the results won’t be apparent until the next generation of seeds are planted.
Consider starting your seeds indoors earlier in the season to give them a head start, especially if you live in a cooler climate. This will ensure that your plants have ample time to mature and produce a generous harvest before the first frost. You can also extend the growing season by bringing your potted habaneros indoors during the colder months.
We wholeheartedly encourage you to give this DIY trick a try. It’s a rewarding experience that will not only enhance your culinary adventures but also connect you with the natural world in a meaningful way. Don’t be intimidated by the perceived difficulty of growing habaneros – with the right guidance and a little bit of effort, anyone can succeed.
And most importantly, we want to hear about your experience! Share your photos, tips, and challenges in the comments section below. Let’s create a community of habanero enthusiasts who can learn from each other and celebrate the joys of homegrown spice. What growing techniques worked best for you? What challenges did you encounter, and how did you overcome them? Your insights could be invaluable to other aspiring habanero growers. So, get your hands dirty, embrace the heat, and embark on your own habanero-growing adventure today! Let’s all learn how to **grow habaneros at home** together!
Frequently Asked Questions (FAQ)
1. How long does it take to grow habaneros from seed?
Growing habaneros from seed can be a patience-testing process. Generally, it takes anywhere from 7 to 21 days for the seeds to germinate, depending on factors like temperature and seed quality. Once the seedlings emerge, it takes approximately 80 to 100 days for the plants to mature and produce ripe peppers. This means you’re looking at a total growing time of around 3 to 4 months from seed to harvest. Starting your seeds indoors 6-8 weeks before the last expected frost can significantly shorten the overall time to harvest.
2. What are the ideal growing conditions for habaneros?
Habaneros thrive in warm, sunny conditions. They require at least 6-8 hours of direct sunlight per day. The ideal temperature range for growing habaneros is between 70°F and 85°F (21°C and 29°C). They also need well-draining soil that is rich in organic matter. Consistent watering is crucial, especially during hot weather, but avoid overwatering, which can lead to root rot. A slightly acidic soil pH of around 6.0 to 6.8 is optimal.
3. What kind of fertilizer should I use for habaneros?
During the early stages of growth, a balanced fertilizer with equal amounts of nitrogen, phosphorus, and potassium (e.g., 10-10-10) is recommended to promote healthy foliage development. Once the plants start to flower and produce fruit, switch to a fertilizer that is higher in phosphorus and potassium (e.g., 5-10-10) to encourage fruit production and ripening. Avoid using fertilizers that are too high in nitrogen, as this can lead to excessive foliage growth at the expense of fruit production. Organic options like compost tea and bone meal are also excellent choices.
4. How often should I water my habanero plants?
The frequency of watering depends on factors like the weather, soil type, and size of the container. As a general rule, water your habanero plants when the top inch of soil feels dry to the touch. During hot, dry weather, you may need to water them daily. In cooler, more humid conditions, you can water them less frequently. Be sure to water deeply, allowing the water to reach the roots. Avoid overhead watering, as this can increase the risk of fungal diseases.
5. What are some common pests and diseases that affect habaneros?
Habaneros are susceptible to a variety of pests and diseases, including aphids, spider mites, whiteflies, pepper weevils, and fungal diseases like powdery mildew and blossom end rot. Regularly inspect your plants for signs of infestation or disease. If you spot any problems, take action immediately. Insecticidal soap, neem oil, and horticultural oil can be effective for controlling many common pests. For fungal diseases, ensure good air circulation around the plants and avoid overhead watering. Copper-based fungicides can also be used as a preventative measure. Blossom end rot is often caused by calcium deficiency, so adding calcium to the soil can help prevent this problem.
6. How do I know when my habaneros are ripe?
Habaneros typically start out green and then ripen to a vibrant orange or red color, depending on the variety. The peppers are generally considered ripe when they have reached their mature color and are slightly soft to the touch. The color change is the best indicator of ripeness. You can harvest them at any stage, but the flavor and heat will be most intense when they are fully ripe.
7. Can I grow habaneros indoors?
Yes, you can grow habaneros indoors, but it requires providing them with the right conditions. They need at least 6-8 hours of direct sunlight per day, which may require the use of grow lights. Choose a well-draining potting mix and a container that is large enough to accommodate the plant’s root system. Maintain a consistent temperature and humidity level. Indoor plants may also require hand-pollination to ensure fruit production.
8. How do I store habaneros?
Freshly harvested habaneros can be stored in the refrigerator for up to a week. For longer storage, you can dry them, freeze them, or pickle them. To dry habaneros, simply string them together and hang them in a well-ventilated area until they are completely dry. You can also use a dehydrator. To freeze habaneros, wash them, remove the stems, and place them in a freezer-safe bag or container. Pickled habaneros can be stored in the refrigerator for several months.
9. Are habaneros really that hot?
Yes, habaneros are known for their intense heat. They typically range from 100,000 to 350,000 Scoville heat units (SHU) on the Scoville scale, which measures the pungency (spiciness or “heat”) of chili peppers. This makes them significantly hotter than jalapeños, which typically range from 2,500 to 8,000 SHU. Handle habaneros with care and avoid touching your eyes or face after handling them. It’s always a good idea to wear gloves when working with hot peppers.
10. Can I save seeds from my habaneros to grow next year?
Yes, you can save seeds from your habaneros to grow next year. However, if your plants were grown near other pepper varieties, there is a chance that they may have cross-pollinated, which could result in offspring with different characteristics. To ensure that you are saving true-to-type seeds, isolate your habanero plants from other pepper varieties. Allow the peppers to fully ripen on the plant before harvesting the seeds. Remove the seeds from the peppers and dry them thoroughly before storing them in an airtight container in a cool, dark place.
Leave a Comment