
Radish harvest small space gardening can feel like a real challenge, especially when you’re dreaming of plump, juicy radishes but only have a tiny balcony or a compact backyard. But don’t despair, fellow gardening enthusiasts! I’m here to tell you that a bountiful radish harvest is absolutely achievable, even in the most limited of spaces.
For centuries, radishes have been a staple in gardens around the world, prized for their peppery bite and quick growth. From ancient Egypt, where they were a common food for laborers building the pyramids, to modern-day salads, radishes have proven their versatility and resilience. But let’s face it, not everyone has acres of land to dedicate to these root vegetables. That’s where clever DIY tricks and hacks come in!
Are you tired of disappointing radish harvests, where you end up with more greens than actual radishes? Or maybe you’re struggling to find the right conditions for them to thrive in your limited space? This article is your ultimate guide to maximizing your radish harvest small space potential. I’ll share my favorite DIY techniques, from optimizing soil conditions to clever container gardening strategies, ensuring you get the most out of every inch of your precious gardening area. Get ready to enjoy a crisp, flavorful radish bounty, no matter how small your space may be!
Growing Radishes in a Small Space: From Seed to Salad in Weeks!
Hey there, fellow garden enthusiasts! So, you’re itching to grow something, but space is tight? Don’t worry, I’ve got you covered! Radishes are the perfect solution. They’re quick, easy, and oh-so-satisfying to grow, even if you only have a balcony or a tiny patch of soil. I’m going to walk you through everything you need to know to get a bumper crop of these peppery delights.
Choosing the Right Radish Variety
First things first, let’s talk radishes! There are tons of varieties out there, and some are better suited for small spaces than others. Here’s a quick rundown:
* **Cherry Belle:** This is a classic, round, red radish that matures super quickly (around 22 days!). It’s a reliable choice for beginners.
* **French Breakfast:** These are elongated, red radishes with a white tip. They have a milder flavor and mature in about 25 days.
* **Easter Egg:** A mix of radishes in different colors (red, pink, purple, white). Adds a fun touch to your garden and matures in about 25 days.
* **Sparkler:** Similar to Cherry Belle, but with a small white tip. Matures in about 24 days.
* **White Icicle:** A longer, white radish with a crisp, mild flavor. Takes a bit longer to mature (around 30 days), but worth it!
For small spaces, I recommend sticking with the smaller, faster-maturing varieties like Cherry Belle, French Breakfast, or Sparkler. They’ll give you a quicker turnaround and allow you to succession plant more often.
Preparing Your Small Space for Radishes
Okay, now that we’ve picked our radish champions, let’s get our growing space ready. Radishes aren’t fussy, but they do appreciate a little TLC.
* **Sunlight:** Radishes need at least 6 hours of sunlight per day. If you’re growing them indoors, a sunny windowsill or grow lights will do the trick.
* **Soil:** Well-draining soil is crucial. Radishes don’t like sitting in soggy soil. A good potting mix works perfectly if you’re using containers. If you’re planting in the ground, amend the soil with compost to improve drainage and fertility.
* **Container:** Choose a container that’s at least 6 inches deep. This will give the radishes enough room to develop. Make sure the container has drainage holes!
* **Location:** Pick a spot that’s easily accessible so you can keep an eye on your radishes and water them regularly.
Planting Your Radish Seeds
Alright, time to get our hands dirty! Planting radish seeds is super easy.
1. **Prepare the soil:** Fill your container with potting mix or amend your garden soil with compost.
2. **Make shallow furrows:** Create shallow furrows (about 1/2 inch deep) in the soil. Space the furrows about 1 inch apart.
3. **Sow the seeds:** Sprinkle the radish seeds into the furrows, spacing them about 1 inch apart. Don’t overcrowd them!
4. **Cover the seeds:** Gently cover the seeds with soil.
5. **Water gently:** Water the soil gently to avoid disturbing the seeds.
6. **Label:** Label your container with the radish variety and the date you planted them. This will help you keep track of when to expect your harvest.
Caring for Your Radishes
Now comes the easy part – watching your radishes grow! Here’s what you need to do to keep them happy and healthy:
* **Watering:** Keep the soil consistently moist, but not soggy. Water deeply whenever the top inch of soil feels dry.
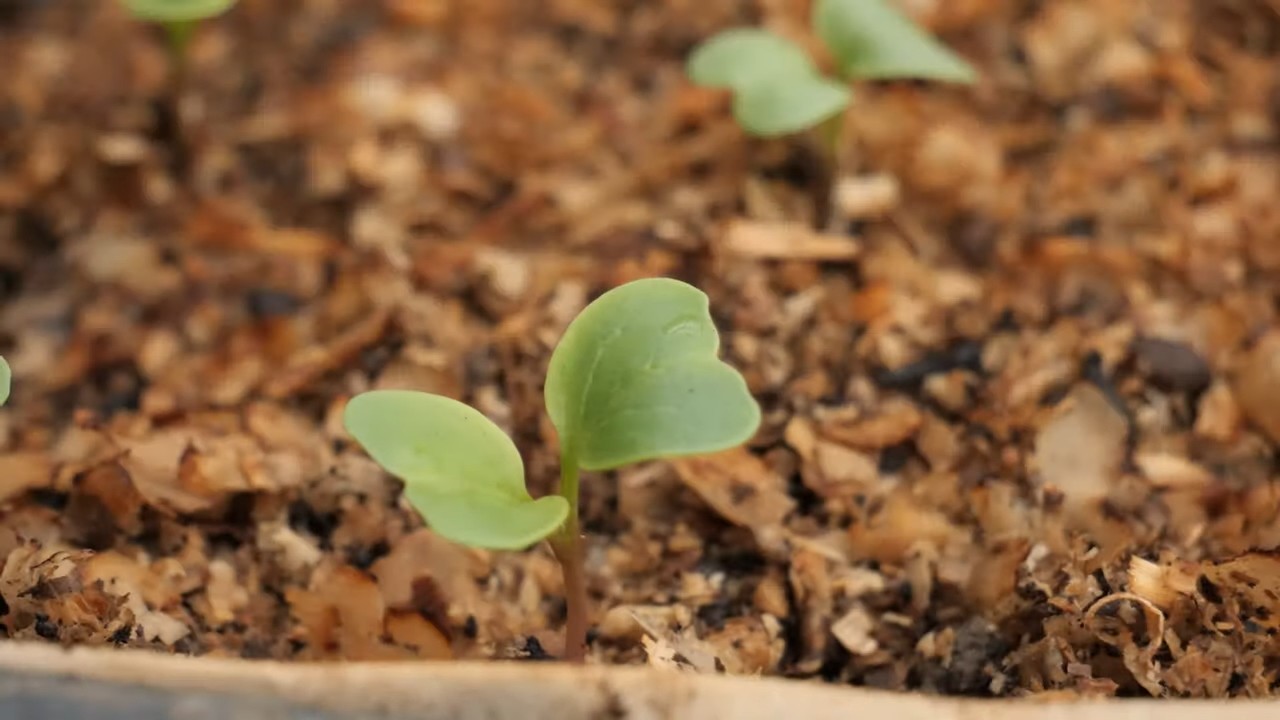
* **Thinning:** Once the seedlings emerge (usually in 3-7 days), thin them out so that they’re about 2 inches apart. This will give them enough room to grow. Don’t be afraid to snip off the weaker seedlings.
* **Weeding:** Keep the area around your radishes free of weeds. Weeds can compete with your radishes for nutrients and water.
* **Fertilizing:** Radishes don’t need a lot of fertilizer. A light feeding with a balanced fertilizer a couple of weeks after planting is usually sufficient. I like to use a liquid seaweed fertilizer.
* **Pest Control:** Radishes are relatively pest-free, but flea beetles can sometimes be a problem. These tiny beetles can chew small holes in the leaves. You can deter them by covering your radishes with row covers or by spraying them with insecticidal soap.
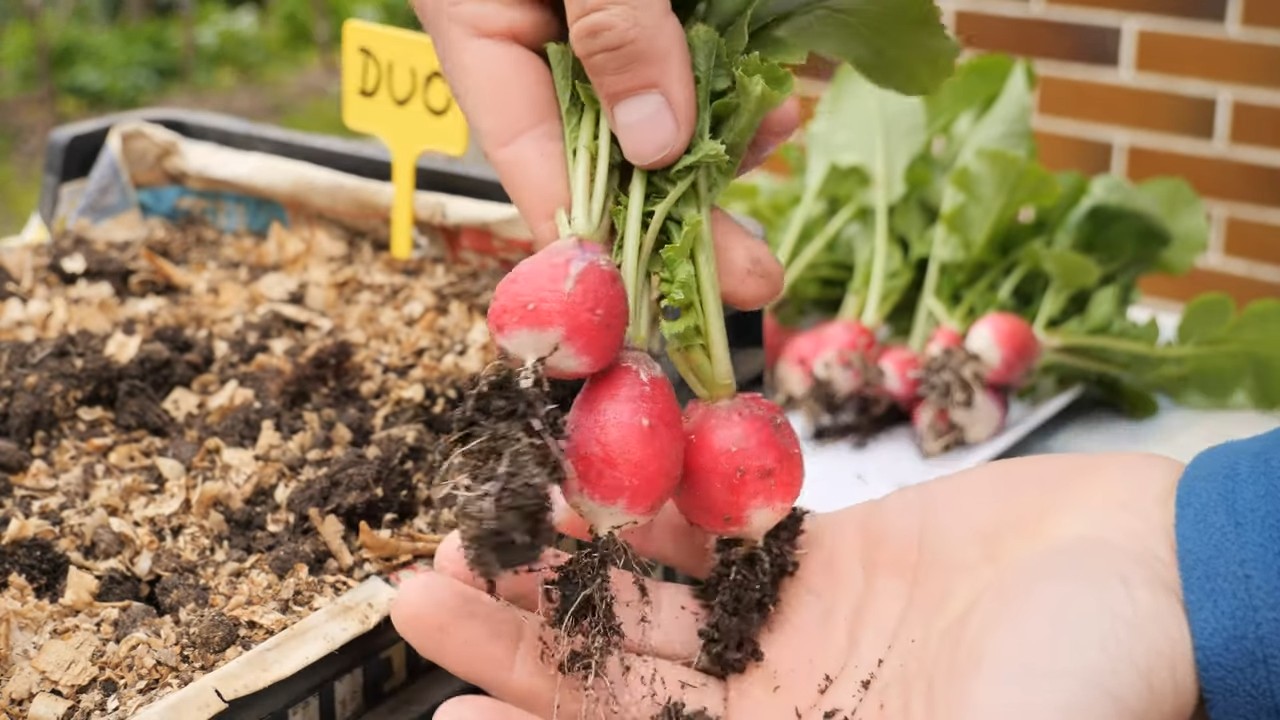
Harvesting Your Radishes
The moment we’ve all been waiting for – harvest time! Radishes are ready to harvest when they reach the size specified on the seed packet (usually about 1 inch in diameter for round varieties).
1. **Check for size:** Gently brush away the soil around the base of the radish to check its size.
2. **Pull them out:** Grasp the radish leaves near the base and gently pull the radish out of the soil. If it’s stubborn, loosen the soil around it with a trowel.
3. **Wash and enjoy:** Wash the radishes thoroughly and enjoy them fresh! You can eat the roots, the leaves, and even the seed pods.
Succession Planting for a Continuous Harvest
Here’s a pro tip: to enjoy a continuous harvest of radishes, practice succession planting. This means planting a new batch of seeds every 1-2 weeks. This way, you’ll always have fresh radishes ready to eat.
Troubleshooting Common Radish Problems
Even with the best care, things can sometimes go wrong. Here are a few common radish problems and how to fix them:
* **Radishes are small and skinny:** This is usually caused by overcrowding or lack of water. Make sure you thin your seedlings properly and water them regularly.
* **Radishes are cracked:** This is often caused by inconsistent watering. Try to keep the soil consistently moist.
* **Radishes are too spicy:** This can be caused by hot weather or letting the radishes grow too large. Harvest them when they’re the right size and try planting them in a shadier spot during hot weather.
* **Radishes are all tops and no bottoms:** This can be caused by too much nitrogen in the soil. Avoid using high-nitrogen fertilizers.
Creative Ways to Enjoy Your Radish Harvest
Okay, you’ve got a pile of fresh radishes – now what? Here are a few of my favorite ways to enjoy them:
* **Raw:** Slice them thinly and add them to salads, sandwiches, or tacos.
* **Roasted:** Roasting radishes mellows out their flavor and makes them surprisingly sweet. Toss them with olive oil, salt, and pepper and roast them at 400°F (200°C) for 20-25 minutes.
* **Pickled:** Pickled radishes are a tangy and delicious addition to any meal.
* **Radish Greens:** Don’t throw away the radish greens! They’re packed with nutrients and can be used in salads, soups, or stir-fries.
* **Radish Butter:** Blend softened butter with finely chopped radishes and radish greens for a flavorful spread.
Maximizing Your Small Space Radish Garden
Want to get the most out of your small space radish garden? Here are a few extra tips:
* **Vertical Gardening:** Consider using vertical gardening techniques, such as hanging baskets or wall planters, to grow even more radishes.
* **Companion Planting:** Plant radishes alongside other vegetables that benefit from their presence. Carrots, lettuce, and spinach are all good companions for radishes.
* **Succession Planting with Other Crops:** After you harvest your radishes, plant another quick-growing crop in the same space, such as lettuce or spinach.
* **Keep Records:** Keep track of which radish varieties you grow, when you plant them, and how well they perform. This will help you improve your radish-growing skills over time.
Radish Seed Saving (Optional)
If you’re feeling adventurous, you can even save your own radish seeds! This is a great way to save money and ensure that you always have a supply of your favorite radish varieties.
1. **Allow some radishes to bolt:** Let a few of your radish plants flower and produce seed pods.
2. **Let the seed pods dry:** Allow the seed pods to dry completely on the plant.
3. **Harvest the seed pods:** Once the seed pods are dry, harvest them and crush them to release the seeds.
4. **Clean and store the seeds:** Clean the seeds by removing any debris. Store them in a cool, dry place in an airtight container.
And there you have it! Everything you need to know to grow a bumper crop of radishes in a small space. With a little bit of planning and effort, you can enjoy fresh, homegrown radishes all season long. Happy gardening!
Conclusion
So, there you have it! Transforming your small space into a radish-producing powerhouse is not only achievable but also incredibly rewarding. We’ve explored a simple yet effective DIY trick that maximizes your yield, minimizes space requirements, and brings the joy of fresh, homegrown radishes right to your doorstep.
Why is this DIY approach a must-try? Because it empowers you to overcome the limitations of small gardens or even balconies. Imagine the satisfaction of harvesting crisp, peppery radishes just steps from your kitchen, knowing you cultivated them yourself. This method is particularly beneficial for urban dwellers, apartment residents, or anyone with limited outdoor space who still craves the taste of fresh, organically grown produce. It’s a sustainable and cost-effective way to enjoy radishes, reducing your reliance on store-bought options and minimizing your environmental footprint.
Beyond the basic technique, there’s ample room for experimentation and personalization. Consider these variations to tailor the method to your specific needs and preferences:
* Vertical Gardening: Adapt the DIY trick to a vertical gardening system. Use stacked planters or hanging baskets to further maximize space utilization. This is especially effective for balconies or patios with limited floor space.
* Companion Planting: Incorporate companion plants like carrots or lettuce into your radish-growing setup. These plants can help deter pests and improve soil health, leading to even better radish yields.
* Succession Planting: Plant radishes in staggered intervals to ensure a continuous harvest throughout the growing season. This way, you’ll always have a fresh supply of radishes on hand.
* Container Choice: Experiment with different container materials and sizes to find what works best for your environment. Terra cotta pots, plastic containers, or even repurposed buckets can all be suitable options. Just ensure adequate drainage.
* Radish Varieties: Don’t limit yourself to just one type of radish! Explore different varieties like French Breakfast, Cherry Belle, or Daikon to add variety to your harvest and discover your personal favorites.
This DIY trick for a bountiful radish harvest small space is more than just a gardening technique; it’s an invitation to connect with nature, cultivate your own food, and experience the satisfaction of growing something from seed to table. It’s a simple project that yields significant rewards, both in terms of fresh produce and personal fulfillment.
We wholeheartedly encourage you to give this DIY trick a try. Whether you’re a seasoned gardener or a complete beginner, you’ll find it surprisingly easy and incredibly rewarding. And most importantly, we want to hear about your experience! Share your photos, tips, and stories with us in the comments section below. Let’s build a community of radish enthusiasts and inspire others to transform their small spaces into thriving gardens. Happy gardening!
Frequently Asked Questions (FAQ)
What kind of soil is best for growing radishes in containers?
Radishes thrive in well-draining, loose soil that is rich in organic matter. A good potting mix specifically formulated for vegetables is an excellent choice. You can also amend regular potting soil with compost or aged manure to improve its fertility and drainage. Avoid heavy clay soils, as they can become compacted and hinder root development. The ideal pH range for radish growth is between 6.0 and 7.0.
How often should I water my radishes?
Radishes require consistent moisture to grow quickly and develop crisp, flavorful roots. Water deeply whenever the top inch of soil feels dry to the touch. Avoid overwatering, as this can lead to root rot. The frequency of watering will depend on factors such as the weather, the type of container you’re using, and the soil’s drainage capacity. During hot, dry periods, you may need to water daily.
How much sunlight do radishes need?
Radishes need at least 6 hours of direct sunlight per day to thrive. If you’re growing them indoors, place them near a sunny window or use grow lights to supplement natural light. Insufficient sunlight can result in leggy growth and poor root development.
How long does it take for radishes to mature?
One of the great things about radishes is their quick growth rate. Most varieties mature in just 3-4 weeks from planting. Check the seed packet for specific maturity times for the variety you’re growing. You can start harvesting radishes as soon as they reach a usable size.
How do I know when my radishes are ready to harvest?
The best way to determine if your radishes are ready to harvest is to gently brush away some of the soil around the base of the plant and check the size of the root. Radishes are typically harvested when they are about 1 inch in diameter, but this can vary depending on the variety. Don’t let them get too large, as they can become woody and bitter.
What are some common pests and diseases that affect radishes?
Radishes are generally pest-resistant, but they can be susceptible to certain problems, such as flea beetles, root maggots, and aphids. Flea beetles can chew small holes in the leaves, while root maggots can damage the roots. Aphids can suck sap from the plants, weakening them. To prevent these problems, use row covers to protect your plants, practice crop rotation, and inspect your plants regularly for signs of pests or diseases. If you find any problems, treat them promptly with appropriate organic pest control methods.
Can I grow radishes in the winter?
Yes, you can grow radishes in the winter if you provide them with adequate protection from the cold. You can grow them indoors under grow lights or in a greenhouse. You can also grow them outdoors in a cold frame or under a row cover. Choose cold-hardy varieties and provide them with plenty of sunlight and water.
What can I do with radish greens?
Don’t throw away those radish greens! They are edible and nutritious. You can use them in salads, soups, stir-fries, or pesto. They have a peppery flavor similar to the roots. Make sure to wash them thoroughly before using them.
Can I save radish seeds for next year?
Yes, you can save radish seeds, but it requires allowing some of your radishes to bolt (flower and produce seeds). This process takes longer than simply harvesting the roots. Allow the seed pods to dry on the plant, then harvest them and extract the seeds. Store the seeds in a cool, dry place until next planting season. Note that hybrid varieties may not produce true-to-type seeds.
My radishes are cracking. What’s causing this?
Cracking in radishes is often caused by inconsistent watering. If the soil dries out and then is suddenly saturated, the radishes can swell too quickly, causing the skin to crack. To prevent this, water your radishes regularly and consistently, especially during hot, dry weather. Mulching around the plants can also help to retain moisture in the soil.

Leave a Comment