
Clean silver with salt? Yes, you read that right! Forget those expensive silver polishes filled with harsh chemicals. I’m about to share a simple, yet incredibly effective, DIY trick that will have your tarnished silverware gleaming like new using ingredients you probably already have in your kitchen.
Silver, a precious metal cherished for centuries, has adorned tables and homes since ancient times. From elaborate Victorian tea sets to minimalist modern jewelry, its beauty is undeniable. But, alas, silver’s one downfall is its tendency to tarnish, leaving it looking dull and lifeless. For generations, families have passed down silver polishing rituals, often involving elbow grease and specialized products. But what if I told you there’s an easier way?
Let’s face it, nobody enjoys spending hours scrubbing away at tarnish. Life is busy! That’s why this clean silver with salt hack is a game-changer. It’s not only incredibly easy and affordable, but it’s also a much gentler alternative to harsh chemical cleaners, which can damage your precious silver over time. Plus, it’s a fun little science experiment that you can even do with your kids! So, ditch the expensive polishes and get ready to rediscover the brilliance of your silver with this simple, natural solution. I promise, you’ll be amazed at the results!
DIY Silver Cleaning with Salt: A Sparkly Solution!
Okay, let’s face it, tarnished silver is a bummer. You pull out your beautiful silverware or that cherished silver necklace, and instead of gleaming, it’s looking dull and… well, tarnished! But don’t despair! You don’t need harsh chemicals or expensive cleaners to bring back the shine. I’m going to show you a super easy and effective way to clean your silver using ingredients you probably already have in your kitchen: salt, baking soda, and aluminum foil. Trust me, it’s like magic!
What You’ll Need
Before we dive in, let’s gather our supplies. This is a pretty low-key project, so you won’t need much:
* A glass or plastic bowl (avoid metal, except for the foil!)
* Aluminum foil
* Boiling water (be careful!)
* Baking soda
* Salt (table salt works perfectly)
* Tongs or a utensil for retrieving the silver
* A soft cloth or microfiber towel for polishing
How It Works: The Science Behind the Shine
So, how does this seemingly simple concoction actually clean silver? It’s all about a chemical reaction! Tarnish on silver is silver sulfide, which forms when silver reacts with sulfur in the air. The aluminum foil, baking soda, and salt create an electrolytic reaction. The aluminum is more reactive than the silver, so it attracts the sulfur. The baking soda and salt help to conduct the electricity and facilitate the transfer of the sulfur from the silver to the aluminum. Pretty cool, right?
Step-by-Step Instructions: Let’s Get Cleaning!
Alright, let’s get down to business and make that silver sparkle!
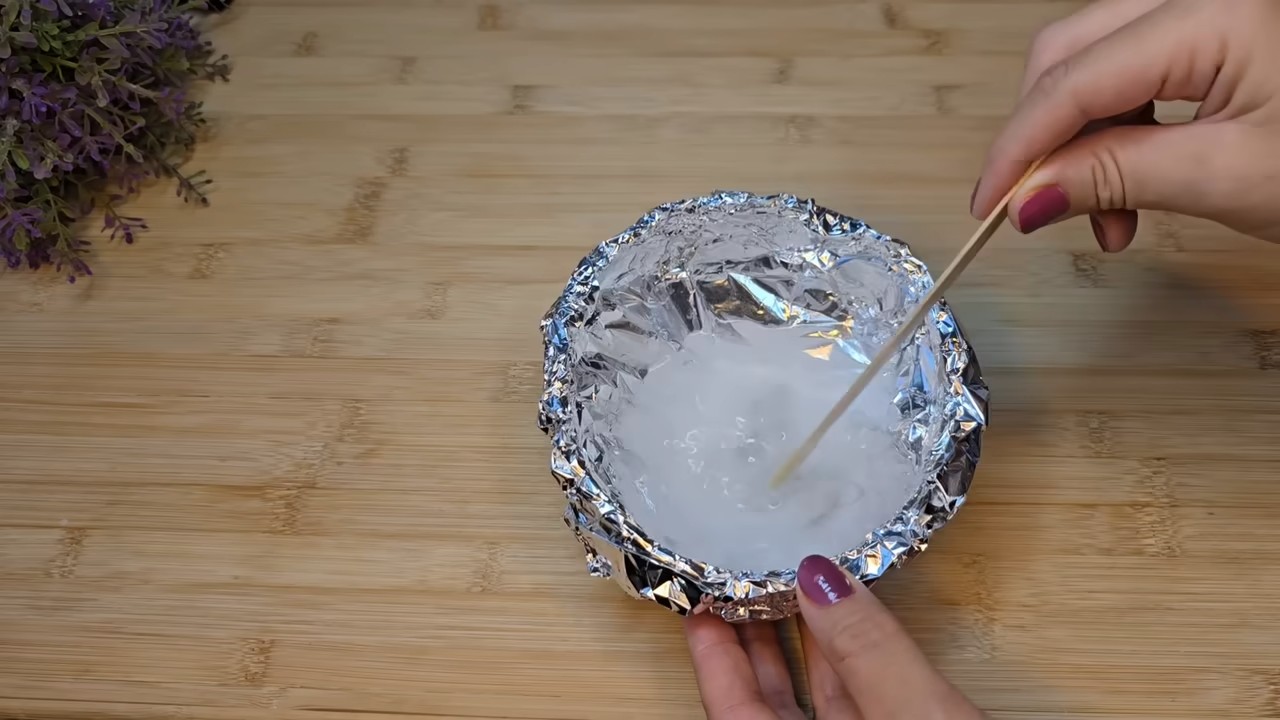
1. Prepare the Bowl: Line your bowl completely with aluminum foil. Make sure the shiny side is facing up, as this is the side that will be in contact with the water and silver. You want good contact between the foil and the water.
2. Add the Baking Soda and Salt: Pour in one tablespoon of baking soda and one tablespoon of salt into the foil-lined bowl. Don’t worry about being super precise; a little more or less won’t hurt.
3. Pour in the Boiling Water: Carefully pour boiling water into the bowl. You’ll need enough water to completely submerge the silver items you want to clean. Be extremely cautious when handling boiling water to avoid burns.
4. Submerge the Silver: Gently place your tarnished silver items into the bowl, making sure they are touching the aluminum foil. This is crucial for the chemical reaction to work. If you have a lot of silver, you might need to do this in batches to ensure everything is in contact with the foil.
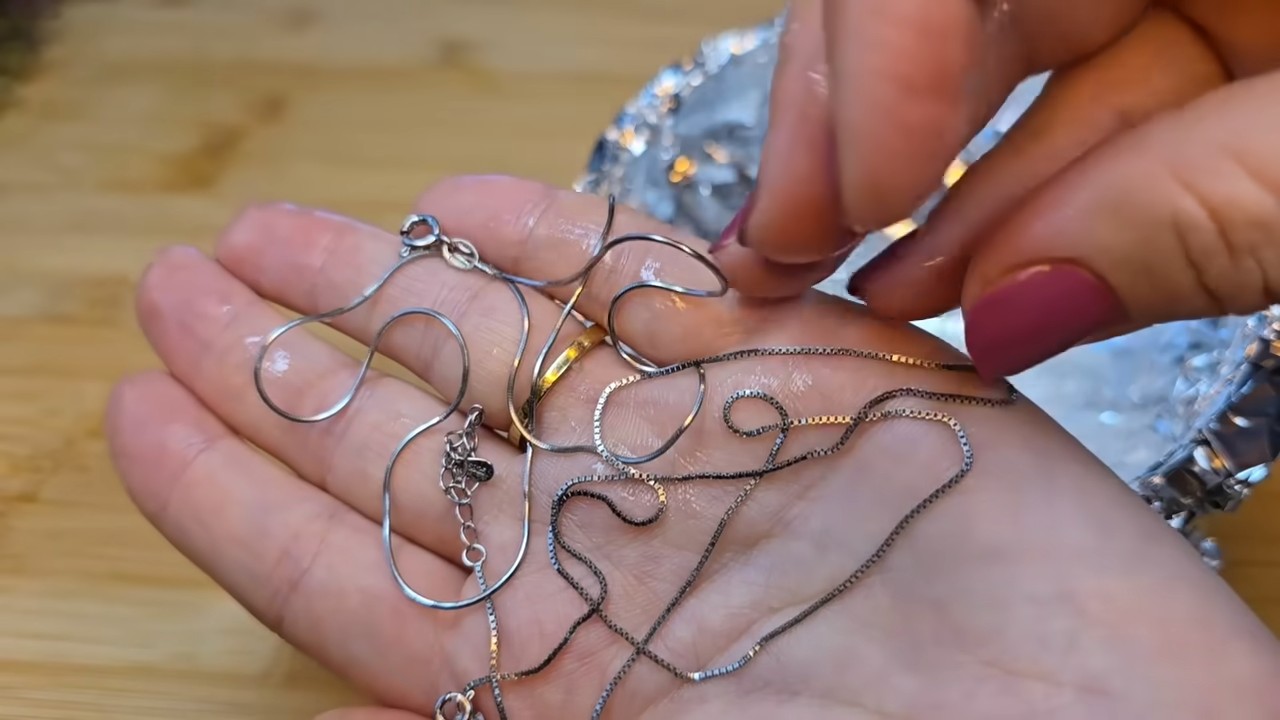
5. Wait and Watch: Now comes the waiting game! You’ll start to see the tarnish disappear almost immediately. The amount of time it takes will depend on how tarnished the silver is. For lightly tarnished items, a few minutes might be enough. For heavily tarnished pieces, you might need to wait 10-15 minutes, or even longer. Keep an eye on it and check periodically. You might notice a sulfurous smell – that’s the tarnish being transferred to the aluminum!
6. Remove and Rinse: Once the tarnish is gone (or significantly reduced), carefully remove the silver items from the bowl using tongs or a utensil. Rinse them thoroughly under warm running water to remove any residue from the baking soda and salt.
7. Dry and Polish: Use a soft cloth or microfiber towel to dry the silver completely. As you dry it, you’ll also be polishing it, bringing out its natural shine. You might need to use a bit of elbow grease for stubborn spots.
Dealing with Heavily Tarnished Silver
Sometimes, silver is so heavily tarnished that one treatment isn’t enough. Don’t worry, you can repeat the process!
* Repeat the Process: If your silver is still tarnished after the first treatment, simply repeat steps 1-7. You might need to use fresh aluminum foil, baking soda, and salt for the best results.
* Increase the Concentration: For really stubborn tarnish, you can try increasing the amount of baking soda and salt you use. Try using two tablespoons of each instead of one.
* Extend the Soaking Time: You can also try letting the silver soak for a longer period of time, up to 30 minutes or even an hour. Just keep an eye on it to make sure the aluminum foil doesn’t disintegrate too much.
Cleaning Silver with Intricate Designs
If you’re cleaning silver with intricate designs or hard-to-reach areas, you might need to take a slightly different approach.
* Use a Soft Brush: After soaking the silver, use a soft-bristled brush (like an old toothbrush) to gently scrub away any remaining tarnish in the crevices.
* Make a Paste: You can also make a paste of baking soda and water and apply it directly to the tarnished areas. Let it sit for a few minutes, then rinse and dry.
Important Considerations and Tips
* Not for All Silver: This method is generally safe for most sterling silver and silver-plated items. However, it’s not recommended for antique silver pieces, especially those with delicate finishes or embellishments. Always test a small, inconspicuous area first before cleaning the entire piece.
* Avoid Gemstones and Pearls: This method is not suitable for silver items with gemstones or pearls, as the heat and chemicals can damage them.
* Don’t Overcrowd the Bowl: Make sure the silver items are not overcrowded in the bowl. They need to be in contact with the aluminum foil for the reaction to work properly.
* Proper Ventilation: While the fumes are not toxic, it’s always a good idea to clean your silver in a well-ventilated area.
* Preventing Future Tarnish: To prevent your silver from tarnishing quickly in the future, store it in airtigh
Okay, let’s face it, tarnished silver is a bummer. You pull out your beautiful silverware or that cherished silver necklace, and instead of gleaming, it’s looking dull and… well, tarnished! But don’t despair! You don’t need harsh chemicals or expensive cleaners to bring back the shine. I’m going to show you a super easy and effective way to clean your silver using ingredients you probably already have in your kitchen: salt, baking soda, and aluminum foil. Trust me, it’s like magic!
What You’ll Need
Before we dive in, let’s gather our supplies. This is a pretty low-key project, so you won’t need much:
* A glass or plastic bowl (avoid metal, except for the foil!)
* Aluminum foil
* Boiling water (be careful!)
* Baking soda
* Salt (table salt works perfectly)
* Tongs or a utensil for retrieving the silver
* A soft cloth or microfiber towel for polishing
How It Works: The Science Behind the Shine
So, how does this seemingly simple concoction actually clean silver? It’s all about a chemical reaction! Tarnish on silver is silver sulfide, which forms when silver reacts with sulfur in the air. The aluminum foil, baking soda, and salt create an electrolytic reaction. The aluminum is more reactive than the silver, so it attracts the sulfur. The baking soda and salt help to conduct the electricity and facilitate the transfer of the sulfur from the silver to the aluminum. Pretty cool, right?
Step-by-Step Instructions: Let’s Get Cleaning!
Alright, let’s get down to business and make that silver sparkle!
1. Prepare the Bowl: Line your bowl completely with aluminum foil. Make sure the shiny side is facing up, as this is the side that will be in contact with the water and silver. You want good contact between the foil and the water.
2. Add the Baking Soda and Salt: Pour in one tablespoon of baking soda and one tablespoon of salt into the foil-lined bowl. Don’t worry about being super precise; a little more or less won’t hurt.
3. Pour in the Boiling Water: Carefully pour boiling water into the bowl. You’ll need enough water to completely submerge the silver items you want to clean. Be extremely cautious when handling boiling water to avoid burns.
4. Submerge the Silver: Gently place your tarnished silver items into the bowl, making sure they are touching the aluminum foil. This is crucial for the chemical reaction to work. If you have a lot of silver, you might need to do this in batches to ensure everything is in contact with the foil.
5. Wait and Watch: Now comes the waiting game! You’ll start to see the tarnish disappear almost immediately. The amount of time it takes will depend on how tarnished the silver is. For lightly tarnished items, a few minutes might be enough. For heavily tarnished pieces, you might need to wait 10-15 minutes, or even longer. Keep an eye on it and check periodically. You might notice a sulfurous smell – that’s the tarnish being transferred to the aluminum!
6. Remove and Rinse: Once the tarnish is gone (or significantly reduced), carefully remove the silver items from the bowl using tongs or a utensil. Rinse them thoroughly under warm running water to remove any residue from the baking soda and salt.
7. Dry and Polish: Use a soft cloth or microfiber towel to dry the silver completely. As you dry it, you’ll also be polishing it, bringing out its natural shine. You might need to use a bit of elbow grease for stubborn spots.
Dealing with Heavily Tarnished Silver
Sometimes, silver is so heavily tarnished that one treatment isn’t enough. Don’t worry, you can repeat the process!
* Repeat the Process: If your silver is still tarnished after the first treatment, simply repeat steps 1-7. You might need to use fresh aluminum foil, baking soda, and salt for the best results.
* Increase the Concentration: For really stubborn tarnish, you can try increasing the amount of baking soda and salt you use. Try using two tablespoons of each instead of one.
* Extend the Soaking Time: You can also try letting the silver soak for a longer period of time, up to 30 minutes or even an hour. Just keep an eye on it to make sure the aluminum foil doesn’t disintegrate too much.
Cleaning Silver with Intricate Designs
If you’re cleaning silver with intricate designs or hard-to-reach areas, you might need to take a slightly different approach.
* Use a Soft Brush: After soaking the silver, use a soft-bristled brush (like an old toothbrush) to gently scrub away any remaining tarnish in the crevices.
* Make a Paste: You can also make a paste of baking soda and water and apply it directly to the tarnished areas. Let it sit for a few minutes, then rinse and dry.
Important Considerations and Tips
* Not for All Silver: This method is generally safe for most sterling silver and silver-plated items. However, it’s not recommended for antique silver pieces, especially those with delicate finishes or embellishments. Always test a small, inconspicuous area first before cleaning the entire piece.
* Avoid Gemstones and Pearls: This method is not suitable for silver items with gemstones or pearls, as the heat and chemicals can damage them.
* Don’t Overcrowd the Bowl: Make sure the silver items are not overcrowded in the bowl. They need to be in contact with the aluminum foil for the reaction to work properly.
* Proper Ventilation: While the fumes are not toxic, it’s always a good idea to clean your silver in a well-ventilated area.
* Preventing Future Tarnish: To prevent your silver from tarnishing quickly in the future, store it in airtight containers or bags. You can also place anti-tarnish strips in the containers to absorb sulfur and keep your silver shiny for longer.
Troubleshooting
* Silver Not Cleaning: If your silver isn’t cleaning, make sure the aluminum foil is making good contact with the silver and the water. Also, ensure the water is hot enough. You might also need to increase the concentration of baking soda and salt or extend the soaking time.
* Aluminum Foil Disintegrating: If the aluminum foil is disintegrating too quickly, it might be too thin. Try using a thicker foil or doubling up the foil.
* Residue on Silver: If you notice a white residue on your silver after cleaning, it’s likely just baking soda or salt. Simply rinse the silver thoroughly under warm water and dry it with a soft cloth.
Why I Love This Method
I absolutely love this method for cleaning silver because it’s so easy, inexpensive, and effective. Plus, it’s a much gentler alternative to harsh chemical cleaners. I’ve used it on everything from silverware to jewelry, and it always delivers amazing results. It’s so satisfying to see that tarnish disappear and the silver regain its beautiful shine! Give it a try, and I think you’ll be just as impressed as I am!
Alternative Cleaning Solutions
While the salt, baking soda, and aluminum foil method is my go-to, there are other DIY silver cleaning solutions you can try:
* Toothpaste: A small amount of non-gel toothpaste can be gently rubbed onto tarnished silver with a soft cloth. Rinse thoroughly and dry. Be careful not to use toothpaste with abrasive ingredients, as it can scratch the silver.
* Lemon Juice: Soak silver in lemon juice for a few hours, then rinse and dry. The acidity of the lemon juice can help to remove tarnish.
* Vinegar: Similar to lemon juice, vinegar can also be used to soak tarnished silver. Mix vinegar with water and soak the silver for a few hours, then rinse and dry.
Remember to always test any cleaning method on a small, inconspicuous area first to ensure it doesn’t damage the silver.
I hope this guide helps you bring back the sparkle to your silver! Happy cleaning!
Conclusion
So, there you have it! Cleaning silver with salt isn’t just a clever hack; it’s a game-changer for anyone who wants to keep their silverware, jewelry, and other silver items sparkling without resorting to harsh chemicals or expensive professional cleaning services. We’ve walked you through the simple steps, explained the science behind the magic, and hopefully, dispelled any doubts you might have had about its effectiveness.
Why is this DIY trick a must-try? Because it’s incredibly effective, surprisingly affordable, and remarkably gentle on your precious silver. Think about it: you likely already have the necessary ingredients – salt, baking soda (optional, but a great booster!), aluminum foil, and water – sitting in your pantry. No need to run to the store for specialized cleaners that might contain abrasive chemicals that could damage delicate silver pieces over time. This method is not only cost-effective but also environmentally friendly, reducing your reliance on potentially harmful commercial products.
But the benefits extend beyond just cost and convenience. This method is particularly useful for intricate silver pieces with detailed designs or hard-to-reach areas. The chemical reaction between the aluminum foil, salt, and tarnish allows the cleaning solution to penetrate even the smallest crevices, lifting away the grime and restoring the silver’s original luster.
Looking for variations? Absolutely! As mentioned earlier, adding baking soda to the solution can enhance its cleaning power, especially for heavily tarnished items. You can also experiment with the water temperature. While hot water is generally recommended, some users have found that slightly cooler water works just as well, particularly for delicate or antique silver. Another variation involves using a stainless steel pot instead of an aluminum pan. While aluminum foil is crucial for the chemical reaction, some prefer the stability and size of a stainless steel pot, lining it with aluminum foil before adding the water and other ingredients.
For smaller items like jewelry, you can create a smaller-scale setup using a glass bowl lined with aluminum foil. Just ensure the silver item is fully submerged in the solution for optimal results. Remember to always rinse your silver thoroughly after cleaning and dry it immediately with a soft, lint-free cloth to prevent water spots and further tarnishing.
We are confident that once you try cleaning silver with salt, you’ll be amazed by the results. It’s a simple, effective, and safe way to restore the beauty of your silver items. Don’t just take our word for it, though. We encourage you to give it a try and see the difference for yourself.
And most importantly, we want to hear about your experience! Did you find this method as effective as we did? Did you try any variations? What kind of silver items did you clean? Share your tips, tricks, and before-and-after photos in the comments below. Your feedback will not only help other readers but also contribute to a community of silver-cleaning enthusiasts who are passionate about preserving the beauty of their treasured possessions. Let’s keep those silver items sparkling!
Frequently Asked Questions (FAQ)
What kind of salt should I use?
Regular table salt (sodium chloride) is perfectly fine for cleaning silver using this method. You don’t need to use fancy sea salt or kosher salt. The key is the sodium chloride content, which is consistent across most common table salts. Iodized salt is also acceptable, although some believe that non-iodized salt is preferable to avoid any potential staining, though this is rare. The important thing is to ensure the salt dissolves completely in the water.
How long should I soak the silver?
The soaking time depends on the level of tarnish. For lightly tarnished silver, a few minutes might be sufficient. For heavily tarnished items, you may need to soak them for up to 10-15 minutes. Keep an eye on the silver and check its progress periodically. You’ll see the tarnish gradually lifting off the silver and transferring to the aluminum foil. Once the tarnish is gone, remove the silver from the solution.
Can I clean silver-plated items using this method?
Yes, you can generally clean silver-plated items using this method. However, it’s crucial to be extra cautious. Silver plating is a thin layer of silver over a base metal, and excessive or harsh cleaning can potentially damage or remove the plating. Reduce the soaking time and monitor the silver closely. If you notice any signs of damage or discoloration, remove the item immediately. For valuable or antique silver-plated items, it’s always best to consult with a professional silver cleaner.
Will this method work on all types of tarnish?
This method is highly effective for removing silver sulfide tarnish, which is the most common type of tarnish that forms on silver. However, it might not be as effective on other types of tarnish or stains, such as those caused by certain chemicals or food substances. In such cases, you may need to try other cleaning methods or consult with a professional.
Is it safe to clean jewelry with gemstones using this method?
It depends on the type of gemstone. Some gemstones, such as diamonds, rubies, and sapphires, are generally safe to clean using this method. However, other gemstones, such as pearls, opals, turquoise, and emeralds, are more delicate and can be damaged by the heat, salt, or baking soda. Avoid soaking jewelry with these types of gemstones in the solution. If you’re unsure, it’s best to clean the silver parts of the jewelry separately, avoiding contact with the gemstones, or consult with a jeweler.
Why does the aluminum foil turn black?
The black residue on the aluminum foil is silver sulfide, the tarnish that was removed from the silver. The chemical reaction between the aluminum foil, salt, and tarnish causes the silver sulfide to transfer from the silver to the aluminum foil. This is why the aluminum foil turns black and the silver becomes clean.
Can I reuse the solution?
No, it’s not recommended to reuse the solution. Once the solution has been used to clean silver, it becomes saturated with silver sulfide and its cleaning power diminishes. Reusing the solution will not be as effective and may even leave a residue on the silver. It’s best to make a fresh solution each time you clean silver.
How can I prevent silver from tarnishing in the future?
There are several ways to prevent silver from tarnishing. Store your silver in airtight containers or bags to protect it from exposure to air and moisture. You can also place anti-tarnish strips or cloths in the storage containers to absorb sulfur compounds that cause tarnish. Avoid exposing your silver to harsh chemicals, such as chlorine bleach, and clean it regularly to prevent tarnish from building up. Polishing your silver with a silver polish can also help to protect it from tarnishing.
What if the tarnish is not completely removed?
If the tarnish is not completely removed after soaking, you can try gently rubbing the silver with a soft cloth or sponge while it’s still submerged in the solution. You can also make a paste of baking soda and water and gently rub it on the tarnished areas. Rinse the silver thoroughly and dry it immediately. For stubborn tarnish, you may need to repeat the process or consult with a professional silver cleaner.
Is cleaning silver with salt safe for the environment?
Yes, cleaning silver with salt is generally considered to be a safe and environmentally friendly method. It uses common household ingredients and avoids the use of harsh chemicals that can be harmful to the environment. However, it’s important to dispose of the used solution properly. Avoid pouring it down the drain, as it may contain small amounts of silver sulfide. Instead, dilute the solution with plenty of water and pour it onto a grassy area or dispose of it according to your local regulations.
Leave a Comment