
Salt and Baking Soda Cleaner: Your Secret Weapon for a Sparkling Home!
Ever feel like you’re battling endless grime and stains around your house? I know I have! For generations, our grandmothers relied on simple, natural ingredients to keep their homes spotless. Think about it – before the age of harsh chemicals, they used the power of pantry staples like salt and baking soda. This isn’t just about cleaning; it’s about connecting to a tradition of resourcefulness and sustainable living.
But why should you ditch the expensive, store-bought cleaners and embrace this time-tested method? Because a salt and baking soda cleaner is incredibly effective, surprisingly versatile, and much gentler on both your home and the environment. Plus, let’s be honest, who doesn’t love a good DIY project that saves money and reduces waste? This article will guide you through easy-to-follow recipes and techniques, empowering you to create your own powerful cleaning solutions using just these two simple ingredients. Get ready to unlock the cleaning potential hiding in your kitchen cabinet!
DIY All-Purpose Cleaner: Salt and Baking Soda Power!
Hey everyone! I’m super excited to share one of my favorite DIY cleaning hacks with you: a powerful all-purpose cleaner using just salt and baking soda! Seriously, these two ingredients are cleaning superheroes, and when combined, they can tackle grime, stains, and odors like nobody’s business. Plus, it’s eco-friendly and saves you a ton of money compared to store-bought cleaners. Let’s get started!
What You’ll Need
Before we dive in, let’s gather our supplies. This is a pretty simple recipe, so you probably already have most of these things on hand:
* Baking Soda: The workhorse of this cleaner! It’s a mild abrasive and deodorizer.
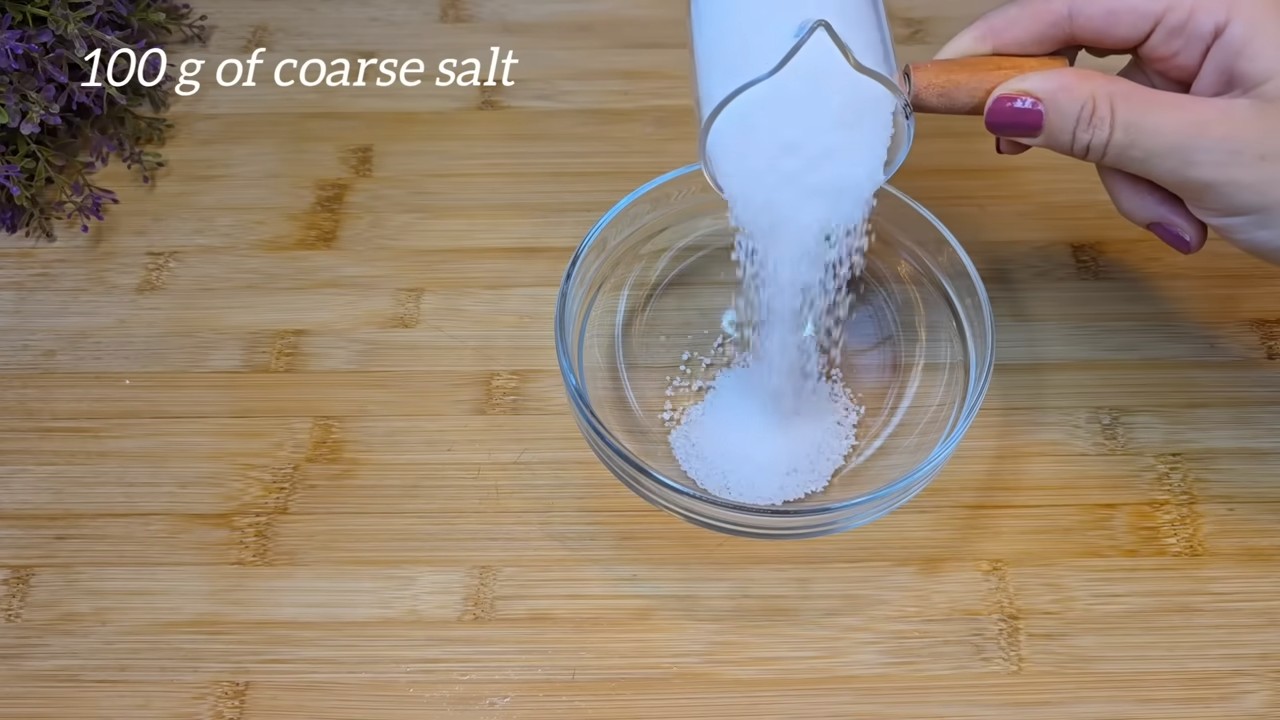
* Table Salt (or Coarse Salt): Adds extra scrubbing power.
* Warm Water: Acts as the solvent and helps everything mix.
* Spray Bottle: To easily apply the cleaner.
* Mixing Bowl: For combining the ingredients.
* Spoon or Whisk: To stir everything together.
* Optional: Essential Oils (like lemon, tea tree, or lavender) for fragrance and added cleaning power. I usually add about 10-15 drops.
* Optional: White Vinegar: For extra tough stains. (Use with caution and *never* mix with bleach!)
The Magic Ratio: Getting the Proportions Right
The key to a successful DIY cleaner is getting the proportions right. I’ve experimented a lot, and this is what I’ve found works best:
* 1/2 cup Baking Soda
* 1/4 cup Table Salt
* 2 cups Warm Water
* Optional: 10-15 drops Essential Oil
* Optional: 1/4 cup White Vinegar (for extra cleaning power on tough stains)
Remember: Always test the cleaner on an inconspicuous area first, especially on delicate surfaces.
Step-by-Step Instructions: Mixing Your Cleaner
Okay, let’s get down to business! Here’s how to mix your all-purpose cleaner:
1. Combine the Dry Ingredients: In your mixing bowl, pour in the 1/2 cup of baking soda and 1/4 cup of salt. Give them a good stir to make sure they’re evenly mixed. This helps prevent clumping later on.
2. Add the Warm Water: Slowly pour in the 2 cups of warm water. Stir constantly as you pour to help the baking soda and salt dissolve. You might notice some fizzing, which is perfectly normal.
3. Stir Until Dissolved: Keep stirring until the baking soda and salt are mostly dissolved. It’s okay if there’s a little bit of sediment at the bottom; it won’t affect the cleaner’s effectiveness.
4. Add Essential Oils (Optional): If you’re using essential oils, now’s the time to add them. I love using lemon oil for its fresh scent and degreasing properties, or tea tree oil for its antibacterial benefits. Lavender is also a great choice for a calming scent. Add 10-15 drops and stir well to distribute the oil evenly.
5. Add White Vinegar (Optional, for Tough Stains): If you’re dealing with particularly stubborn stains, you can add 1/4 cup of white vinegar. Be careful, as the mixture will fizz up quite a bit when you add the vinegar. Stir gently to combine. Important: Never mix vinegar with bleach, as this can create dangerous fumes.
6. Transfer to Spray Bottle: Carefully pour the mixture into your spray bottle. A funnel can be helpful to avoid spills.
7. Shake Well Before Each Use: Because the baking soda and salt can settle at the bottom, it’s important to shake the spray bottle well before each use to ensure the ingredients are properly mixed.
Where to Use Your DIY Cleaner: A Cleaning Guide
This all-purpose cleaner is incredibly versatile! Here are some of my favorite places to use it:
* Kitchen Counters: It’s great for wiping down kitchen counters after cooking. Just spray, let it sit for a minute or two, and then wipe clean with a damp cloth.
* Sinks: It works wonders on sinks, removing soap scum and water spots. For extra scrubbing power, sprinkle a little baking soda directly onto the sink before spraying.
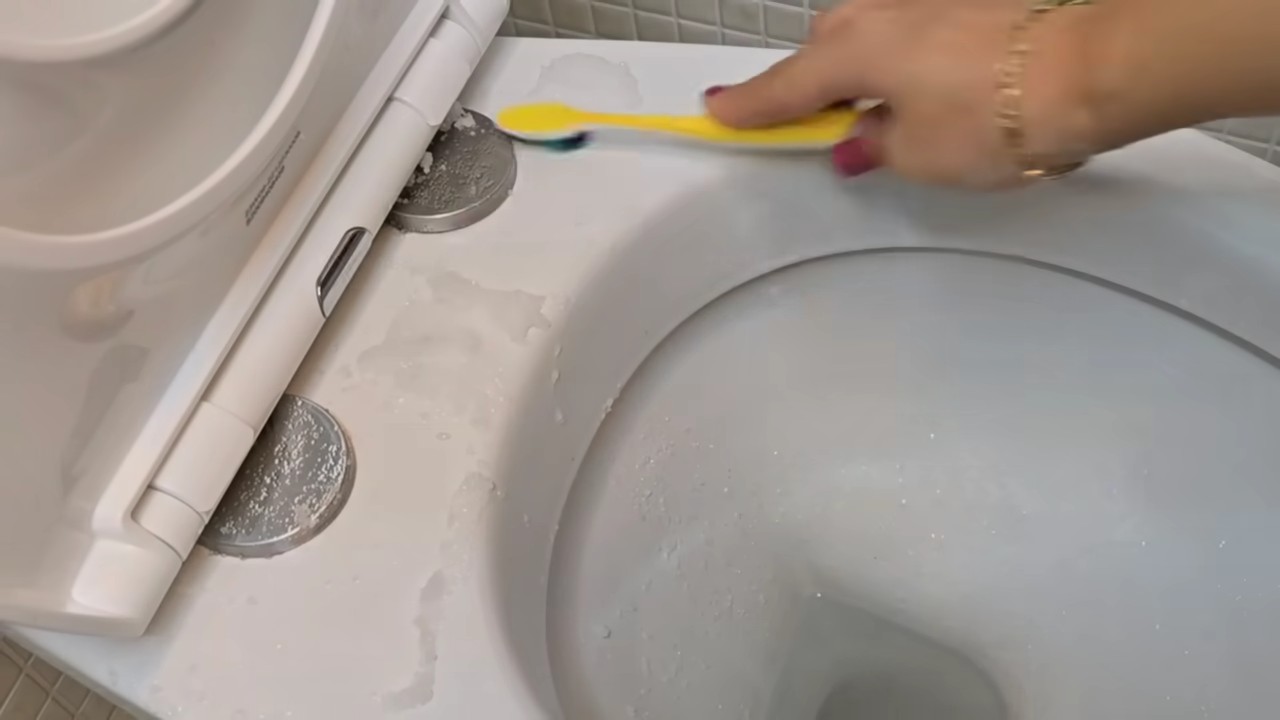
* Bathroom Surfaces: Use it on bathroom counters, sinks, and even shower walls (though you might need a stronger cleaner for heavy mildew).
* Appliances: It’s safe to use on most appliances, like refrigerators, microwaves, and stovetops. Just be sure to unplug the appliance before cleaning and avoid spraying directly into electrical components.
* Floors (Certain Types): This cleaner can be used on some types of floors, like tile and linoleum. However, avoid using it on hardwood floors, as the water can damage the wood. Always test in an inconspicuous area first!
* Garbage Disposal: Pour some down the garbage disposal to freshen it up and eliminate odors. Let it sit for a few minutes, then run the disposal with cold water.
* Cleaning Sponges: Soak your sponges in a solution of this cleaner to disinfect them and remove odors.
Tackling Tough Stains: Level Up Your Cleaning Game
While this cleaner is great for everyday cleaning, sometimes you need a little extra oomph to tackle tough stains. Here are a few tips:
* For Stubborn Grease: Add a few drops of dish soap to the cleaner for extra degreasing power.
* For Hard Water Stains: Use a stronger vinegar solution. You can even soak a paper towel in vinegar and place it over the stain for a few hours.
* For Baked-On Food: Sprinkle baking soda directly onto the stain, then spray with the cleaner. Let it sit for a while to loosen the food, then scrub with a sponge or brush.
* For Mildew: While this cleaner can help prevent mildew, it’s not the best for removing existing mildew. For that, you’ll need a stronger solution, like bleach (use with caution and always ventilate the area well).
Safety First: Important Precautions
While this DIY cleaner is generally safe, it’s still important to take a few precautions:
* Test on an Inconspicuous Area: Always test the cleaner on a small, hidden area before using it on a larger surface to make sure it doesn’t damage or discolor the material.
* Avoid Contact with Eyes: Avoid getting the cleaner in your eyes. If you do, rinse thoroughly with water.
* Keep Out of Reach of Children and Pets: As with all cleaning products, keep this cleaner out of reach of children and pets.
* Never Mix with Bleach: This is super important! Never mix this cleaner with bleach, as this can create dangerous fumes.
* Ventilate the Area: When cleaning, especially in enclosed spaces, make sure to ventilate the area well.
Storage Tips: Keeping Your Cleaner Fresh
To keep your DIY cleaner fresh and effective, follow these storage tips:
* Store in a Cool, Dark Place: Store the spray bottle in a cool, dark place away from direct sunlight.
* Shake Well Before Each Use: As mentioned before, shake the bottle well before each use to ensure the ingredients are properly mixed.
* Use Within a Few Months: While the cleaner won’t necessarily “go bad,” it’s best to use it within a few months for optimal effectiveness.
Why I Love This DIY Cleaner: The Benefits
I’m a huge fan of this DIY cleaner for so many reasons:
* It’s Eco-Friendly: It’s made with natural ingredients and reduces your reliance on harsh chemicals.
* It’s Budget-Friendly: Baking soda and salt are incredibly cheap, so you’ll save a ton of money compared to buying store-bought cleaners.
* It’s Versatile: You can use it on a wide variety of surfaces and for different cleaning tasks.
* It’s Customizable: You can add essential oils to create your own signature scent and boost the cleaning power.
* It’s Safe: It’s generally safe to use around children and pets (though you should still keep it out of their reach).
Troubleshooting: Common Issues and Solutions
Sometimes, things don’t go exactly as planned. Here are a few common issues you might encounter and how to fix them:
* Baking Soda Not Dissolving: Make sure you’re using warm water, not cold. You can also try adding the baking soda to the water gradually, stirring constantly.
* Spray Bottle Clogging: This can happen if the baking soda isn’t fully dissolved. Try straining the cleaner through a fine-mesh sieve before pouring it into the spray bottle.
* Cleaner Not Working as Well as Expected: Make sure you’re using the correct proportions of ingredients. You can also try adding
Conclusion
So, there you have it! The salt and baking soda cleaner – a simple, effective, and surprisingly powerful solution for tackling grime and stains around your home. We’ve explored how these two humble ingredients, often relegated to the pantry, can transform into a cleaning powerhouse, saving you money and reducing your reliance on harsh chemicals.
Why is this DIY trick a must-try? Because it’s more than just a cleaner; it’s a return to basics. It’s about harnessing the natural abrasive and deodorizing properties of salt and baking soda to achieve sparkling results without the environmental impact of many commercial products. It’s about knowing exactly what’s in your cleaning solution and feeling good about using it around your family and pets.
But the benefits don’t stop there. This salt and baking soda cleaner is incredibly versatile. While we’ve focused on general cleaning applications, don’t be afraid to experiment!
Here are a few suggestions and variations to get you started:
* **For extra stubborn stains:** Create a paste with a higher concentration of salt and baking soda. Apply it to the stain, let it sit for a few minutes, and then scrub gently.
* **To boost the cleaning power:** Add a few drops of your favorite essential oil, like lemon or tea tree, for added fragrance and antibacterial properties.
* **For delicate surfaces:** Test the cleaner on an inconspicuous area first to ensure it doesn’t scratch or damage the material. You might want to use a softer cloth or sponge.
* **For grout cleaning:** Mix the salt and baking soda with a little white vinegar to create a fizzing paste that helps lift dirt and grime from grout lines. Be careful when using vinegar on certain surfaces like marble.
The possibilities are truly endless! The beauty of this DIY cleaner lies in its adaptability. You can tailor it to your specific needs and preferences, creating a cleaning solution that’s perfectly suited to your home.
We understand that trying something new can sometimes feel daunting, but we urge you to give this salt and baking soda cleaner a try. It’s a small change that can make a big difference, both in the cleanliness of your home and in your overall well-being.
We’re confident that you’ll be amazed by the results. So, ditch the expensive, chemical-laden cleaners and embrace the power of salt and baking soda. Your home – and your wallet – will thank you for it!
Now, we want to hear from you! Have you tried this DIY salt and baking soda cleaner? What are your favorite uses for it? What variations have you discovered? Share your experiences, tips, and tricks in the comments below. Let’s build a community of DIY cleaning enthusiasts and help each other create cleaner, healthier homes. We can’t wait to see what you come up with!
Frequently Asked Questions (FAQ)
What exactly makes salt and baking soda such effective cleaning agents?
Salt, specifically table salt or even better, kosher salt or sea salt, acts as a mild abrasive. Its granular texture helps to scrub away dirt, grime, and even some types of stains without being overly harsh on most surfaces. Baking soda, on the other hand, is a mild alkali. This means it can react with acids, helping to neutralize odors and dissolve grease and dirt. It also has gentle abrasive properties, complementing the action of the salt. The combination of these two creates a synergistic effect, where they work together to clean more effectively than either ingredient would on its own.
What surfaces can I safely clean with a salt and baking soda mixture?
This cleaner is generally safe for use on a wide variety of surfaces, including:
* **Sinks and countertops:** Stainless steel, porcelain, ceramic, and even some types of stone countertops can be cleaned with this mixture. Always test in an inconspicuous area first, especially with natural stone.
* **Tubs and showers:** It’s great for removing soap scum and mildew stains.
* **Ovens and stovetops:** The abrasive action helps to loosen baked-on food and grease.
* **Grout:** As mentioned earlier, combining it with vinegar can be particularly effective for grout cleaning.
* **Pots and pans:** It can help remove burnt food residue.
* **Drains:** Pouring a mixture down the drain followed by hot water can help freshen and deodorize.
However, it’s important to exercise caution on certain surfaces:
* **Delicate surfaces:** Avoid using it on polished or varnished wood, as it can scratch the finish.
* **Soft plastics:** Test in an inconspicuous area first, as it may scratch some types of plastic.
* **Gold or silver plated items:** The abrasive nature can damage the plating.
* **Marble:** While some people use it on marble, the acidity of baking soda can potentially etch the surface over time. It’s best to avoid it or use it very sparingly and rinse thoroughly.
What’s the best ratio of salt to baking soda for cleaning?
A good starting point is a 1:1 ratio. For example, you could mix 1/2 cup of salt with 1/2 cup of baking soda. However, you can adjust the ratio depending on the specific cleaning task. For more abrasive cleaning, you might use a slightly higher proportion of salt. For deodorizing or lighter cleaning, you might use more baking soda. The key is to experiment and find what works best for you.
How do I store the salt and baking soda cleaner?
You can store the dry mixture of salt and baking soda in an airtight container in a cool, dry place. This will prevent it from clumping or absorbing moisture. If you’ve mixed it with water to create a paste or solution, it’s best to use it immediately. You can store the wet mixture for a short period (a day or two) in a sealed container, but it may lose some of its effectiveness over time.
Can I use this cleaner on clothing stains?
While salt and baking soda can be helpful for some clothing stains, it’s important to proceed with caution. Baking soda is generally safe for most fabrics, but salt can be abrasive and may damage delicate materials. It’s always best to test the cleaner on an inconspicuous area of the garment first. For clothing stains, you might want to create a paste of baking soda and water and apply it to the stain. Let it sit for a few minutes, then gently rub and rinse. For tougher stains, you can try adding a small amount of salt to the paste, but be extra careful.
Is this cleaner safe for septic systems?
Yes, salt and baking soda are generally considered safe for septic systems. They are natural ingredients that won’t harm the beneficial bacteria in your septic tank. However, it’s always a good idea to avoid pouring excessive amounts of any cleaning product down the drain, even natural ones.
Can I use this cleaner to remove hard water stains?
Yes, the salt and baking soda cleaner can be effective for removing hard water stains, especially when combined with vinegar. The vinegar helps to dissolve the mineral deposits, while the salt and baking soda provide abrasive cleaning power. Create a paste of salt, baking soda, and vinegar, apply it to the hard water stains, let it sit for a few minutes, and then scrub gently. Rinse thoroughly with water.
What are some other natural cleaning alternatives I can use with salt and baking soda?
Besides vinegar, other natural cleaning alternatives that pair well with salt and baking soda include:
* **Lemon juice:** Its acidity helps to cut through grease and grime, and it also has a pleasant scent.
* **Hydrogen peroxide:** A mild disinfectant and bleaching agent. Use with caution on colored fabrics.
* **Essential oils:** As mentioned earlier, essential oils like lemon, tea tree, and lavender can add fragrance and antibacterial properties.
* **Borax:** A natural mineral that can be used as a cleaning booster and disinfectant.
Remember to always research and understand the properties of any cleaning agent before using it, and to test it in an inconspicuous area first.
What if the salt and baking soda cleaner doesn’t work on a particular stain?
Sometimes, even the most effective cleaners won’t work on every stain. If the salt and baking soda cleaner doesn’t remove a particular stain, you may need to try a different approach. Consider using a specialized stain remover or consulting a professional cleaning service. It’s also important to act quickly when dealing with stains, as the longer they sit, the harder they are to remove.
Is it really worth making my own cleaner when I can just buy one at the store?
Absolutely! While store-bought cleaners offer convenience, making your own salt and baking soda cleaner offers several advantages:
* **Cost-effectiveness:** Salt and baking soda are inexpensive ingredients, making this a very budget-friendly cleaning option.
* **Environmental friendliness:** You’re reducing your reliance on harsh chemicals and plastic packaging.
* **Control over ingredients:** You know exactly what’s in your cleaner, avoiding potentially harmful chemicals and allergens.
* **Customization:** You can tailor the cleaner to your specific needs and preferences.
Ultimately, the decision is yours, but we believe that the benefits of making your own salt and baking soda cleaner outweigh the convenience of buying a store-bought product. Give it a try and see for yourself!
Leave a Comment