
Grow Peppers Windowsill – sounds impossible, right? I used to think so too! But trust me, with a few clever tricks and a little DIY magic, you can be harvesting vibrant, flavorful peppers right from your windowsill, no matter the season. Imagine adding a dash of homegrown heat to your winter meals, all thanks to your indoor garden.
Growing peppers indoors has a surprisingly long history. While large-scale pepper cultivation is relatively modern, the idea of nurturing plants indoors dates back centuries. Think of the ancient Romans with their orangeries, or the Victorian era’s fascination with indoor ferns. We’re simply adapting that age-old desire to bring nature inside, but with a spicy twist!
Why bother with this DIY project? Well, for starters, it’s incredibly rewarding! There’s something deeply satisfying about nurturing a plant from seed to fruit. Plus, growing your own peppers means you control exactly what goes into them – no pesticides, no mystery ingredients. But more importantly, for those of us with limited outdoor space, or those who live in climates where pepper growing is challenging, learning how to grow peppers windowsill opens up a world of possibilities. You can enjoy fresh, delicious peppers year-round, regardless of the weather outside. So, let’s dive in and discover the secrets to a thriving indoor pepper garden!
Growing Peppers Indoors: A Beginner’s Guide to Windowsill Pepper Paradise
Hey there, fellow plant enthusiasts! Ever dreamt of having fresh, spicy peppers right at your fingertips, even if you don’t have a sprawling garden? Well, you’re in luck! Growing peppers indoors on a windowsill is totally achievable, and I’m here to guide you through every step of the process. Get ready to add some zest to your life (and your meals!) with your very own windowsill pepper garden.
Choosing the Right Peppers
Before we dive into the nitty-gritty, let’s talk peppers. Not all peppers are created equal when it comes to indoor growing. We need to consider size, light requirements, and overall ease of care. Here’s what I recommend:
* Compact Varieties: Think about smaller pepper plants that won’t outgrow your windowsill. Some excellent choices include:
* Thai Peppers: These little firecrackers are prolific producers and don’t need a ton of space.
* Tabasco Peppers: Famous for hot sauce, these are also relatively compact and easy to manage.
* Jalapeño Peppers: A classic choice, but be sure to select a smaller variety like “Early Jalapeño.”
* Sweet Peppers (like mini bells): If you prefer something milder, mini bell peppers are a great option. Look for varieties specifically bred for container growing.
* Consider Light Needs: Peppers need plenty of sunlight, so choose varieties that can tolerate slightly less than the full sun a garden would provide. The varieties listed above generally do well with windowsill light.
* Read Seed Packets: Always check the seed packet for information on plant size, light requirements, and days to maturity. This will help you make the best choice for your windowsill garden.
Gathering Your Supplies
Okay, now that we’ve picked our pepper varieties, let’s gather our supplies. Here’s what you’ll need:
* Pepper Seeds: Obviously! Choose your desired varieties from a reputable seed supplier.
* Seed Starting Tray or Small Pots: These will be used to germinate your seeds.
* Seed Starting Mix: This is a light, sterile mix that’s perfect for delicate seedlings. Don’t use regular potting soil for starting seeds.
* Larger Pots (4-6 inch): Once your seedlings are big enough, you’ll need to transplant them into larger pots.
* High-Quality Potting Soil: Choose a well-draining potting mix that’s specifically formulated for containers.
* Watering Can or Spray Bottle: For gentle watering.
* Grow Lights (Optional but Recommended): If your windowsill doesn’t get enough sunlight (at least 6-8 hours per day), you’ll need to supplement with grow lights.
* Fertilizer: A balanced liquid fertilizer formulated for vegetables.
* Small Stakes or Trellis (Optional): For supporting taller pepper plants.
* Spray Bottle with Water: For misting the plants to increase humidity.
Starting Your Pepper Seeds
This is where the magic begins! Starting your pepper seeds indoors gives them a head start before the weather warms up (or in our case, before they move to their permanent windowsill home).
1. Prepare Your Seed Starting Tray or Pots: Fill your seed starting tray or small pots with seed starting mix. Gently moisten the mix with water. You want it damp, not soggy.
2. Sow the Seeds: Make a small indentation (about 1/4 inch deep) in the center of each cell or pot. Place 2-3 pepper seeds in each indentation. This increases your chances of at least one seed germinating.
3. Cover the Seeds: Gently cover the seeds with seed starting mix.
4. Water Gently: Use a spray bottle to mist the surface of the soil. Avoid overwatering, as this can cause the seeds to rot.
5. Provide Warmth: Pepper seeds need warmth to germinate. The ideal temperature is between 75-85°F (24-29°C). You can use a heat mat specifically designed for seed starting, or simply place the tray in a warm location in your home.
6. Maintain Moisture: Keep the seed starting mix consistently moist, but not soggy. You can cover the tray with a clear plastic dome or plastic wrap to help retain moisture.
7. Wait Patiently: Pepper seeds can take anywhere from 7-21 days to germinate, so be patient! Once you see seedlings emerge, remove the plastic cover and move the tray to a bright location.
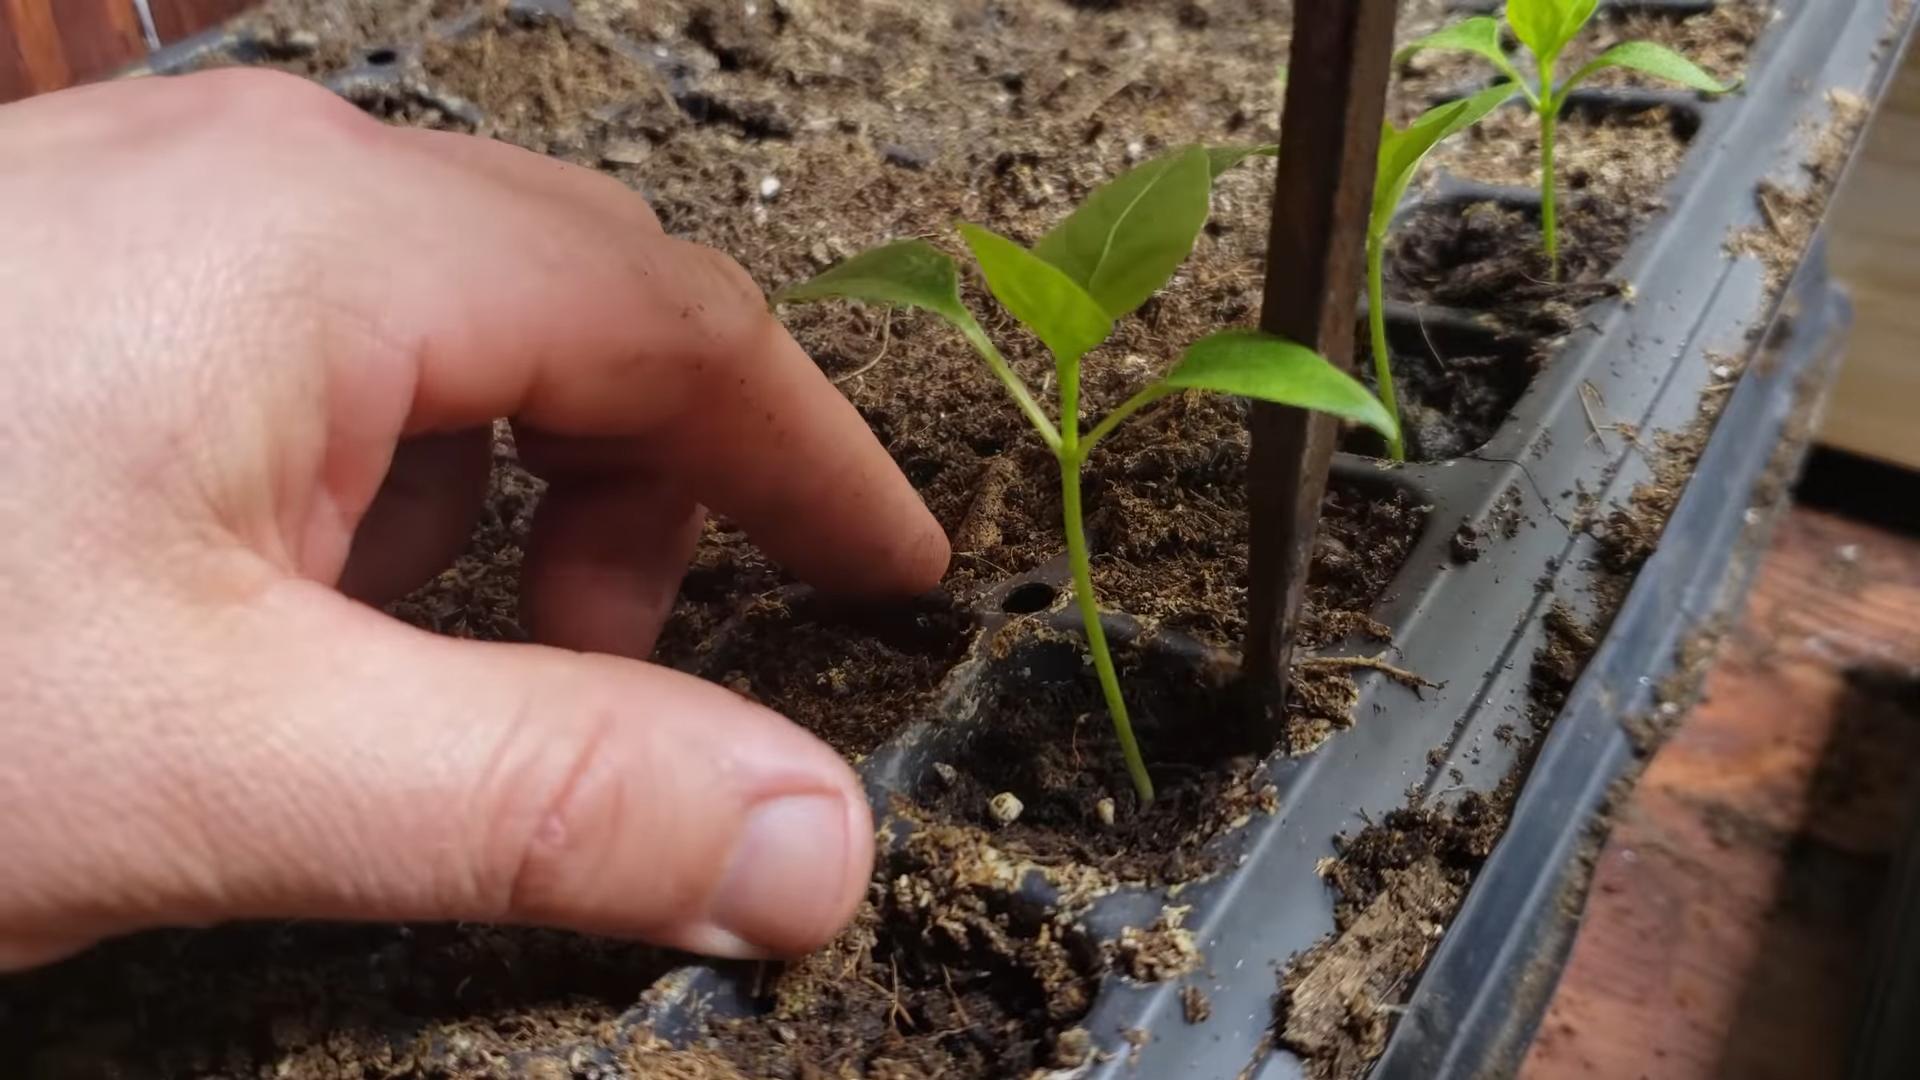
Transplanting Your Seedlings
Once your seedlings have developed their first set of true leaves (the leaves that look like miniature versions of pepper leaves, not the initial seed leaves), it’s time to transplant them into larger pots.
1. Prepare Your Larger Pots: Fill your 4-6 inch pots with high-quality potting soil.
2. Gently Remove the Seedlings: Carefully remove the seedlings from the seed starting tray or pots. Be gentle, as their roots are delicate. If the seedlings are crowded, you may need to separate them. Try to keep as much of the root ball intact as possible.
3. Plant the Seedlings: Make a hole in the center of each pot that’s large enough to accommodate the seedling’s root ball. Place the seedling in the hole and gently backfill with potting soil.
4. Water Thoroughly: Water the newly transplanted seedlings thoroughly.
5. Provide Support (Optional): If you’re growing taller pepper varieties, you may want to insert a small stake or trellis into the pot to provide support.
Caring for Your Windowsill Pepper Plants
Now comes the ongoing care. This is where you’ll nurture your little pepper plants and watch them grow into productive, pepper-producing machines!
1. Sunlight: Peppers need at least 6-8 hours of sunlight per day. Place your plants in a south-facing window if possible. If you don’t have enough natural light, supplement with grow lights. Position the grow lights a few inches above the plants.
2. Watering: Water your pepper plants when the top inch of soil feels dry to the touch. Avoid overwatering, as this can lead to root rot. Water deeply, until water drains out of the bottom of the pot.
3. Fertilizing: Feed your pepper plants with a balanced liquid fertilizer every 2-3 weeks. Follow the instructions on the fertilizer label.
4. Temperature: Peppers prefer warm temperatures, between 70-85°F (21-29°C). Avoid placing your plants near drafty windows or doors.
5. Humidity: Peppers like humidity. If your home is dry, you can increase humidity by misting the plants with water regularly or placing a tray of water near the plants.
6. Pollination: Pepper plants are self-pollinating, but sometimes they need a little help, especially indoors. You can hand-pollinate your plants by gently shaking the flowers or using a small paintbrush to transfer pollen from one flower to another.
7. Pruning: Pruning isn’t strictly necessary, but it can help to encourage bushier growth and more pepper production. You can pinch off the tips of the branches to encourage side growth.
8. Pest Control: Keep an eye out for pests like aphids, spider mites, and whiteflies. If you spot any pests, you can try spraying the plants with insecticidal soap or neem oil.
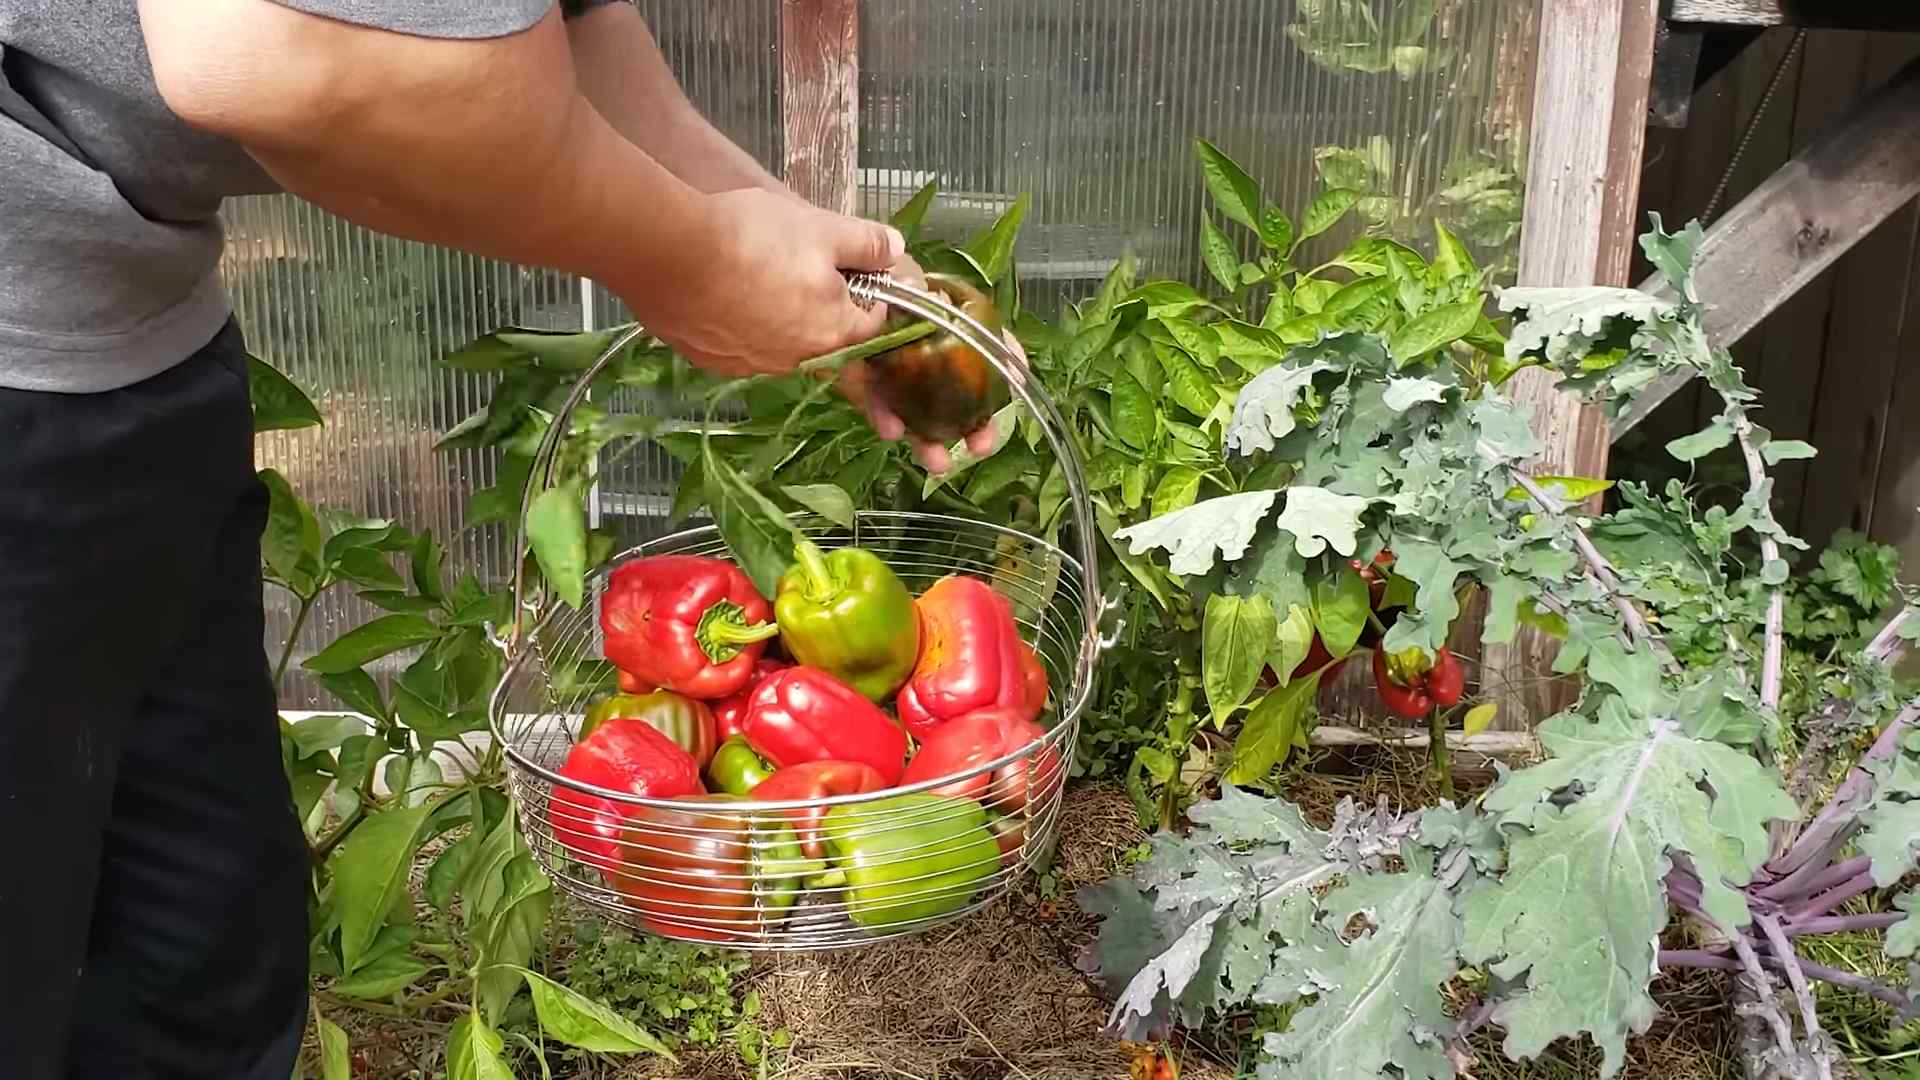
Harvesting Your Peppers
The moment you’ve been waiting for! Harvesting your peppers is the most rewarding part of the process.
1. Harvest When Ripe: Peppers are typically ready to harvest when they’ve reached their mature color and size. The color will vary depending on the variety.
2. Use Pruning Shears or Scissors: Use a sharp pair of pruning shears or scissors to cut the peppers from the plant. Be careful not to damage the plant.
3. Enjoy Your Harvest: Use your fresh peppers in your favorite recipes, or preserve them for later use.
Troubleshooting
Even with the best care, you might encounter some problems along the way. Here are a few common issues and how to address them:
* Yellowing Leaves: This could be a sign of overwatering, underwatering, or nutrient deficiency. Check the soil moisture and adjust your watering accordingly. If the soil is consistently moist, you may be overwatering. If the soil is dry, you may be underwatering. If the leaves are yellowing all over, it could be a sign of nutrient deficiency. Try fertilizing with a balanced liquid fertilizer.
* Dropping Flowers: This can be caused by temperature fluctuations, lack of pollination, or stress. Make sure your plants are in a stable environment and hand-pollinate the flowers if necessary.
* Pests: As mentioned earlier, keep an eye out for pests and treat them promptly with insecticidal soap or
Conclusion
So, there you have it! Growing peppers on a windowsill isn’t just a quirky gardening experiment; it’s a genuinely rewarding experience that brings a touch of summer sunshine indoors, even when the weather outside is less than inspiring. We’ve walked through the steps, from selecting the right pepper varieties to providing the optimal light and care. Now, it’s time to put that knowledge into action and embark on your own indoor pepper-growing adventure.
Why is this DIY trick a must-try? Because it’s accessible, space-saving, and incredibly satisfying. Imagine plucking fresh, vibrant peppers right from your windowsill, ready to add a burst of flavor to your favorite dishes. Forget those bland, store-bought peppers that have traveled miles to reach your plate. With windowsill-grown peppers, you’re in control of the entire process, ensuring the freshest, most flavorful produce possible. Plus, it’s a fantastic way to connect with nature, even if you don’t have a traditional garden.
But the fun doesn’t stop there! Feel free to experiment with different pepper varieties to discover your personal favorites. Jalapeños, bell peppers, chili peppers, even the fiery habaneros can thrive indoors with the right care. Consider using different types of potting mix to see which one yields the best results. You can also try different container sizes to optimize growth.
Don’t be afraid to get creative with your setup. A simple south-facing windowsill is a great starting point, but you can also supplement with grow lights if needed, especially during the darker winter months. Think about adding a small fan to improve air circulation and prevent fungal diseases. And remember to keep a close eye on your plants, adjusting your watering and fertilizing schedule as needed.
Ultimately, the key to success with growing peppers on a windowsill is observation and adaptation. Pay attention to your plants’ needs, and they’ll reward you with a bountiful harvest.
We’re confident that you’ll find this DIY trick to be both enjoyable and rewarding. So, grab your seeds, potting mix, and a sunny windowsill, and get ready to experience the joy of growing your own peppers indoors.
We encourage you to try this DIY trick and share your experience with us! Post photos of your windowsill pepper plants on social media using #WindowsillPeppers and tag us. We can’t wait to see your green thumbs in action! Let us know what varieties you’re growing, what challenges you’ve faced, and what tips you’ve learned along the way. Together, we can create a community of indoor pepper growers and inspire others to bring the garden indoors.
Frequently Asked Questions (FAQ)
What are the best pepper varieties to grow on a windowsill?
Smaller pepper varieties tend to do best on windowsills due to space constraints. Some excellent choices include:
* **Jalapeños:** These are relatively compact and produce a good yield of moderately spicy peppers.
* **Bell Peppers (especially dwarf varieties):** Look for varieties specifically bred for container gardening, as they will be more manageable.
* **Chili Peppers (like Thai or Serrano):** These are often prolific producers and add a fiery kick to your dishes.
* **Sweet Peppers (like mini sweet peppers):** These are perfect for snacking and add a touch of sweetness to salads.
* **Ornamental Peppers:** These are grown for their colorful foliage and peppers, adding visual appeal to your windowsill garden.
How much sunlight do windowsill peppers need?
Peppers need at least 6-8 hours of direct sunlight per day to thrive. A south-facing windowsill is ideal, as it receives the most sunlight. If you don’t have a south-facing window, an east- or west-facing window can also work, but you may need to supplement with grow lights, especially during the winter months. If your peppers are not getting enough light, they may become leggy (tall and spindly) and produce fewer peppers.
What type of potting mix should I use for windowsill peppers?
Use a well-draining potting mix specifically formulated for containers. Avoid using garden soil, as it can become compacted and doesn’t drain well, which can lead to root rot. A good potting mix will contain ingredients like peat moss, perlite, and vermiculite to provide good drainage and aeration. You can also add some compost to the potting mix to provide extra nutrients.
How often should I water my windowsill peppers?
Water your peppers when the top inch of soil feels dry to the touch. Avoid overwatering, as this can lead to root rot. When you water, water thoroughly until water drains out of the bottom of the pot. Be sure to empty the saucer underneath the pot to prevent the roots from sitting in water. The frequency of watering will depend on factors like the size of the pot, the type of potting mix, and the temperature and humidity of your home.
Do I need to fertilize my windowsill peppers?
Yes, peppers are heavy feeders and need regular fertilization to produce a good yield. Use a balanced fertilizer (e.g., 10-10-10) or a fertilizer specifically formulated for vegetables. Follow the instructions on the fertilizer label for application rates. Fertilize your peppers every 2-4 weeks during the growing season. You can also use a liquid fertilizer diluted in water for more frequent feeding.
How do I pollinate my windowsill peppers?
Peppers are self-pollinating, meaning they don’t need another plant to produce fruit. However, indoor peppers may need a little help with pollination, as there are no bees or other insects to do the job. You can hand-pollinate your peppers by gently shaking the plant or using a small paintbrush to transfer pollen from one flower to another. Do this in the morning when the flowers are open.
What are some common problems with windowsill peppers and how can I fix them?
Some common problems with windowsill peppers include:
* **Aphids:** These small, sap-sucking insects can weaken your plants. Control them with insecticidal soap or neem oil.
* **Spider Mites:** These tiny pests can cause yellowing and stippling of the leaves. Control them with insecticidal soap or neem oil.
* **Whiteflies:** These small, white insects can suck sap from your plants. Control them with insecticidal soap or yellow sticky traps.
* **Root Rot:** This is caused by overwatering and can lead to wilting and death of the plant. Prevent it by using well-draining potting mix and avoiding overwatering.
* **Blossom-End Rot:** This is caused by calcium deficiency and can lead to dark, sunken spots on the bottom of the peppers. Prevent it by adding calcium to the soil or using a calcium-rich fertilizer.
How long does it take for windowsill peppers to produce fruit?
The time it takes for windowsill peppers to produce fruit depends on the variety and growing conditions. Generally, it takes about 60-90 days from planting to harvest. Some faster-maturing varieties may produce fruit in as little as 50 days, while slower-maturing varieties may take up to 120 days.
Can I grow peppers on a windowsill year-round?
Yes, you can grow peppers on a windowsill year-round if you provide them with the right conditions. This includes adequate sunlight (or grow lights), proper watering and fertilization, and protection from pests and diseases. You may need to adjust your care routine depending on the season. For example, you may need to water less frequently during the winter months when the plants are not growing as actively.
What size pot should I use for growing peppers on a windowsill?
A pot that is at least 8-12 inches in diameter is recommended for growing peppers on a windowsill. This will provide enough space for the roots to grow and allow the plant to produce a good yield of peppers. Choose a pot with drainage holes to prevent water from accumulating at the bottom.
Leave a Comment