
Soilless Rosemary Growing: Ever dreamt of having a thriving rosemary bush right in your kitchen, even if you don’t have a garden? I know I have! Forget battling with soil composition and unpredictable weather; there’s a fantastic way to cultivate this fragrant herb indoors, and it’s surprisingly simple. We’re diving into the world of soilless rosemary growing, a method that’s gaining popularity for its ease and efficiency.
For centuries, rosemary has been cherished not only for its culinary uses but also for its medicinal and symbolic significance. In ancient Greece, it was believed to improve memory, and sprigs were often woven into wreaths. Today, we’re taking this age-old herb into the modern era with a technique that bypasses traditional soil-based gardening.
Why should you consider soilless rosemary growing? Well, for starters, it’s perfect for apartment dwellers or anyone with limited outdoor space. Plus, it minimizes the risk of soilborne diseases and pests that can plague traditional gardens. Imagine fresh, aromatic rosemary readily available for your favorite recipes, all grown in a clean, controlled environment. This DIY guide will walk you through everything you need to know to successfully cultivate your own soilless rosemary, from choosing the right growing medium to providing the perfect nutrients. Get ready to unleash your inner gardener and enjoy the delightful benefits of fresh rosemary, no soil required!
Growing Rosemary Without Soil: A DIY Guide to Hydroponic Rosemary
Hey there, fellow plant enthusiasts! Ever dreamed of having a constant supply of fresh rosemary right at your fingertips, without the hassle of soil? Well, you’re in the right place! I’m going to walk you through a super cool DIY project: growing rosemary hydroponically. It’s easier than you think, and the results are incredibly rewarding. Get ready to ditch the dirt and embrace the future of rosemary cultivation!
What is Hydroponics, Anyway?
Before we dive in, let’s quickly cover the basics. Hydroponics is simply growing plants without soil, using a nutrient-rich water solution. The roots get everything they need directly from the water, making it a super efficient way to grow herbs and veggies. Plus, it’s a great way to control the growing environment and minimize pests and diseases.
Why Rosemary and Hydroponics are a Match Made in Heaven
Rosemary is a fantastic candidate for hydroponics for a few reasons:
* Faster Growth: Hydroponically grown rosemary tends to grow faster than soil-grown rosemary because the roots have constant access to nutrients.
* Less Mess: No soil means no soil-borne diseases and pests, and a much cleaner growing environment.
* Year-Round Harvest: You can grow rosemary indoors year-round, regardless of the weather outside.
* Space Saving: Hydroponic systems can be compact, making them perfect for small spaces.
Gathering Your Supplies: The Rosemary Hydroponics Shopping List
Okay, let’s get down to business. Here’s what you’ll need to get started:
* Rosemary Cuttings or Seedlings: You can either take cuttings from an existing rosemary plant or purchase seedlings from a nursery. I personally prefer cuttings because it’s a fun way to propagate and save money!
* Hydroponic System: There are tons of options here, from simple DIY setups to more advanced systems. For beginners, I recommend a Deep Water Culture (DWC) system or a Kratky system. We’ll focus on a simple DWC system for this guide.
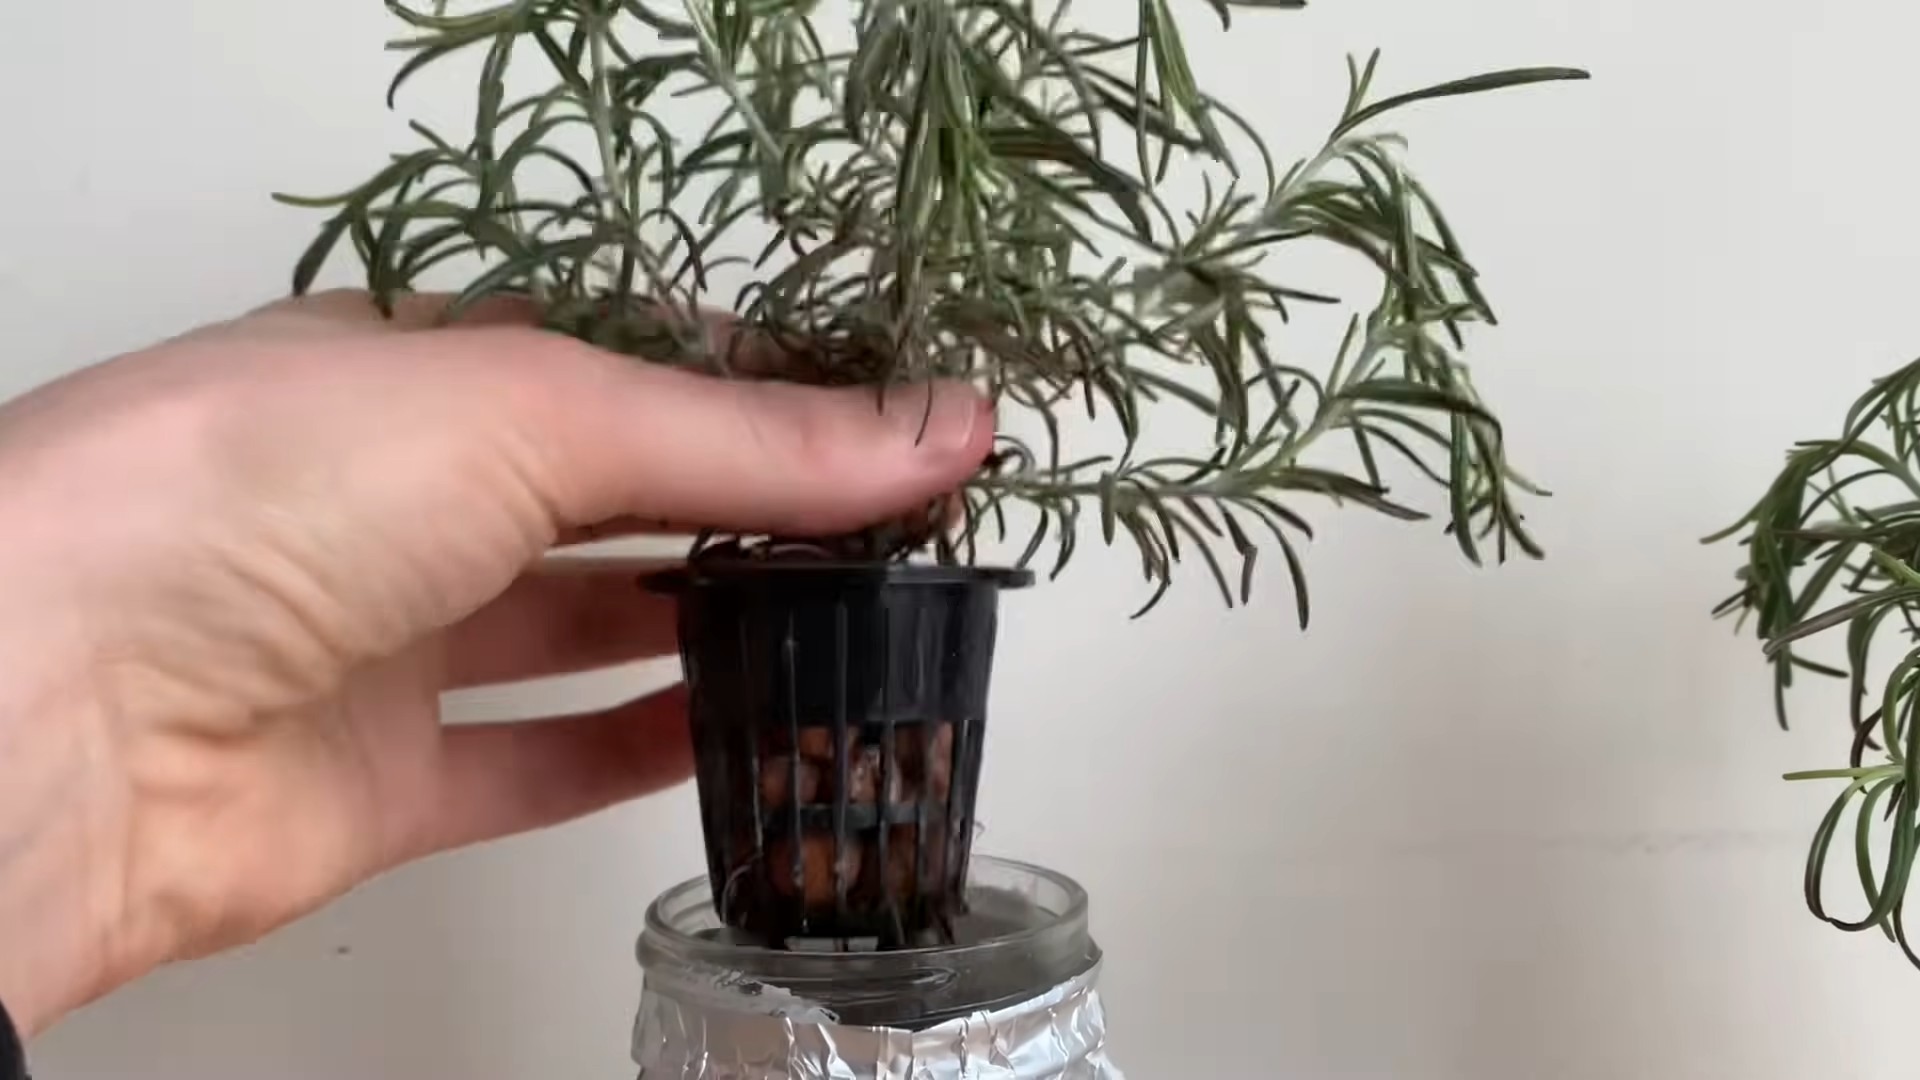
* Net Pots: These are small plastic pots with holes that will hold your rosemary cuttings or seedlings and allow the roots to grow into the nutrient solution.
* Hydroponic Growing Medium: You’ll need something to support the roots in the net pots. Rockwool cubes, coco coir, or clay pebbles are all good choices. I like using rockwool because it’s easy to work with.
* Air Pump and Air Stone: These are essential for oxygenating the nutrient solution. Rosemary roots need oxygen to thrive!
* Nutrient Solution: You’ll need a hydroponic nutrient solution specifically formulated for herbs. Look for a balanced formula that contains all the essential macronutrients and micronutrients.
* pH Meter and pH Up/Down: Maintaining the correct pH level is crucial for nutrient absorption. A pH meter will help you monitor the pH, and pH up/down solutions will allow you to adjust it as needed.
* Grow Lights (Optional but Recommended): If you’re growing rosemary indoors, you’ll likely need grow lights to provide adequate light. LED grow lights are energy-efficient and work well.
* Container: A plastic tub or bucket will work perfectly for your DWC system. Make sure it’s opaque to prevent algae growth.
* Drill with Hole Saw Attachment: You’ll need this to drill holes in the lid of your container for the net pots.
* Measuring Cups and Spoons: For accurately measuring nutrient solutions.
Building Your DIY Deep Water Culture (DWC) System
This is where the fun begins! Let’s build our simple DWC system.
1. Prepare the Container: Start by cleaning your plastic tub or bucket thoroughly. This will help prevent algae growth and contamination.
2. Drill Holes for Net Pots: Measure the diameter of your net pots and use a hole saw attachment to drill holes in the lid of the container. The holes should be slightly smaller than the diameter of the net pots so they fit snugly. Space the holes evenly apart to allow for adequate airflow and light penetration.
3. Assemble the Air Pump and Air Stone: Connect the air tubing to the air pump and the air stone. Place the air stone at the bottom of the container. This will oxygenate the nutrient solution.
4. Add Nutrient Solution: Fill the container with water, leaving a few inches of space at the top. Add the hydroponic nutrient solution according to the manufacturer’s instructions. Use measuring cups and spoons to ensure accurate measurements.
5. Adjust the pH: Use your pH meter to check the pH of the nutrient solution. Rosemary prefers a pH between 5.5 and 6.5. If the pH is too high or too low, use pH up or pH down solutions to adjust it accordingly. Add small amounts of the solutions at a time and recheck the pH until it’s within the desired range.
Preparing Your Rosemary Cuttings or Seedlings
Now that our DWC system is ready, let’s prepare our rosemary cuttings or seedlings.
1. Taking Rosemary Cuttings (If Using Cuttings): If you’re using cuttings, take 4-6 inch cuttings from a healthy rosemary plant. Remove the leaves from the bottom inch of the cutting.
2. Rooting the Cuttings (If Using Cuttings): Place the cuttings in a glass of water or a rooting hormone solution. Change the water every few days. Roots should start to develop in a week or two.
3. Preparing Seedlings (If Using Seedlings): If you’re using seedlings, gently remove them from their containers and rinse off any excess soil from the roots.
4. Planting in Net Pots: Fill the net pots with your chosen hydroponic growing medium (rockwool, coco coir, or clay pebbles). Make a small hole in the center of the medium and gently insert the rosemary cutting or seedling. Make sure the roots are well-supported by the medium.
Planting Your Rosemary in the DWC System
Almost there! Let’s get those rosemary plants into our DWC system.
1. Place Net Pots in the Lid: Carefully place the net pots containing your rosemary cuttings or seedlings into the holes in the lid of the container.
2. Ensure Root Contact with Nutrient Solution: Make sure the bottom of the net pots is submerged in the nutrient solution. This will allow the roots to access the nutrients they need. If the roots are not long enough to reach the solution, you can lower the water level slightly or use a small piece of absorbent material to wick the solution up to the roots.
3. Turn on the Air Pump: Plug in the air pump and make sure the air stone is bubbling vigorously. This will oxygenate the nutrient solution and prevent root rot.
Caring for Your Hydroponic Rosemary
Now that your rosemary is planted, it’s time to provide the care it needs to thrive.
1. Light: Rosemary needs plenty of light to grow well. If you’re growing indoors, provide at least 6-8 hours of light per day using grow lights. Position the grow lights close enough to the plants to provide adequate light intensity, but not so close that they burn the leaves.
2. Nutrient Solution: Monitor the nutrient solution regularly and replenish it as needed. Change the entire solution every 2-3 weeks to prevent nutrient imbalances and the buildup of harmful bacteria.
3. pH: Check the pH of the nutrient solution regularly and adjust it as needed to maintain a pH between 5.5 and 6.5.
4. Water Level: Maintain the water level in the container so that the bottom of the net pots is always submerged in the nutrient solution.
5. Temperature: Rosemary prefers temperatures between 60°F and 80°F (15°C and 27°C). Avoid exposing your plants to extreme temperatures.
6. Humidity: Rosemary prefers moderate humidity levels. If the air is too dry, you can increase the humidity by misting the plants with water or using a humidifier.
7. Pruning: Prune your rosemary plants regularly to encourage bushier growth and prevent them from becoming leggy. Simply pinch off the tips of the stems to promote branching.
Troubleshooting Common Problems
Even with the best care, you might encounter some problems along the way. Here are a few common issues and how to address them:
* Yellowing Leaves: This could be a sign of nutrient deficiency, pH imbalance, or overwatering. Check the nutrient solution, pH, and water level and adjust as needed.
* Root Rot: This is caused by a lack of oxygen in the nutrient solution. Make sure your air pump and air stone are working properly and that the nutrient solution is well-oxygenated.
* Algae Growth: Algae can grow in the nutrient solution if it’s exposed to light. Use an opaque container to prevent light from reaching the solution

Conclusion
So, there you have it! Growing rosemary without soil might seem unconventional, but as you’ve seen, it’s a surprisingly simple and effective method for cultivating this fragrant and useful herb. This soilless rosemary growing technique opens up a world of possibilities, especially for those with limited space, poor soil conditions, or simply a desire to experiment with alternative gardening methods.
Why is this a must-try? Because it offers a cleaner, often faster, and more controlled environment for your rosemary to thrive. You bypass the common issues associated with soil, such as pests, diseases, and nutrient imbalances. Plus, the visual appeal of roots suspended in water or nestled in inert media adds a unique aesthetic touch to your indoor or outdoor garden.
But don’t stop there! Feel free to experiment with different nutrient solutions to find the perfect blend for your rosemary’s needs. Try varying the type of inert media you use – perlite, vermiculite, coco coir, or even LECA balls can all yield excellent results. Consider adding a small air pump and air stone to your hydroponic setup to further oxygenate the water and promote robust root growth. You can even explore different rosemary varieties to see which ones adapt best to soilless cultivation. Some varieties, like ‘Blue Boy’ or ‘Roman Beauty,’ might exhibit slightly different growth patterns or fragrance profiles when grown hydroponically.
Another exciting variation is to integrate your soilless rosemary growing into a larger aquaponic system. The nutrient-rich water from a fish tank can provide a natural and sustainable source of fertilizer for your rosemary, creating a symbiotic relationship that benefits both plants and aquatic life. Imagine the satisfaction of harvesting fresh, fragrant rosemary grown with the help of your own little ecosystem!
The beauty of this method lies in its adaptability. Whether you’re a seasoned gardener or a complete beginner, you can easily adapt this technique to suit your specific needs and preferences. Start small with a single rosemary cutting in a jar of water, and gradually expand your operation as you gain confidence and experience.
We wholeheartedly encourage you to give this soilless rosemary growing method a try. It’s a rewarding and educational experience that will not only provide you with a constant supply of fresh rosemary but also deepen your understanding of plant physiology and sustainable gardening practices.
Once you’ve embarked on your soilless rosemary adventure, we’d love to hear about your experiences! Share your tips, tricks, and successes (and even your challenges!) in the comments section below. Let’s create a community of soilless rosemary enthusiasts who can learn from each other and inspire others to embrace this innovative gardening technique. Your insights could be invaluable to someone just starting out, and together, we can unlock the full potential of soilless rosemary cultivation. Don’t be shy – share your photos, videos, and stories! We can’t wait to see what you create. Happy growing!
Frequently Asked Questions (FAQ)
What exactly is soilless rosemary growing, and why should I consider it?
Soilless rosemary growing refers to cultivating rosemary plants without using traditional soil as a growing medium. Instead, the roots are supported by inert materials like perlite, vermiculite, coco coir, or even just water (hydroponics). The plants receive nutrients from a specially formulated nutrient solution. You should consider it because it offers several advantages: it eliminates soilborne diseases and pests, allows for better control over nutrient delivery, often results in faster growth, and is ideal for limited spaces or areas with poor soil quality. It’s also a fascinating way to learn more about plant physiology and sustainable gardening.
What kind of nutrient solution do I need for soilless rosemary growing?
Rosemary, like other plants, requires a balanced nutrient solution containing macronutrients (nitrogen, phosphorus, potassium) and micronutrients (iron, manganese, zinc, copper, boron, molybdenum). You can purchase commercially available hydroponic nutrient solutions specifically formulated for herbs or leafy greens. Look for solutions with a slightly higher nitrogen content during the vegetative growth phase and a balanced NPK ratio during flowering (although rosemary doesn’t “flower” in the same way as other plants, this balanced approach still promotes healthy growth). Always follow the manufacturer’s instructions for dilution and application. You can also find recipes for DIY nutrient solutions online, but be sure to research thoroughly and use accurate measurements to avoid nutrient imbalances.
How often should I change the nutrient solution in my soilless rosemary setup?
The frequency of nutrient solution changes depends on the size of your reservoir, the growth rate of your rosemary, and the type of soilless system you’re using. As a general rule, change the nutrient solution every 1-2 weeks. However, if you notice the solution becoming cloudy, discolored, or developing an unpleasant odor, change it immediately. Regularly monitoring the pH and EC (electrical conductivity) of the solution can also help you determine when a change is needed. A stable pH and EC indicate a healthy nutrient balance, while fluctuations may signal depletion or contamination.
What kind of lighting does soilless rosemary need?
Rosemary thrives in bright sunlight, so providing adequate lighting is crucial for successful soilless growing. If you’re growing rosemary indoors, you’ll need to supplement natural light with artificial grow lights. LED grow lights are a popular choice due to their energy efficiency and long lifespan. Choose a full-spectrum LED grow light that emits a balanced range of wavelengths to support both vegetative growth and essential oil production. Aim for at least 14-16 hours of light per day. If you’re growing rosemary outdoors, ensure it receives at least 6-8 hours of direct sunlight daily.
Can I grow rosemary from seed in a soilless system?
While it’s possible to grow rosemary from seed in a soilless system, it’s generally more challenging and time-consuming than propagating from cuttings. Rosemary seeds have a relatively low germination rate and can take several weeks to sprout. If you choose to start from seed, use a seed-starting mix or rockwool cubes and provide consistent moisture and warmth. Once the seedlings have developed a few sets of true leaves, you can transplant them into your chosen soilless system. However, for beginners, propagating from cuttings is a much easier and more reliable method.
How do I propagate rosemary cuttings for soilless growing?
Propagating rosemary cuttings is a simple and effective way to start new plants for your soilless system. Take 4-6 inch cuttings from healthy, non-flowering stems. Remove the leaves from the bottom inch of the cutting and dip the cut end in rooting hormone (optional, but it can speed up the rooting process). Place the cuttings in a glass of water or directly into a moist rooting medium like perlite or vermiculite. Keep the cuttings in a warm, bright location out of direct sunlight. Change the water every few days or mist the rooting medium regularly to keep it moist. Roots should develop within 2-4 weeks. Once the cuttings have established a good root system, you can transplant them into your soilless setup.
What are some common problems I might encounter when growing rosemary soillessly, and how can I fix them?
Some common problems include nutrient deficiencies, root rot, and pest infestations. Nutrient deficiencies can manifest as yellowing leaves, stunted growth, or discoloration. Ensure you’re using a balanced nutrient solution and adjust the concentration as needed. Root rot can occur if the roots are constantly submerged in water without adequate aeration. Improve aeration by adding an air stone to your hydroponic system or using a well-draining soilless medium. Pest infestations can be treated with organic insecticides or by manually removing the pests. Regularly inspect your plants for signs of problems and address them promptly to prevent them from escalating.
Is soilless rosemary growing suitable for beginners?
Yes! While it might seem intimidating at first, soilless rosemary growing is actually quite accessible to beginners. Starting with a simple hydroponic setup using a jar of water and a rosemary cutting is a great way to get your feet wet. As you gain experience, you can gradually expand your operation and experiment with different techniques. The key is to do your research, follow instructions carefully, and be patient. Don’t be afraid to make mistakes – they’re a valuable learning opportunity. With a little practice, you’ll be enjoying fresh, fragrant rosemary from your soilless garden in no time.


Leave a Comment