
Kale growing soil bags – ever heard of them? Maybe you’re picturing some fancy, pre-made contraption from a garden center. Well, get ready to ditch that image because we’re about to dive into a super simple, budget-friendly, and incredibly effective DIY project that will have you harvesting delicious kale in no time! For centuries, cultivating nutrient-rich greens like kale has been a cornerstone of healthy diets across various cultures. From the hearty stews of Scotland to the vibrant salads of the Mediterranean, kale has proven its resilience and nutritional value.
But let’s be honest, not everyone has the perfect garden soil or the space for a traditional garden bed. That’s where these DIY kale growing soil bags come in! I’ve found that they are a game-changer, especially if you’re dealing with poor soil quality, limited space (think balconies, patios, or even a sunny windowsill!), or just want a super easy way to grow your own fresh produce. Imagine stepping outside and snipping off a few leaves for your morning smoothie or adding them to a stir-fry – all thanks to your own homemade soil bag garden.
This DIY trick is a must-try because it eliminates the guesswork and provides the perfect environment for your kale to thrive. Plus, it’s a fantastic way to recycle old materials and reduce your environmental footprint. So, are you ready to get your hands dirty (in a good way!) and learn how to create your own thriving kale patch? Let’s get started!
DIY Upside-Down Kale Growing Bags: A Bountiful Harvest at Eye Level!
Hey there, fellow gardening enthusiasts! I’m super excited to share one of my favorite DIY projects with you: creating upside-down kale growing bags. Not only are these bags a fantastic space-saver, perfect for balconies or small patios, but they also add a unique, whimsical touch to your garden. Plus, harvesting kale becomes a breeze – no more bending over! Let’s dive into how you can make your own.
What You’ll Need: The Gathering of Supplies
Before we get our hands dirty, let’s make sure we have everything we need. This project is relatively inexpensive and uses readily available materials.
* Heavy-Duty Shopping Bags or Buckets: I prefer using sturdy, reusable shopping bags (the kind that can hold a lot of weight) or 5-gallon buckets. The darker the color, the better, as it helps retain heat.
* Potting Soil: Choose a high-quality potting mix that’s well-draining. Kale loves rich soil!
* Kale Seedlings: You can start your kale from seeds, but for this project, I recommend using established seedlings. It’s just faster and easier.
* Landscape Fabric or Burlap: This will help keep the soil from falling out of the hole we’ll be making.
* Scissors or Utility Knife: For cutting the landscape fabric and making the hole in the bag.
* Measuring Tape or Ruler: To ensure accurate measurements.
* Gloves: To keep your hands clean and protected.
* Watering Can or Hose: For watering your kale.
* Optional: Slow-Release Fertilizer: To give your kale an extra boost.
* Optional: Eye Hooks and Chain: If you want to hang your bags.
Step-by-Step Instructions: From Bag to Bounty
Alright, let’s get started! Follow these steps carefully, and you’ll have your upside-down kale growing bags ready in no time.
1. Prepare the Bag:
* First, lay your shopping bag or bucket flat on a surface.
* Using your measuring tape or ruler, find the center of the bottom of the bag. This is where our kale seedling will go.
* With your scissors or utility knife, carefully cut a hole in the center. The hole should be just big enough to accommodate the kale seedling’s stem – about 2-3 inches in diameter. You don’t want it too big, or the soil will fall out.
* If you’re using a bucket, you might need to drill a hole. Be careful and wear safety glasses!
2. Reinforce the Hole:
* Cut a square of landscape fabric or burlap that’s slightly larger than the hole you just made (about 4-5 inches square).
* Make a small slit in the center of the fabric square, just big enough to slip the kale seedling’s stem through.
* Carefully insert the fabric square through the hole in the bag, so it’s on the inside. This will act as a barrier to prevent soil from escaping.
* You can secure the fabric to the bag with a bit of hot glue if you want, but it’s usually not necessary.
3. Add the Soil:
* Now, it’s time to add the potting soil. Start by filling the bag about one-third of the way full.
* Gently pack the soil down a bit to create a stable base for the kale seedling.
4. Plant the Kale Seedling:
* Carefully remove the kale seedling from its container. Gently loosen the roots a bit.
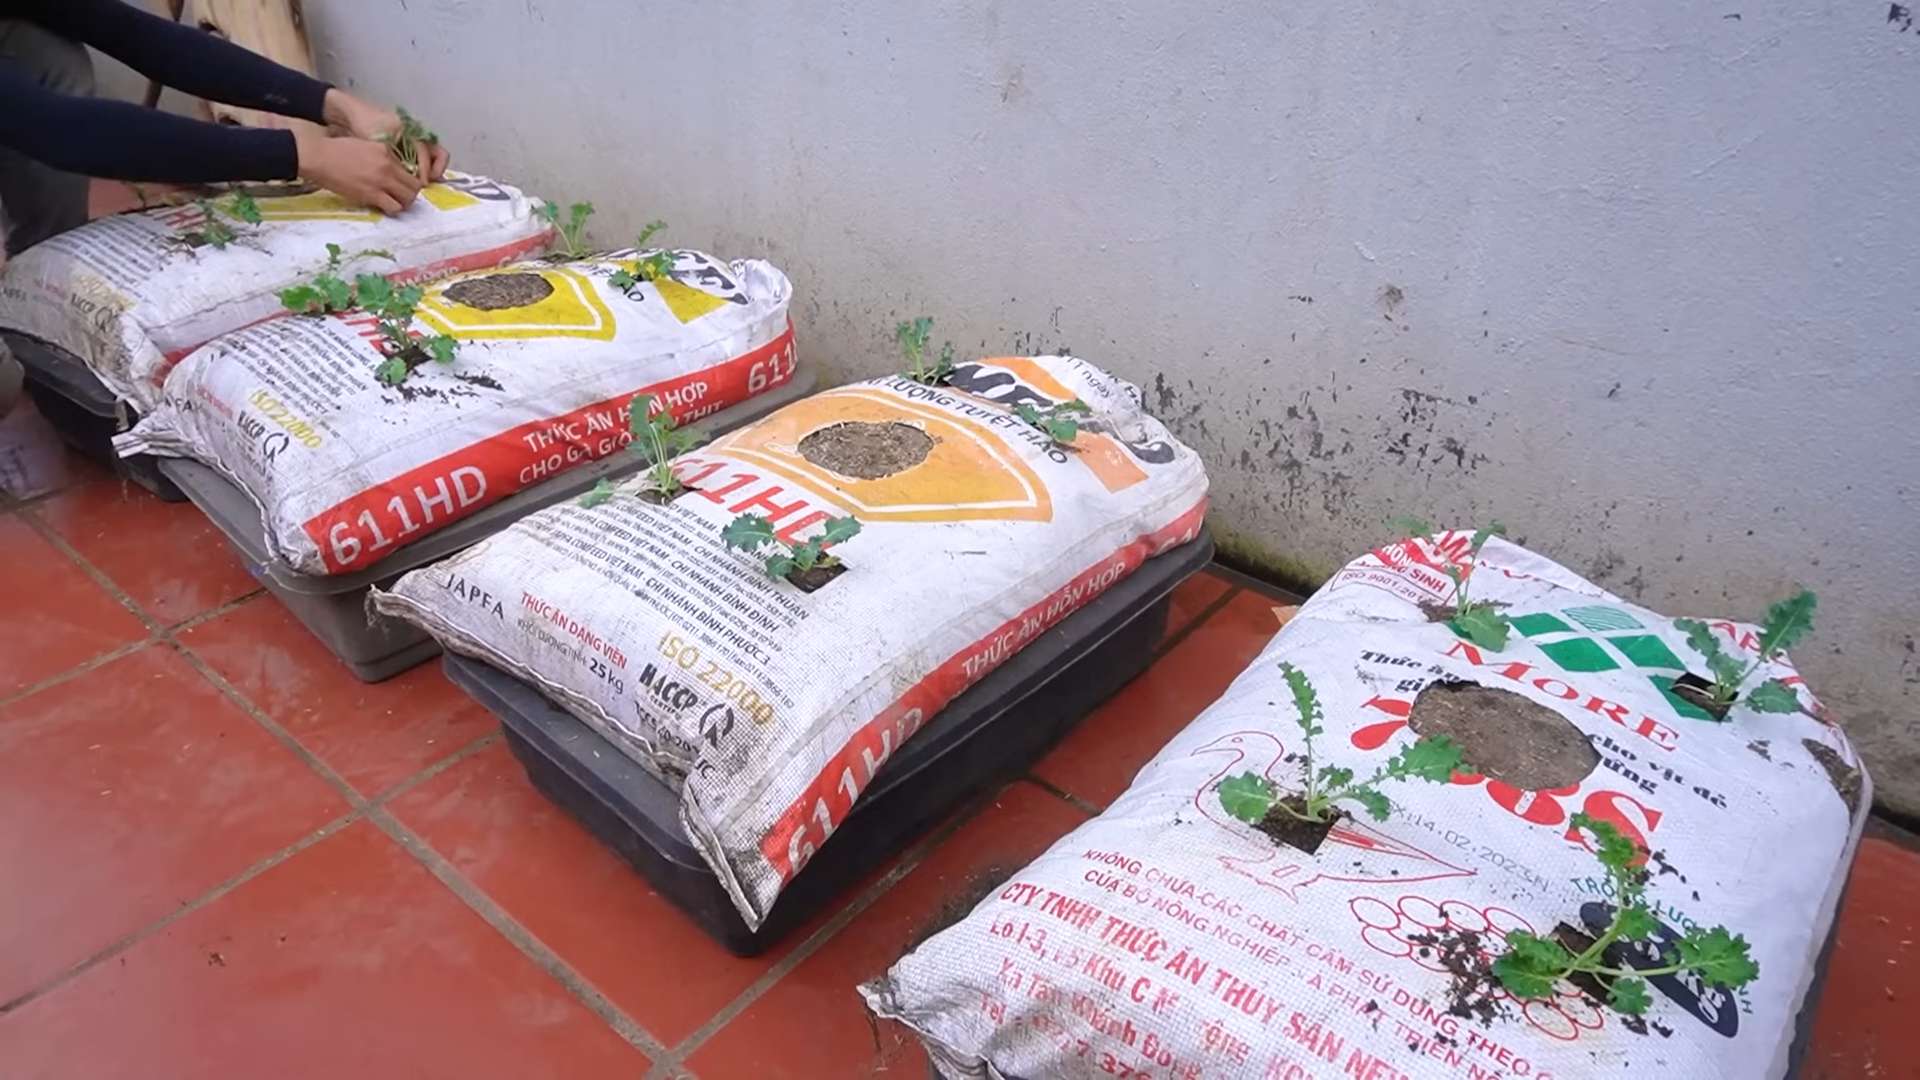
* Holding the bag upside down (this is where a helper comes in handy!), carefully insert the kale seedling through the hole in the bottom of the bag, with the leaves pointing downwards.
* Gently guide the roots through the fabric and into the soil.
* Make sure the base of the stem is just below the surface of the soil.
5. Fill the Bag with Soil:
* Continue adding potting soil around the kale seedling, filling the bag almost to the top.
* Gently pack the soil down as you go, making sure the seedling is securely in place.
* Leave a couple of inches of space at the top of the bag for watering.
6. Water Thoroughly:
* Once the bag is filled with soil, give it a good watering. Water slowly and evenly, allowing the water to soak into the soil.
* You’ll likely see some water draining out of the bottom hole – that’s perfectly normal.
7. Hanging the Bag (Optional):
* If you want to hang your kale growing bag, you’ll need to add some eye hooks and chain.
* Carefully insert two eye hooks into the top of the bag, on opposite sides. Make sure they’re securely fastened.
* Attach the chain to the eye hooks, creating a loop for hanging.
* Choose a sunny spot to hang your bag. Make sure the support is strong enough to hold the weight of the bag, soil, and kale.
8. Placement and Sunlight:
* Whether you’re hanging your bag or placing it on the ground, make sure it gets at least 6 hours of sunlight per day. Kale loves the sun!
* If you’re placing it on the ground, prop it up slightly so the kale leaves don’t touch the ground.
Caring for Your Upside-Down Kale: Nurturing Your Greens
Now that your upside-down kale growing bag is set up, it’s important to provide proper care to ensure a healthy and bountiful harvest.
* Watering: Kale needs consistent moisture, especially when grown in a container. Check the soil moisture regularly by sticking your finger into the soil. If the top inch feels dry, it’s time to water. Water thoroughly, until water drains out of the bottom hole. Avoid overwatering, as this can lead to root rot.
* Fertilizing: Kale is a heavy feeder, so it benefits from regular fertilization. You can use a slow-release fertilizer at planting time, or you can fertilize every few weeks with a liquid fertilizer. Follow the instructions on the fertilizer package.
* Pest Control: Keep an eye out for pests like aphids, cabbage worms, and slugs. You can control these pests with organic methods, such as hand-picking, insecticidal soap, or diatomaceous earth.
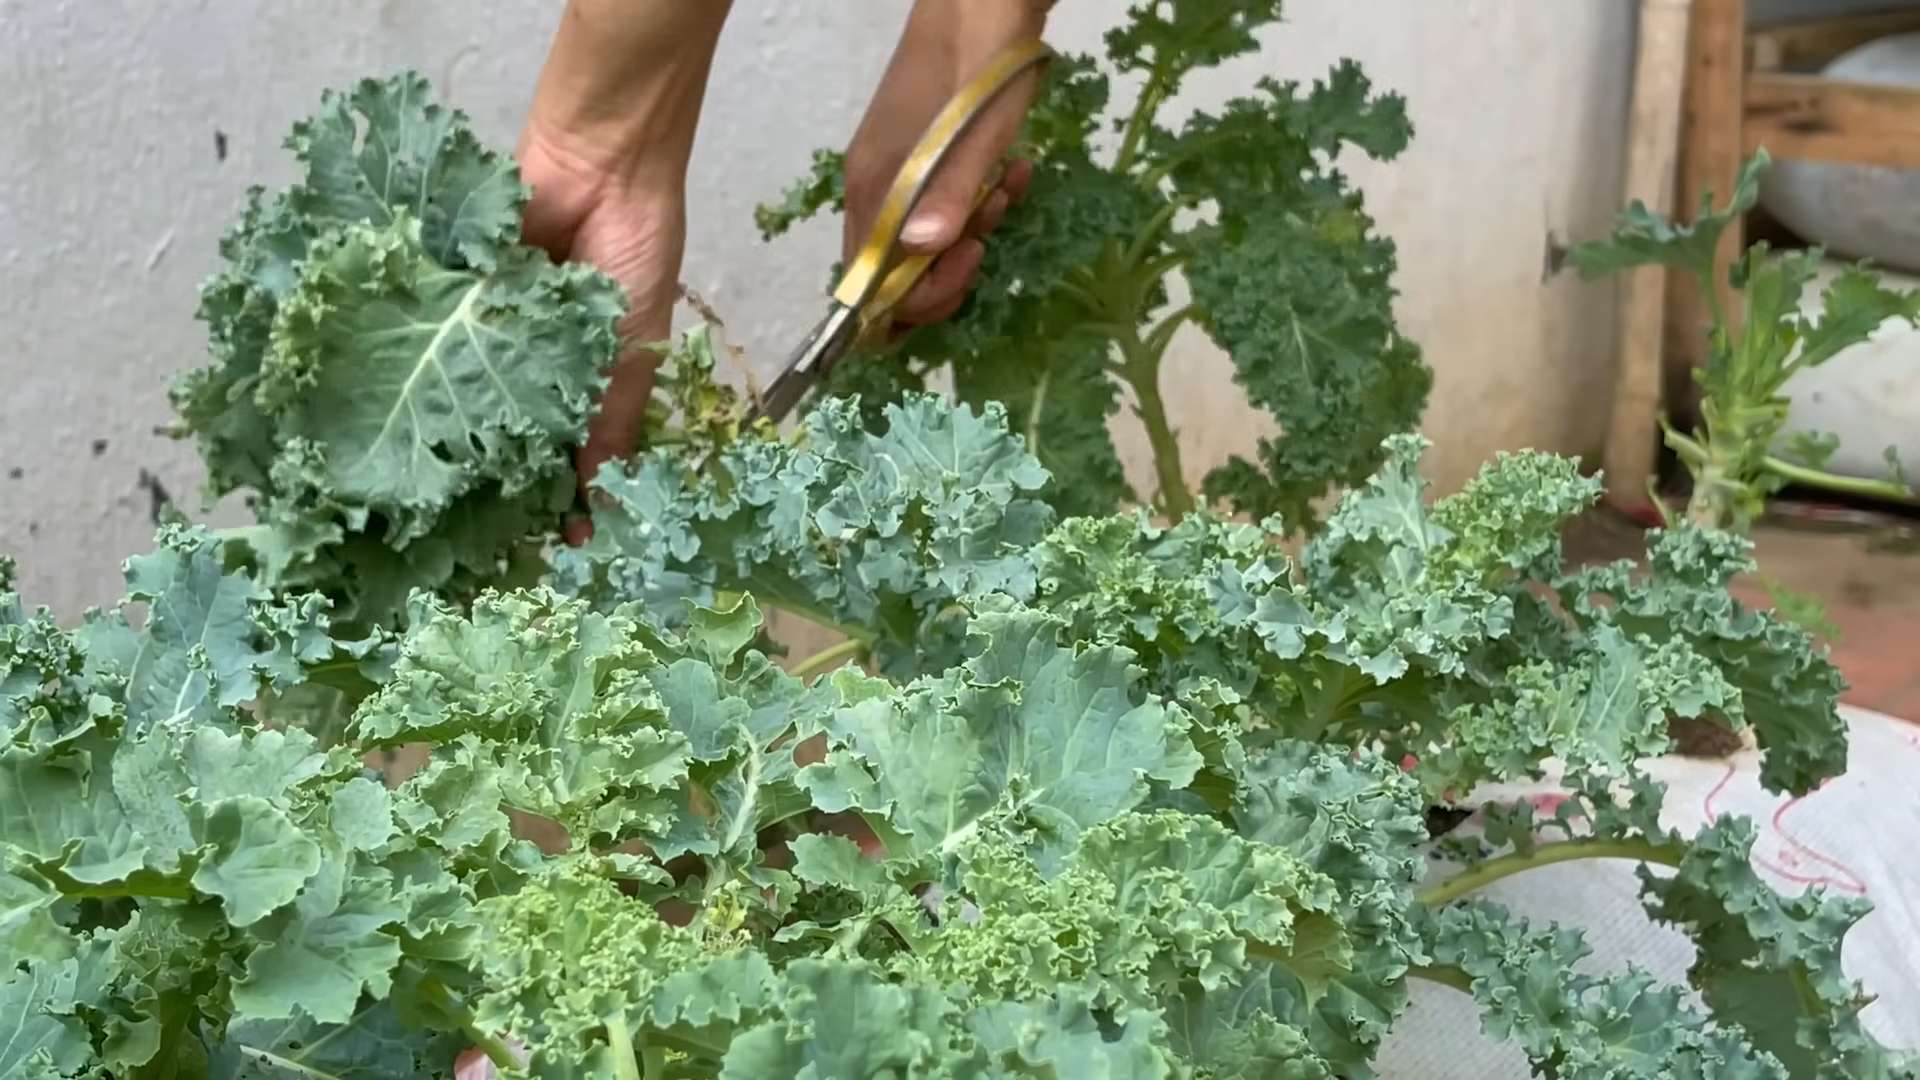
* Harvesting: You can start harvesting kale leaves once they’re about 4-6 inches long. Simply snip off the outer leaves with scissors or a knife, leaving the inner leaves to continue growing. Harvest regularly to encourage new growth.
* Sunlight: Ensure your kale receives at least 6 hours of direct sunlight daily. If you live in a particularly hot climate, some afternoon shade can be beneficial.
* Rotation: If you’re using the same bag year after year, consider rotating the soil or adding fresh compost to replenish nutrients.
Troubleshooting: Addressing Common Issues
Even with the best care, you might encounter some challenges along the way. Here are a few common issues and how to address them:
* Yellowing Leaves: This could be a sign of overwatering, underwatering, or nutrient deficiency. Check the soil moisture and adjust your watering accordingly. Fertilize with a balanced fertilizer to provide essential nutrients.
* Pest Infestation: As mentioned earlier, keep an eye out for pests. Treat infestations promptly with organic methods.
* Slow Growth: This could be due to insufficient sunlight, poor soil, or lack of nutrients. Ensure your kale is getting enough sunlight, and amend the soil with compost or fertilizer.
* Soil Drying Out Quickly: This is common in containers, especially during hot weather. Consider adding a layer of mulch to the top of the soil to help retain moisture. You can also try using a larger bag or bucket.
Enjoying Your Harvest: From Garden to Table
The best part of growing your own kale is, of course, enjoying the delicious and nutritious harvest! Kale is incredibly versatile and can be used in a variety of dishes.
* Salads: Massage kale leaves with olive oil and lemon juice to soften them, then add your favorite toppings.
* Smoothies: Add a handful of kale to your smoothies for a boost of vitamins and minerals.
* Soups and Stews: Kale adds a hearty and nutritious element to soups and stews.
* Chips: Toss kale leaves with olive oil and salt, then bake until crispy for a healthy snack.
* Sautéed: Sauté kale with garlic and olive oil for a simple and delicious side dish.
I hope you found this guide helpful! Growing your own upside-down kale is a rewarding experience that brings fresh, healthy greens right to your doorstep. Happy gardening!
Conclusion
So, there you have it! Creating your own kale growing soil bags isn’t just a cost-effective alternative to store-bought options; it’s a gateway to a more sustainable and rewarding gardening experience. By taking control of the ingredients, you’re ensuring your kale receives the precise nutrients it needs to thrive, resulting in healthier, more vibrant plants and, ultimately, a more bountiful harvest.
Think about it: no more wondering about the source of the soil, no more questioning the additives. You’re in charge, crafting the perfect environment for your kale to flourish. This DIY approach also allows you to tailor the soil mix to your specific climate and growing conditions. If you live in a particularly dry area, consider adding more water-retentive materials like vermiculite or coconut coir. Conversely, if your area experiences heavy rainfall, increase the drainage by incorporating more perlite or coarse sand.
But the benefits extend beyond just healthy kale. This project is incredibly satisfying. There’s a unique sense of accomplishment that comes from nurturing your plants from the very beginning, knowing you’ve provided them with the best possible start. Plus, it’s a fantastic way to reduce your environmental impact by repurposing materials and minimizing your reliance on commercially produced products.
Don’t be afraid to experiment! Try different combinations of compost, peat moss (or a peat-free alternative), and perlite to find the mix that works best for your kale. You could even add a slow-release organic fertilizer to give your plants an extra boost. Consider adding some worm castings for an extra dose of beneficial microbes. The possibilities are endless!
We strongly encourage you to give this DIY kale growing soil bags trick a try. It’s easier than you might think, and the rewards are well worth the effort. Imagine the satisfaction of harvesting your own delicious, homegrown kale, knowing you played an active role in its success.
Once you’ve created your own kale growing soil bags and started seeing results, we’d love to hear about your experience! Share your tips, tricks, and photos in the comments below. Let’s build a community of kale-loving gardeners who are passionate about sustainable and rewarding growing practices. Let us know what worked best for you, what challenges you faced, and any variations you tried. Your insights could help other gardeners achieve even greater success. So, get your hands dirty, embrace the DIY spirit, and start growing your own amazing kale today! This simple project can truly transform your gardening game.
Frequently Asked Questions (FAQs)
What exactly are the benefits of making my own kale growing soil bags compared to buying pre-made ones?
Making your own kale growing soil bags offers several key advantages. First and foremost, you have complete control over the ingredients. This allows you to tailor the soil mix to the specific needs of your kale plants, ensuring they receive the optimal balance of nutrients and drainage. You can avoid potentially harmful additives or chemicals that might be present in commercially produced soil. Secondly, it’s often more cost-effective, especially if you have access to compost or other soil amendments. Finally, it’s a more sustainable option, reducing your reliance on commercially packaged products and allowing you to repurpose materials. You can also customize the pH level to ensure it is ideal for kale growth.
What are the essential ingredients for a good kale growing soil mix?
A good kale growing soil mix typically consists of a combination of ingredients that provide drainage, aeration, and essential nutrients. A common recipe includes:
* **Compost:** Provides essential nutrients and improves soil structure.
* **Peat Moss (or a Peat-Free Alternative like Coconut Coir):** Helps retain moisture and improve aeration. Coconut coir is a more sustainable option.
* **Perlite:** Improves drainage and aeration.
* **Optional: Slow-Release Organic Fertilizer:** Provides a steady supply of nutrients over time.
* **Optional: Worm Castings:** Adds beneficial microbes and improves soil fertility.
The ideal ratio will depend on your specific climate and growing conditions, but a good starting point is equal parts compost, peat moss (or coir), and perlite.
How do I know if my soil mix is right for kale? What are the signs of a good or bad mix?
A good kale growing soil mix should be well-draining but still retain some moisture. It should be loose and crumbly, not compacted or heavy. Signs of a good mix include healthy, vigorous plant growth, dark green leaves, and a strong root system. Signs of a bad mix include stunted growth, yellowing leaves, wilting, and root rot. If your kale is showing signs of distress, it’s important to assess the soil and make adjustments as needed. You can also perform a soil test to determine the pH and nutrient levels. Kale prefers a slightly acidic to neutral soil pH (around 6.0 to 7.0).
Can I use regular garden soil in my kale growing soil bags?
While you can technically use regular garden soil, it’s generally not recommended unless you amend it significantly. Garden soil is often too heavy and compacted, which can hinder drainage and aeration. This can lead to root rot and other problems. If you do use garden soil, be sure to mix it with plenty of compost, perlite, and other amendments to improve its structure and drainage. It’s also important to ensure that the garden soil is free from pests, diseases, and weed seeds.
How often should I water my kale growing soil bags?
The frequency of watering will depend on several factors, including the climate, the size of the bag, and the stage of growth of the kale plants. Generally, you should water when the top inch of soil feels dry to the touch. Avoid overwatering, as this can lead to root rot. During hot, dry weather, you may need to water more frequently. During cooler, wetter weather, you may need to water less frequently. A good rule of thumb is to check the soil moisture regularly and water accordingly.
What size bag is best for growing kale?
The ideal bag size depends on the variety of kale you’re growing and how many plants you want to grow in each bag. A good starting point is a 5-gallon bag, which can accommodate one to two kale plants. For larger varieties of kale, you may want to use a 10-gallon bag or larger. Make sure the bag has drainage holes to prevent waterlogging.
Can I reuse the soil from my kale growing soil bags?
Yes, you can reuse the soil, but it’s important to amend it before planting again. Over time, the soil will become depleted of nutrients and may become compacted. To reuse the soil, remove any plant debris and mix in fresh compost, perlite, and other amendments. You may also want to add a slow-release organic fertilizer to replenish the nutrient levels. It’s also a good idea to sterilize the soil to kill any pests or diseases that may be present. You can do this by baking the soil in the oven at 200 degrees Fahrenheit for 30 minutes.
What are some common problems I might encounter when growing kale in soil bags, and how can I fix them?
Some common problems include:
* **Pests:** Aphids, cabbage worms, and flea beetles can attack kale plants. Use organic pest control methods such as insecticidal soap, neem oil, or handpicking.
* **Diseases:** Fungal diseases like powdery mildew and downy mildew can affect kale. Ensure good air circulation and avoid overwatering. Use a fungicide if necessary.
* **Nutrient Deficiencies:** Yellowing leaves can indicate a nutrient deficiency. Amend the soil with compost or fertilizer.
* **Poor Drainage:** Waterlogged soil can lead to root rot. Ensure the soil mix is well-draining and the bag has drainage holes.
Regularly inspect your plants for signs of problems and take action promptly to prevent them from escalating.
Where can I find the ingredients for making my own kale growing soil bags?
You can find the ingredients at most garden centers, nurseries, and home improvement stores. Compost can often be purchased in bulk from local landscaping companies. You can also make your own compost at home using kitchen scraps and yard waste. Peat moss is widely available, but consider using a more sustainable alternative like coconut coir. Perlite is also readily available at garden centers.
How do I store leftover soil mix?
Store leftover soil mix in a cool, dry place in an airtight container. This will prevent it from drying out or becoming contaminated. You can also store it in a plastic bag, but make sure to seal it tightly. Properly stored soil mix can last for several months.
Leave a Comment