
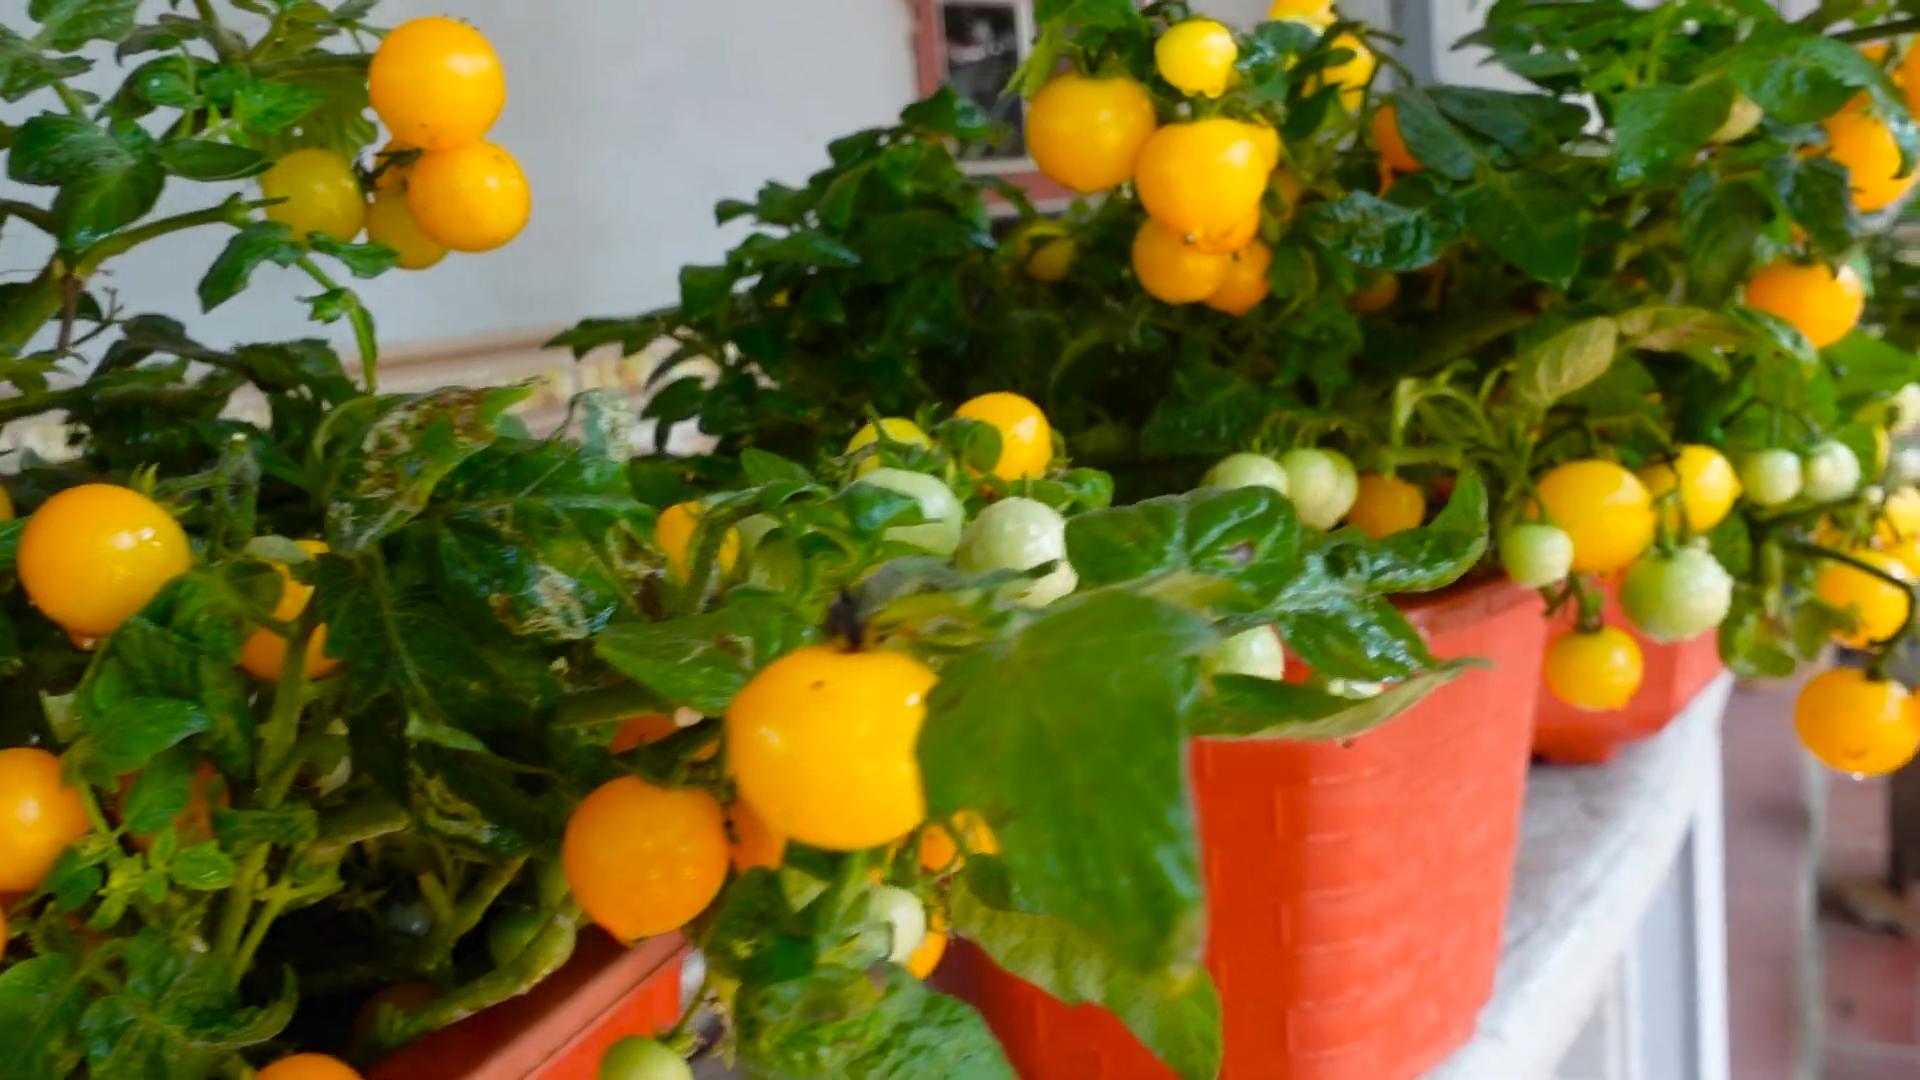
Balcony Cherry Tomato Setup: Imagine stepping onto your balcony and plucking a sun-ripened, juicy cherry tomato, bursting with flavor, right from your own little garden oasis. Sounds idyllic, doesn’t it? Well, it’s more achievable than you think! For centuries, people have cultivated small gardens in urban spaces, from window boxes in ancient Rome to rooftop farms in modern cities. This connection to nature, even in the smallest of spaces, provides a sense of peace and accomplishment.
But let’s be honest, sometimes the thought of starting a garden, especially on a limited balcony space, can feel overwhelming. That’s where this DIY guide comes in! I’m going to share some simple yet effective tricks and hacks to help you create the perfect balcony cherry tomato setup, even if you’re a complete beginner.
Why cherry tomatoes? They’re relatively easy to grow, incredibly rewarding, and perfect for small spaces. Plus, who can resist the sweet, tangy taste of a homegrown cherry tomato? This DIY project will not only provide you with fresh, delicious produce, but it will also transform your balcony into a vibrant, green space you’ll love spending time in. So, let’s get started and turn your balcony into a cherry tomato paradise!
DIY Balcony Cherry Tomato Paradise: A Step-by-Step Guide
Hey there, fellow balcony gardeners! I’m so excited to share my tried-and-true method for creating a thriving cherry tomato garden right on your balcony. Trust me, there’s nothing quite like popping a sun-warmed, juicy cherry tomato straight from the vine. This guide will walk you through everything you need to know, from choosing the right varieties to troubleshooting common problems. Let’s get started!
Choosing the Right Cherry Tomato Variety
Before we dive into the nitty-gritty, let’s talk tomatoes. Not all cherry tomatoes are created equal, especially when it comes to balcony gardening. We need to consider size, growth habit, and disease resistance.
* Determinate vs. Indeterminate: This is crucial! Determinate varieties grow to a certain size and then stop, producing all their fruit at once. Indeterminate varieties, on the other hand, keep growing and producing fruit throughout the season. For balconies, determinate varieties are often better because they tend to be more compact. However, if you have the space and are diligent about pruning, indeterminate varieties can also work.
* Popular Balcony-Friendly Varieties:
* ‘Tiny Tim’: A super compact determinate variety, perfect for small spaces.
* ‘Tumbling Tom’: A trailing variety ideal for hanging baskets.
* ‘Patio’: Another compact determinate variety that produces a good yield.
* ‘Sweet Million’: An indeterminate variety known for its prolific production of small, sweet tomatoes (requires more pruning and support).
* ‘Black Cherry’: An indeterminate variety with a unique flavor and color (also requires more pruning and support).
* Disease Resistance: Look for varieties labeled with resistance to common tomato diseases like Verticillium wilt (V), Fusarium wilt (F), and Tomato mosaic virus (ToMV). This will save you a lot of headaches later on.
Gathering Your Supplies
Okay, now that we’ve picked our tomato stars, let’s gather the necessary supplies. Here’s what you’ll need:
* Containers: Choose containers that are at least 12 inches in diameter and 12 inches deep. Larger is generally better, as it gives the roots more room to grow. Fabric pots are a great option because they allow for good drainage and aeration.
* Potting Mix: Don’t use garden soil! It’s too heavy and doesn’t drain well in containers. Opt for a high-quality potting mix specifically formulated for containers. I like to use a mix that contains peat moss, perlite, and vermiculite.
* Tomato Cages or Stakes: Even determinate varieties can benefit from some support, especially when they’re loaded with fruit. Indeterminate varieties absolutely require sturdy cages or stakes.
* Tomato Fertilizer: A balanced fertilizer specifically formulated for tomatoes will provide the nutrients your plants need to thrive. Look for a fertilizer with an NPK ratio (nitrogen, phosphorus, potassium) of around 5-10-5 or 10-10-10.
* Watering Can or Hose: Essential for keeping your plants hydrated.
* Hand Trowel: For planting and transplanting.
* Pruning Shears: For removing suckers (more on that later).
* Optional:
* Mulch: Helps retain moisture and suppress weeds. Straw or wood chips work well.
* Plant Labels: To keep track of your different varieties.
* Gloves: To protect your hands.
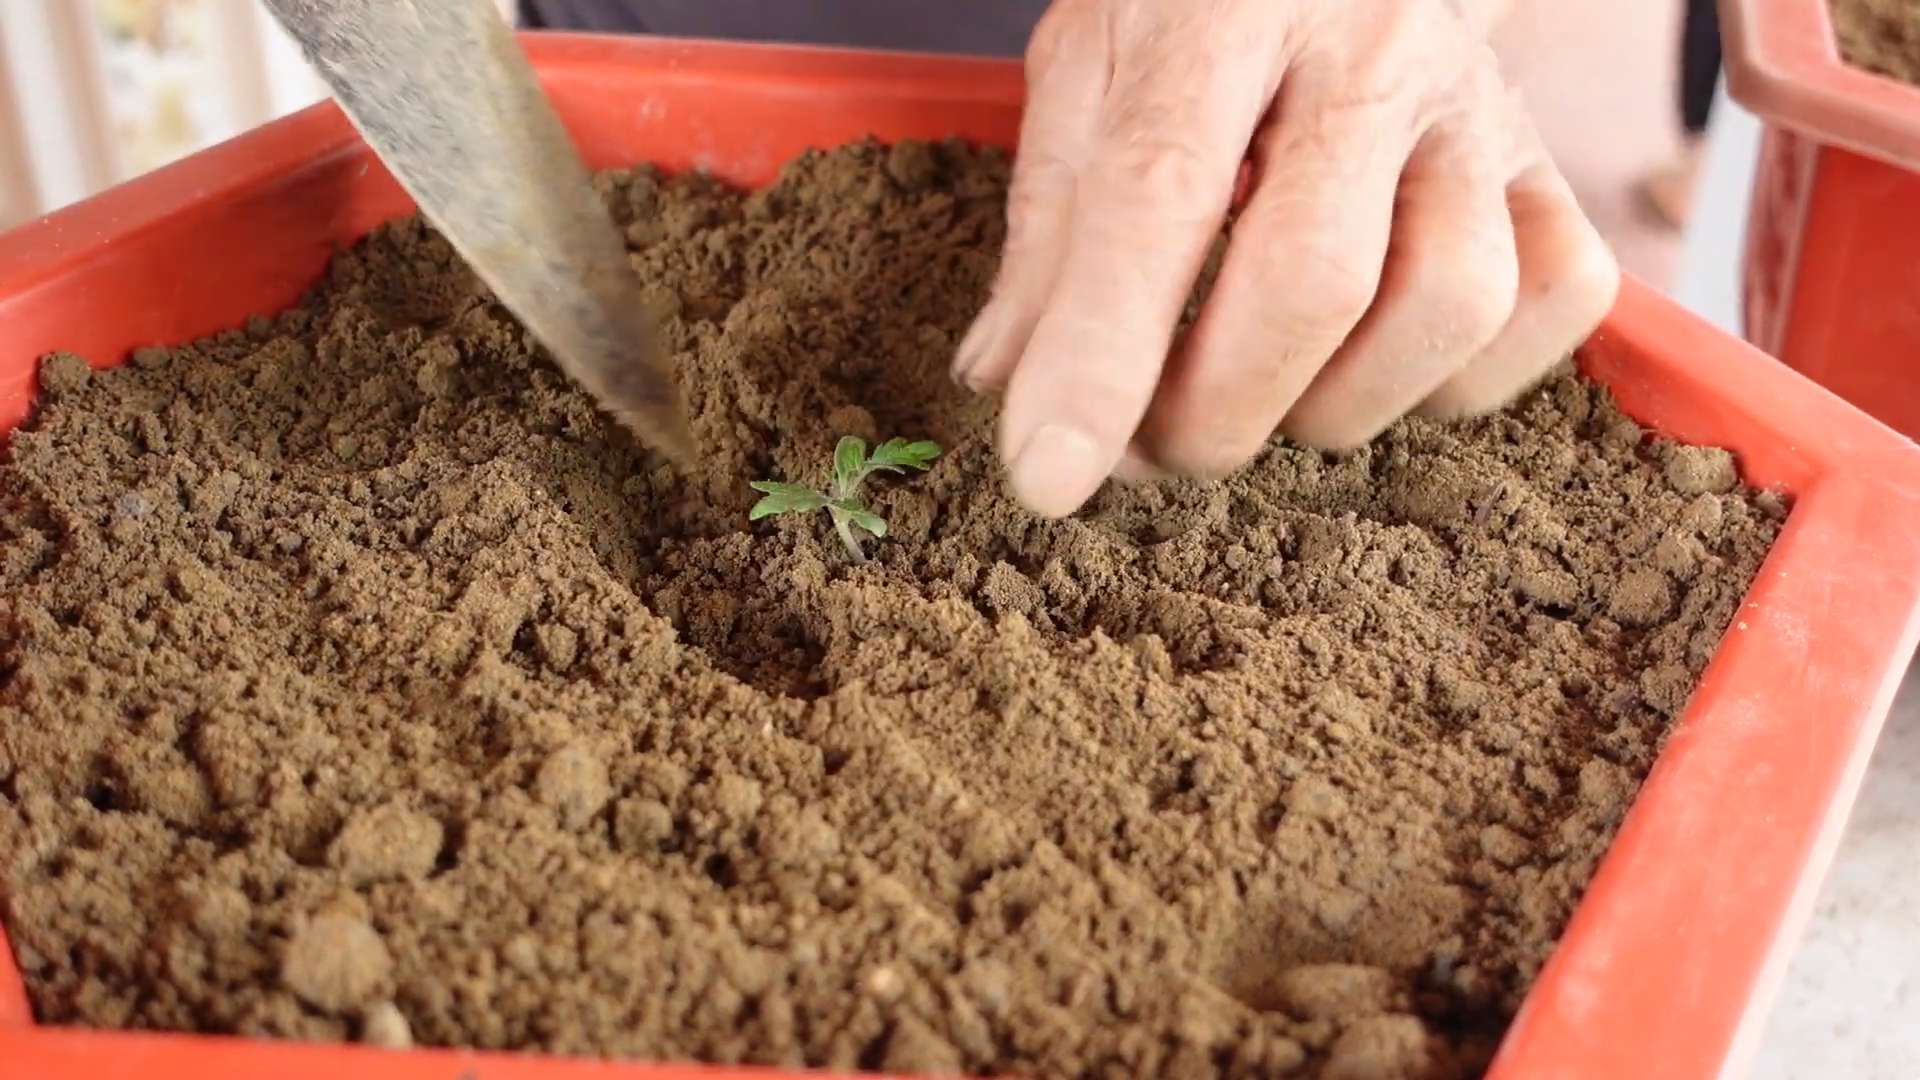
Planting Your Cherry Tomato Seedlings
Now for the fun part – planting!
1. Prepare Your Containers: Fill your containers with potting mix, leaving about an inch or two of space at the top.
2. Dig a Hole: Dig a hole in the center of each container that’s large enough to accommodate the root ball of your tomato seedling.
3. Remove the Seedling from Its Container: Gently squeeze the sides of the seedling’s container to loosen the root ball. Carefully remove the seedling, being careful not to damage the roots.
4. Plant the Seedling: Place the seedling in the hole and backfill with potting mix. Gently firm the soil around the base of the plant. You can plant the seedling deeper than it was in its original container, as tomatoes can grow roots along their stems. This will help create a stronger root system.
5. Water Thoroughly: Water the newly planted seedling thoroughly until water drains out of the bottom of the container.
6. Add Support: Install your tomato cage or stakes now, before the plant gets too big. This will prevent you from damaging the roots later on.
7. Mulch (Optional): Add a layer of mulch around the base of the plant to help retain moisture and suppress weeds.
Caring for Your Cherry Tomato Plants
Once your tomato plants are in their new homes, it’s time to provide them with the care they need to flourish.
1. Watering: Water your tomato plants regularly, especially during hot, dry weather. The soil should be consistently moist, but not soggy. Water deeply and less frequently, rather than shallowly and often. Check the soil moisture by sticking your finger into the soil about an inch deep. If it feels dry, it’s time to water.
2. Fertilizing: Feed your tomato plants with a tomato fertilizer every two to three weeks, following the instructions on the fertilizer package.
3. Sunlight: Cherry tomatoes need at least six hours of sunlight per day to produce a good crop. Choose a location on your balcony that receives plenty of sun.
4. Pruning (Especially for Indeterminate Varieties): Pruning is essential for indeterminate varieties to keep them manageable and encourage fruit production. The main thing you’ll be pruning are “suckers,” which are small shoots that grow in the “V” between the main stem and a branch. These suckers will eventually become full-fledged branches, but they’ll also steal energy from the main plant and reduce fruit production. To prune suckers, simply pinch them off with your fingers or snip them off with pruning shears when they’re small (a few inches long).
5. Pest and Disease Control: Keep an eye out for common tomato pests like aphids, whiteflies, and tomato hornworms. You can often control these pests by hand-picking them off the plants or spraying them with insecticidal soap. For diseases, good air circulation and proper watering can help prevent problems. If you do notice signs of disease, such as yellowing leaves or spots on the fruit, treat the plants with an appropriate fungicide.
6. Pollination: Tomatoes are self-pollinating, but sometimes they need a little help, especially on balconies where there may be fewer pollinators. You can hand-pollinate your tomato plants by gently shaking the flower clusters or using a small brush to transfer pollen from one flower to another.
Troubleshooting Common Problems
Even with the best care, you may encounter some problems along the way. Here are a few common issues and how to address them:
* Blossom End Rot: This is a condition where the bottom of the tomato turns black and leathery. It’s caused by a calcium deficiency, which is often due to inconsistent watering. To prevent blossom end rot, water your plants regularly and consistently, and consider adding calcium to the soil.
* Yellowing Leaves: Yellowing leaves can be caused by a variety of factors, including nutrient deficiencies, overwatering, underwatering, and disease. Check the soil moisture and nutrient levels, and look for signs of disease.
* Lack of Fruit: If your tomato plants are not producing fruit, it could be due to a lack of sunlight, poor pollination, or extreme temperatures. Make sure your plants are getting enough sunlight, hand-pollinate them if necessary, and protect them from extreme heat or cold.
* Cracking Fruit: This can happen when tomatoes experience sudden changes in moisture levels, such as after a heavy rain. To prevent cracking, water your plants consistently and avoid letting the soil dry out completely.
Harvesting Your Cherry Tomatoes
The moment you’ve been waiting for! Cherry tomatoes are typically ready to harvest when they’re fully colored and slightly soft to the touch. Gently twist the tomato off the vine. The taste is best when they are allowed to ripen fully on the vine.
Enjoy your delicious, homegrown cherry tomatoes! They’re perfect for snacking, salads, sauces, and so much more. I hope this guide has helped you create your own thriving balcony cherry tomato paradise. Happy gardening!
Conclusion
So, there you have it! Transforming your balcony into a thriving cherry tomato garden is not only achievable, but incredibly rewarding. We’ve walked you through the simple steps to create a flourishing space, even if you’re short on square footage. This DIY balcony cherry tomato setup is more than just a gardening project; it’s an invitation to connect with nature, enjoy fresh, homegrown produce, and add a touch of vibrant green to your urban dwelling.
Why is this a must-try? Because store-bought cherry tomatoes simply can’t compare to the burst of flavor you get from vine-ripened, sun-kissed beauties grown with your own hands. Plus, you control everything – from the soil to the watering schedule – ensuring you’re consuming healthy, organic produce. Imagine popping a juicy cherry tomato straight from the vine while relaxing on your balcony – a truly unparalleled experience.
Beyond the basic setup, there’s plenty of room for personalization. Consider experimenting with different varieties of cherry tomatoes. ‘Sungold’ offers an intensely sweet flavor, while ‘Black Cherry’ provides a rich, earthy taste. You could also incorporate companion plants like basil or marigolds to deter pests and enhance the overall health of your tomato plants. Another variation is to use self-watering containers, which are especially helpful if you travel frequently or tend to forget to water your plants. Vertical gardening systems, such as stacked planters or hanging baskets, can maximize space and add visual appeal to your balcony.
Don’t be intimidated if you’re a beginner gardener. This project is designed to be accessible and enjoyable for everyone. The key is to start small, be patient, and learn as you go. Observe your plants closely, adjust your watering and feeding schedule as needed, and don’t be afraid to experiment.
We are confident that you’ll find this DIY balcony cherry tomato setup to be a fulfilling and delicious endeavor. The satisfaction of harvesting your own tomatoes is immense, and the fresh, vibrant flavor will elevate your salads, snacks, and culinary creations.
Now, it’s your turn! Gather your supplies, follow our guide, and embark on your balcony gardening adventure. We can’t wait to see your results! Share your photos, tips, and experiences with us in the comments below. Let’s create a community of balcony gardeners and inspire others to bring the joy of homegrown tomatoes to their urban spaces. Let us know what worked for you, what challenges you faced, and any creative solutions you discovered along the way. Your insights will be invaluable to fellow gardeners. Happy growing!
Frequently Asked Questions (FAQ)
What kind of soil should I use for my balcony cherry tomato setup?
The best soil for cherry tomatoes in containers is a well-draining potting mix specifically formulated for vegetables. Avoid using garden soil, as it tends to compact in containers and doesn’t provide adequate drainage. Look for a potting mix that contains ingredients like peat moss, perlite, and vermiculite. These components help retain moisture while ensuring proper aeration for the roots. You can also amend your potting mix with compost to provide additional nutrients. A slightly acidic soil pH (around 6.0 to 6.8) is ideal for cherry tomatoes.
How much sunlight do cherry tomatoes need on a balcony?
Cherry tomatoes require at least 6-8 hours of direct sunlight per day to thrive. Choose a location on your balcony that receives ample sunlight throughout the day. If your balcony doesn’t get enough direct sunlight, you may need to supplement with grow lights. Position the grow lights about 6-12 inches above the plants and use them for 12-16 hours per day. Rotate your tomato plants regularly to ensure even exposure to sunlight.
How often should I water my cherry tomato plants on a balcony?
Water your cherry tomato plants deeply and regularly, especially during hot and dry weather. The frequency of watering will depend on factors such as the size of your container, the type of potting mix, and the weather conditions. Check the soil moisture level by sticking your finger about an inch deep into the soil. If the soil feels dry, it’s time to water. Avoid overwatering, as this can lead to root rot. Water at the base of the plant to avoid wetting the foliage, which can increase the risk of fungal diseases. Consider using a self-watering container or a drip irrigation system to ensure consistent watering.
What kind of fertilizer should I use for my balcony cherry tomato plants?
Cherry tomatoes are heavy feeders and require regular fertilization to produce abundant fruit. Use a balanced fertilizer specifically formulated for tomatoes or vegetables. Look for a fertilizer with an NPK ratio (nitrogen, phosphorus, potassium) of around 5-10-5 or 10-10-10. Apply the fertilizer according to the package instructions. You can also supplement with organic fertilizers such as compost tea or fish emulsion. Avoid over-fertilizing, as this can lead to excessive foliage growth and reduced fruit production.
How do I prevent pests and diseases on my balcony cherry tomato plants?
Preventing pests and diseases is crucial for a successful balcony cherry tomato setup. Regularly inspect your plants for signs of pests such as aphids, whiteflies, and spider mites. If you find any pests, treat them with insecticidal soap or neem oil. You can also attract beneficial insects such as ladybugs and lacewings to your balcony to help control pests. To prevent diseases, ensure good air circulation around your plants, avoid wetting the foliage when watering, and remove any diseased leaves promptly. Consider using a copper fungicide or a sulfur fungicide to prevent fungal diseases.
What size container is best for growing cherry tomatoes on a balcony?
A container that is at least 12 inches in diameter and 12 inches deep is recommended for growing cherry tomatoes on a balcony. Larger containers are even better, as they provide more room for the roots to grow and help retain moisture. Choose a container made of a durable material such as plastic, terracotta, or wood. Make sure the container has drainage holes to prevent waterlogging.
How do I support my cherry tomato plants on a balcony?
Cherry tomato plants can become quite tall and heavy, so it’s important to provide them with adequate support. Use stakes, cages, or trellises to support the plants and prevent them from falling over. Insert the support structure into the container when you plant the tomato seedlings. As the plants grow, tie the stems to the support structure with soft twine or plant ties.
When should I harvest my cherry tomatoes?
Cherry tomatoes are typically ready to harvest about 60-70 days after transplanting. The tomatoes should be fully colored and slightly soft to the touch. Gently twist the tomatoes off the vine when they are ripe. Harvest regularly to encourage continued fruit production.
Can I grow cherry tomatoes on a balcony in a hanging basket?
Yes, you can grow cherry tomatoes in a hanging basket, especially smaller, bush-type varieties. Choose a hanging basket that is at least 12 inches in diameter and use a well-draining potting mix. Water regularly and fertilize as needed. Hanging baskets can be a great way to maximize space on a small balcony.
What are some good companion plants for cherry tomatoes on a balcony?
Companion planting can help improve the health and productivity of your cherry tomato plants. Some good companion plants for cherry tomatoes include basil, marigolds, nasturtiums, and onions. Basil helps repel pests and improves the flavor of tomatoes. Marigolds deter nematodes and other soil pests. Nasturtiums attract aphids away from tomato plants. Onions repel aphids and other pests.


Leave a Comment