
Clean Sink DIY: Is your kitchen sink looking less than sparkling? Let’s face it, the sink is the unsung hero of the kitchen, battling food scraps, greasy dishes, and who-knows-what-else on a daily basis. It’s no wonder it can quickly become a breeding ground for grime and unpleasant odors. But don’t despair! You don’t need harsh chemicals or expensive cleaners to restore your sink to its former glory. I’m here to share some simple, effective, and budget-friendly clean sink DIY tricks that will leave your sink looking and smelling fresh.
Throughout history, keeping our living spaces clean has been a sign of prosperity and health. While our ancestors may not have had stainless steel sinks, the principle remains the same: a clean space contributes to a healthier and happier life. Think of the satisfaction of a sparkling clean sink – it’s a small victory that can brighten your entire day!
Why do you need these DIY sink cleaning hacks? Because a clean sink isn’t just about aesthetics. It’s about preventing the spread of bacteria, eliminating unpleasant smells, and extending the life of your sink. Plus, who wants to spend hours scrubbing when you can achieve amazing results with just a few simple ingredients you probably already have in your pantry? So, grab your apron, and let’s get started on these easy and effective DIY sink cleaning solutions!

DIY Sparkling Clean Sink: A Guide to a Gleaming Basin
Okay, let’s face it, the sink is the unsung hero of the kitchen (or bathroom!). It handles everything from dirty dishes to messy hands, and it often gets neglected in the cleaning department. But fear not! I’m going to walk you through a super effective DIY method to get your sink sparkling clean and looking brand new. This isn’t just about a quick wipe-down; we’re talking deep clean, stain removal, and shine restoration.
What You’ll Need: Your Arsenal of Cleaning Supplies
Before we dive in, let’s gather our supplies. I like to have everything within easy reach so I’m not running around mid-clean. Here’s what you’ll need:
* **Baking Soda:** This is our gentle abrasive. It’s fantastic for scrubbing away grime without scratching.
* **White Vinegar:** The acid in vinegar helps dissolve hard water stains and mineral deposits. Plus, it’s a natural disinfectant!
* **Dish Soap:** A good quality dish soap will cut through grease and food residue.
* **Lemon (Optional):** Lemon juice is a natural brightener and deodorizer. It also smells amazing!
* **Salt (Optional):** For extra scrubbing power, especially on stubborn stains.
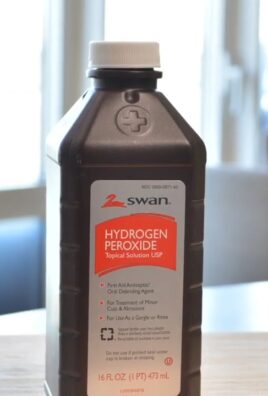
* **Hydrogen Peroxide (Optional):** Great for disinfecting and removing stains, especially in stainless steel sinks.
* **Soft Cloths or Sponges:** Microfiber cloths are my go-to for a streak-free shine.
* **Old Toothbrush:** Perfect for getting into those hard-to-reach corners and around the drain.
* **Spray Bottle:** For easy application of vinegar.
* **Rubber Gloves (Optional):** If you have sensitive skin, gloves are a good idea.
* **Sink Stopper:** To plug the drain when needed.
* **Boiling Water:** For a final rinse and to help clear any lingering debris.
Phase 1: The Initial Scrub – Getting Rid of the Surface Grime
This first step is all about removing the loose dirt and debris that’s accumulated in your sink.
1. **Rinse the Sink:** Start by giving your sink a good rinse with warm water. This will loosen any surface dirt and make the cleaning process easier.
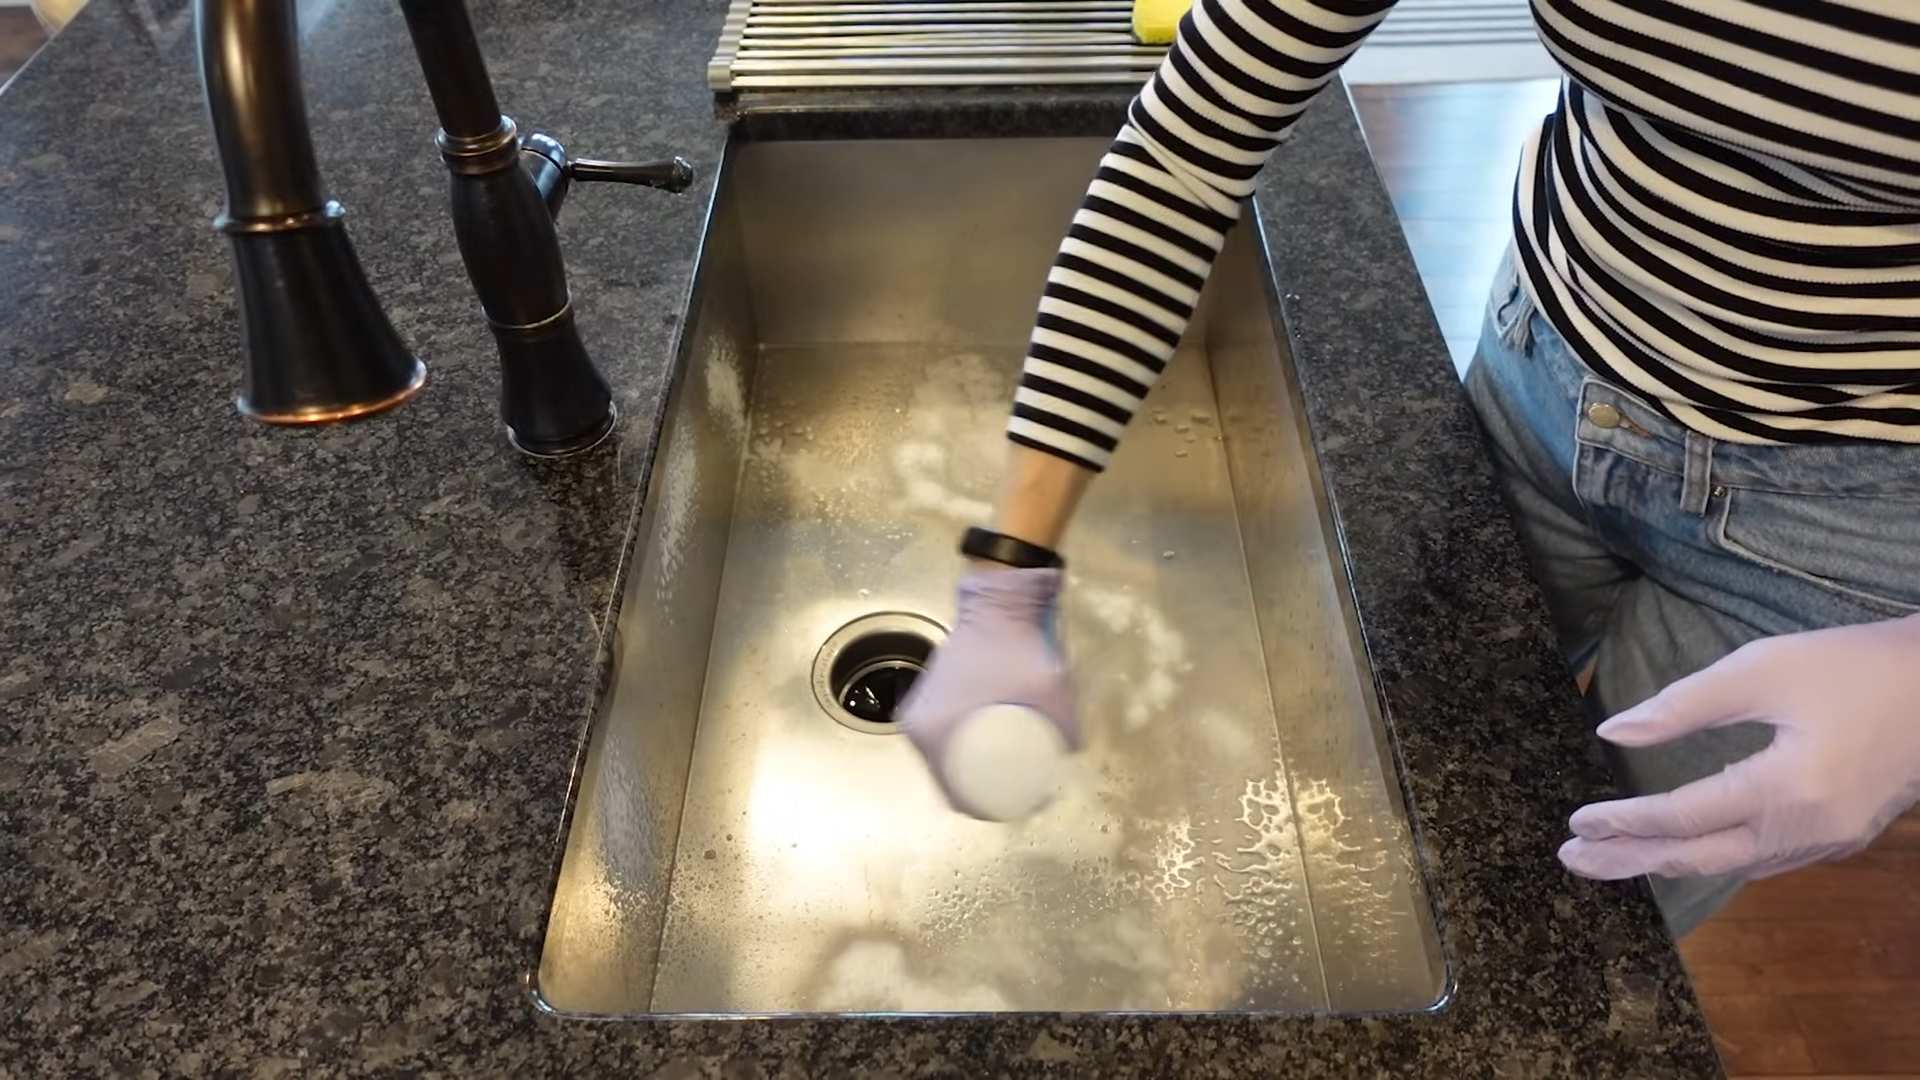
2. **Apply Baking Soda:** Generously sprinkle baking soda all over the sink surface, including the sides and bottom. Don’t be shy! You want a good coating.
3. **Scrub with a Damp Sponge:** Using a damp sponge or soft cloth, scrub the baking soda into the sink. Use circular motions and apply a bit of pressure, especially in areas with visible grime.
4. **Focus on Problem Areas:** Pay extra attention to areas around the drain, faucet, and any spots with noticeable stains. Use your old toothbrush to scrub those hard-to-reach corners and crevices.
5. **Rinse Thoroughly:** Once you’ve scrubbed the entire sink, rinse it thoroughly with warm water. Make sure to remove all traces of baking soda.
Phase 2: Vinegar Power – Tackling Hard Water and Stains
Now it’s time to unleash the power of vinegar! This step will help dissolve hard water stains, mineral deposits, and any lingering grime.
1. **Spray with Vinegar:** Fill your spray bottle with white vinegar and generously spray the entire sink surface, including the faucet and drain area.
2. **Let it Sit (Fizzing Action):** Let the vinegar sit for about 5-10 minutes. You’ll likely see some fizzing, which is a good sign! It means the vinegar is reacting with the baking soda and breaking down the grime.
3. **Scrub Again (Gently):** After the vinegar has had a chance to work its magic, gently scrub the sink again with your sponge or cloth. You should notice that the stains and grime are much easier to remove now.
4. **Rinse Again:** Rinse the sink thoroughly with warm water to remove all traces of vinegar.
Phase 3: The Deep Clean – For Stubborn Stains and Disinfection
If you still have some stubborn stains or want to give your sink an extra boost of cleanliness, this phase is for you.
1. **Choose Your Weapon (Lemon, Salt, or Hydrogen Peroxide):**
* **Lemon:** Cut a lemon in half and rub it all over the sink surface. The citric acid will help brighten the sink and remove any lingering odors. Let it sit for about 10 minutes, then rinse.
* **Salt:** Sprinkle salt on a damp sponge and use it to scrub any remaining stains. The salt acts as a gentle abrasive.
* **Hydrogen Peroxide:** Pour a small amount of hydrogen peroxide onto a cloth and apply it to the stained areas. Let it sit for a few minutes, then rinse. *Be careful when using hydrogen peroxide on colored sinks, as it may cause fading. Always test in an inconspicuous area first.*
2. **Scrub and Rinse:** After using your chosen method, scrub the sink one last time and rinse thoroughly with warm water.
Phase 4: The Finishing Touches – Shine and Protection
This final phase is all about giving your sink that extra sparkle and protecting it from future stains.
1. **Dish Soap Wash:** Wash the sink with a small amount of dish soap and warm water. This will remove any remaining residue and leave it smelling fresh.
2. **Rinse with Boiling Water:** Carefully pour boiling water down the drain. This will help clear any lingering debris and disinfect the drain. *Be cautious when using boiling water, especially on porcelain sinks, as it could potentially cause cracking. If you’re unsure, skip this step.*
3. **Dry Thoroughly:** Use a clean, dry microfiber cloth to dry the entire sink. This is crucial for preventing water spots and achieving a streak-free shine.
4. **Optional: Oil Rub (Stainless Steel Sinks):** For stainless steel sinks, you can apply a small amount of mineral oil or stainless steel cleaner to a cloth and buff the sink to a brilliant shine. This will also help protect the sink from future stains and fingerprints. *Only use this method on stainless steel sinks.*
Specific Sink Materials: Tailoring Your Cleaning Approach
The best cleaning method can vary slightly depending on the material of your sink. Here’s a quick guide:
* **Stainless Steel:** Stainless steel is generally quite durable, but it can be prone to water spots and scratches. Avoid using harsh abrasives like steel wool. Always dry your stainless steel sink thoroughly after cleaning to prevent water spots. The oil rub in the finishing touches section is highly recommended for stainless steel.
* **Porcelain:** Porcelain sinks are beautiful but can be susceptible to chipping and staining. Avoid using abrasive cleaners or scouring pads. Gentle cleaning methods like baking soda and vinegar are usually sufficient. Be cautious with boiling water, as extreme temperature changes can cause cracking.
* **Composite:** Composite sinks are made from a blend of materials like granite or quartz and resin. They’re generally quite durable and stain-resistant. However, avoid using harsh chemicals or abrasive cleaners. Follow the general cleaning steps outlined above.
* **Copper:** Copper sinks have a unique patina that can be affected by cleaning. Avoid using harsh chemicals or abrasive cleaners. A gentle soap and water solution is usually sufficient. You can also use a copper cleaner specifically designed for sinks.
Maintaining Your Sparkling Sink: Tips for Long-Lasting Cleanliness
Now that you’ve got your sink sparkling clean, here are a few tips to help you maintain its shine:
* **Rinse After Each Use:** Make it a habit to rinse your sink after each use to prevent food particles and grime from building up.
* **Wipe Down Regularly:** Wipe down your sink with a damp cloth and a mild cleaner every day or two to keep it looking its best.
* **Avoid Harsh Chemicals:** Avoid using harsh chemicals like bleach or ammonia, as they can damage the sink surface.
* **Protect from Scratches:** Use a sink protector or dish drying mat to prevent scratches from pots and pans.
* **Address Stains Promptly:** If you notice any stains, address them promptly to prevent them from becoming permanent.
* **Clean the Faucet Regularly:** Don’t forget to clean your faucet regularly to remove water spots and mineral deposits. A simple wipe-down with vinegar or a commercial faucet cleaner will do the trick.
By following these simple steps and tips, you can keep your sink sparkling clean and looking its best for years to come! Happy cleaning!
Conclusion
So, there you have it! This simple, yet incredibly effective, DIY trick for a sparkling clean sink is more than just a cleaning hack; it’s a game-changer for your kitchen routine. We’ve walked you through the steps, highlighting the ease and affordability of using readily available household ingredients to achieve professional-level results. Forget expensive, chemical-laden cleaners that promise the world but often fall short. This method is not only budget-friendly but also environmentally conscious, reducing your reliance on harsh chemicals that can harm both your health and the planet.
Why is this DIY trick a must-try? Because it delivers on its promise. It effortlessly tackles stubborn stains, eliminates unpleasant odors, and leaves your sink gleaming like new. Imagine the satisfaction of stepping into your kitchen each morning and being greeted by a spotless, inviting sink. It sets a positive tone for the day and makes your kitchen a more enjoyable space to be in. Beyond the aesthetic appeal, a clean sink is also a hygienic one, reducing the risk of bacteria and germs lurking in your food preparation area.
But the beauty of this DIY approach lies in its adaptability. Feel free to experiment with variations to suit your specific needs and preferences. For instance, if you have particularly tough stains, consider adding a tablespoon of borax to the paste for extra cleaning power. If you prefer a more fragrant clean, a few drops of your favorite essential oil, such as lemon or lavender, can be added to the baking soda mixture. For stainless steel sinks, always scrub in the direction of the grain to avoid scratching. And for porcelain sinks, be gentle and avoid abrasive scrubbers that could damage the finish. You can even use this same method to clean other areas of your kitchen, like your stovetop or countertops.
We understand that trying something new can sometimes feel daunting, but trust us, this is one DIY project that’s well worth the effort. The minimal time and resources required are a small price to pay for the significant improvement in the cleanliness and appearance of your sink. Plus, the satisfaction of knowing you achieved these results with your own two hands is an added bonus.
We are confident that once you try this DIY trick, you’ll be amazed by the results. It’s a simple, effective, and affordable way to maintain a clean and hygienic kitchen. So, ditch the expensive cleaners and embrace the power of DIY.
Now, we want to hear from you! We encourage you to try this **clean sink DIY** method and share your experience with us. Did it work as well for you as it did for us? Did you try any variations? What were your results? Share your tips, tricks, and photos in the comments section below. Let’s create a community of clean sink enthusiasts and inspire others to embrace the power of DIY cleaning! We can’t wait to hear your success stories!
Frequently Asked Questions (FAQ)
What kind of baking soda should I use?
Plain, regular baking soda (sodium bicarbonate) is all you need for this DIY cleaning trick. There’s no need to buy any special or expensive baking soda products. The key is the abrasive quality of the baking soda combined with its ability to neutralize odors.
Can I use this method on all types of sinks?
This method is generally safe for most types of sinks, including stainless steel, porcelain, and composite sinks. However, it’s always a good idea to test a small, inconspicuous area first, especially if you have a delicate or antique sink. For stainless steel, be sure to scrub in the direction of the grain to avoid scratches. For porcelain, avoid using abrasive scrubbers that could damage the finish. If you have a particularly delicate sink material, consider diluting the baking soda paste with more water to make it less abrasive.
How often should I clean my sink using this method?
The frequency of cleaning depends on how often you use your sink and how dirty it gets. For most households, cleaning your sink with this method once or twice a week is sufficient to maintain a clean and hygienic surface. If you notice stains or odors developing more frequently, you may need to clean it more often.
What if I don’t have baking soda? Can I use something else?
While baking soda is the star ingredient in this DIY cleaning trick, you can try using other mild abrasives as a substitute. Cream of tartar or a paste made from salt and water can work in a pinch, but they may not be as effective as baking soda. Baking soda’s unique properties, including its mild alkalinity and ability to absorb odors, make it the ideal choice for cleaning sinks.
The stains in my sink are really stubborn. What can I do?
For particularly stubborn stains, you can try a few different approaches. First, make sure you’re using enough baking soda paste and applying enough pressure when scrubbing. You can also let the paste sit on the stain for a longer period of time, up to 30 minutes, before scrubbing. Another option is to add a tablespoon of borax to the baking soda paste for extra cleaning power. For rust stains, try using a paste made from lemon juice and salt.
My sink has a lingering odor. Will this method get rid of it?
Yes, baking soda is excellent at neutralizing odors. The baking soda will absorb any lingering smells in your sink, leaving it fresh and clean. If the odor persists after cleaning, you can try pouring a cup of baking soda down the drain followed by a cup of vinegar. Let it fizz for 30 minutes, then flush with hot water. This will help to clean and deodorize your drain as well.
Can I use this method to clean my garbage disposal?
While this method is primarily for cleaning the sink basin, you can also use it to freshen up your garbage disposal. Simply sprinkle some baking soda down the disposal and let it sit for a few minutes before running the disposal with cold water. You can also add some lemon or lime peels to the disposal to help deodorize it.
Is this method safe for my septic system?
Yes, this method is generally safe for septic systems. Baking soda is a natural substance that won’t harm the bacteria in your septic tank. However, it’s always a good idea to avoid pouring large amounts of any cleaning product down the drain if you have a septic system.
What kind of scrub brush should I use?
The type of scrub brush you use depends on the material of your sink. For stainless steel, use a soft-bristled brush or sponge to avoid scratching. For porcelain, avoid using abrasive scrubbers that could damage the finish. For composite sinks, you can use a slightly more abrasive brush, but still be gentle.
Can I use this method on colored sinks?
Yes, this method is generally safe for colored sinks, but it’s always a good idea to test a small, inconspicuous area first to ensure that it doesn’t fade or discolor the finish. Avoid using abrasive scrubbers that could scratch or damage the color.


Leave a Comment