
Clorox grout cleaning method – sounds intimidating, right? But trust me, it doesn’t have to be! Are you tired of staring at dingy, discolored grout lines that seem to mock your cleaning efforts? I know I was! For years, I battled stubborn stains, trying every cleaner under the sun with little success. It felt like a never-ending chore, and honestly, a bit of a losing battle.
Grout, that porous material between your tiles, has been a staple in homes for centuries. From the intricate mosaics of ancient Rome to the modern kitchens of today, grout provides stability and a finished look. But its porous nature makes it a magnet for dirt, grime, and mildew, turning a beautiful tile surface into an eyesore.
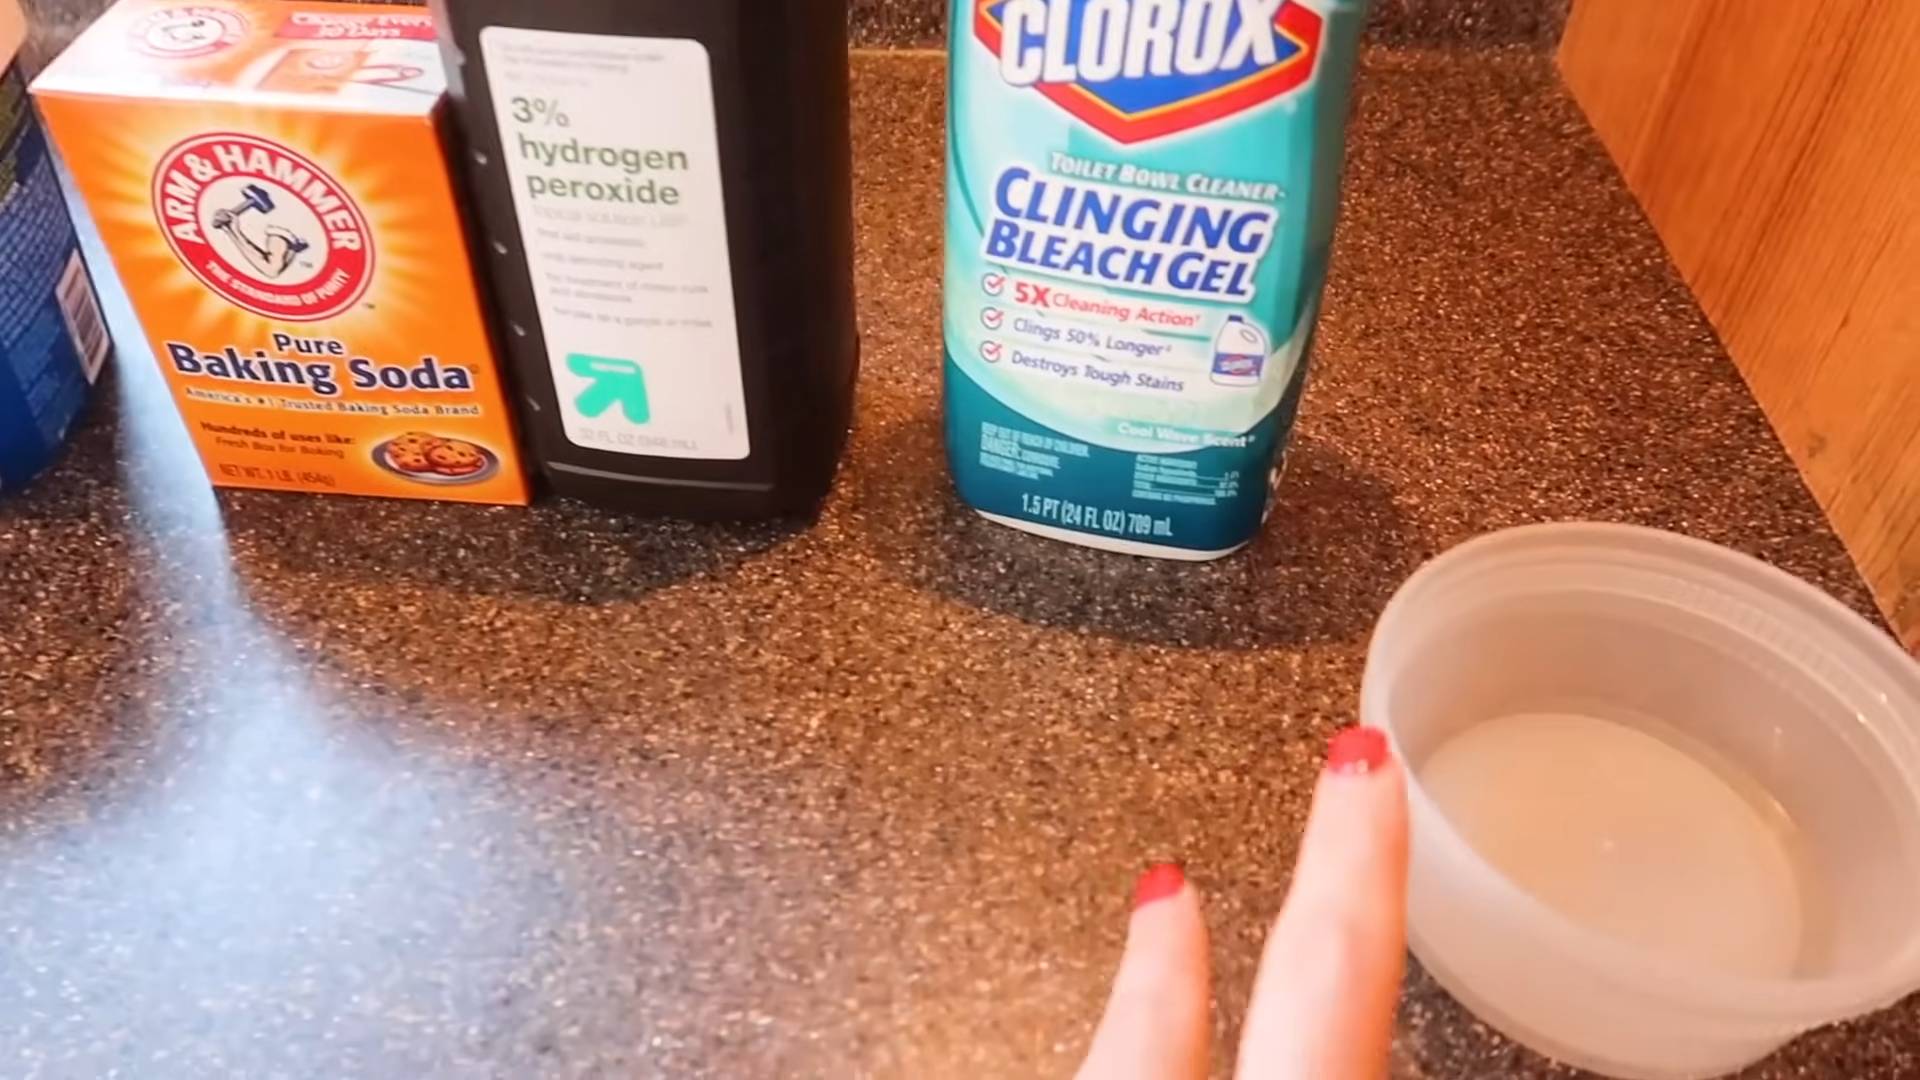
That’s where this DIY guide comes in! I’m going to share my tried-and-true Clorox grout cleaning method that will transform your grout from drab to fab. Why do you need this? Because a clean home is a happy home, and sparkling grout can instantly brighten up any space. Plus, tackling grout stains now can prevent more serious problems like mold growth down the line. So, grab your supplies, and let’s get cleaning!
Grow Your Own Delicious Strawberries: A DIY Guide
Hey there, fellow gardening enthusiasts! I’m so excited to share my tried-and-true method for growing plump, juicy strawberries right at home. Forget those bland, store-bought berries – nothing beats the taste of homegrown goodness. This guide will walk you through everything you need to know, from choosing the right variety to harvesting your sweet rewards. Let’s get started!
Choosing Your Strawberry Variety
Before we dive into the nitty-gritty, let’s talk about strawberry varieties. There are three main types, and each has its own unique characteristics:
* **June-Bearing:** These varieties produce one large crop of strawberries in the spring, typically around June (hence the name!). They’re great if you want a big harvest all at once for making jam or freezing. Popular June-bearing varieties include ‘Chandler,’ ‘Honeoye,’ and ‘Earliglow.’
* **Everbearing:** Don’t let the name fool you – everbearing strawberries don’t produce fruit continuously. Instead, they typically have two or three harvests throughout the growing season: one in the spring, one in the summer, and sometimes another in the fall. ‘Ozark Beauty’ and ‘Seascape’ are popular everbearing choices.
* **Day-Neutral:** These varieties are the most consistent producers, fruiting throughout the growing season as long as temperatures are moderate. They’re less sensitive to day length than June-bearing or everbearing types. ‘Albion’ and ‘San Andreas’ are excellent day-neutral options.
Choosing the right variety depends on your climate and how you want to use your strawberries. I personally love day-neutral varieties because I enjoy having fresh strawberries all summer long.
Preparing Your Strawberry Patch
Strawberries need a sunny spot and well-drained soil to thrive. Here’s how to get your garden ready:
* **Sunlight:** Strawberries need at least 6-8 hours of direct sunlight per day. Choose a location that gets plenty of sunshine.
* **Soil:** Strawberries prefer slightly acidic soil with a pH between 5.5 and 6.5. If your soil is heavy clay or sandy, amend it with compost or other organic matter to improve drainage and fertility.
* **Weed Control:** Clear the area of all weeds and grass. Strawberries don’t compete well with weeds, so it’s important to start with a clean slate.
* **Soil Testing:** I highly recommend testing your soil before planting. This will tell you the pH level and nutrient content, so you can amend it accordingly. You can purchase a soil testing kit at most garden centers or send a sample to your local agricultural extension office.
Planting Your Strawberry Plants
Now for the fun part – planting! Here’s a step-by-step guide:
1. **Soak the Roots:** Before planting, soak the roots of your strawberry plants in water for about 30 minutes. This will help them rehydrate and get off to a good start.
2. **Dig the Holes:** Dig holes that are large enough to accommodate the roots of your plants. Space the holes about 12-18 inches apart in rows that are 2-3 feet apart.
3. **Planting Depth:** This is crucial! Make sure the crown of the plant (the point where the roots meet the stem) is level with the soil surface. Planting too deep can cause the crown to rot, while planting too shallow can dry out the roots.
4. **Spread the Roots:** Gently spread the roots out in the hole before backfilling with soil.
5. **Water Thoroughly:** After planting, water the plants thoroughly to settle the soil and help them establish.
Caring for Your Strawberry Plants
Once your strawberry plants are in the ground, it’s important to provide them with the care they need to thrive.
* **Watering:** Strawberries need consistent moisture, especially during fruit production. Water deeply whenever the top inch of soil feels dry. Avoid overhead watering, as this can promote fungal diseases. Drip irrigation or soaker hoses are ideal.
* **Fertilizing:** Fertilize your strawberry plants in the spring with a balanced fertilizer, such as 10-10-10. Avoid over-fertilizing, as this can lead to excessive foliage growth at the expense of fruit production. I usually fertilize again after the first harvest to encourage continued fruiting.
* **Weed Control:** Keep your strawberry patch free of weeds by hand-pulling or using a hoe. Mulching with straw or wood chips can also help suppress weeds and retain moisture.
* **Pest and Disease Control:** Strawberries can be susceptible to various pests and diseases, such as aphids, spider mites, and fungal diseases. Inspect your plants regularly for signs of trouble and take action promptly. Insecticidal soap or neem oil can be effective against many common pests. For fungal diseases, try a copper-based fungicide.
* **Removing Runners:** June-bearing strawberries produce runners, which are long stems that grow horizontally and develop new plantlets at the nodes. If you want to maximize fruit production, remove the runners as they appear. Everbearing and day-neutral varieties also produce runners, but they don’t need to be removed as frequently.
* **Mulching for Winter:** In colder climates, mulch your strawberry plants with straw in the fall to protect them from freezing temperatures. Remove the mulch in the spring after the last frost.
Growing Strawberries in Containers
Don’t have a garden? No problem! You can easily grow strawberries in containers. Here’s what you need to know:
* **Choose the Right Container:** Select a container that is at least 12 inches in diameter and 8 inches deep. Hanging baskets are also a great option for strawberries.
* **Use a Good Quality Potting Mix:** Avoid using garden soil in containers, as it can become compacted and poorly drained. Use a lightweight potting mix that is specifically formulated for containers.
* **Planting:** Plant your strawberry plants in the container as described above, making sure the crown is level with the soil surface.
* **Watering and Fertilizing:** Container-grown strawberries need more frequent watering and fertilizing than those grown in the ground. Water whenever the top inch of soil feels dry and fertilize every 2-3 weeks with a balanced liquid fertilizer.
* **Sunlight:** Place your container in a sunny location that gets at least 6-8 hours of direct sunlight per day.
* **Overwintering:** In colder climates, move your containers to a sheltered location, such as a garage or shed, during the winter. Water occasionally to keep the soil from drying out completely.
Harvesting Your Strawberries
The moment you’ve been waiting for – harvesting! Here’s how to tell when your strawberries are ripe:
* **Color:** Ripe strawberries will be a deep, vibrant red color.
* **Firmness:** The berries should be firm to the touch, but not hard.
* **Ease of Picking:** Ripe strawberries will easily detach from the plant with a gentle tug.
* **Taste Test:** The best way to tell if a strawberry is ripe is to taste it! It should be sweet and juicy.
Harvest your strawberries in the morning, after the dew has dried. Gently grasp the berry and twist it off the plant, leaving a small piece of the stem attached. Store your strawberries in the refrigerator and use them within a few days.
Troubleshooting Common Strawberry Problems
Even with the best care, you may encounter some problems when growing strawberries. Here are a few common issues and how to address them:
* **Lack of Fruit:** If your strawberry plants are not producing fruit, it could be due to a lack of sunlight, poor soil, or over-fertilizing. Make sure your plants are getting enough sunlight, amend the soil with compost, and avoid over-fertilizing.
* **Small Berries:** Small berries can be caused by a lack of water, poor soil, or overcrowding. Water your plants regularly, amend the soil with compost, and thin out the plants if they are too crowded.
* **Rotting Berries:** Rotting berries can be caused by fungal diseases, such as gray mold. Avoid overhead watering, provide good air circulation, and remove any infected berries promptly.
* **Pest Infestations:** Inspect your plants regularly for signs of pests and take action promptly. Insecticidal soap or neem oil can be effective against many common pests.
Enjoying Your Homegrown Strawberries
Congratulations! You’ve successfully grown your own delicious strawberries. Now it’s time to enjoy the fruits (literally!) of your labor. Here are a few ideas:
* **Eat them fresh:** Nothing beats the taste of a freshly picked strawberry.
* **Make jam or jelly:** Preserve your strawberry harvest by making homemade jam or jelly.
* **Bake a pie or cobbler:** Strawberries are a delicious addition to pies, cobblers, and other desserts.
* **Add them to smoothies or yogurt:** Strawberries are a healthy and delicious way to add flavor to smoothies and yogurt.
* **Freeze them for later:** Freeze your strawberries to enjoy them throughout the year. Simply wash and hull the berries, then spread them out on a baking sheet
Conclusion
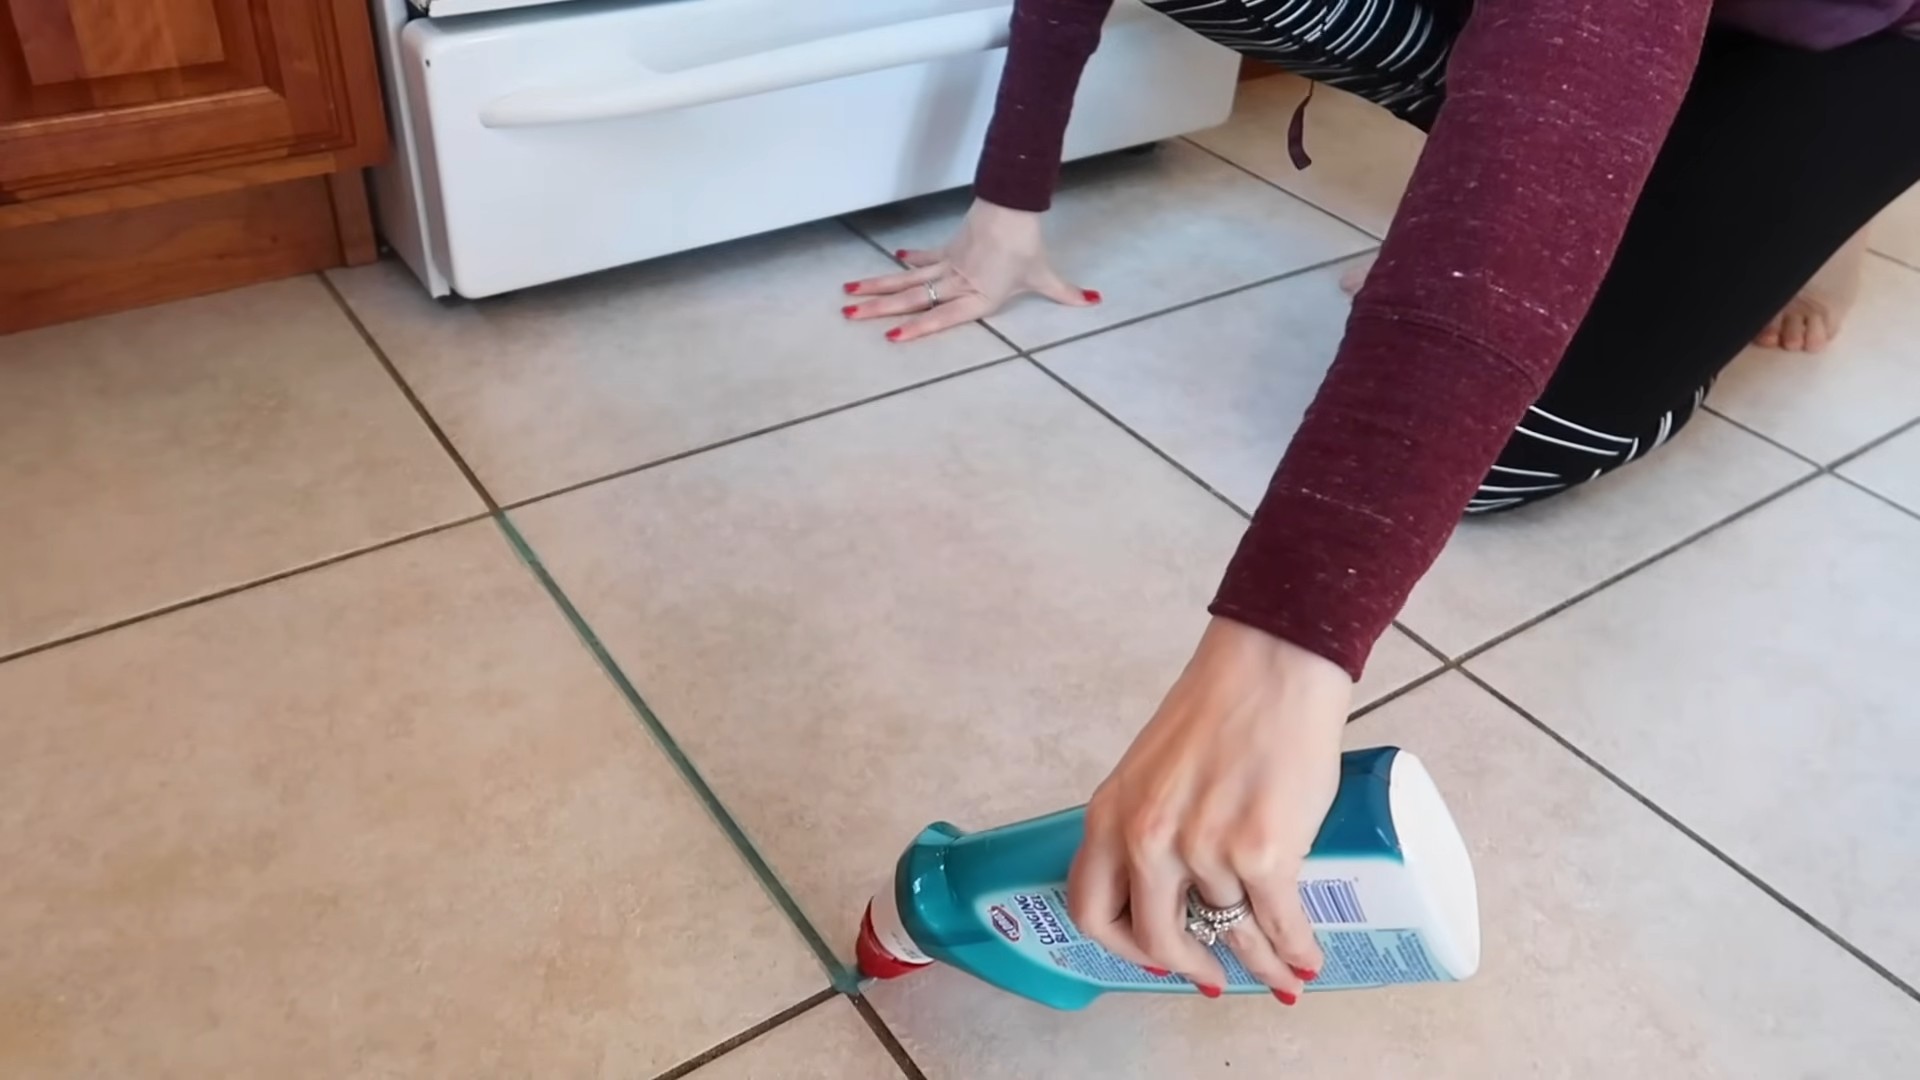
So, there you have it! This simple, yet incredibly effective, Clorox grout cleaning method is a game-changer for anyone battling stubborn stains and discoloration in their tiled spaces. Forget spending hours scrubbing with minimal results or investing in expensive, harsh chemicals that can damage your grout and potentially harm your health. This DIY approach offers a powerful clean with readily available supplies, saving you time, money, and frustration.
The beauty of this method lies in its simplicity and adaptability. While we’ve outlined the basic steps using Clorox bleach, feel free to experiment with variations to suit your specific needs and preferences. For instance, if you’re dealing with particularly tough stains, consider letting the Clorox solution sit on the grout for a slightly longer period, perhaps up to 15 minutes, before scrubbing. Just be sure to monitor the grout closely to avoid any potential discoloration, especially on colored grout.
Another variation you might explore is the addition of baking soda to create a paste. This can provide a more abrasive cleaning action for heavily soiled areas. Simply mix the Clorox bleach with baking soda until you achieve a thick, spreadable consistency. Apply the paste to the grout lines, let it sit for a few minutes, and then scrub with your chosen brush. Remember to rinse thoroughly with clean water afterward.
For those concerned about the strong scent of bleach, ensure adequate ventilation by opening windows and doors. You can also consider wearing a mask to minimize inhalation. Alternatively, you could explore using a bleach pen for more targeted application, reducing the overall exposure to fumes.
Ultimately, the key to success with this Clorox grout cleaning method is patience and persistence. Don’t expect miracles with the first application, especially if your grout is severely stained. You may need to repeat the process a few times to achieve the desired results. But trust us, the effort is well worth it when you see your grout transformed from dingy and discolored to bright and clean.
We are confident that this DIY trick will become your go-to solution for maintaining sparkling clean grout. It’s a cost-effective, efficient, and surprisingly simple way to revitalize your tiled surfaces and breathe new life into your bathrooms, kitchens, and other tiled areas.
So, what are you waiting for? Grab your Clorox bleach, gather your supplies, and prepare to be amazed by the transformative power of this grout cleaning method. We encourage you to try this DIY trick and share your experiences with us! Let us know in the comments below how it worked for you, any variations you tried, and any tips you discovered along the way. Your feedback will not only help us improve this guide but also inspire others to tackle their grout cleaning challenges with confidence. We can’t wait to hear your success stories!
Frequently Asked Questions (FAQ)
1. Is Clorox bleach safe to use on all types of grout?
While Clorox bleach is generally effective and safe for most types of grout, it’s always a good idea to test it in an inconspicuous area first, especially if you have colored grout. Bleach can sometimes lighten or discolor colored grout, so a spot test will help you determine if it’s suitable for your specific grout type. If you notice any adverse effects, discontinue use and explore alternative cleaning methods. For epoxy grout, it is generally safe, but always test a small area first.
2. What type of brush is best for scrubbing grout?
The best type of brush for scrubbing grout depends on the severity of the staining and the type of grout you have. For light to moderate staining, a stiff-bristled nylon brush is usually sufficient. You can find these brushes at most hardware stores or online retailers. For more stubborn stains, you might consider using a grout brush with a narrower head and more aggressive bristles. An old toothbrush can also be effective for reaching tight spaces and corners. Avoid using metal brushes, as they can scratch or damage the grout.
3. How long should I let the Clorox bleach solution sit on the grout before scrubbing?
The ideal dwell time for the Clorox bleach solution depends on the severity of the staining. For lightly stained grout, 5-10 minutes may be sufficient. For more heavily stained grout, you can let it sit for up to 15 minutes. However, it’s crucial to monitor the grout closely during this time to avoid any potential discoloration. If you notice any adverse effects, rinse the area immediately with clean water. Never leave the bleach solution on the grout for longer than 15 minutes.
4. What safety precautions should I take when using Clorox bleach?
Clorox bleach is a powerful cleaning agent and should be handled with care. Always wear gloves to protect your skin from irritation. Ensure adequate ventilation by opening windows and doors to minimize inhalation of fumes. Consider wearing a mask, especially if you are sensitive to strong odors. Avoid contact with your eyes. If bleach comes into contact with your eyes, rinse immediately with plenty of water and seek medical attention. Never mix bleach with ammonia or other cleaning products, as this can create dangerous and toxic fumes. Keep bleach out of reach of children and pets.
5. Can I use this method on vertical surfaces, such as shower walls?
Yes, you can use this method on vertical surfaces, such as shower walls. However, you may need to adjust the consistency of the Clorox bleach solution to prevent it from running down the wall. You can thicken the solution by adding baking soda to create a paste. Apply the paste to the grout lines, let it sit for a few minutes, and then scrub with your chosen brush. Rinse thoroughly with clean water.
6. What if the Clorox bleach method doesn’t completely remove the stains?
If the Clorox bleach method doesn’t completely remove the stains, you can try repeating the process a few times. For particularly stubborn stains, you might consider using a stronger concentration of bleach, but be sure to test it in an inconspicuous area first. Alternatively, you could explore other grout cleaning products specifically designed for removing tough stains. In some cases, severely stained grout may require professional cleaning or even replacement.
7. How often should I clean my grout using this method?
The frequency of cleaning your grout depends on the amount of traffic and exposure to dirt and grime. In high-traffic areas, such as bathrooms and kitchens, you may need to clean your grout every few weeks. In less frequently used areas, you can clean your grout less often. Regular cleaning will help prevent stains from setting in and make the cleaning process easier.
8. Can I use this method on colored grout?
Using Clorox bleach on colored grout carries a risk of discoloration. It’s imperative to perform a spot test in an inconspicuous area before applying it to the entire surface. If you notice any lightening or fading of the color, discontinue use immediately. For colored grout, consider using alternative cleaning methods specifically designed for colored grout, such as those containing oxygen bleach or mild detergents.
9. What are some alternative grout cleaning methods if I don’t want to use Clorox bleach?
If you prefer not to use Clorox bleach, there are several alternative grout cleaning methods you can try. These include using a mixture of baking soda and vinegar, a paste of baking soda and water, or commercial grout cleaning products that are specifically formulated for grout cleaning. Steam cleaning is another effective option that uses high-pressure steam to loosen dirt and grime. Always follow the manufacturer’s instructions when using commercial cleaning products.
10. How can I prevent grout from getting stained in the future?
Preventing grout from getting stained in the future is key to maintaining its appearance and reducing the need for frequent cleaning. Sealing your grout is one of the most effective ways to protect it from stains. Grout sealers create a barrier that prevents dirt, grime, and liquids from penetrating the grout. Apply a grout sealer after cleaning your grout and reapply it every 6-12 months, or as recommended by the manufacturer. Regularly wipe up spills and messes to prevent them from setting in. Consider using mats or rugs in high-traffic areas to protect the grout from dirt and wear.

Leave a Comment