
Container bell peppers! Imagine stepping onto your patio and plucking a vibrant, juicy bell pepper, grown with your own two hands. Sounds idyllic, right? Well, it’s more achievable than you might think! For centuries, humans have cultivated gardens, from the hanging gardens of Babylon to the humble window boxes of today. This connection to the earth, this ability to nurture life, is deeply ingrained in us.
But let’s face it, not everyone has acres of land to dedicate to a sprawling vegetable patch. That’s where the magic of container gardening comes in. And specifically, growing container bell peppers. This DIY guide is your passport to a bountiful harvest, even if you’re working with a tiny balcony or a sunny windowsill. We’ll unlock simple, effective tricks and hacks that will transform you into a container gardening pro.
Why do you need this? Because store-bought peppers, while convenient, often lack the flavor and freshness of homegrown. Plus, there’s an undeniable satisfaction in nurturing a plant from seed to table. We’ll show you how to choose the right containers, select the best soil, and provide the perfect amount of sunlight and water. Get ready to enjoy the freshest, most flavorful bell peppers you’ve ever tasted, all thanks to your own green thumb!
Growing Bell Peppers in Containers: A Comprehensive DIY Guide
Hey there, fellow gardening enthusiasts! I’m so excited to share my tried-and-true method for growing vibrant, delicious bell peppers right in containers. Forget those flimsy grocery store peppers – with a little know-how, you can harvest your own juicy, homegrown beauties. This guide will walk you through every step, from choosing the right container to troubleshooting common pepper problems. Let’s get started!
Choosing the Right Container and Soil
This is the foundation of your pepper-growing success. Don’t skimp on this step!
* Container Size: Bell peppers need room to spread their roots. I recommend a container that’s at least 12 inches in diameter and 12 inches deep. A 5-gallon bucket works perfectly, but larger is always better. The bigger the container, the more stable the moisture levels will be, and the happier your pepper plant will be.
* Drainage: This is absolutely crucial! Peppers hate sitting in soggy soil. Make sure your container has plenty of drainage holes. If it doesn’t, drill some!
* Container Material: Plastic, terracotta, or even fabric grow bags all work well. Terracotta pots are beautiful, but they dry out faster than plastic, so you’ll need to water more frequently. Fabric grow bags offer excellent drainage and aeration, which peppers love.
* Potting Mix: Don’t use garden soil! It’s too heavy and compacts easily, which can suffocate the roots. Instead, opt for a high-quality potting mix specifically formulated for containers. Look for a mix that contains peat moss, perlite, and vermiculite. These ingredients provide good drainage, aeration, and water retention. I personally love using a mix that also has some compost mixed in for added nutrients.
Selecting Your Bell Pepper Variety
The world of bell peppers is vast and colorful! Here’s what to consider:
* Color: Red, yellow, orange, green, purple, even chocolate! Choose your favorite colors and flavors. Red and orange peppers are generally sweeter than green peppers.
* Size: Some varieties produce huge, blocky peppers, while others yield smaller, more compact fruits. Consider how you plan to use your peppers when making your selection.
* Days to Maturity: This is the number of days it takes for the peppers to ripen after transplanting. If you live in a cooler climate with a shorter growing season, choose varieties with a shorter maturity time.
* Disease Resistance: Look for varieties that are resistant to common pepper diseases like Tobacco Mosaic Virus (TMV) and Verticillium Wilt. This will save you a lot of headaches down the road.
* My Personal Favorites: California Wonder (classic green bell pepper), Sweet Banana (yellow, elongated pepper), and Chocolate Beauty (unique brown pepper).
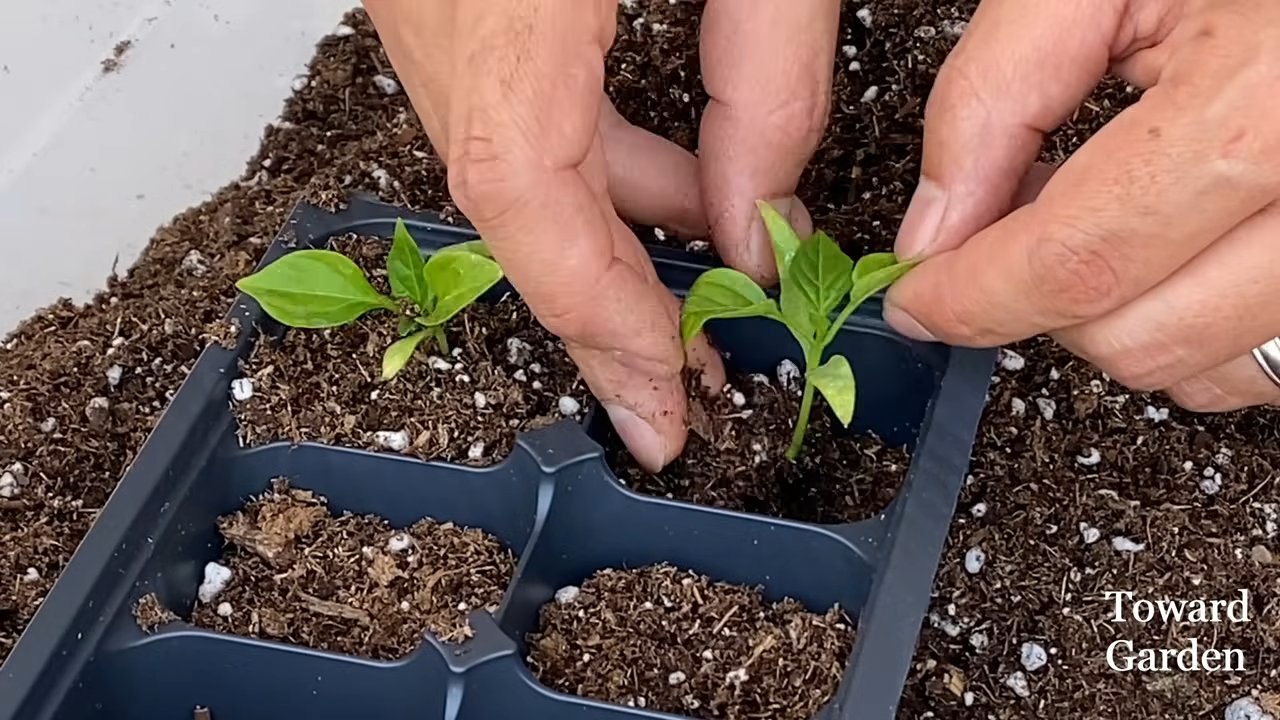
Planting Your Bell Pepper Seedlings
Now for the fun part!
1. Prepare Your Container: Fill your chosen container with the potting mix, leaving about an inch or two of space at the top.
2. Water the Soil: Thoroughly water the potting mix until water drains out of the drainage holes. This will help settle the soil and provide moisture for the seedlings.
3. Gently Remove the Seedling: Carefully remove the bell pepper seedling from its nursery pot. Gently loosen the roots with your fingers to encourage them to spread out.
4. Plant the Seedling: Dig a hole in the potting mix that’s large enough to accommodate the seedling’s root ball. Place the seedling in the hole and backfill with potting mix, gently firming the soil around the base of the plant. Make sure the top of the root ball is level with the surrounding soil.
5. Water Again: Water the newly planted seedling thoroughly.
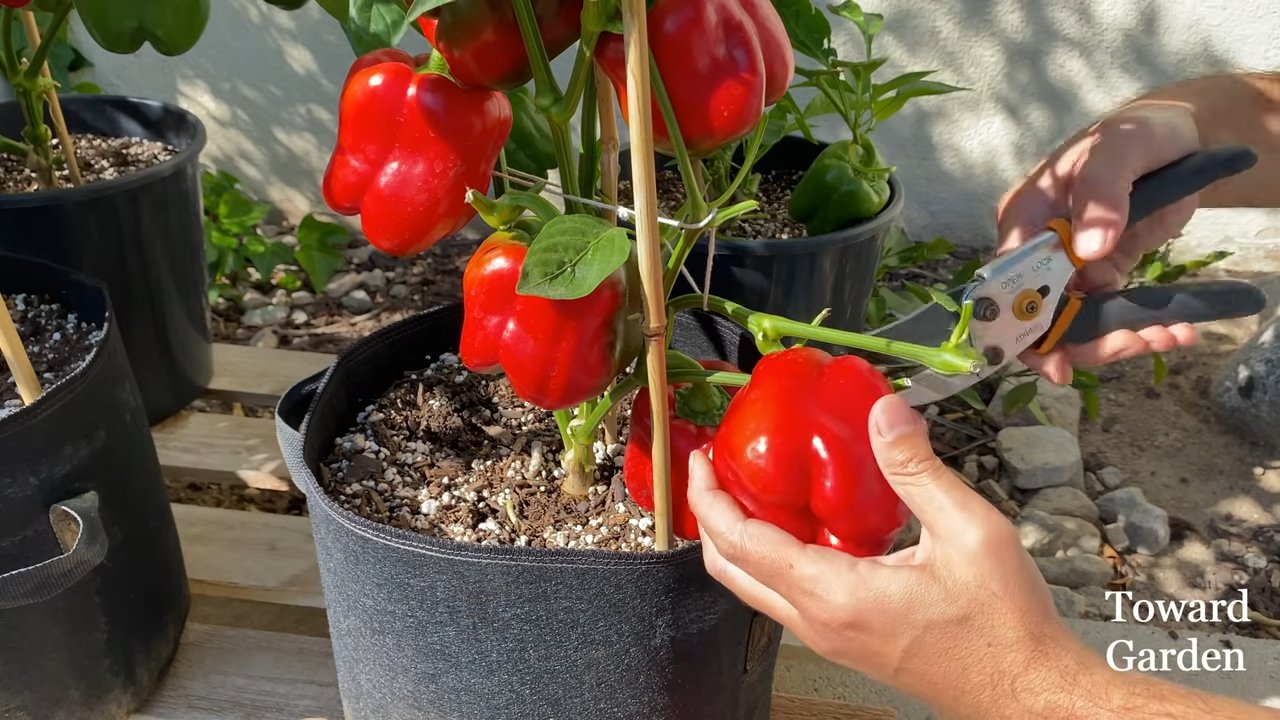
6. Add Support (Optional): Bell pepper plants can get quite top-heavy when loaded with fruit. Consider adding a stake or tomato cage to provide support and prevent the plant from toppling over. I usually add the support right away so I don’t disturb the roots later.
Caring for Your Container Bell Peppers
Consistent care is key to a bountiful harvest.
* Sunlight: Bell peppers need at least 6-8 hours of direct sunlight per day. Choose a sunny location for your container. If you don’t have enough sunlight, you can supplement with grow lights.
* Watering: Water deeply and regularly, especially during hot, dry weather. Check the soil moisture by sticking your finger into the soil. If the top inch feels dry, it’s time to water. Avoid overwatering, as this can lead to root rot. I usually water in the morning so the foliage has time to dry before nightfall.
* Fertilizing: Bell peppers are heavy feeders. Fertilize every 2-3 weeks with a balanced fertilizer (e.g., 10-10-10) or a fertilizer specifically formulated for vegetables. Follow the instructions on the fertilizer package. You can also use organic fertilizers like compost tea or fish emulsion.
* Pruning: Pruning isn’t strictly necessary, but it can help improve air circulation and encourage bushier growth. Remove any suckers (small shoots that grow from the base of the plant) to direct the plant’s energy towards fruit production.
* Pest Control: Keep an eye out for common pepper pests like aphids, whiteflies, and spider mites. You can control these pests with insecticidal soap, neem oil, or by handpicking them off the plants.
* Pollination: Bell peppers are self-pollinating, but you can help them along by gently shaking the plant or using a small paintbrush to transfer pollen from one flower to another. This is especially helpful if you’re growing your peppers indoors.
Troubleshooting Common Bell Pepper Problems
Even with the best care, problems can sometimes arise. Here’s how to deal with them:
* Blossom End Rot: This is a common problem caused by calcium deficiency. The bottom of the pepper turns brown and leathery. To prevent blossom end rot, ensure your soil has adequate calcium and water consistently. You can also add calcium to the soil by mixing in crushed eggshells or bone meal.
* Sunscald: This occurs when peppers are exposed to too much direct sunlight, causing them to develop white or yellow patches. Provide shade during the hottest part of the day.
* Leaf Drop: This can be caused by a variety of factors, including overwatering, underwatering, nutrient deficiencies, and pest infestations. Check the soil moisture, fertilize regularly, and inspect the plants for pests.
* Lack of Fruit Set: This can be caused by high temperatures, lack of pollination, or nutrient deficiencies. Ensure the plants are getting enough sunlight, water, and fertilizer. You can also try hand-pollinating the flowers.
* Pests: Aphids, whiteflies, and spider mites are common pepper pests. Control them with insecticidal soap, neem oil, or by handpicking them off the plants.
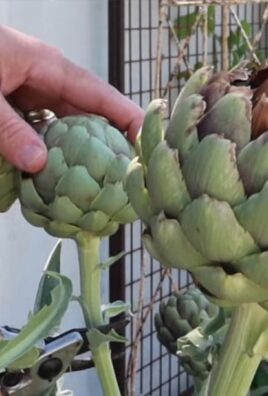
Harvesting Your Bell Peppers
The moment you’ve been waiting for!
1. When to Harvest: Bell peppers can be harvested at any stage of maturity, but they’re sweetest and most flavorful when they’re fully ripe. The color of the pepper will deepen, and the skin will become glossy.
2. How to Harvest: Use a sharp knife or pruning shears to cut the pepper from the plant, leaving a short stem attached.
3. Enjoy Your Harvest: Use your homegrown bell peppers in salads, stir-fries, stuffed peppers, or any other dish you can imagine!
Extending the Growing Season
Want to keep the pepper party going longer?
* Cold Frames: A cold frame can protect your peppers from frost and extend the growing season by several weeks.
* Row Covers: Row covers are lightweight fabrics that can be placed over your plants to provide protection from frost and pests.
* Bring Indoors: If you live in a cold climate, you can bring your container peppers indoors for the winter. Place them in a sunny location and provide supplemental light if needed.
Additional Tips for Success
* Start with Healthy Seedlings: Buy your seedlings from a reputable nursery or start your own from seed.
* Rotate Your Crops: Don’t plant peppers in the same container year after year. This can deplete the soil of nutrients and increase the risk of disease.
* Mulch: Apply a layer of mulch around the base of the plants to help retain moisture, suppress weeds, and regulate soil temperature.
* Keep a Gardening Journal: Record your planting dates, watering schedule, fertilization schedule, and any problems you encounter. This will help you learn from your mistakes and improve your success in future years.
Growing bell peppers in containers is a rewarding experience. With a little patience and care, you can enjoy a bountiful harvest of delicious, homegrown peppers. Happy gardening!
Conclusion
So, there you have it! Growing your own bell peppers in containers isn’t just a gardening project; it’s a gateway to fresher, tastier, and more vibrant meals. We’ve walked you through the essential steps, from selecting the right container and soil to nurturing your plants and harvesting your bountiful crop. But why is this DIY trick a must-try?
First and foremost, the flavor difference is undeniable. Store-bought bell peppers, while convenient, often lack the intense sweetness and crispness of homegrown varieties. When you grow your own, you’re in control of the entire process, ensuring that your peppers are picked at their peak ripeness, bursting with flavor and nutrients. Imagine the satisfaction of adding a vibrant, sun-ripened bell pepper to your salad, stir-fry, or stuffed pepper recipe, knowing that you nurtured it from seed to table.
Beyond the superior taste, growing container bell peppers offers a unique sense of accomplishment and connection to nature. There’s something incredibly rewarding about watching a tiny seedling transform into a thriving plant, laden with colorful fruit. It’s a tangible reminder of the power of nature and your ability to cultivate your own food. This connection can be especially beneficial for children, teaching them about the life cycle of plants and the importance of healthy eating.
Moreover, container gardening provides flexibility and accessibility, even if you have limited space. Whether you have a sprawling backyard, a small balcony, or just a sunny windowsill, you can successfully grow bell peppers in containers. This makes it an ideal option for apartment dwellers, urban gardeners, and anyone who wants to enjoy fresh produce without the commitment of a traditional garden plot.
Ready to take your container bell pepper gardening to the next level? Consider experimenting with different varieties. From the classic green bell pepper to the sweeter red, yellow, and orange varieties, there’s a whole world of flavors and colors to explore. You can also try growing specialty peppers like the miniature lunchbox peppers or the slightly spicy shishito peppers.
Another variation to consider is companion planting. Basil, marigolds, and nasturtiums are all excellent companions for bell peppers, helping to deter pests and attract beneficial insects. Planting these alongside your bell peppers can create a healthier and more productive growing environment.
Don’t be afraid to get creative with your container design. Use colorful pots, hanging baskets, or even repurposed containers to add a touch of personality to your garden. The possibilities are endless!
We wholeheartedly encourage you to try this DIY trick and experience the joy of growing your own bell peppers. It’s a rewarding, flavorful, and accessible way to connect with nature and enhance your culinary creations.
And now, we want to hear from you! Share your experiences, tips, and photos of your container bell pepper gardens in the comments below. What varieties are you growing? What challenges have you faced, and how have you overcome them? Let’s create a community of container bell pepper enthusiasts and learn from each other. Happy gardening!
Frequently Asked Questions (FAQ)
What is the best size container for growing bell peppers?
The ideal container size for bell peppers is at least 5 gallons, but a 10-gallon container is even better. This provides ample space for the roots to grow and develop, which is essential for healthy plant growth and abundant fruit production. Smaller containers may restrict root growth, leading to stunted plants and fewer peppers. Make sure the container has drainage holes to prevent waterlogging, which can cause root rot.
What type of soil should I use for container bell peppers?
Use a high-quality potting mix specifically formulated for containers. Avoid using garden soil, as it can become compacted in containers and doesn’t provide adequate drainage. A good potting mix should be lightweight, well-draining, and rich in organic matter. You can also amend your potting mix with compost or other organic materials to improve its fertility and water-holding capacity.
How often should I water my container bell peppers?
Water your bell peppers regularly, especially during hot, dry weather. The frequency of watering will depend on the size of your container, the type of potting mix you’re using, and the weather conditions. Check the soil moisture regularly by sticking your finger about an inch into the soil. If the soil feels dry, it’s time to water. Water deeply, until water drains out of the drainage holes. Avoid overwatering, as this can lead to root rot.
How much sunlight do bell peppers need?
Bell peppers need at least 6-8 hours of direct sunlight per day to thrive. Choose a sunny location for your container bell peppers, such as a south-facing balcony or patio. If you don’t have enough sunlight, you can supplement with grow lights.
Do I need to fertilize my container bell peppers?
Yes, bell peppers are heavy feeders and require regular fertilization to produce abundant fruit. Use a balanced fertilizer specifically formulated for vegetables, following the instructions on the package. Fertilize every 2-3 weeks during the growing season. You can also use organic fertilizers, such as compost tea or fish emulsion.
How do I prevent pests and diseases on my container bell peppers?
Regularly inspect your plants for pests and diseases. Common pests of bell peppers include aphids, spider mites, and whiteflies. You can control these pests with insecticidal soap, neem oil, or by handpicking them off the plants. Common diseases of bell peppers include blossom end rot, fungal leaf spot, and powdery mildew. Prevent these diseases by providing good air circulation, avoiding overhead watering, and using disease-resistant varieties.
What is blossom end rot and how do I prevent it?
Blossom end rot is a common problem in bell peppers, characterized by a dark, sunken spot on the bottom of the fruit. It’s caused by a calcium deficiency, which can be due to inconsistent watering, poor soil drainage, or high levels of nitrogen in the soil. To prevent blossom end rot, ensure consistent watering, use a well-draining potting mix, and avoid over-fertilizing with nitrogen. You can also add calcium to the soil by amending it with bone meal or crushed eggshells.
When should I harvest my bell peppers?
Harvest your bell peppers when they are fully colored and firm to the touch. The time it takes for bell peppers to mature will depend on the variety and the growing conditions. Green bell peppers can be harvested when they are still green, but they will be sweeter and more flavorful if you allow them to ripen to their mature color. Use a sharp knife or pruning shears to cut the peppers from the plant, leaving a short stem attached.
Can I grow bell peppers indoors?
Yes, you can grow bell peppers indoors, but you’ll need to provide them with adequate light and warmth. Place your container bell peppers in a sunny window or under grow lights. You’ll also need to pollinate the flowers by hand, using a small brush to transfer pollen from one flower to another.
What are some good companion plants for bell peppers in containers?
Good companion plants for bell peppers include basil, marigolds, nasturtiums, onions, garlic, and carrots. These plants can help to deter pests, attract beneficial insects, and improve the overall health of your bell pepper plants. Avoid planting bell peppers near fennel or brassicas (such as cabbage, broccoli, and cauliflower), as these plants can inhibit their growth.
Leave a Comment