
DIY Vertical Garden Watering: Tired of lugging around a watering can and struggling to reach those plants perched high in your beautiful vertical garden? I know the feeling! Creating a lush, thriving vertical garden is incredibly rewarding, adding a touch of green to even the smallest spaces. But let’s be honest, keeping those plants properly hydrated can quickly turn into a chore.
Vertical gardens, while a relatively modern trend in urban landscaping, draw inspiration from ancient practices like the Hanging Gardens of Babylon – a testament to humanity’s enduring desire to bring nature closer. Today, we’re adapting these concepts to our own homes, balconies, and patios. However, unlike those ancient wonders with their sophisticated irrigation systems, we often rely on manual watering, which can be time-consuming and inefficient.
That’s where this DIY guide comes in! I’m going to share some simple, effective, and budget-friendly DIY vertical garden watering tricks and hacks that will save you time, water, and a whole lot of effort. Imagine spending less time watering and more time enjoying the vibrant beauty of your vertical oasis. Whether you’re a seasoned gardener or just starting out, these tips will help you create a self-sufficient and flourishing vertical garden. Let’s dive in and make watering a breeze!
DIY Automatic Vertical Garden Watering System
Hey there, fellow plant lovers! Are you tired of spending hours watering your vertical garden, especially during those scorching summer months? I know I was! That’s why I decided to create my own automatic watering system, and let me tell you, it’s been a game-changer. Not only does it save me time and effort, but it also ensures my plants get the perfect amount of water, leading to healthier and happier greenery. So, if you’re ready to ditch the watering can and embrace a more efficient way to care for your vertical garden, let’s dive in!
What You’ll Need
Before we get started, let’s gather all the necessary materials. Don’t worry, most of these are readily available at your local hardware store or online.
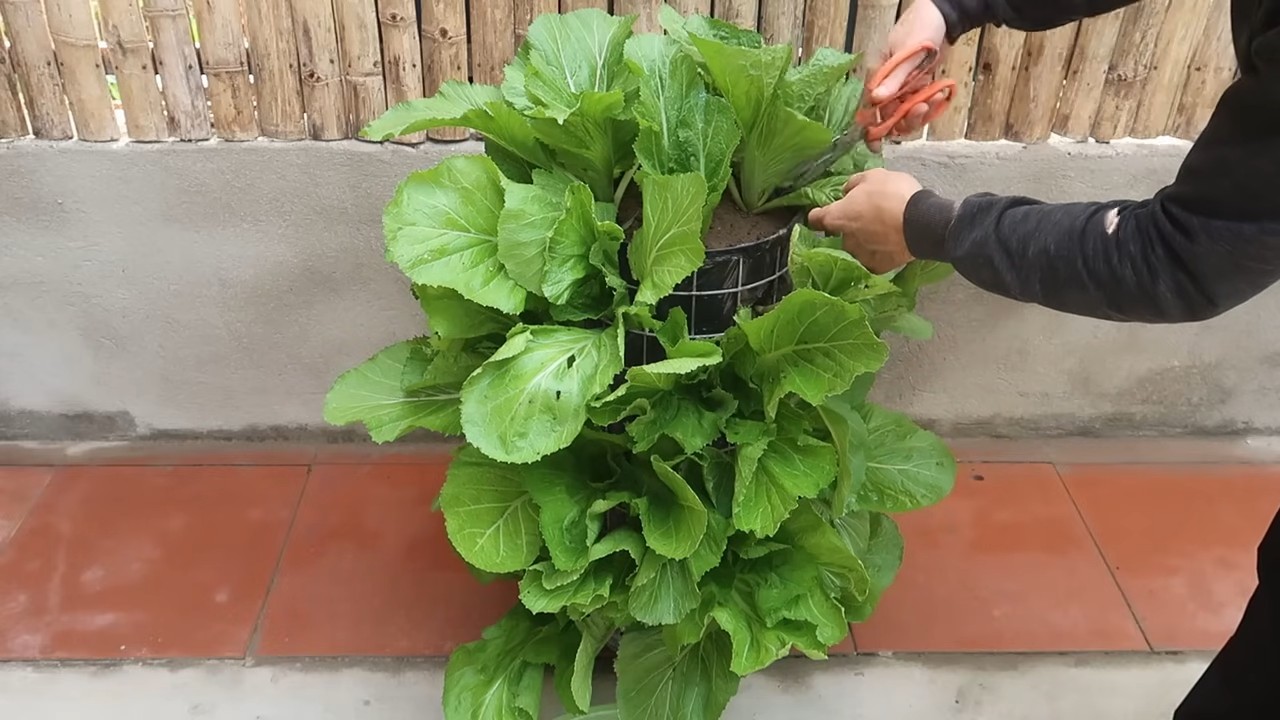
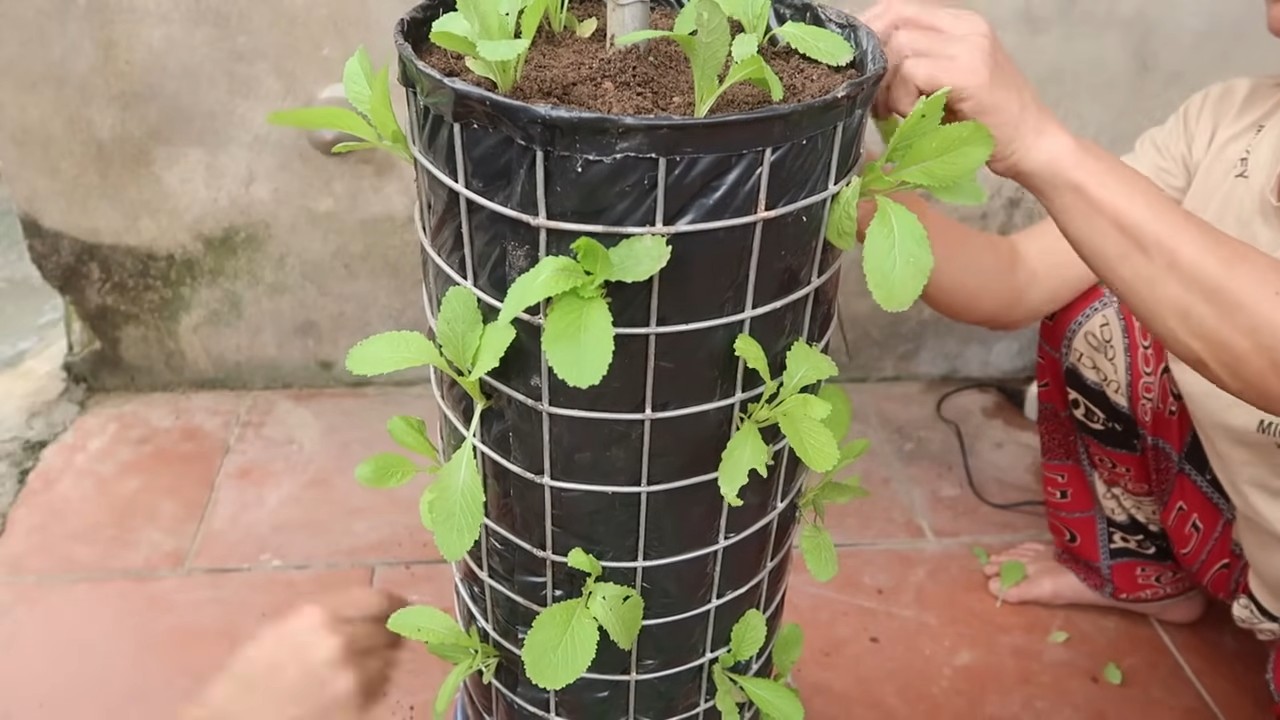
* Water Reservoir: A large bucket, bin, or even a repurposed container will work. The size depends on the number of plants you have and how often you want to refill it. I’m using a 20-gallon plastic storage bin.
* Submersible Water Pump: This is the heart of the system. Choose a pump with enough power to lift water to the top of your vertical garden. Check the pump’s specifications for its maximum head height (the vertical distance it can pump water).
* Timer: A digital timer allows you to schedule watering cycles. I recommend one with multiple on/off settings for maximum flexibility.
* Drip Irrigation Tubing: This is the main line that will carry water from the pump to your plants. I’m using ¼-inch tubing, which is a good size for most vertical gardens.
* Drip Emitters: These small devices regulate the amount of water delivered to each plant. Choose emitters with different flow rates (e.g., 0.5 GPH, 1 GPH) depending on the water needs of your plants.
* Connectors and Fittings: You’ll need various connectors to connect the tubing, pump, and emitters. These might include T-connectors, elbow connectors, and end caps.
* Drill with Drill Bits: You’ll need a drill to create holes in the tubing for the drip emitters. Make sure you have drill bits that are the correct size for your emitters.
* Scissors or Tubing Cutter: For cutting the drip irrigation tubing to the desired lengths.
* Zip Ties or Clips: To secure the tubing to your vertical garden structure.
* Water Filter (Optional but Recommended): This will help prevent clogging of the drip emitters, especially if you’re using well water.
* Fertilizer Injector (Optional): If you want to automatically fertilize your plants, you can add a fertilizer injector to the system.
Step-by-Step Instructions
Okay, let’s get our hands dirty! Here’s how to assemble your automatic vertical garden watering system:
1. Prepare the Water Reservoir:
* First, find a suitable location for your water reservoir. It should be close to your vertical garden and easily accessible for refilling.
* Clean the reservoir thoroughly to remove any dirt or debris.
* If you’re using a container that wasn’t originally designed for water storage, make sure it’s watertight. You might need to seal any seams or cracks with silicone sealant.
2. Install the Submersible Water Pump:
* Place the submersible water pump inside the water reservoir.
* Attach the drip irrigation tubing to the pump’s outlet. You might need a connector to ensure a secure fit.
* Make sure the pump is fully submerged in water before turning it on.
3. Lay Out the Drip Irrigation Tubing:
* Run the drip irrigation tubing from the water reservoir to the top of your vertical garden.
* Secure the tubing to the vertical garden structure using zip ties or clips. Make sure the tubing is positioned so that it can easily reach all of your plants.
* If your vertical garden is very tall, you might need to use a larger pump or split the tubing into multiple lines to ensure even water distribution.
4. Install the Drip Emitters:
* This is where things get a little more customized. Decide where you want to place the drip emitters based on the location of your plants.
* Use the drill to create small holes in the drip irrigation tubing at the desired locations. Make sure the holes are the correct size for your drip emitters.
* Insert the drip emitters into the holes. You might need to use a bit of force to get them in securely.
* For plants that need more water, use emitters with a higher flow rate. For plants that need less water, use emitters with a lower flow rate.
5. Connect the Tubing and Emitters:
* Use T-connectors to branch off the main drip irrigation tubing to reach individual plants.
* Use elbow connectors to make sharp turns in the tubing.
* Use end caps to seal off the ends of the tubing.
* Make sure all connections are tight and secure to prevent leaks.
6. Set Up the Timer:
* Program the timer to turn the water pump on and off at the desired intervals.
* Start with short watering cycles (e.g., 5-10 minutes) and adjust as needed based on the needs of your plants.
* Consider watering more frequently during hot weather and less frequently during cooler weather.
* I usually water my vertical garden for 10 minutes twice a day during the summer and 5 minutes once a day during the spring and fall.
7. Test the System:
* Fill the water reservoir with water.
* Turn on the timer and observe the system in action.
* Check for leaks and make sure all of the drip emitters are working properly.
* Adjust the flow rate of the drip emitters as needed to ensure that each plant is getting the right amount of water.
8. Fine-Tune and Monitor:
* Over the next few days, carefully monitor your plants to see how they’re responding to the new watering system.
* Adjust the timer settings and drip emitter flow rates as needed to optimize the watering schedule.
* Keep an eye out for any signs of overwatering or underwatering.
* Remember, every vertical garden is different, so it might take some experimentation to find the perfect watering schedule for your plants.
Troubleshooting Tips
Even with the best planning, you might encounter some issues along the way. Here are a few common problems and how to fix them:
* Clogged Drip Emitters: This is a common problem, especially if you’re using well water. To prevent clogging, install a water filter in the system. If your emitters do get clogged, you can try cleaning them with a small brush or soaking them in vinegar.
* Leaks: Leaks can occur at any of the connections in the system. Make sure all connections are tight and secure. If you find a leak, try tightening the connection or replacing the connector.
* Pump Not Working: Make sure the pump is fully submerged in water and that the power cord is plugged in. If the pump still isn’t working, it might be faulty and need to be replaced.
* Uneven Water Distribution: If some plants are getting more water than others, adjust the flow rates of the drip emitters. You might also need to reposition the emitters or add more emitters to certain plants.
* Timer Malfunctioning: Check the timer’s batteries and make sure it’s programmed correctly. If the timer is still not working, it might be faulty and need to be replaced.
Maintaining Your System
To keep your automatic watering system running smoothly, here are a few maintenance tips:
* Clean the Water Reservoir Regularly: This will help prevent the buildup of algae and other debris.
* Check the Water Filter Regularly: Clean or replace the water filter as needed to prevent clogging.
* Inspect the Drip Emitters Regularly: Make sure the emitters are not clogged and are working properly.
* Adjust the Watering Schedule Seasonally: Water more frequently during hot weather and less frequently during cooler weather.
* Winterize the System: If you live in a cold climate, drain the system before winter to prevent freezing and damage.
Optional Add-ons
Want to take your automatic watering system to the next level? Here are a few optional add-ons to consider:
* Fertilizer Injector: This device allows you to automatically fertilize your plants as you water them. Simply add liquid fertilizer to the injector, and it will be mixed with the water as it flows through the system.
* Soil Moisture Sensor: This sensor measures the moisture level in the soil and automatically adjusts the watering schedule based on the needs of your plants. This is a great way to prevent overwatering or underwatering.
* Rain Sensor: This sensor detects rainfall and automatically turns off the watering system when it
Conclusion
Creating your own DIY vertical garden watering system is more than just a weekend project; it’s an investment in the health and vibrancy of your plants, a step towards sustainable gardening, and a fantastic way to personalize your outdoor or indoor space. We’ve explored a range of methods, from simple gravity-fed systems to more sophisticated automated setups, each offering unique benefits and catering to different skill levels and budgets.
The beauty of this DIY approach lies in its adaptability. You’re not confined to pre-made solutions; you have the freedom to tailor your watering system to the specific needs of your vertical garden. Consider the types of plants you’re growing – succulents require less frequent watering than leafy greens – and adjust the system accordingly. Think about the location of your garden – a sunny balcony might necessitate more frequent watering than a shaded patio.
Beyond the practical advantages of efficient watering and reduced water waste, building your own system fosters a deeper connection with your garden. You’ll gain a better understanding of your plants’ needs and develop a greater appreciation for the intricate processes that sustain them. Plus, there’s immense satisfaction in knowing that you’ve created something functional and beautiful with your own hands.
Don’t be afraid to experiment with variations. Try incorporating a timer to automate the watering process, freeing you from daily chores. Explore different types of tubing and emitters to find the perfect flow rate for your plants. Consider adding a fertilizer injector to deliver nutrients directly to the roots, promoting healthy growth and abundant blooms. You can even integrate a rainwater harvesting system to make your DIY vertical garden watering even more eco-friendly.
The possibilities are endless, and the rewards are significant. A thriving vertical garden, bursting with life and color, is a testament to your creativity and dedication. So, gather your materials, unleash your inner engineer, and embark on this exciting DIY adventure.
We’re confident that you’ll find this project both rewarding and enjoyable. And we’d love to hear about your experiences! Share your photos, tips, and challenges in the comments below. Let’s build a community of DIY vertical garden enthusiasts and inspire each other to create beautiful and sustainable green spaces. Your insights could be invaluable to others embarking on this journey. Remember, the best gardens are those that are nurtured with care, creativity, and a little bit of DIY magic. So, get started on your **DIY vertical garden watering** system today!
Frequently Asked Questions (FAQ)
What are the benefits of a DIY vertical garden watering system compared to manual watering?
A DIY vertical garden watering system offers several advantages over manual watering. Firstly, it provides consistent and even watering, ensuring that all plants receive the right amount of moisture. This is particularly important in vertical gardens, where plants at the top may dry out faster than those at the bottom. Secondly, it saves time and effort. Once the system is set up, you can automate the watering process, freeing you from the daily chore of hand-watering. Thirdly, it reduces water waste. By delivering water directly to the roots, you minimize evaporation and runoff, making your gardening more sustainable. Finally, a DIY system allows for customization. You can tailor the system to the specific needs of your plants and the unique conditions of your garden.
What are the essential materials I need to build a basic DIY vertical garden watering system?
For a basic gravity-fed system, you’ll need a water reservoir (a bucket or container), tubing (drip irrigation tubing or soaker hose), connectors (T-connectors, elbow connectors), emitters (drip emitters or spray nozzles), and a drill with appropriate drill bits for making holes in the tubing. You may also need zip ties or clips to secure the tubing to your vertical garden structure. For a more advanced system, you might need a water pump, a timer, and a fertilizer injector. The specific materials will depend on the design you choose.
How do I determine the appropriate watering frequency and duration for my vertical garden?
The watering frequency and duration will depend on several factors, including the type of plants you’re growing, the climate, the amount of sunlight your garden receives, and the type of soil or growing medium you’re using. As a general rule, succulents and cacti require less frequent watering than leafy greens and flowering plants. Observe your plants closely for signs of overwatering (yellowing leaves, soggy soil) or underwatering (wilting leaves, dry soil). You can also use a soil moisture meter to monitor the moisture levels in the soil. Start with a conservative watering schedule and adjust as needed based on your observations.
Can I use recycled materials to build my DIY vertical garden watering system?
Absolutely! Using recycled materials is a great way to make your project more sustainable and cost-effective. You can use recycled plastic bottles as water reservoirs, old garden hoses as tubing, and repurposed containers as planters. Be creative and look for ways to repurpose materials that you already have on hand. Just make sure that the materials are clean and free of any harmful chemicals.
How do I prevent clogging in my DIY vertical garden watering system?
Clogging can be a common problem in drip irrigation systems, especially if you’re using hard water or well water. To prevent clogging, use a water filter to remove sediment and debris from the water. You can also flush the system periodically by disconnecting the emitters and running water through the tubing. If you’re using fertilizer, make sure it’s fully dissolved before adding it to the system. Regularly inspect the emitters for any signs of clogging and clean them as needed.
What are some common mistakes to avoid when building a DIY vertical garden watering system?
One common mistake is using tubing that is too small, which can restrict water flow. Another mistake is placing the water reservoir too low, which can reduce water pressure. It’s also important to choose the right type of emitters for your plants. Drip emitters are best for plants that prefer slow, steady watering, while spray nozzles are better for plants that need more frequent watering. Finally, don’t forget to test the system thoroughly before planting your garden.
How can I automate my DIY vertical garden watering system?
Automating your system is easier than you might think. You’ll need a timer that can be programmed to turn the water pump on and off at specific intervals. You can find affordable timers at most hardware stores or online. Simply connect the timer to the water pump and set the desired watering schedule. You can also use a smart irrigation controller, which allows you to control your watering system remotely using your smartphone or tablet. These controllers often have features like weather-based adjustments and soil moisture sensors, which can further optimize your watering schedule.
What if my vertical garden is indoors? Are there special considerations?
Yes, indoor vertical gardens require a few special considerations. First, you’ll need to ensure that your watering system is leak-proof to prevent water damage to your floors and walls. Use high-quality connectors and seal any potential leaks with silicone sealant. Second, you’ll need to provide adequate drainage to prevent water from accumulating in the planters. Use planters with drainage holes and place a tray underneath to catch any excess water. Third, be mindful of humidity levels. Indoor environments can be drier than outdoor environments, so you may need to water your plants more frequently.
How do I winterize my DIY vertical garden watering system?
If you live in an area with freezing temperatures, you’ll need to winterize your watering system to prevent damage from frost. Disconnect the water reservoir and drain all the water from the tubing and emitters. Store the tubing and emitters in a dry, frost-free location. If you have a water pump, disconnect it and store it indoors as well. This will help to prolong the life of your system and ensure that it’s ready to use again in the spring.
Where can I find inspiration and ideas for my DIY vertical garden watering system?
There are many resources available online to help you design and build your DIY vertical garden watering system. Search for tutorials on YouTube, browse Pinterest for inspiration, and join online gardening forums to connect with other DIY enthusiasts. Don’t be afraid to experiment and try new things. The most important thing is to have fun and create a system that works for you and your plants. Remember, the best **DIY vertical garden watering** system is the one that you build yourself!

Leave a Comment