
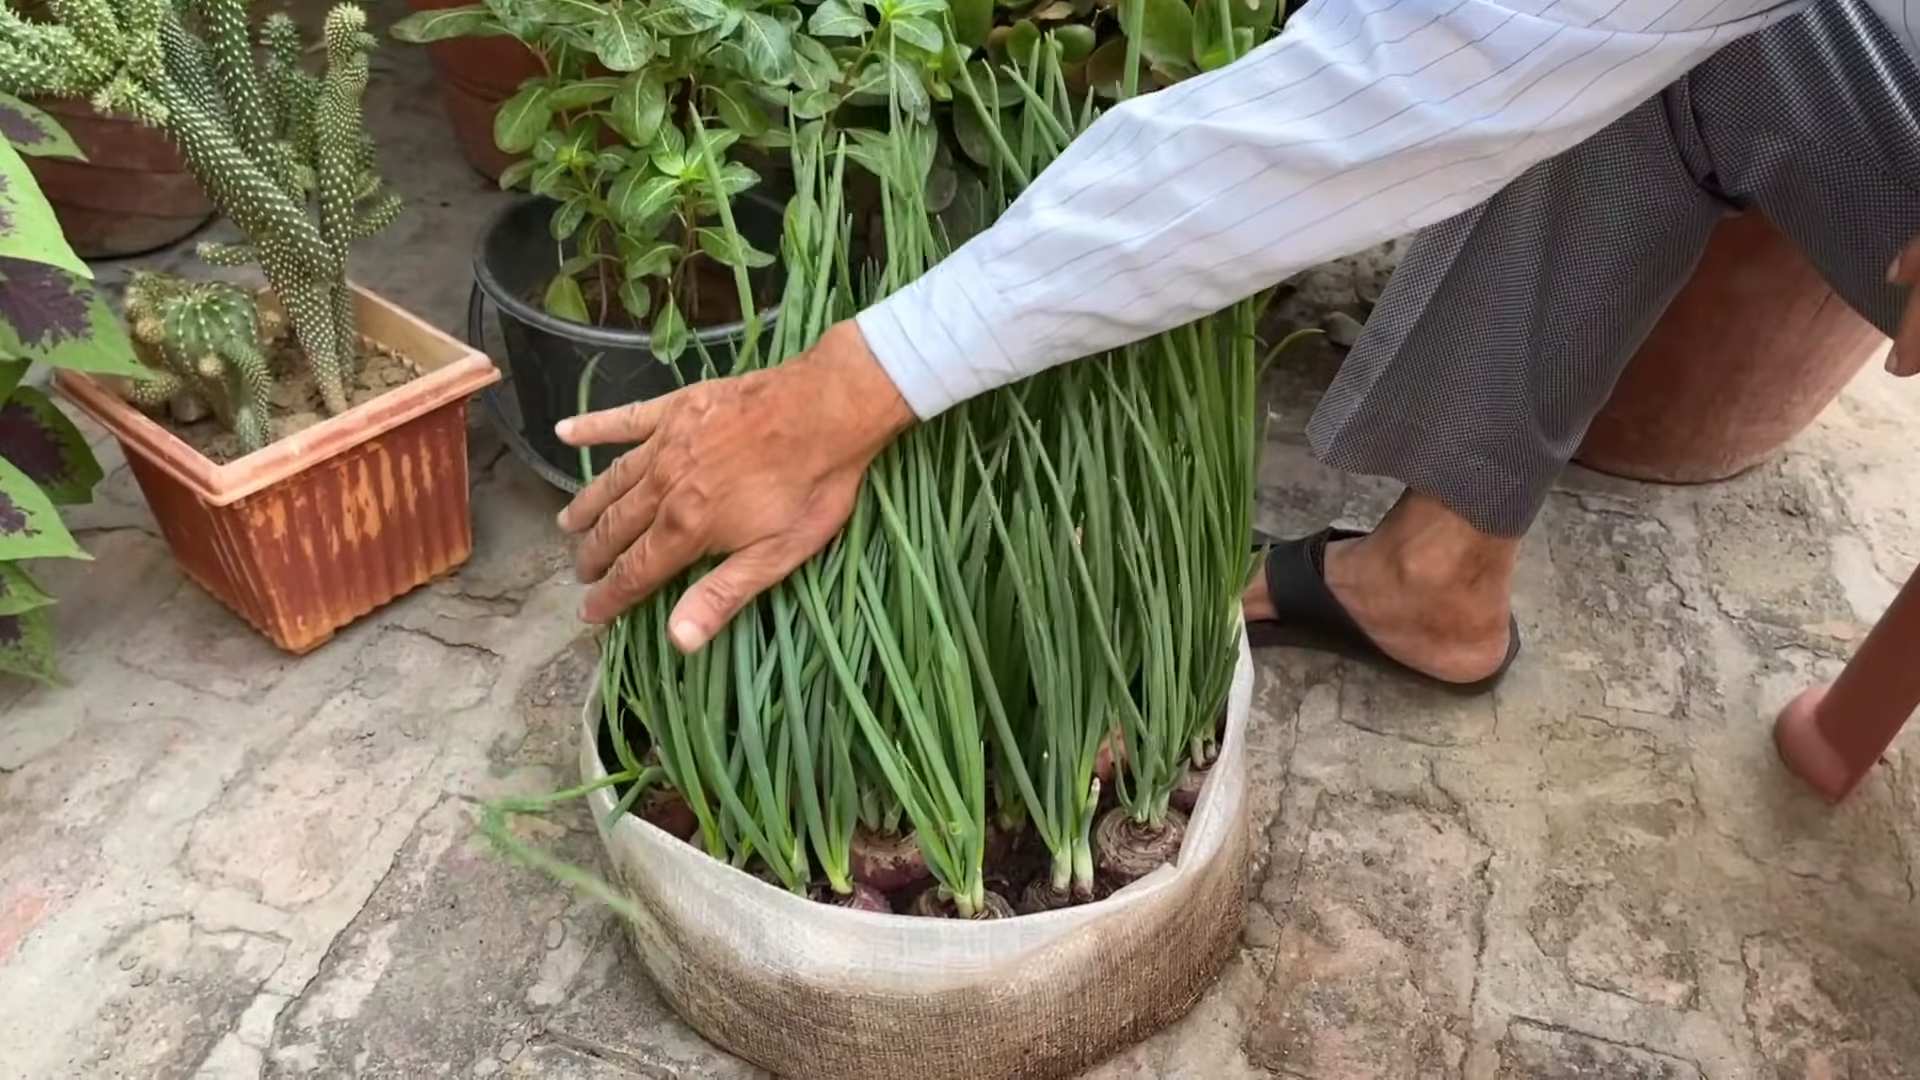
Easy Onion Planting Routine: Ever dream of a garden overflowing with plump, juicy onions, ready to elevate your culinary creations? I know I have! For centuries, onions have been a staple in diets worldwide, dating back to ancient Egypt where they were even revered as symbols of eternity. But let’s be honest, sometimes the thought of starting from tiny onion sets or seeds can feel a little daunting. That’s where this DIY guide comes in – I’m going to share my super simple, practically foolproof easy onion planting routine that will have you harvesting a bumper crop in no time.
Forget complicated gardening techniques and endless hours toiling in the soil. This isn’t about reinventing the wheel; it’s about streamlining the process and making onion growing accessible to everyone, regardless of their gardening experience. Whether you’re a seasoned green thumb or a complete beginner, this easy onion planting routine will empower you to grow your own delicious onions, save money at the grocery store, and enjoy the satisfaction of nurturing something from seed to table. So, grab your gardening gloves, and let’s get started!
DIY Closet Organization: Transforming Chaos into Calm
Okay, let’s face it, we’ve all been there. You open your closet door and are greeted by an avalanche of clothes, shoes, and accessories. Finding anything becomes a daily treasure hunt, and the thought of organizing it all feels completely overwhelming. But fear not! I’m here to guide you through a DIY closet organization project that will transform your chaotic space into a haven of order and efficiency. This isn’t just about tidying up; it’s about creating a system that works for you and makes getting dressed a joy, not a chore.
Phase 1: The Great Purge – Decluttering Your Closet
Before we even think about organizing, we need to tackle the biggest hurdle: decluttering. This is where you’ll separate the wheat from the chaff, the loved from the loathed, and the wearable from the… well, the unwearable. Be honest with yourself!
1. **Empty Everything Out:** Yes, everything. Take it all out of your closet and lay it on your bed, floor, or any available surface. This might seem daunting, but it’s crucial to see the full extent of your wardrobe. It’s also a good time to give your closet a quick clean – dust the shelves, vacuum the floor, and wipe down the rods.
2. **Create Sorting Piles:** Prepare four distinct piles:
* **Keep:** These are the clothes you love, wear regularly, and that fit you well.
* **Donate/Sell:** These are items in good condition that you no longer wear or need. Maybe they don’t fit your style anymore, or perhaps they’re just taking up space.
* **Repair/Alter:** These are clothes you love but need a little TLC – a missing button, a torn seam, or a hem that needs adjusting.
* **Trash:** These are items that are stained, ripped beyond repair, or simply too worn out to be donated.
3. **The Ruthless Assessment:** Now comes the hard part. Pick up each item, one by one, and ask yourself these questions:
* Have I worn this in the past year? (Be honest!)
* Does it fit me well and flatter my figure?
* Is it in good condition?
* Do I love it and feel good when I wear it?
* If you answer “no” to most of these questions, it’s probably time to let it go.
4. **Dealing with Sentimental Items:** We all have those clothes that hold sentimental value, even if we never wear them. Consider storing these items in a separate box or garment bag, away from your everyday wardrobe. This allows you to keep the memories without cluttering your closet.
5. **Take Action Immediately:** Don’t let those piles sit around for weeks! Immediately bag up the items for donation or sale and take them to your local charity shop or consignment store. Dispose of the trash pile responsibly. Gather the items needing repair and create a plan to get them fixed.
Phase 2: Planning Your Closet Layout
Now that you’ve decluttered, it’s time to plan your closet layout. This is where you’ll determine how to best utilize the space you have.
1. **Assess Your Closet Space:** Measure the dimensions of your closet – height, width, and depth. Note the location of shelves, rods, and any existing features.
2. **Consider Your Wardrobe:** Think about the types of clothes you own and how you like to store them. Do you have a lot of long dresses that need hanging space? Or are you more of a sweater and jeans person who needs more shelf space?
3. **Sketch a Layout:** Draw a rough sketch of your closet and experiment with different layouts. Consider adding shelves, drawers, or hanging rods to maximize space.
4. **Think Vertically:** Utilize the vertical space in your closet by adding shelves or hanging organizers. This is especially helpful for storing shoes, bags, and accessories.
5. **Maximize Corner Space:** Corner shelves or organizers can help you make the most of those awkward corners.
6. **Consider Adjustable Systems:** If you’re investing in a new closet system, opt for adjustable shelves and rods that can be customized to your needs.
Phase 3: Implementing Your Organization Plan
With your decluttering done and your layout planned, it’s time to put your organization plan into action.
1. **Invest in Matching Hangers:** This is a game-changer! Matching hangers create a cohesive and visually appealing look in your closet. I personally love slim velvet hangers because they save space and prevent clothes from slipping.
2. **Hang Clothes by Category and Color:** Organize your clothes by type (e.g., shirts, pants, dresses) and then by color within each category. This makes it easy to find what you’re looking for and creates a visually pleasing effect.
3. **Fold Sweaters and Bulky Items:** Sweaters and other bulky items take up a lot of space when hung. Fold them neatly and store them on shelves or in drawers.
4. **Utilize Shelf Dividers:** Shelf dividers help keep stacks of clothes neat and organized. They prevent items from toppling over and make it easier to find what you need.
5. **Store Shoes Strategically:** Shoes can quickly become a clutter magnet. Store them on shoe racks, shelves, or in clear shoe boxes. Consider organizing them by type (e.g., sneakers, heels, boots).
6. **Organize Accessories:** Use drawer organizers, jewelry boxes, and hanging organizers to keep your accessories neat and tidy.
7. **Label Everything:** Labeling shelves, drawers, and boxes makes it easy to find what you’re looking for and helps you maintain your organization system.
8. **Utilize Baskets and Bins:** Baskets and bins are great for storing items that don’t fit neatly on shelves, such as scarves, hats, and gloves.
9. **Install Hooks:** Hooks are perfect for hanging bags, belts, and other accessories. Install them on the inside of your closet door or on the walls.
10. **Add Lighting:** Good lighting is essential for a well-organized closet. Consider adding a closet light or using LED strip lights to illuminate the space.
Phase 4: Maintaining Your Organized Closet
The key to a truly organized closet is maintenance. It’s not a one-time project; it’s an ongoing process.
1. **The One-In, One-Out Rule:** For every new item you bring into your closet, get rid of one old item. This helps prevent clutter from accumulating.
2. **Regular Decluttering:** Schedule a regular decluttering session (e.g., every season) to get rid of clothes you no longer wear or need.
3. **Put Things Back in Their Place:** Make it a habit to put clothes back in their designated spot after wearing them. This prevents clutter from building up.
4. **Tidy Up Regularly:** Take a few minutes each week to tidy up your closet – straighten clothes, fold sweaters, and organize accessories.
5. **Adjust as Needed:** Your needs may change over time, so be prepared to adjust your organization system as needed.
Specific DIY Projects to Enhance Your Closet Organization
Here are a few DIY projects that can take your closet organization to the next level:
DIY Hanging Jewelry Organizer
This is a super simple and effective way to keep your jewelry tangle-free and easily accessible.
1. **Materials:**
* A wooden frame (you can repurpose an old picture frame)
* Chicken wire or mesh
* Staple gun
* Small hooks or S-hooks
* Paint or stain (optional)
2. **Instructions:**
1. If desired, paint or stain the wooden frame to match your closet decor.
2. Cut the chicken wire or mesh to fit the inside of the frame.
3. Use a staple gun to secure the chicken wire or mesh to the back of the frame.
4. Attach small hooks or S-hooks to the chicken wire or mesh.
5. Hang your jewelry on the hooks.
DIY Scarf Organizer
Say goodbye to tangled scarves with this easy DIY project.
1. **Materials:**
* A wooden hanger
* Shower curtain rings
* Hot glue gun
2. **Instructions:**
1. Open the shower curtain rings.
2. Hot glue the open end of each shower curtain ring to the bottom of the wooden hanger.
3. Hang your scarves on the rings.
DIY Shoe Rack from PVC Pipes
This is a great way to store shoes in a visually appealing and organized way.
1. **Materials:**
* PVC pipes (various diameters, depending on the size of your shoes)
* PVC pipe cutter
* Sandpaper
* PVC glue
* Paint (optional)
2. **Instructions:**
1. Cut the PVC pipes into desired lengths using a PVC pipe cutter.
2. Sand the edges
Conclusion
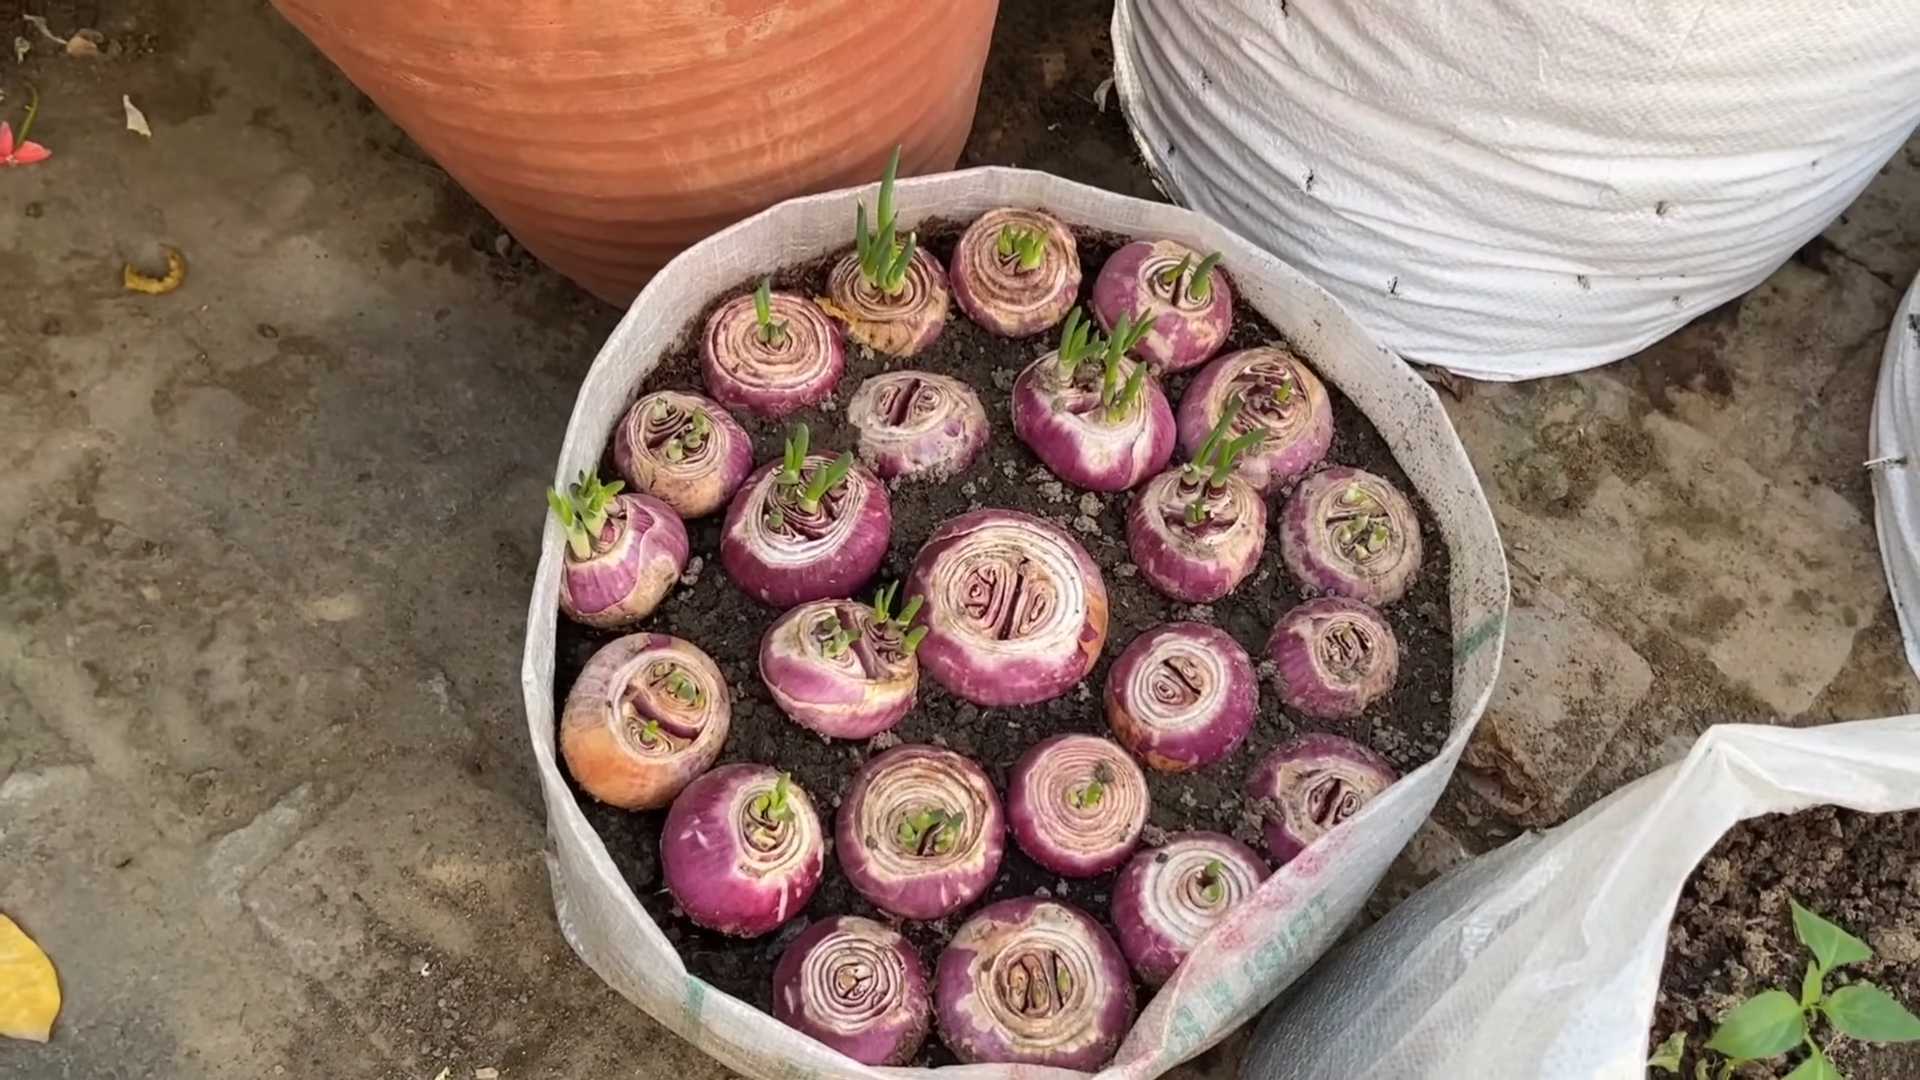
So, there you have it! This simple, yet incredibly effective, onion planting routine is more than just a gardening hack; it’s a game-changer for anyone looking to maximize their yield and minimize their effort. We’ve walked you through the steps, highlighting the ease and efficiency of this method, and hopefully, dispelled any lingering doubts about its viability.
Why is this a must-try? Because it streamlines the entire process. Forget about painstakingly spacing individual onion sets or seedlings. This routine allows you to plant a large number of onions quickly and efficiently, freeing up your time for other gardening tasks or simply enjoying the fruits (or vegetables!) of your labor. The improved spacing also promotes better air circulation, reducing the risk of disease and leading to healthier, more robust onion bulbs. Plus, the satisfaction of harvesting a bountiful crop of onions that you grew yourself using this clever technique is simply unmatched.
But don’t just take our word for it. The beauty of this onion planting routine lies in its adaptability. Feel free to experiment with different onion varieties to see which ones thrive best in your specific climate and soil conditions. Consider adding a layer of mulch around your onion plants to help retain moisture and suppress weeds. You could even try companion planting, pairing your onions with other vegetables like carrots or lettuce, which are known to deter pests.
Variations to Consider:
* Raised Beds: If you have heavy clay soil or poor drainage, consider using raised beds for your onion planting. This will improve drainage and provide a more favorable growing environment.
* Different Onion Types: Experiment with different types of onions, such as yellow, white, or red onions, to find your favorites. Each variety has its own unique flavor and characteristics.
* Succession Planting: Plant onions in succession, starting with early-maturing varieties and following with later-maturing ones, to extend your harvest season.
* Fertilizer Adjustments: Adjust the type and amount of fertilizer you use based on your soil test results and the specific needs of your onion plants.
We are confident that once you try this **easy onion planting routine**, you’ll be hooked. It’s a simple, effective, and rewarding way to grow your own onions and enjoy the taste of fresh, homegrown produce.
Now, it’s your turn! We encourage you to give this method a try in your own garden. Plant your onions using this routine, observe the results, and share your experience with us. We’d love to hear about your successes, your challenges, and any variations you discover along the way. Let’s build a community of gardeners who are passionate about growing their own food and sharing their knowledge with others. So, grab your onion sets, head out to your garden, and get planting! We can’t wait to hear your stories.
Frequently Asked Questions (FAQ)
Q: What is the best time to plant onions using this routine?
A: The best time to plant onions depends on your climate and the type of onions you’re growing. In general, you can plant onion sets or transplants in the spring as soon as the ground can be worked. For fall-planted onions, aim to plant them about 4-6 weeks before the first expected frost. Check your local gardening resources for specific planting dates in your area.
Q: What type of soil is best for growing onions?
A: Onions prefer well-drained, fertile soil that is rich in organic matter. The ideal soil pH is between 6.0 and 7.0. If your soil is heavy clay or sandy, amend it with compost or other organic matter to improve drainage and fertility.
Q: How much sunlight do onions need?
A: Onions need at least 6-8 hours of direct sunlight per day to thrive. Choose a planting location that receives plenty of sunlight throughout the growing season.
Q: How often should I water my onions?
A: Water your onions regularly, especially during dry periods. Aim to keep the soil consistently moist but not waterlogged. Water deeply and less frequently, rather than shallowly and more often.
Q: What kind of fertilizer should I use for onions?
A: Onions are heavy feeders and benefit from regular fertilization. Use a balanced fertilizer with a higher phosphorus content to promote root growth. You can also side-dress your onions with compost or other organic fertilizers throughout the growing season.
Q: How do I know when my onions are ready to harvest?
A: Onions are typically ready to harvest when the tops begin to fall over and turn yellow or brown. You can also check the size of the bulbs to see if they have reached their desired size. Once harvested, cure the onions in a dry, well-ventilated place for a few weeks to allow the outer layers to dry and toughen up.
Q: Can I grow onions from seed using this routine?
A: While this routine is primarily designed for planting onion sets or transplants, you can also grow onions from seed. However, starting onions from seed requires more time and effort. You’ll need to start the seeds indoors several weeks before the last expected frost and then transplant the seedlings outdoors once the weather warms up.
Q: What are some common pests and diseases that affect onions?
A: Common pests that affect onions include onion maggots, thrips, and aphids. Common diseases include onion downy mildew, white rot, and pink root. Practice good sanitation and crop rotation to help prevent these problems. You can also use organic pest control methods, such as insecticidal soap or neem oil, to control pests.
Q: Can I use this routine for other bulb vegetables, like garlic or shallots?
A: While this routine is specifically designed for onions, you can adapt it for other bulb vegetables like garlic or shallots. The key is to adjust the spacing and planting depth according to the specific needs of each vegetable.
Q: What if I don’t have a garden? Can I still use this routine?
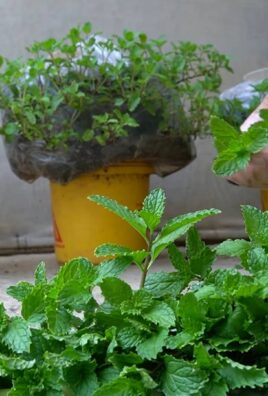
A: Yes! You can adapt this routine for container gardening. Choose a large container with good drainage and fill it with a well-draining potting mix. Plant your onion sets or transplants in the container, following the same spacing guidelines as for in-ground planting. Be sure to water and fertilize your container-grown onions regularly.
Q: How can I improve the flavor of my homegrown onions?
A: The flavor of your homegrown onions can be influenced by several factors, including the variety of onion you choose, the soil conditions, and the amount of sunlight they receive. To improve the flavor, choose a variety that is known for its sweetness or pungency, amend your soil with plenty of organic matter, and ensure that your onions receive at least 6-8 hours of direct sunlight per day. Proper watering and fertilization can also contribute to better flavor.
Leave a Comment