
Grow Arugula Indoors? Absolutely! Imagine fresh, peppery arugula gracing your salads, pizzas, and sandwiches, even when the snow is falling outside. No more sad, wilted greens from the grocery store – just vibrant, flavorful arugula harvested right from your windowsill. For centuries, cultivating herbs and vegetables indoors has been a way for people to connect with nature and ensure a supply of fresh produce, regardless of the season. Think of the ancient Romans with their rooftop gardens or the medieval monks tending their medicinal herbs within cloistered walls.
Today, with busy schedules and limited outdoor space, the need for accessible and convenient gardening solutions is greater than ever. That’s where this DIY guide comes in! I’m going to show you simple, effective tricks to grow arugula indoors successfully, even if you don’t have a green thumb. We’ll cover everything from choosing the right container and soil to providing adequate light and water. Get ready to enjoy the satisfaction of nurturing your own little arugula patch and adding a burst of fresh flavor to your meals all year round!
Grow Your Own Arugula Indoors: A Step-by-Step Guide
Hey there, fellow plant enthusiasts! Are you craving that peppery, zesty arugula flavor but don’t have a garden or the weather isn’t cooperating? No problem! I’m going to show you how to grow your own delicious arugula right inside your home. It’s easier than you think, and the fresh, homegrown taste is totally worth it.
What You’ll Need
Before we dive in, let’s gather our supplies. Here’s what you’ll need to get started:
* Arugula Seeds: You can find these at most garden centers or online. Look for varieties specifically suited for container gardening if possible.
* Containers: Choose containers that are at least 6 inches deep. I like using rectangular planters, but any pot with drainage holes will work.
* Potting Mix: Use a high-quality potting mix that drains well. Avoid using garden soil, as it can compact and hinder growth.
* Watering Can or Spray Bottle: For gentle watering.
* Grow Lights (Optional but Recommended): Arugula needs plenty of light, especially indoors. If you don’t have a sunny windowsill, grow lights are a must.
* Spray Bottle with Water: For misting the seedlings.
* Small Shovel or Trowel: For planting the seeds.
* Fertilizer (Optional): A balanced liquid fertilizer can help boost growth.
Phase 1: Planting Your Arugula Seeds
Okay, let’s get our hands dirty! This is the fun part.
1. Prepare Your Containers: First, make sure your containers are clean. Fill them with your chosen potting mix, leaving about an inch of space at the top. Gently pat down the soil to create a level surface.
2. Sow the Seeds: Arugula seeds are tiny, so be careful not to plant them too densely. Sprinkle the seeds evenly over the surface of the soil. Aim for about 1/4 inch spacing between seeds. You can also sow them in rows if you prefer.
3. Cover the Seeds: Lightly cover the seeds with a thin layer of potting mix, about 1/4 inch deep. This helps them stay moist and encourages germination.
4. Water Gently: Use your watering can or spray bottle to gently water the soil. You want to moisten the soil without disturbing the seeds. Avoid overwatering, as this can lead to rot.
5. Provide Light: Place your containers in a sunny windowsill that receives at least 6 hours of direct sunlight per day. If you don’t have enough natural light, use grow lights. Position the lights a few inches above the soil surface and keep them on for 12-14 hours per day.
Phase 2: Nurturing Your Arugula Seedlings
Now comes the waiting game! But don’t worry, arugula grows quickly.
1. Maintain Moisture: Keep the soil consistently moist, but not soggy. Check the soil moisture daily by sticking your finger into the soil. If the top inch feels dry, water gently.
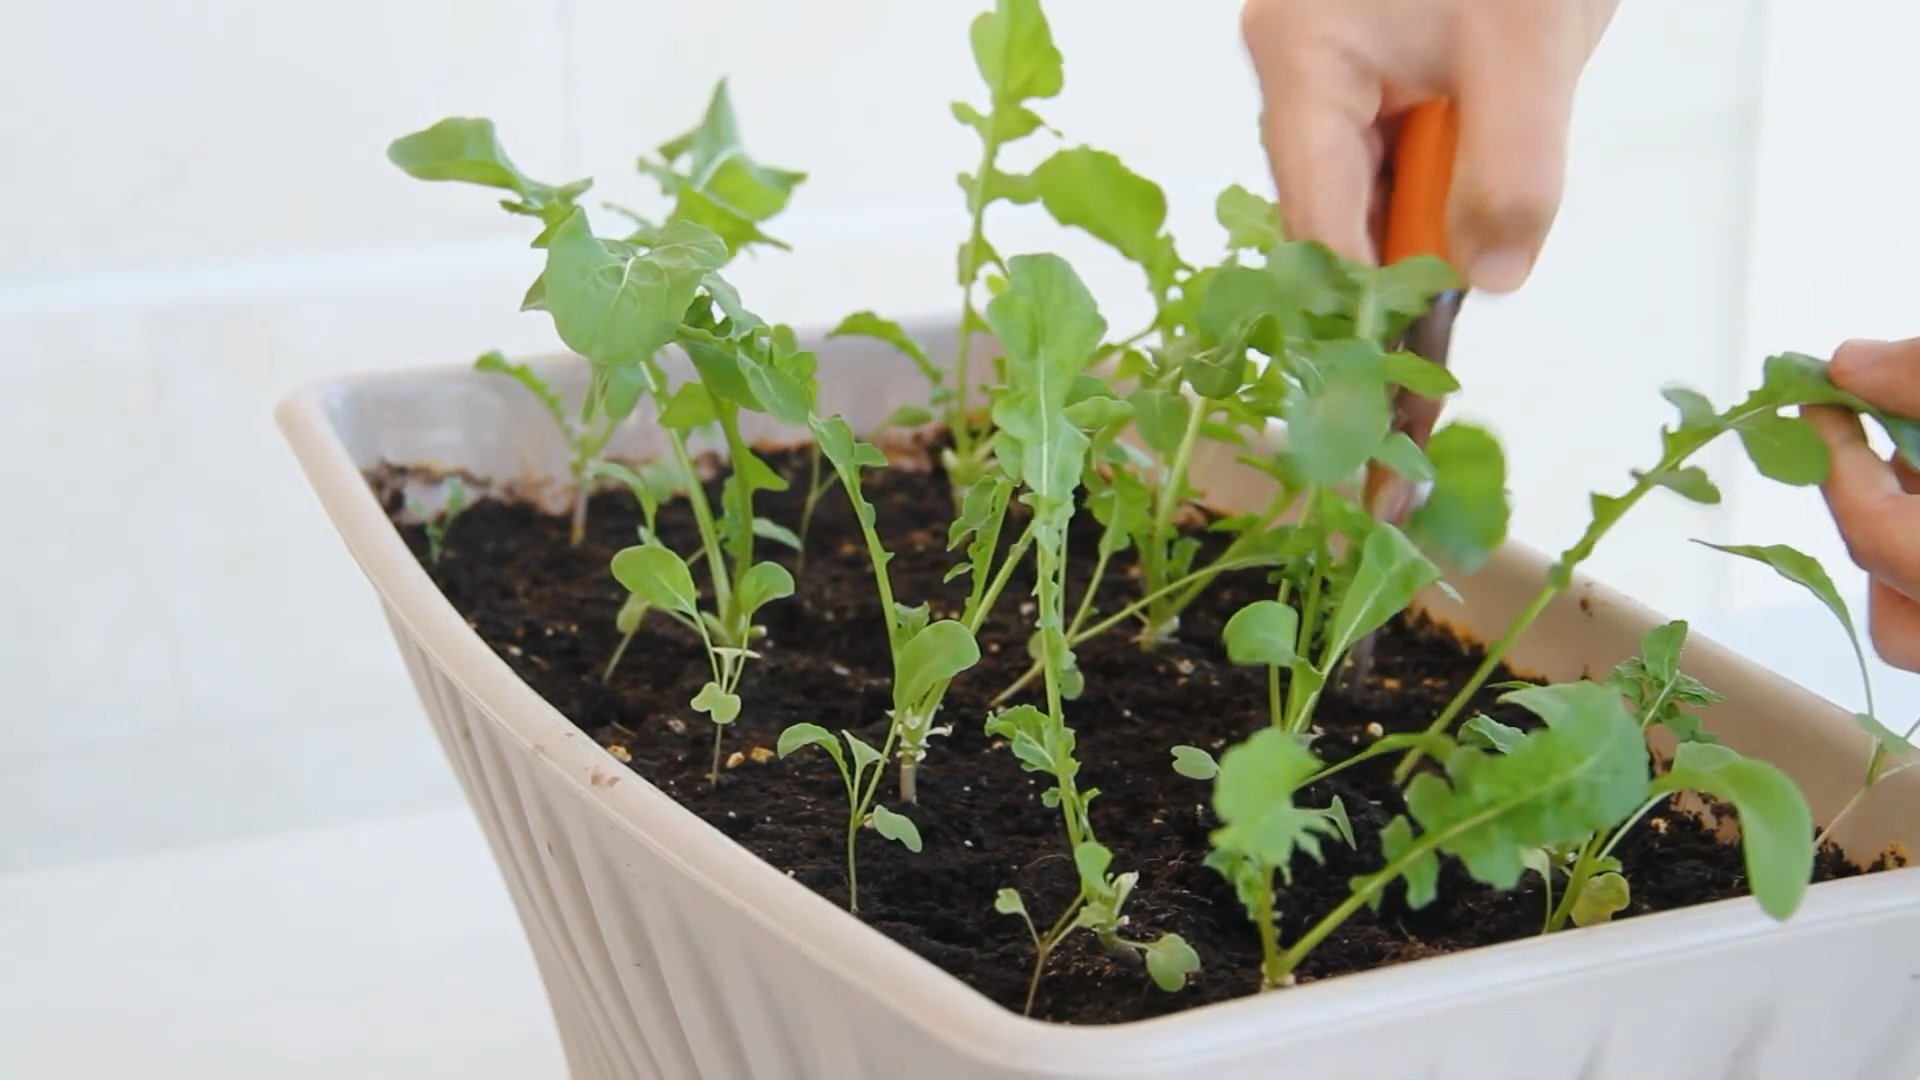
2. Thin the Seedlings (If Necessary): Once the seedlings emerge (usually within 5-7 days), you may need to thin them out if they are too crowded. This will give the remaining plants enough space to grow. Snip off the weaker seedlings at the soil line, leaving about 2-3 inches between plants.
3. Fertilize (Optional): If you want to give your arugula a boost, you can fertilize it with a balanced liquid fertilizer diluted to half strength. Apply the fertilizer every 2-3 weeks, following the instructions on the fertilizer label. I personally like to use organic fertilizers.
4. Monitor for Pests and Diseases: Keep an eye out for any signs of pests or diseases. Aphids and flea beetles are common pests that can attack arugula. If you spot any pests, you can try spraying them with insecticidal soap or neem oil. Good air circulation can help prevent fungal diseases.
5. Rotate Your Crops: If you’re planting multiple batches of arugula, rotate your containers to ensure even light exposure. This will help prevent the plants from becoming leggy and reaching for the light.
Phase 3: Harvesting Your Arugula
The moment we’ve been waiting for! Time to enjoy the fruits (or rather, leaves) of your labor.
1. Harvest When Ready: You can start harvesting arugula leaves when they are about 2-3 inches long. This usually takes about 3-4 weeks after planting.
2. Harvesting Technique: Use scissors or your fingers to snip off the outer leaves, leaving the inner leaves to continue growing. This is known as “cut and come again” harvesting, and it allows you to harvest multiple times from the same plant.
3. Successive Planting: To ensure a continuous supply of arugula, sow new seeds every 2-3 weeks. This will give you a steady harvest throughout the growing season.
4. Wash and Enjoy: Wash the harvested arugula leaves thoroughly before eating. Arugula is delicious in salads, sandwiches, pizzas, and pesto.
Troubleshooting Tips
Even with the best intentions, sometimes things don’t go exactly as planned. Here are a few common problems you might encounter and how to fix them:
* Leggy Seedlings: If your seedlings are tall and spindly, they’re likely not getting enough light. Move them to a sunnier location or provide supplemental light with grow lights.
* Yellowing Leaves: Yellowing leaves can be a sign of overwatering, underwatering, or nutrient deficiency. Check the soil moisture and adjust your watering accordingly. If the soil is consistently moist, you may be overwatering. If the soil is dry, you may need to water more frequently. You can also try fertilizing with a balanced liquid fertilizer.
* Slow Growth: Slow growth can be caused by a variety of factors, including insufficient light, poor soil, or lack of nutrients. Make sure your arugula is getting enough light, and consider using a high-quality potting mix and fertilizing regularly.
* Pests: As mentioned earlier, aphids and flea beetles are common pests that can attack arugula. Inspect your plants regularly and treat any infestations promptly with insecticidal soap or neem oil.
Extra Tips for Arugula Success
Here are a few extra tips to help you grow the best arugula possible:
* Choose the Right Variety: Some arugula varieties are more heat-tolerant than others. If you live in a warm climate, choose a heat-tolerant variety to prevent bolting (premature flowering).
* Provide Good Air Circulation: Good air circulation helps prevent fungal diseases. Make sure your plants are not too crowded and that there is adequate space between containers.
* Don’t Overwater: Overwatering can lead to root rot and other problems. Water only when the top inch of soil feels dry.
* Harvest Regularly: Harvesting regularly encourages new growth and prevents the plants from becoming too leggy.
* Enjoy the Process! Growing your own arugula is a rewarding experience. Don’t be afraid to experiment and have fun!
Growing arugula indoors is a simple and satisfying way to enjoy fresh, peppery greens year-round. With a little bit of care and attention, you can have a thriving arugula patch right in your own home. Happy gardening!

Conclusion
So, there you have it! Growing arugula indoors is not only achievable, but it’s also a rewarding experience that puts fresh, peppery greens right at your fingertips, no matter the season. We’ve walked you through the simple steps, from selecting the right container and soil to ensuring adequate light and consistent watering. The beauty of this DIY project lies in its accessibility; you don’t need a sprawling garden or specialized equipment to enjoy the vibrant flavor of homegrown arugula.
Why is this a must-try? Because it empowers you to take control of your food source, reduces your reliance on store-bought produce (which can often be expensive and lacking in freshness), and adds a touch of green to your indoor space. Imagine the satisfaction of snipping fresh arugula leaves for your salad, sandwich, or pizza, knowing that you nurtured them from tiny seeds. The taste difference is remarkable – the homegrown arugula boasts a more intense, peppery bite that elevates any dish.
But the fun doesn’t stop there! Feel free to experiment with different varieties of arugula. ‘Rocket’ is a classic choice, but you might also enjoy ‘Sylvetta’ for its more deeply lobed leaves and slightly milder flavor. Consider adding companion plants to your container, such as basil or chives, to create a mini herb garden. You can also adjust the intensity of the flavor by controlling the amount of sunlight your arugula receives; more sunlight generally leads to a spicier taste.
Don’t be afraid to get creative and personalize your indoor arugula garden. Try using recycled containers, like old yogurt tubs or plastic bottles, to reduce waste and add a unique touch. You can even decorate your containers with paint or stickers to match your home décor.
We wholeheartedly encourage you to embark on this simple yet fulfilling journey of growing arugula indoors. It’s a fantastic way to connect with nature, enhance your culinary creations, and enjoy the benefits of fresh, homegrown produce.
Now, we want to hear from you! Have you tried growing arugula indoors before? What challenges did you face, and what tips do you have to share? We invite you to try this DIY trick and share your experiences in the comments below. Let’s create a community of indoor gardeners and inspire each other to cultivate our own little green havens. Share your photos, your successes, and even your failures – we’re all learning together! We are confident that you will find that growing arugula indoors is a simple and satisfying way to add fresh, flavorful greens to your diet.
FAQ
What kind of soil is best for growing arugula indoors?
Arugula thrives in well-draining soil that is rich in organic matter. A good option is a potting mix specifically formulated for vegetables or herbs. You can also create your own mix by combining equal parts of potting soil, compost, and perlite or vermiculite. The compost provides essential nutrients, while the perlite or vermiculite improves drainage and aeration. Avoid using garden soil, as it can be too heavy and may contain pests or diseases.
How much sunlight does indoor arugula need?
Arugula needs at least 6 hours of sunlight per day to grow well indoors. A south-facing window is ideal, but an east- or west-facing window can also work. If you don’t have enough natural light, you can supplement with a grow light. Place the grow light a few inches above the plants and keep it on for 12-14 hours per day. Insufficient light can lead to leggy growth and a less intense flavor.
How often should I water my indoor arugula?
Water your arugula regularly, keeping the soil consistently moist but not waterlogged. Check the soil moisture by sticking your finger about an inch into the soil. If it feels dry, it’s time to water. Water deeply, allowing the excess water to drain out of the bottom of the container. Avoid overwatering, as this can lead to root rot. The frequency of watering will depend on factors such as the size of the container, the type of soil, and the temperature and humidity of your home.
How long does it take for arugula to grow indoors?
Arugula is a fast-growing plant, and you can typically start harvesting leaves within 3-4 weeks of planting. The exact time will depend on the variety of arugula, the growing conditions, and your desired leaf size. You can harvest leaves as soon as they are large enough to eat, usually around 2-3 inches long.
How do I harvest arugula indoors?
Harvest arugula by snipping off the outer leaves with scissors or your fingers. Leave the inner leaves to continue growing. This cut-and-come-again method allows you to harvest arugula multiple times from the same plant. Harvest in the morning for the best flavor.
What are some common problems when growing arugula indoors?
Some common problems when growing arugula indoors include pests, diseases, and nutrient deficiencies. Pests such as aphids and flea beetles can be controlled with insecticidal soap or neem oil. Diseases such as powdery mildew can be prevented by providing good air circulation and avoiding overwatering. Nutrient deficiencies can be addressed by fertilizing with a balanced liquid fertilizer.
Can I grow arugula indoors year-round?
Yes, you can grow arugula indoors year-round, as long as you provide the right growing conditions. This includes adequate light, consistent watering, and well-draining soil. You may need to adjust your watering and fertilizing schedule depending on the season.
What kind of fertilizer should I use for indoor arugula?
Use a balanced liquid fertilizer, such as a 10-10-10 or 20-20-20, diluted to half strength. Fertilize every 2-3 weeks, or as needed. Avoid over-fertilizing, as this can lead to leggy growth and a bitter taste. Organic fertilizers, such as compost tea or fish emulsion, are also good options.
How do I prevent arugula from bolting indoors?
Bolting is when a plant prematurely goes to seed, which can make the leaves bitter. To prevent arugula from bolting indoors, keep the temperature cool (around 60-70°F) and provide adequate moisture. Avoid letting the soil dry out completely. You can also choose bolt-resistant varieties of arugula.
Is it better to start arugula seeds indoors or direct sow them?
For indoor growing, direct sowing is generally recommended. Arugula seeds germinate quickly and easily, and transplanting seedlings can sometimes stress the plants. Simply sow the seeds directly into your container, cover them lightly with soil, and keep the soil moist.
Can I grow arugula in a hydroponic system indoors?
Yes, arugula can be successfully grown in a hydroponic system indoors. Hydroponics allows for precise control over nutrient delivery and can result in faster growth rates. You’ll need a hydroponic setup, nutrient solution specifically formulated for leafy greens, and a grow light.
How do I know when my indoor arugula is ready to harvest?
Your indoor arugula is ready to harvest when the leaves are 2-3 inches long and have a vibrant green color. The flavor will be more intense as the leaves mature, so harvest them when they reach your desired level of spiciness. Don’t let the leaves get too large, as they can become tough and bitter.
What can I do with my homegrown arugula?
Homegrown arugula can be used in a variety of dishes. Add it to salads, sandwiches, pizzas, or pasta dishes. It can also be used to make pesto or as a garnish. The peppery flavor of arugula adds a delicious kick to any meal.

Leave a Comment