
Grow Carrots At Home – imagine pulling vibrant, sweet carrots straight from your own backyard! Forget those bland, store-bought veggies; with a few simple tricks, you can cultivate a thriving carrot patch right outside your door.
For centuries, carrots have been a staple in diets worldwide, with their cultivation dating back to ancient times. Originally, they weren’t even orange! The vibrant hue we know and love today is a relatively modern development, but the joy of harvesting your own root vegetables is timeless.
Why should you bother learning how to grow carrots at home? Well, for starters, the taste is incomparable. Freshly harvested carrots are sweeter and more flavorful than anything you’ll find on supermarket shelves. Plus, you’ll know exactly what’s going into your food – no pesticides or mystery ingredients! I’m going to show you some easy DIY tricks and hacks that will help you succeed, even if you think you have a “brown thumb.”
This article is packed with practical tips and DIY solutions to common gardening challenges. From preparing the soil to protecting your precious carrots from pests, I’ve got you covered. Get ready to enjoy the satisfaction of growing your own delicious, healthy carrots – it’s easier than you think!
Growing Carrots at Home: A Beginner’s Guide
Hey there, fellow gardening enthusiasts! I’m so excited to share my experience with growing carrots at home. It’s surprisingly easy and incredibly rewarding to harvest your own sweet, crunchy carrots. Forget those bland, store-bought ones – homegrown carrots are bursting with flavor! This guide will walk you through every step, from choosing the right variety to troubleshooting common problems. Let’s get digging!
Choosing the Right Carrot Variety
Before you even think about planting, you need to pick the right carrot variety for your space and climate. Carrots come in all shapes and sizes, and some are better suited for container gardening than others.
* **For Containers:** Shorter varieties like ‘Thumbelina,’ ‘Parisian,’ or ‘Little Finger’ are perfect for pots because they don’t need as much depth.
* **For Heavy Soil:** If your soil is clay-heavy, consider ‘Nantes’ or ‘Chantenay’ varieties. They’re shorter and sturdier, making them less likely to split or become misshapen.
* **For Sweetness:** ‘Nantes’ varieties are known for their sweetness and tender texture.
* **For Storage:** ‘Danvers’ carrots are excellent for storing over the winter.
* **For Fun Colors:** Branch out and try purple, yellow, or white carrots for a colorful addition to your garden!
I personally love growing ‘Nantes’ because they’re so sweet and reliable. But don’t be afraid to experiment and find your favorite!
Preparing the Soil: The Key to Success
Carrots need loose, well-drained soil to grow long and straight. This is probably the most crucial step, so don’t skip it! Rocky or compacted soil will result in stunted, forked, or otherwise deformed carrots.
* Soil Type: Carrots thrive in sandy loam soil. If your soil is heavy clay, you’ll need to amend it.
* pH Level: Aim for a soil pH between 6.0 and 6.8. You can test your soil with a kit from your local garden center.
* Removing Obstacles: This is super important! Remove any rocks, stones, or debris from the soil. Even small pebbles can cause carrots to split or grow sideways.
* Amending the Soil: Add plenty of compost or well-rotted manure to improve drainage and fertility. I like to use a mix of compost, peat moss, and perlite for container gardening.
* Avoid Fresh Manure: Fresh manure can cause forking and hairy roots. Make sure it’s well-rotted.
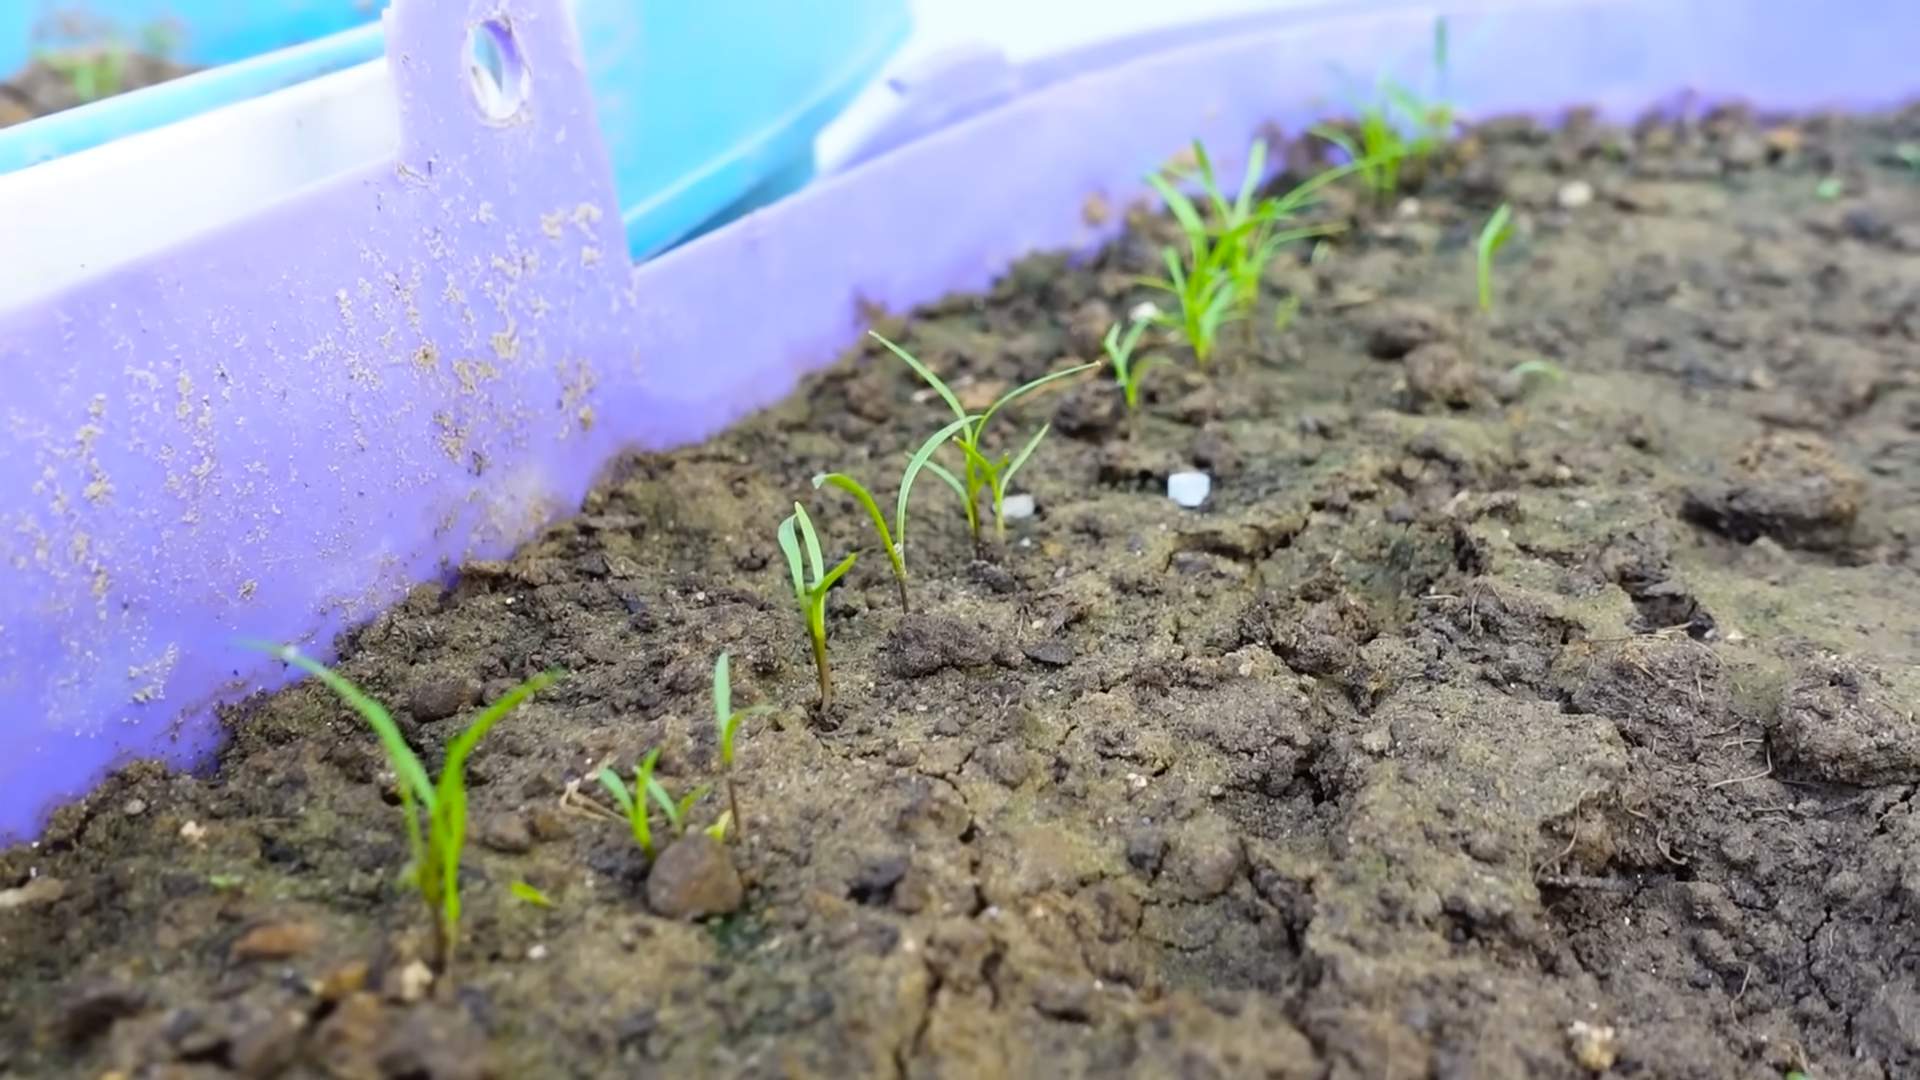
Planting Carrot Seeds: Getting Started
Carrot seeds are tiny, so planting them can be a bit tricky. But with a little patience, you’ll get the hang of it.
1. Timing is Everything: Carrots are a cool-season crop, so plant them in early spring or late summer for a fall harvest. Check your local frost dates to determine the best time to plant. I usually start planting about 2-3 weeks before the last expected frost.
2. Direct Sowing: Carrots don’t transplant well, so it’s best to sow the seeds directly into the ground or container.
3. Creating Furrows: Make shallow furrows about 1/4 to 1/2 inch deep and 1-2 inches apart. You can use a trowel or even your finger to create the furrows.
4. Sowing the Seeds: Sprinkle the seeds thinly along the furrows. Carrot seeds are notoriously small, so it’s easy to over-sow. Try mixing the seeds with sand to make them easier to handle.
5. Covering the Seeds: Gently cover the seeds with a thin layer of soil or vermiculite.
6. Watering: Water the soil gently but thoroughly. Use a watering can with a rose head or a gentle spray nozzle to avoid washing away the seeds.
7. Keep it Moist: Keep the soil consistently moist until the seeds germinate. This is crucial! The seeds need consistent moisture to sprout. I often cover the planting area with burlap or a piece of cardboard to help retain moisture. Just remember to remove it once the seedlings emerge.
Thinning Seedlings: Giving Them Space to Grow
Thinning is essential for allowing your carrots to develop properly. If you don’t thin them, they’ll be overcrowded and won’t have enough space to grow to their full size.
1. When to Thin: Once the seedlings are about 1-2 inches tall, it’s time to thin them.
2. Thinning Technique: Gently pull out the weaker seedlings, leaving the strongest ones spaced about 1-2 inches apart. Be careful not to disturb the roots of the remaining seedlings.
3. Successive Thinning: You may need to thin them again a few weeks later, spacing them about 3-4 inches apart.
4. Don’t Waste the Thinnings: You can eat the thinnings! They’re small but flavorful. Add them to salads or use them as a garnish.
Watering and Fertilizing: Keeping Them Healthy
Carrots need consistent moisture and nutrients to thrive.
* Watering: Water deeply and regularly, especially during dry periods. Aim for about 1 inch of water per week. Avoid overhead watering, as this can promote fungal diseases.
* Fertilizing: Carrots are not heavy feeders, but they do benefit from a balanced fertilizer. I like to use a fertilizer with a lower nitrogen content, as too much nitrogen can result in excessive foliage growth at the expense of root development. A 5-10-10 fertilizer is a good option. Apply the fertilizer according to the package directions.
* Side-dressing: You can also side-dress your carrots with compost or worm castings every few weeks to provide them with a steady supply of nutrients.
Weed Control: Protecting Your Crop
Weeds can compete with carrots for water, nutrients, and sunlight. It’s important to keep your carrot patch weed-free.
* Hand-weeding: The best way to control weeds is to hand-weed regularly. Be careful not to disturb the carrot roots.
* Mulching: Apply a layer of mulch around the carrots to suppress weed growth and retain moisture. Straw, hay, or shredded leaves are good options.
* Avoid Herbicides: I generally avoid using herbicides in my vegetable garden.
Pest and Disease Control: Addressing Common Problems
Carrots are generally pest-resistant, but they can be susceptible to certain pests and diseases.
* Carrot Rust Fly: This is a common pest that can damage carrot roots. The larvae tunnel into the roots, causing them to become discolored and distorted. You can prevent carrot rust fly by covering your carrots with row covers.
* Nematodes: These microscopic worms can attack carrot roots, causing them to become stunted and deformed. You can control nematodes by planting resistant varieties or by amending the soil with beneficial nematodes.
* Leaf Spot Diseases: These fungal diseases can cause spots on the leaves. You can prevent leaf spot diseases by providing good air circulation and avoiding overhead watering.
* Crop Rotation: Rotate your crops each year to prevent the buildup of pests and diseases in the soil.
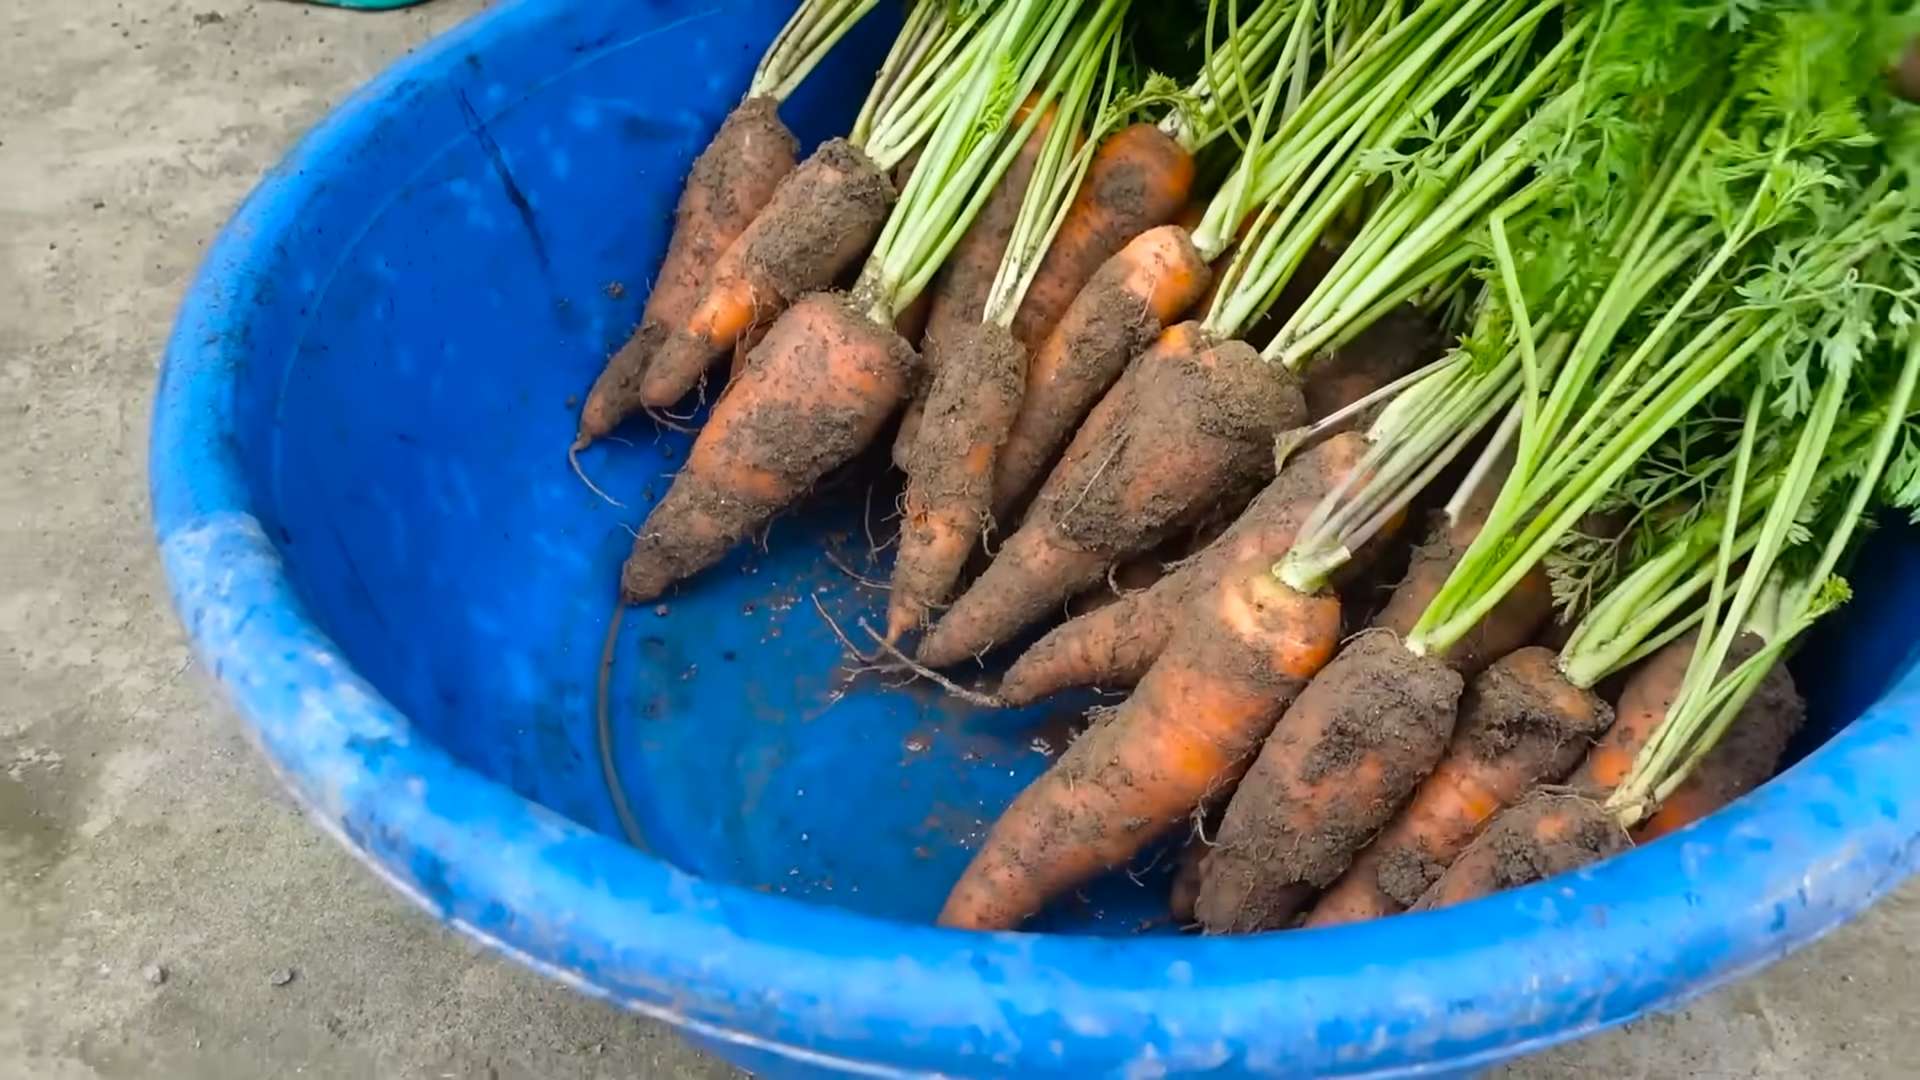
Harvesting Carrots: The Sweet Reward
Harvesting is the most exciting part! You’ve put in the work, and now it’s time to enjoy the fruits (or rather, vegetables) of your labor.
1. When to Harvest: Carrots are typically ready to harvest 60-80 days after planting, depending on the variety. Check the seed packet for specific maturity dates.
2. Signs of Maturity: The tops of the carrots will be visible above the soil. You can gently brush away some soil to check the size of the carrots.
3. Harvesting Technique: Loosen the soil around the carrots with a garden fork or trowel. Gently pull the carrots out of the ground by the tops. If the soil is dry, water it well before harvesting to make it easier to pull the carrots.
4. Washing and Storing: Wash the carrots thoroughly and remove any excess soil. Store them in the refrigerator in a plastic bag or container. You can also store them in a cool, dark place, such as a root cellar.
Troubleshooting: Common Carrot Growing Problems
Even with the best care, you might encounter some problems along the way. Here are a few common issues and how to address them:
* Forked or Split Carrots: This is usually caused by rocky or compacted soil. Make sure to remove any rocks and amend the soil with plenty of compost.
* Stunted Growth: This can be caused by poor soil, lack of nutrients, or pests. Make sure your soil is well-drained and fertile, and check for pests.
* Hairy Roots: This can be caused by excessive nitrogen in the soil or by nematodes. Avoid using fresh manure and consider planting resistant varieties.
Conclusion
So, there you have it! Growing carrots at home, while it might seem daunting at first, is surprisingly achievable and incredibly rewarding. We’ve walked you through the essential steps, from selecting the right carrot variety to nurturing your seedlings and finally, harvesting those vibrant, homegrown beauties. But why should you bother with all this effort when you can simply buy carrots at the store? The answer lies in the unparalleled freshness, the superior flavor, and the sheer satisfaction of nurturing something from seed to table.
Think about it: store-bought carrots often travel long distances, losing their peak flavor and nutritional value along the way. By growing your own, you’re guaranteeing the freshest, most flavorful carrots imaginable. Imagine the sweet, earthy taste of a carrot pulled straight from your garden, still warm from the sun. It’s a taste experience that simply can’t be replicated.
Beyond the flavor, growing your own carrots allows you to control every aspect of the process. You can choose organic methods, avoiding harmful pesticides and herbicides. You can select heirloom varieties that offer unique flavors and colors. You can even tailor your growing techniques to suit your specific climate and soil conditions.
And let’s not forget the therapeutic benefits of gardening. Spending time outdoors, connecting with nature, and nurturing living things can be incredibly calming and restorative. Growing carrots at home is more than just a way to get fresh vegetables; it’s a way to connect with the earth, reduce stress, and improve your overall well-being.
This DIY approach to growing carrots is a must-try for anyone who values fresh, flavorful, and sustainable food.
But don’t stop there! Experiment with different carrot varieties to discover your favorites. Try planting companion plants like onions or marigolds to deter pests and improve soil health. Consider succession planting to ensure a continuous harvest throughout the growing season. You can even try growing carrots in containers if you have limited space.
For a fun twist, try growing rainbow carrots! These colorful varieties add a vibrant touch to salads and snacks, and they’re sure to impress your friends and family. Or, if you’re feeling adventurous, try growing miniature carrots in pots on your windowsill. They’re perfect for snacking and add a touch of greenery to your indoor space.
We encourage you to take the plunge and start growing carrots at home today. It’s a rewarding experience that will bring you closer to nature and provide you with delicious, healthy food. And most importantly, don’t be afraid to experiment and have fun!
Once you’ve harvested your first crop of homegrown carrots, we’d love to hear about your experience. Share your tips, tricks, and photos in the comments below. Let’s create a community of carrot-growing enthusiasts and inspire others to embrace the joys of gardening. What variety did you choose? What challenges did you face, and how did you overcome them? Your insights could be invaluable to other aspiring gardeners. So, get your hands dirty, plant some seeds, and let the carrot-growing adventure begin! We are confident that you will find that growing carrots at home is easier than you think.
Frequently Asked Questions (FAQ)
What is the best time of year to plant carrot seeds?
The best time to plant carrot seeds depends on your climate. In general, carrots are a cool-season crop, so they thrive in temperatures between 60°F and 70°F (15°C and 21°C). For most regions, this means planting in early spring or late summer/early fall.
* **Spring Planting:** Plant carrot seeds 2-3 weeks before the last expected frost. This will give them enough time to germinate and establish themselves before the weather gets too hot.
* **Fall Planting:** Plant carrot seeds 10-12 weeks before the first expected frost. This will allow them to mature before the ground freezes.
If you live in a region with mild winters, you may be able to plant carrots throughout the winter. However, be sure to protect them from frost if temperatures drop too low.
What kind of soil is best for growing carrots?
Carrots need loose, well-drained soil to grow properly. Rocky or compacted soil can cause them to become stunted or misshapen. The ideal soil for carrots is sandy loam, which is a mixture of sand, silt, and clay.
Before planting, amend your soil with compost or other organic matter to improve drainage and fertility. Remove any rocks or debris that could impede root growth. A pH level between 6.0 and 6.8 is ideal for carrot growth.
How often should I water my carrot plants?
Carrots need consistent moisture to thrive. Water deeply and regularly, especially during dry periods. Aim to keep the soil consistently moist but not waterlogged.
A good rule of thumb is to water your carrot plants when the top inch of soil feels dry to the touch. Avoid overhead watering, as this can promote fungal diseases. Instead, water at the base of the plants.
How much sunlight do carrots need?
Carrots need at least 6 hours of sunlight per day to grow properly. Choose a planting location that receives full sun for best results. If you live in a hot climate, you may need to provide some afternoon shade to prevent the carrots from overheating.
What are some common pests and diseases that affect carrots?
Carrots are susceptible to a few common pests and diseases, including:
* **Carrot Rust Fly:** This pest lays its eggs near the base of carrot plants, and the larvae burrow into the roots, causing damage.
* **Aphids:** These small insects suck sap from carrot leaves, weakening the plants.
* **Leaf Blight:** This fungal disease causes brown spots to appear on carrot leaves.
To prevent pests and diseases, practice good garden hygiene. Remove any diseased or infested plants promptly. Use organic pest control methods, such as insecticidal soap or neem oil, to control pests. Ensure good air circulation to prevent fungal diseases.
How do I know when my carrots are ready to harvest?
Carrots are typically ready to harvest 60-80 days after planting, depending on the variety. The best way to tell if your carrots are ready is to check their size. Most carrot varieties are ready to harvest when they are about 1-2 inches in diameter at the top.
You can also gently pull back the soil around the top of the carrot to check its size. If the carrot is large enough, carefully loosen the soil around it and pull it out of the ground.
Can I grow carrots in containers?
Yes, you can grow carrots in containers, but you’ll need to choose a large enough container to accommodate their roots. A container that is at least 12 inches deep and 8 inches wide is ideal.
Use a well-draining potting mix and water regularly. Be sure to choose a carrot variety that is suitable for container growing, such as Nantes or Thumbelina.
Why are my carrots forked or misshapen?
Forked or misshapen carrots are often caused by rocky or compacted soil. When the carrot root encounters an obstacle, it splits or bends to avoid it.
To prevent forked carrots, prepare your soil carefully before planting. Remove any rocks or debris and amend the soil with compost or other organic matter to improve drainage.
Can I save carrot seeds for next year?
Yes, you can save carrot seeds, but it’s a bit more involved than saving seeds from some other vegetables. Carrots are biennials, meaning they take two years to produce seeds.
In the first year, you’ll grow the carrots as usual. In the fall, select the best-looking carrots and leave them in the ground over the winter. In the second year, the carrots will flower and produce seeds. Once the seed heads are dry and brown, you can harvest them and store them in a cool, dry place.
What are some good companion plants for carrots?
Companion planting can help to deter pests, improve soil health, and enhance the flavor of your carrots. Some good companion plants for carrots include:
* **Onions:** Onions deter carrot rust flies.
* **Garlic:** Garlic also deters carrot rust flies.
* **Marigolds:** Marigolds repel nematodes and other soil pests.
* **Rosemary:** Rosemary deters carrot flies.
* **Lettuce:** Lettuce provides shade for young carrot seedlings.
* **Radishes:** Radishes break up the soil and make it easier for carrots to grow.

Leave a Comment