
Growing Peanuts in Buckets: Imagine harvesting a bounty of fresh, homegrown peanuts right from your patio! Forget sprawling fields; with this simple DIY guide, you can cultivate these delicious legumes in the comfort of your own home, even if you only have a small balcony. For centuries, peanuts have been a staple food in many cultures, offering a rich source of protein and healthy fats. From ancient South American civilizations to modern-day snacks, peanuts have nourished and delighted people worldwide.
But why should you consider growing peanuts in buckets? Well, traditional peanut farming requires a lot of space and specific soil conditions. This DIY trick eliminates those barriers, making peanut cultivation accessible to everyone. I’ve found that it’s a fantastic way to enjoy fresh, organic peanuts without the hassle of a large garden. Plus, it’s incredibly rewarding to watch those little plants thrive and produce a tasty harvest.
This article will walk you through every step of the process, from selecting the right bucket and soil to nurturing your peanut plants and harvesting your very own homegrown treats. Get ready to discover the joy of growing peanuts in buckets and impress your friends and family with your green thumb!
Growing Peanuts in Buckets: A Beginner’s Guide
Hey there, fellow gardening enthusiasts! Ever thought about growing your own peanuts? It’s surprisingly easy, even if you don’t have a sprawling garden. I’m going to walk you through how to grow peanuts right in buckets – perfect for patios, balconies, or small spaces. Get ready for some homegrown goodness!
Choosing the Right Peanut Variety
Before we dive into the nitty-gritty, let’s talk peanuts. Not all peanut varieties are created equal, especially when it comes to container gardening. You’ll want to choose a type that’s well-suited for smaller spaces and shorter growing seasons.
* Bush or Virginia Types: These are generally the best choices. Bush types are compact and don’t spread out as much, making them ideal for buckets. Virginia types, while slightly larger, still perform well in containers.
* Avoid Runner Types: Runner types tend to spread horizontally, which isn’t ideal for the limited space of a bucket.
* Consider Your Climate: Different peanut varieties have different maturity times. Choose one that will mature within your growing season. Look for varieties labeled as “early maturing” if you live in a cooler climate.
I personally had great success with the “Early Spanish” variety. They’re compact, produce a good yield, and mature relatively quickly.
Gathering Your Supplies
Okay, now for the fun part – gathering everything you need! Here’s a checklist to get you started:
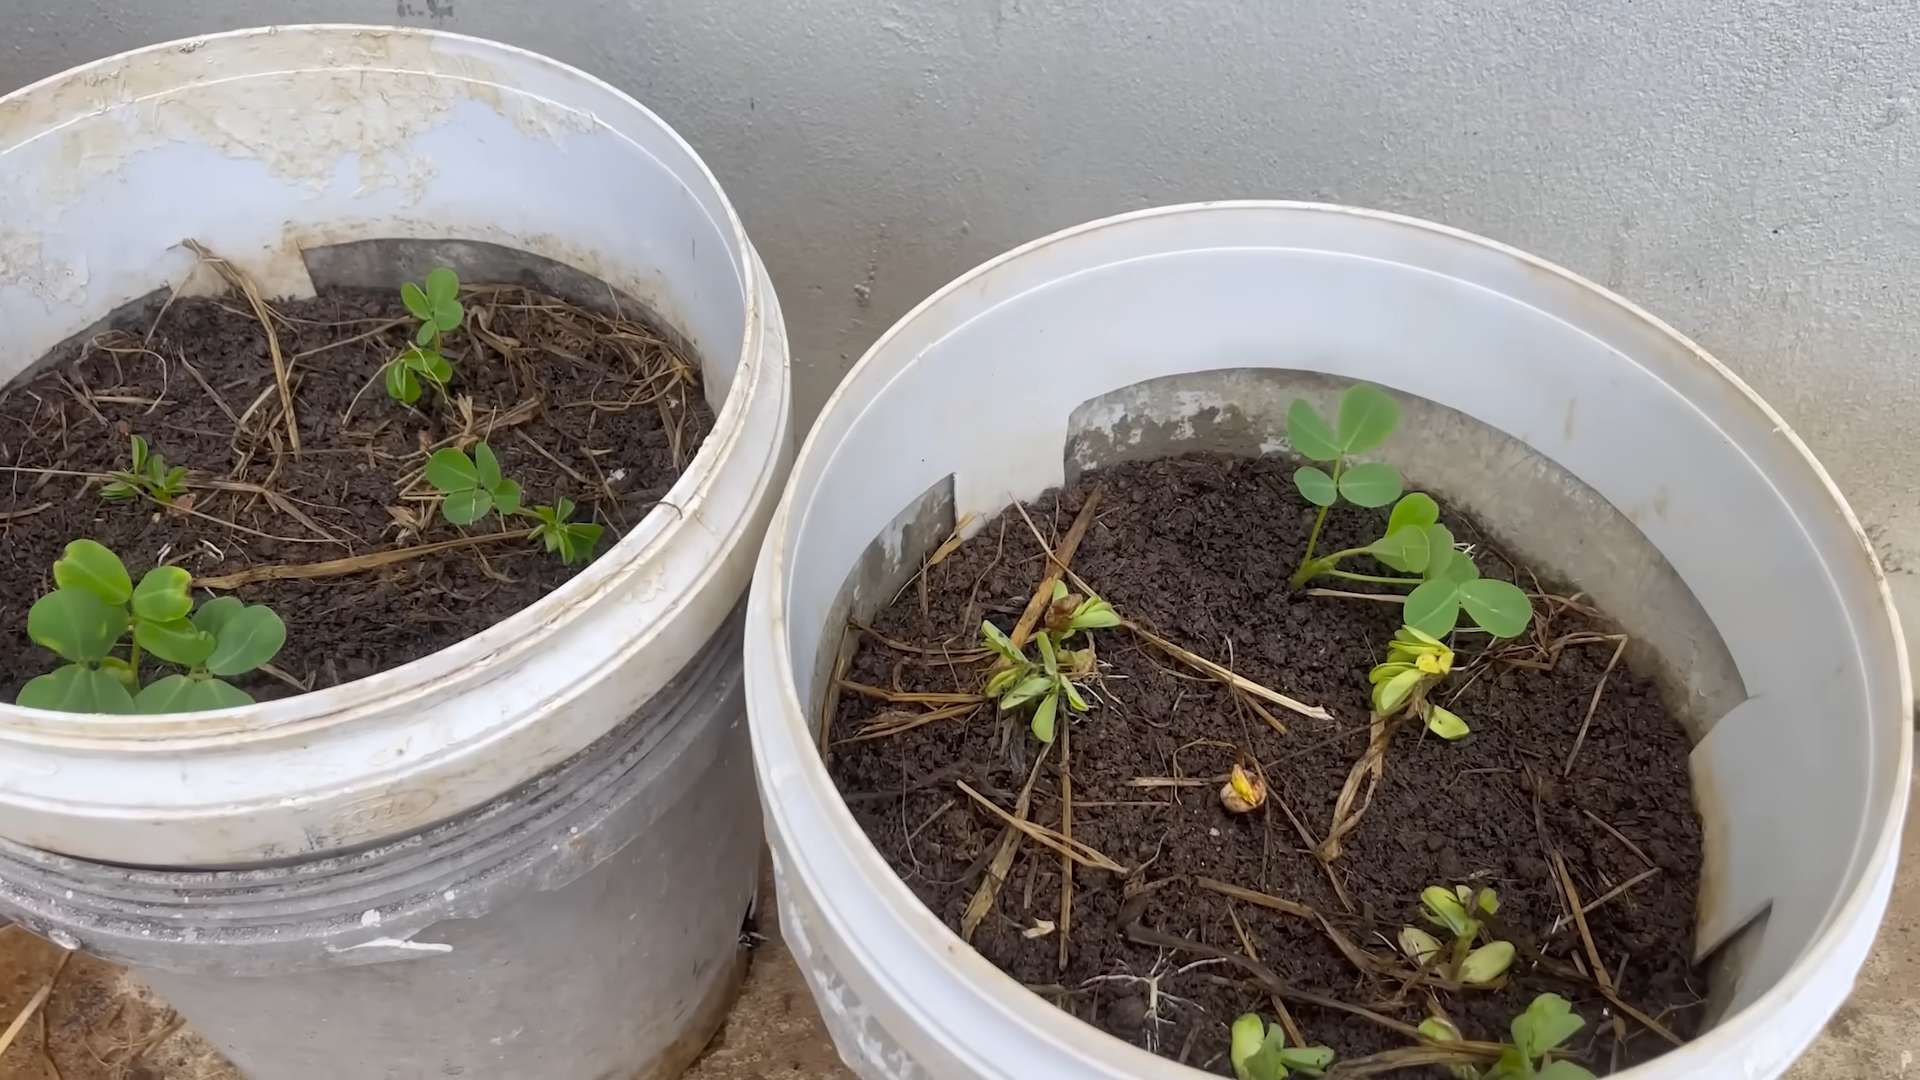
* Buckets: You’ll need at least a 5-gallon bucket per peanut plant. I prefer using 10-gallon buckets to give the roots plenty of room to spread. Make sure the buckets have drainage holes!
* Potting Mix: Don’t use garden soil! It’s too heavy and compacts easily. Opt for a well-draining potting mix. I like to mix equal parts of potting soil, compost, and perlite for optimal drainage and nutrients.
* Peanut Seeds: You can buy peanut seeds online or at your local garden center. Make sure they’re raw, unsalted peanuts. Roasted peanuts won’t germinate.
* Watering Can or Hose: For, well, watering!
* Optional:
* Pea Gravel or Rocks: To place at the bottom of the bucket for improved drainage.
* Liquid Fertilizer: A balanced liquid fertilizer to feed your peanut plants throughout the growing season.
* Mulch: To help retain moisture and suppress weeds.
Planting Your Peanut Seeds
Alright, let’s get those peanuts in the ground (or, in this case, the bucket!).
1. Prepare the Buckets: If your buckets don’t have drainage holes, drill several into the bottom. Add a layer of pea gravel or rocks to the bottom of each bucket to improve drainage. This is crucial to prevent root rot.
2. Fill with Potting Mix: Fill the buckets with your prepared potting mix, leaving about 2 inches of space at the top.
3. Plant the Seeds: Make small holes about 1-2 inches deep and 4-6 inches apart. Plant 3-4 peanut seeds in each bucket. Planting multiple seeds increases the chances of at least one germinating.
4. Cover and Water: Gently cover the seeds with potting mix and water thoroughly. The soil should be moist but not soggy.
5. Find a Sunny Spot: Peanuts need at least 6-8 hours of sunlight per day. Place your buckets in a sunny location.
Caring for Your Peanut Plants
Now that your peanuts are planted, it’s time to nurture them and watch them grow!
1. Watering: Keep the soil consistently moist, especially during flowering and pegging (when the “pegs” or stems that will become peanuts start to grow into the soil). Water deeply whenever the top inch of soil feels dry. Avoid overwatering, as this can lead to root rot.
2. Fertilizing: Peanuts are legumes, which means they can fix nitrogen from the air. However, they still benefit from regular fertilization. Use a balanced liquid fertilizer (like 10-10-10) every 2-3 weeks. Follow the instructions on the fertilizer label.
3. Hilling: As your peanut plants grow, you’ll notice small, stem-like structures called “pegs” emerging from the base of the plant. These pegs need to burrow into the soil to form peanuts. To help them along, gently hill the soil around the base of the plants, covering the pegs. You can do this every few weeks as the plants grow.
4. Weeding: Keep the buckets free of weeds. Weeds compete with your peanut plants for nutrients and water.
5. Pest Control: Peanuts are generally pest-resistant, but keep an eye out for common garden pests like aphids or spider mites. If you spot any pests, treat them with an appropriate insecticide or insecticidal soap. I prefer using organic pest control methods whenever possible.
Harvesting Your Peanuts
This is the moment you’ve been waiting for! Harvesting your homegrown peanuts is incredibly rewarding.
1. Timing is Key: Peanuts are typically ready to harvest about 120-150 days after planting, depending on the variety and your climate. A good indicator is when the foliage starts to turn yellow and the lower leaves begin to die back.
2. Test Dig: Before harvesting all your peanuts, dig up one plant to check the maturity of the peanuts. The peanut shells should be well-formed and the kernels inside should be plump and have a reddish-brown skin.
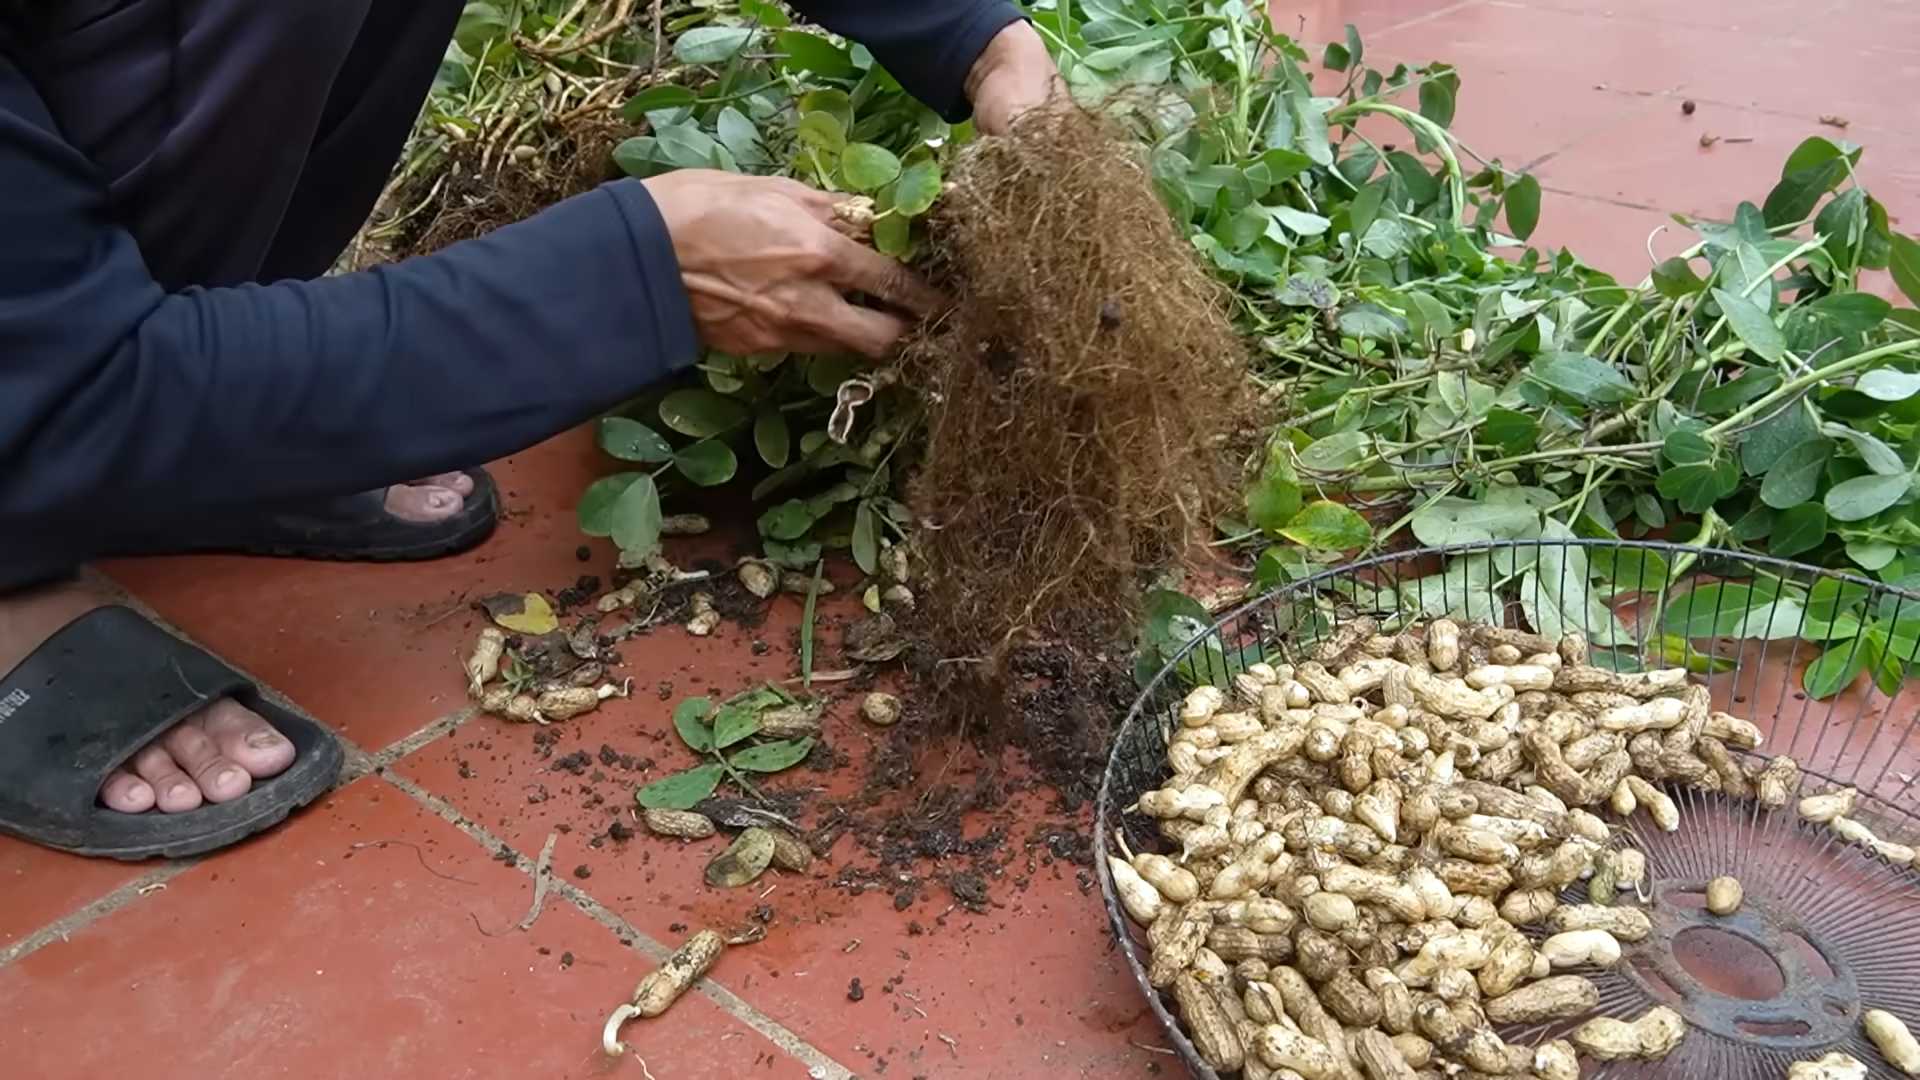
3. Harvesting: To harvest, gently pull the entire plant out of the bucket. Shake off as much soil as possible.
4. Curing: Curing is essential for developing the flavor and preventing mold growth. Hang the entire plant upside down in a warm, dry, well-ventilated area for 2-4 weeks. You can hang them in a garage, shed, or even indoors.
5. Threshing: Once the plants are cured, you can remove the peanuts from the vines. This is called threshing. You can do this by hand or by gently beating the plants against a hard surface.
6. Drying: After threshing, spread the peanuts out in a single layer on a screen or tray and let them dry for another week or two. This will further reduce the moisture content and prevent spoilage.
Roasting Your Homegrown Peanuts
Now for the best part – enjoying the fruits (or, rather, the nuts!) of your labor. Roasting your homegrown peanuts is easy and delicious.
1. Preheat Oven: Preheat your oven to 350°F (175°C).
2. Prepare Peanuts: Spread the dried peanuts in a single layer on a baking sheet.
3. Roast: Roast for 20-25 minutes, or until the peanuts are golden brown and fragrant. Stir them occasionally to ensure even roasting.
4. Cool: Let the peanuts cool completely before eating.
5. Enjoy! Enjoy your freshly roasted, homegrown peanuts! You can eat them plain, add them to salads, or use them in your favorite recipes.
Troubleshooting
Even with the best planning, things can sometimes go wrong. Here are a few common problems you might encounter and how to fix them:
* Poor Germination: If your peanut seeds don’t germinate, it could be due to several factors:
* Old Seeds: Make sure your seeds are fresh. Peanut seeds lose their viability over time.
* Improper Planting Depth: Plant the seeds at the correct depth (1-2 inches).
* Insufficient Moisture: Keep the soil consistently moist but not soggy.
* Cold Soil: Peanuts need warm soil to germinate. Wait until the soil temperature is consistently above 65°F (18°C) before planting.
* Yellowing Leaves: Yellowing leaves can indicate a nutrient deficiency. Try fertilizing with a balanced liquid fertilizer. It could also be a sign of overwatering or poor drainage.
* Lack of Peanuts: If your plants are growing well but not producing peanuts, it could be due to:
* Insufficient Sunlight: Make sure your plants are getting enough sunlight (at least 6-8 hours per day).
* Poor Pollination: Peanuts are self-pollinating, but sometimes they need a little help. Gently shake the plants to encourage pollination.
* Soil pH: Peanuts prefer a slightly acidic soil pH (around 6.0-6.5). Test your soil and amend it if necessary.
* Root Rot: Root rot is caused by overwatering and poor drainage. Make sure your buckets have drainage holes and avoid overwatering.
Tips for Success
Here are a few extra tips to help
Conclusion
So, there you have it! Growing peanuts in buckets is not only possible, it’s surprisingly rewarding and accessible, even if you don’t have acres of farmland. This DIY trick transforms the often-intimidating process of peanut cultivation into a manageable and enjoyable project for gardeners of all skill levels. Forget the sprawling fields; with a few buckets, some quality soil, and a sunny spot, you can cultivate your own supply of fresh, homegrown peanuts.
Why is this a must-try? Because it democratizes peanut farming! It allows apartment dwellers, balcony gardeners, and anyone with limited space to experience the unique satisfaction of nurturing a plant from seed to harvest. Imagine the bragging rights when you serve up a bowl of freshly roasted peanuts that you grew yourself! Beyond the novelty, growing your own peanuts ensures you know exactly what went into them – no mystery chemicals or questionable farming practices. You control the entire process, guaranteeing a healthier and more sustainable snack.
But the fun doesn’t stop there. Feel free to experiment with different peanut varieties. Virginia peanuts, known for their large size, thrive in buckets, as do Spanish peanuts, which mature more quickly. Consider adding companion plants like marigolds or basil to your buckets to deter pests naturally. You can also adjust the soil composition to suit your specific climate and peanut variety. Some gardeners even add a small trellis to provide extra support for the peanut plants as they grow.
Don’t be afraid to get your hands dirty and personalize your peanut-growing experience. The beauty of this DIY trick lies in its adaptability. You can tailor it to your specific needs and preferences.
We wholeheartedly encourage you to give growing peanuts in buckets a try. It’s a fantastic way to connect with nature, learn about the food you eat, and enjoy the unparalleled taste of homegrown goodness. And most importantly, we want to hear about your experience! Share your photos, tips, and triumphs in the comments below. Let’s build a community of bucket peanut farmers and inspire others to embark on this exciting gardening adventure. What are you waiting for? Grab a bucket, some seeds, and get growing! Let us know if you have any questions, we are here to help you succeed in your peanut growing journey.
Frequently Asked Questions (FAQs)
1. What kind of bucket should I use for growing peanuts?
The ideal bucket size is at least 5 gallons, but 10-gallon buckets are even better as they provide more room for root development and peanut production. Ensure the bucket has drainage holes at the bottom to prevent waterlogging, which can lead to root rot. You can drill these yourself if the bucket doesn’t already have them. Avoid using buckets that previously contained chemicals or toxic substances, as these could contaminate your peanuts. Food-grade buckets are the safest option.
2. What type of soil is best for growing peanuts in buckets?
Peanuts thrive in well-draining, sandy loam soil. This type of soil allows the pegs (the stems that develop into peanuts) to easily penetrate the ground. You can create your own mix by combining equal parts of potting soil, sand, and compost. Avoid heavy clay soils, as they can become compacted and hinder peanut development. The pH level of the soil should be between 6.0 and 6.5 for optimal growth. You can test your soil’s pH using a soil testing kit available at most garden centers.
3. How often should I water my peanut plants in buckets?
Peanut plants need consistent moisture, especially during flowering and pegging (when the pegs start to grow into the soil). Water deeply whenever the top inch of soil feels dry to the touch. Avoid overwatering, as this can lead to root rot. During hot, dry weather, you may need to water daily. In cooler, wetter weather, you can reduce the frequency of watering. A good rule of thumb is to check the soil moisture regularly and adjust your watering schedule accordingly.
4. How much sunlight do peanut plants need?
Peanut plants require at least 6-8 hours of direct sunlight per day to thrive. Choose a sunny location for your buckets where the plants will receive ample sunlight throughout the growing season. If you live in a particularly hot climate, you may need to provide some afternoon shade to prevent the plants from scorching.
5. When is the best time to plant peanuts in buckets?
The best time to plant peanuts is after the last frost when the soil temperature has warmed to at least 65°F (18°C). In most regions, this is typically in late spring or early summer. You can start peanut seeds indoors 4-6 weeks before the last frost and transplant them into buckets once the weather warms up. This will give you a head start on the growing season.
6. How long does it take for peanuts to mature in buckets?
Peanuts typically take 120-150 days to mature, depending on the variety and growing conditions. You’ll know your peanuts are ready to harvest when the foliage starts to turn yellow and the inside of the peanut shells are brown with prominent veins. You can also dig up a few plants to check the peanut development.
7. How do I harvest peanuts from buckets?
To harvest, gently pull the entire plant out of the bucket. Shake off any excess soil and allow the peanuts to dry in a well-ventilated area for several days. Once the peanuts are dry, you can remove them from the plant.
8. How do I cure and store my homegrown peanuts?
After harvesting, cure the peanuts by drying them in a well-ventilated area for 2-3 weeks. This will help to improve their flavor and prevent mold growth. Store the cured peanuts in a cool, dry place in airtight containers. You can also freeze peanuts for longer storage.
9. Are there any common pests or diseases that affect peanut plants in buckets?
Common pests that can affect peanut plants include aphids, spider mites, and leafhoppers. You can control these pests with insecticidal soap or neem oil. Diseases that can affect peanut plants include leaf spot and root rot. Prevent these diseases by providing good air circulation, avoiding overwatering, and using disease-resistant peanut varieties.
10. Can I grow different varieties of peanuts in the same bucket?
It’s generally not recommended to grow different varieties of peanuts in the same bucket, as they may compete for resources and affect each other’s growth. It’s best to grow each variety in its own separate bucket to ensure optimal peanut production.
11. What are some signs that my peanut plants are not thriving?
Some signs that your peanut plants are not thriving include yellowing leaves, stunted growth, lack of flowering, and poor peanut development. These problems can be caused by a variety of factors, including nutrient deficiencies, pests, diseases, and improper watering. Check your plants regularly and address any problems promptly to ensure a successful harvest.
12. Can I reuse the soil from my peanut buckets for other plants?
Yes, you can reuse the soil from your peanut buckets for other plants, but it’s important to amend it with compost or other organic matter to replenish the nutrients that were used by the peanut plants. You should also sterilize the soil to kill any potential pests or diseases. You can sterilize the soil by baking it in the oven at 200°F (93°C) for 30 minutes or by solarizing it in a clear plastic bag for several weeks.
13. Can I grow peanuts indoors in buckets?
While it’s possible to grow peanuts indoors in buckets, it can be challenging to provide them with the amount of sunlight they need. If you do grow peanuts indoors, you’ll need to supplement with grow lights to ensure they receive at least 6-8 hours of light per day. You’ll also need to provide good air circulation and monitor the plants closely for pests and diseases.
14. How do I know if my peanuts are safe to eat?
Homegrown peanuts are generally safe to eat if they are properly harvested, cured, and stored. However, it’s important to inspect the peanuts for any signs of mold or spoilage before eating them. Discard any peanuts that look or smell suspicious. If you have any concerns about the safety of your homegrown peanuts, consult with a local agricultural extension office or food safety expert.
Leave a Comment