
Grow Kohlrabi Early and enjoy a delicious, crunchy harvest weeks before your neighbors! Have you ever dreamt of biting into a crisp, sweet kohlrabi fresh from your garden while everyone else is still waiting for spring to truly arrive? Well, dream no more! This DIY guide is packed with simple, effective tricks to get a head start on your kohlrabi crop, ensuring you’re the envy of the neighborhood garden club.
Kohlrabi, sometimes called a “German turnip,” has a fascinating history, dating back to the Roman Empire. It’s a staple in many European cuisines and is gaining popularity worldwide for its unique flavor and nutritional benefits. But let’s face it, sometimes the growing season just isn’t long enough to fully enjoy this delightful vegetable. That’s where these clever hacks come in!
Many gardeners struggle with getting kohlrabi to mature before the summer heat sets in, which can cause the bulbs to become woody and bitter. I’ve been there, trust me! But with these proven techniques, you can bypass those common pitfalls and grow kohlrabi early, reaping the rewards of a bountiful harvest. I’m excited to share these tips with you, so let’s get started and unlock the secrets to early kohlrabi success!
How to Get a Head Start on Kohlrabi: My DIY Early Growing Guide
Okay, kohlrabi lovers, let’s talk about getting that delicious, slightly sweet, and crunchy goodness on your table *way* earlier than everyone else. I’m going to walk you through my tried-and-true method for starting kohlrabi indoors and transplanting it successfully, giving you a significant head start on the growing season. Trust me, it’s easier than you think!
Why Start Kohlrabi Indoors?
Before we dive into the how-to, let’s quickly cover the *why*. Kohlrabi is a cool-season crop, meaning it thrives in cooler temperatures. Starting it indoors allows you to get a jump on the season, avoiding the heat of summer that can cause the bulbs to become woody and bitter. Plus, you’ll have earlier harvests, which is always a win in my book!
Materials You’ll Need
Here’s a list of everything you’ll need to get started. Don’t worry, most of it is pretty standard gardening stuff:
* **Kohlrabi Seeds:** Choose a variety that suits your taste and climate. I personally love ‘Early White Vienna’ and ‘Purple Vienna’ for their reliability and flavor.
* **Seed Starting Trays or Pots:** I prefer using seed starting trays with individual cells, but small pots work just as well. Make sure they have drainage holes!
* **Seed Starting Mix:** This is crucial! Don’t use regular garden soil; it’s too heavy and can harbor diseases. Seed starting mix is light, airy, and sterile.
* **Watering Can or Spray Bottle:** Gentle watering is key to avoid disturbing the delicate seedlings.
* **Grow Lights (Optional but Recommended):** If you don’t have a sunny windowsill, grow lights will provide the necessary light for healthy growth.
* **Heat Mat (Optional):** A heat mat can speed up germination, but it’s not essential.
* **Small Labels and a Marker:** To keep track of which variety you’re growing.
* **Small Trowel or Spoon:** For transplanting seedlings.
* **Hardening-Off Area:** A sheltered outdoor space to acclimate your seedlings before transplanting.
Getting Started: Sowing the Seeds
This is where the magic begins! Follow these steps carefully:
1. **Moisten the Seed Starting Mix:** Before filling your trays or pots, thoroughly moisten the seed starting mix. It should be damp but not soggy. I usually do this in a large bowl or bucket.
2. **Fill the Trays or Pots:** Fill each cell or pot with the moistened seed starting mix, leaving about half an inch of space at the top. Gently tap the trays to settle the mix.
3. **Sow the Seeds:** Place 2-3 kohlrabi seeds in each cell or pot. This increases the chances of at least one seed germinating.
4. **Cover the Seeds:** Lightly cover the seeds with a thin layer of seed starting mix, about 1/4 inch deep.
5. **Water Gently:** Use a watering can or spray bottle to gently water the surface of the soil. Avoid overwatering, which can lead to damping-off disease.
6. **Label Everything:** Label each tray or pot with the variety of kohlrabi you’re growing and the date you planted them. This will help you stay organized.
7. **Provide Warmth and Light:** Place the trays or pots in a warm location, ideally between 65-75°F (18-24°C). If you’re using a heat mat, place the trays on top of it. If you’re using grow lights, position them a few inches above the trays. If you are using a window sill, make sure it is a south facing window.
Caring for Your Seedlings
Now comes the waiting game, but don’t worry, it’s not long!
1. **Monitor Moisture Levels:** Keep the seed starting mix consistently moist, but not waterlogged. Check the moisture level daily and water as needed.
2. **Provide Adequate Light:** If you’re using grow lights, keep them on for 14-16 hours per day. If you’re using a windowsill, rotate the trays or pots regularly to ensure even light exposure.
3. **Thin the Seedlings:** Once the seedlings have emerged and have their first true leaves (the second set of leaves), thin them to one seedling per cell or pot. Choose the strongest, healthiest-looking seedling and gently snip off the others at the soil line. Don’t pull them out, as this can disturb the roots of the remaining seedling.
4. **Fertilize (Optional):** After a couple of weeks, you can start fertilizing the seedlings with a diluted liquid fertilizer. I like to use a balanced fertilizer diluted to half strength. Follow the instructions on the fertilizer label.
Hardening Off: Preparing for the Great Outdoors
This is a crucial step that many beginners skip, but it’s essential for successful transplanting. Hardening off gradually acclimates the seedlings to outdoor conditions, preventing transplant shock.
1. **Start Gradually:** About a week before you plan to transplant, start taking the seedlings outdoors for a few hours each day. Choose a sheltered location that’s protected from wind and direct sunlight.
2. **Increase Exposure:** Gradually increase the amount of time the seedlings spend outdoors each day, exposing them to more sunlight and wind.
3. **Monitor the Weather:** Avoid exposing the seedlings to frost or extreme temperatures. If frost is predicted, bring them back indoors.
4. **Water Regularly:** Continue to water the seedlings regularly during the hardening-off process.
Transplanting: Setting Your Kohlrabi Free
Finally, the moment we’ve been waiting for!
1. **Choose the Right Time:** Transplant your kohlrabi seedlings when the soil has warmed up and the danger of frost has passed. The ideal time is usually 2-4 weeks before the last expected frost.
2. **Prepare the Garden Bed:** Choose a sunny location with well-drained soil. Amend the soil with compost or other organic matter to improve its fertility and drainage.
3. **Space the Seedlings:** Space the kohlrabi seedlings about 6-8 inches apart in rows that are 12-18 inches apart.
4. **Dig the Holes:** Dig holes that are slightly larger than the root balls of the seedlings.
5. **Gently Remove the Seedlings:** Carefully remove the seedlings from their trays or pots, being careful not to damage the roots.
6. **Plant the Seedlings:** Place the seedlings in the holes and gently backfill with soil. Make sure the top of the root ball is level with the surrounding soil.
7. **Water Thoroughly:** Water the seedlings thoroughly after transplanting.
8. **Mulch (Optional):** Apply a layer of mulch around the plants to help retain moisture, suppress weeds, and regulate soil temperature.
Ongoing Care: Keeping Your Kohlrabi Happy
Your work isn’t quite done yet! Here’s how to keep your kohlrabi thriving:
1. **Water Regularly:** Kohlrabi needs consistent moisture to develop plump, juicy bulbs. Water regularly, especially during dry periods.
2. **Fertilize (Optional):** You can fertilize your kohlrabi plants every few weeks with a balanced fertilizer. Follow the instructions on the fertilizer label.
3. **Weed Regularly:** Keep the garden bed free of weeds, which can compete with the kohlrabi plants for nutrients and water.
4. **Pest Control:** Keep an eye out for pests such as cabbage worms and aphids. Handpick them off the plants or use an organic insecticide if necessary.
Harvesting: The Sweet Reward
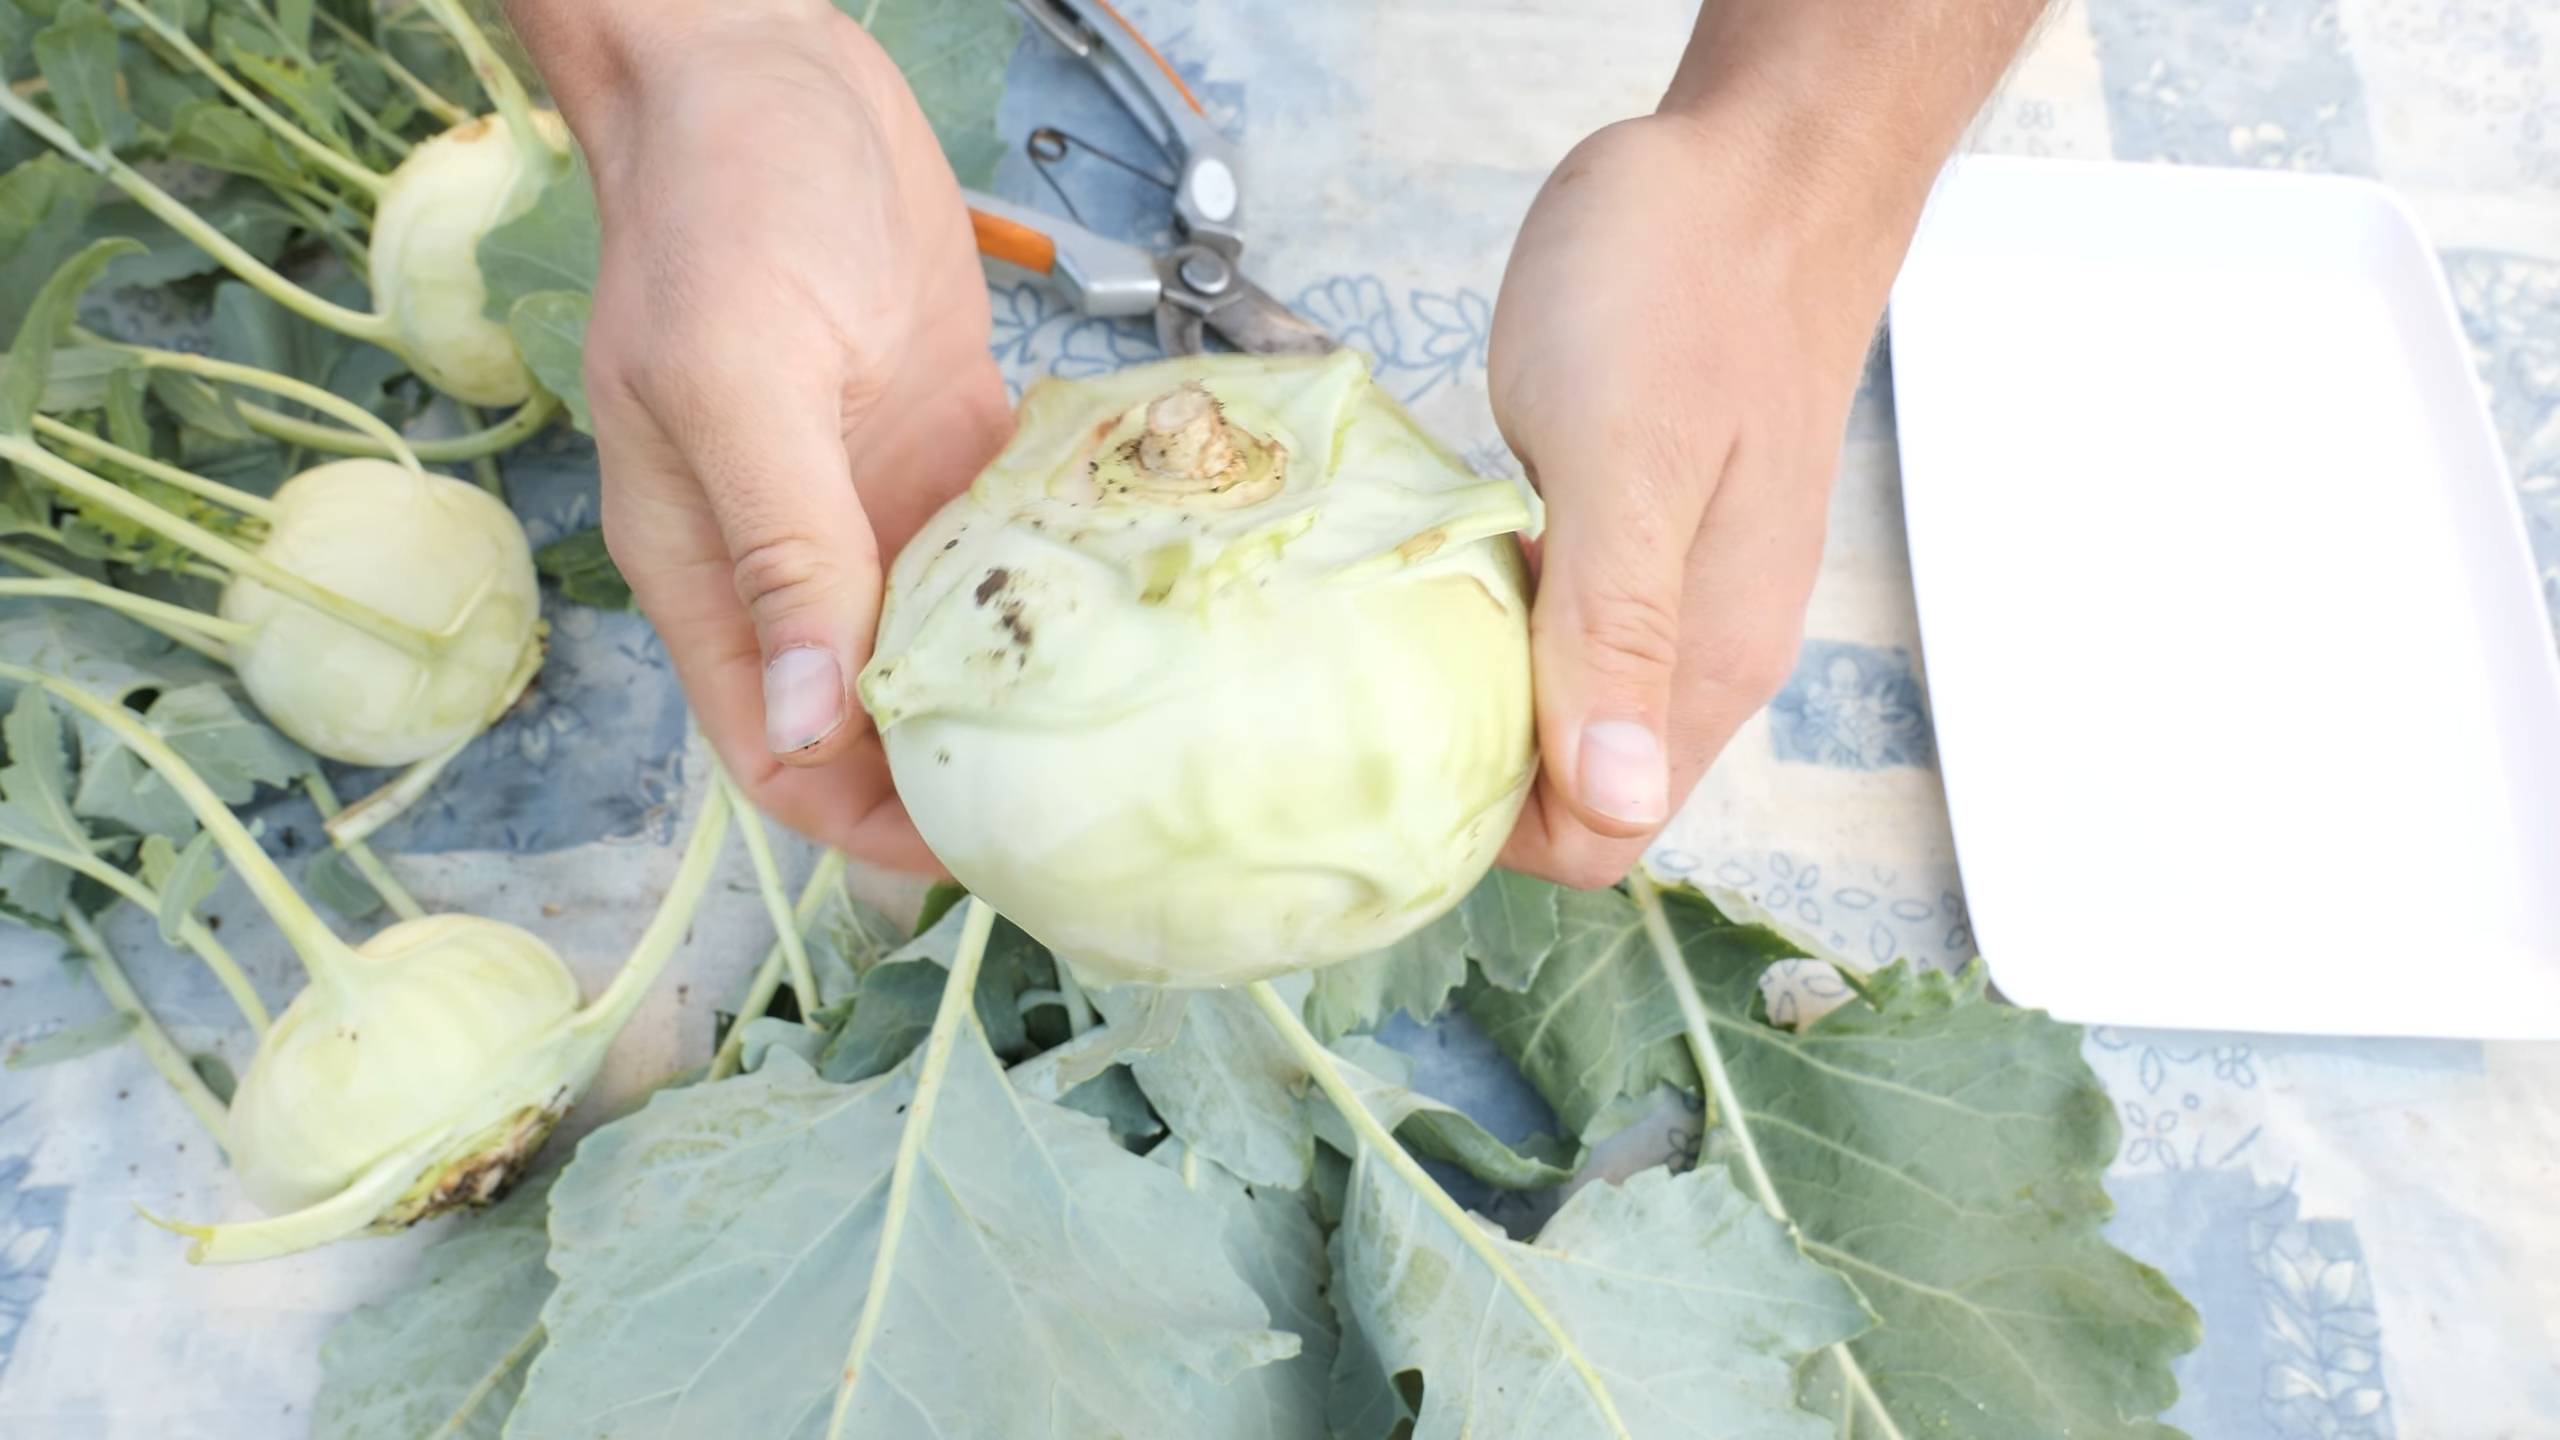
The best part! You can harvest kohlrabi when the bulbs are about 2-3 inches in diameter. Don’t let them get too large, as they can become woody and tough.
1. **Harvesting Time:** Kohlrabi is typically ready to harvest 50-60 days after planting.
2. **How to Harvest:** To harvest, simply cut the bulb off at the base of the plant with a sharp knife.
3. **Enjoy!** Kohlrabi can be eaten raw, cooked, or pickled. It’s delicious in salads, stir-fries, and soups. The leaves are also edible and can be cooked like spinach.
Troubleshooting
Even with the best planning, things can sometimes go wrong. Here are a few common problems and how to fix them:
* **Damping-Off Disease:** This fungal disease can kill seedlings. To prevent it, use sterile seed starting mix, avoid overwatering, and provide good ventilation.
* **Leggy Seedlings:** This happens when seedlings don’t get enough light. Provide more light by using grow lights or moving the seedlings to a sunnier location.
* **Pests:** Cabbage worms and aphids are common pests of kohlrabi. Handpick them off the plants or use an organic insecticide.
* **Woody Bulbs

Conclusion
So, there you have it! Mastering the art of starting your kohlrabi indoors is not just a gardening hack; it’s a gateway to a longer growing season, healthier plants, and ultimately, a more abundant harvest. We’ve walked through the simple steps, from selecting the right seeds and soil to providing the optimal environment for your kohlrabi seedlings to thrive.
Why is this DIY trick a must-try? Because it empowers you to take control of your garden’s timeline. In regions with short growing seasons, starting kohlrabi indoors is the difference between enjoying fresh, crisp kohlrabi and missing out altogether. It also gives your plants a head start against pests and diseases, leading to stronger, more resilient crops. Plus, let’s be honest, there’s a certain satisfaction that comes from nurturing tiny seeds into thriving plants.
But don’t stop there! Experiment with different kohlrabi varieties. Try starting ‘Early White Vienna’ for its quick maturity or ‘Purple Vienna’ for its beautiful color and slightly sweeter flavor. You can also play around with the timing of your indoor starts. If you’re aiming for a continuous harvest, stagger your planting by starting a new batch of seeds every few weeks.
Consider using different types of grow lights to see which yields the best results for your setup. Some gardeners swear by LED grow lights for their energy efficiency and full-spectrum output, while others prefer fluorescent lights for their affordability. The key is to find what works best for your space and budget.
And for those of you who are feeling adventurous, why not try companion planting your kohlrabi seedlings with herbs like dill or chamomile? These herbs can help deter pests and attract beneficial insects, creating a healthier environment for your kohlrabi to flourish.
Ultimately, the best way to learn is by doing. So, grab your seeds, soil, and containers, and give this DIY trick a try. We’re confident that you’ll be amazed by the results. Remember, even experienced gardeners face challenges, so don’t be discouraged if your first attempt isn’t perfect. The most important thing is to learn from your mistakes and keep experimenting.
We’re eager to hear about your experiences! Share your tips, tricks, and triumphs in the comments below. Let us know what kohlrabi varieties you’re growing, what challenges you’ve faced, and what solutions you’ve found. Together, we can create a community of kohlrabi enthusiasts and help each other grow the best possible crops. So, get growing and let’s talk kohlrabi! Don’t forget that starting your **kohlrabi early** indoors is the best way to get a head start on the growing season.
Frequently Asked Questions (FAQ)
Q: How early should I start my kohlrabi indoors?
A: Generally, you should start your kohlrabi seeds indoors about 4-6 weeks before the last expected frost in your area. This gives the seedlings enough time to develop a strong root system before being transplanted outdoors. Check your local frost dates to determine the best time to start your seeds. You can usually find this information from your local agricultural extension office or online weather resources.
Q: What kind of soil should I use for starting kohlrabi seeds indoors?
A: Use a well-draining seed starting mix. Avoid using garden soil, as it can be too heavy and may contain pests or diseases. A good seed starting mix will be light and airy, allowing the roots to easily penetrate and absorb nutrients. You can find seed starting mixes at most garden centers or online retailers. You can also make your own by combining equal parts peat moss, vermiculite, and perlite.
Q: How much light do kohlrabi seedlings need?
A: Kohlrabi seedlings need plenty of light to grow strong and healthy. If you don’t have a sunny windowsill that receives at least 6 hours of direct sunlight per day, you’ll need to use grow lights. Position the grow lights a few inches above the seedlings and keep them on for 14-16 hours per day. As the seedlings grow, you may need to adjust the height of the lights to prevent them from getting burned.
Q: How often should I water my kohlrabi seedlings?
A: Keep the soil consistently moist, but not soggy. Water the seedlings when the top inch of soil feels dry to the touch. Avoid overwatering, as this can lead to root rot. Use a gentle watering can or spray bottle to avoid disturbing the seedlings.
Q: When can I transplant my kohlrabi seedlings outdoors?
A: Transplant your kohlrabi seedlings outdoors after the last expected frost and when the soil has warmed up to at least 50°F (10°C). Harden off the seedlings for a week before transplanting by gradually exposing them to outdoor conditions. Start by placing them in a sheltered location for a few hours each day, gradually increasing the amount of time they spend outdoors.
Q: What is “hardening off” and why is it important?
A: Hardening off is the process of gradually acclimating your seedlings to outdoor conditions before transplanting them. This is important because indoor conditions are much different than outdoor conditions. Seedlings that are not hardened off can be shocked by the sudden change in temperature, sunlight, and wind, which can stunt their growth or even kill them.
Q: What are some common pests and diseases that affect kohlrabi?
A: Common pests that affect kohlrabi include aphids, cabbage worms, and flea beetles. Common diseases include clubroot and black rot. You can prevent pests and diseases by practicing good garden hygiene, such as removing weeds and debris, and by using organic pest control methods, such as insecticidal soap or neem oil.
Q: How do I know when my kohlrabi is ready to harvest?
A: Kohlrabi is typically ready to harvest when the bulb is about 2-3 inches in diameter. The exact size will depend on the variety. The bulb should be firm and smooth. If the bulb gets too large, it can become tough and woody.
Q: Can I eat the leaves of the kohlrabi plant?
A: Yes, the leaves of the kohlrabi plant are edible and nutritious. They can be eaten raw in salads or cooked like spinach or kale. Choose young, tender leaves for the best flavor.
Q: What are some ways to use kohlrabi in cooking?
A: Kohlrabi can be eaten raw or cooked. Raw kohlrabi has a crisp, slightly sweet flavor and can be grated into salads or used as a crudité. Cooked kohlrabi can be steamed, roasted, sautéed, or added to soups and stews. It has a mild, cabbage-like flavor.
Q: Can I grow kohlrabi in containers?
A: Yes, kohlrabi can be grown in containers. Choose a container that is at least 12 inches deep and wide. Use a well-draining potting mix and provide plenty of sunlight and water.
Q: What are the best companion plants for kohlrabi?
A: Good companion plants for kohlrabi include herbs like dill, chamomile, and rosemary, as well as vegetables like onions, garlic, and beets. These plants can help deter pests and attract beneficial insects. Avoid planting kohlrabi near other members of the brassica family, such as cabbage, broccoli, and cauliflower, as they can attract the same pests and diseases.
Leave a Comment