
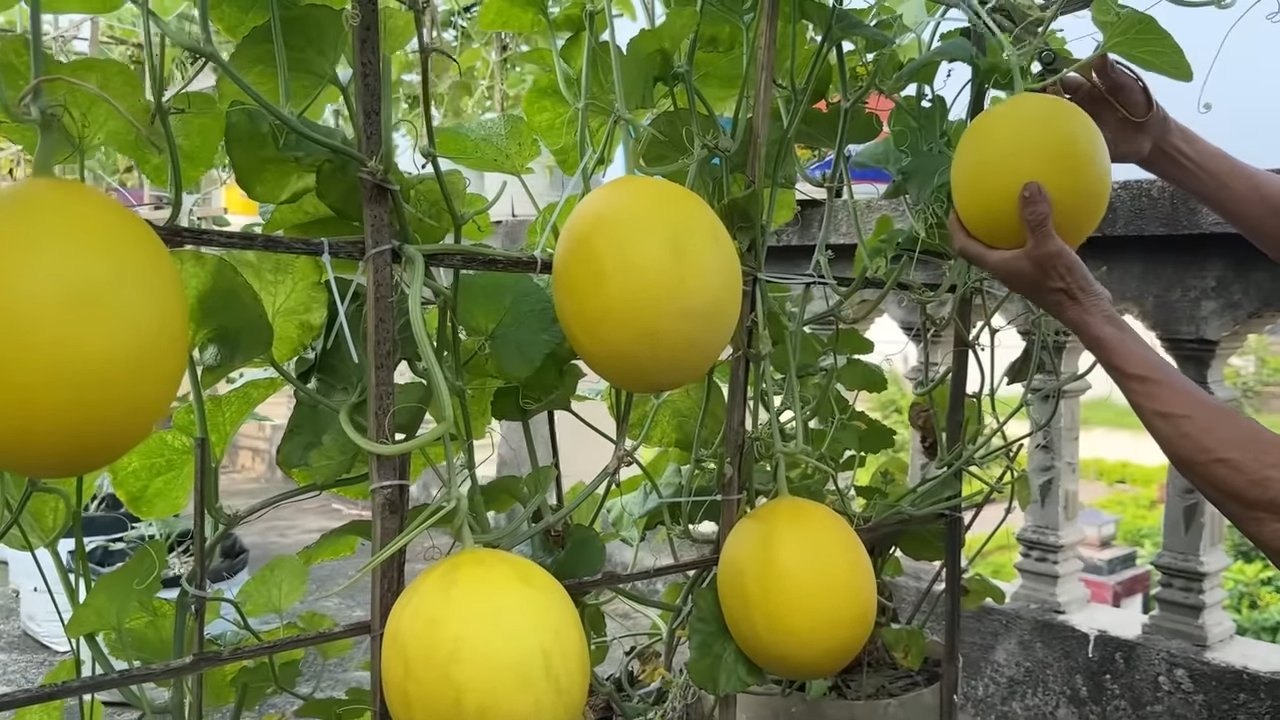
Grow Large Melons Easily – dreaming of juicy, oversized melons bursting with flavor, straight from your own backyard? I know I am! There’s something incredibly satisfying about nurturing a tiny seed into a bountiful harvest, especially when that harvest is a prize-winning melon. For centuries, gardeners have been perfecting the art of melon cultivation, from the ancient Egyptians who revered watermelons as symbols of prosperity to the modern-day enthusiasts competing for the heaviest fruit at state fairs.
But let’s be honest, growing massive melons can feel like a daunting task. You might be thinking, “I don’t have a green thumb,” or “My garden is too small.” That’s where these DIY tricks and hacks come in! I’m here to share some simple, yet effective techniques that will help you grow large melons easily, regardless of your experience level or garden size.
Why do you need these tricks? Because store-bought melons simply can’t compare to the taste and satisfaction of a homegrown masterpiece. Plus, knowing you nurtured that giant, delicious fruit yourself? Priceless! Get ready to unlock the secrets to melon-growing success and impress your friends and family with your impressive harvest. Let’s get started!
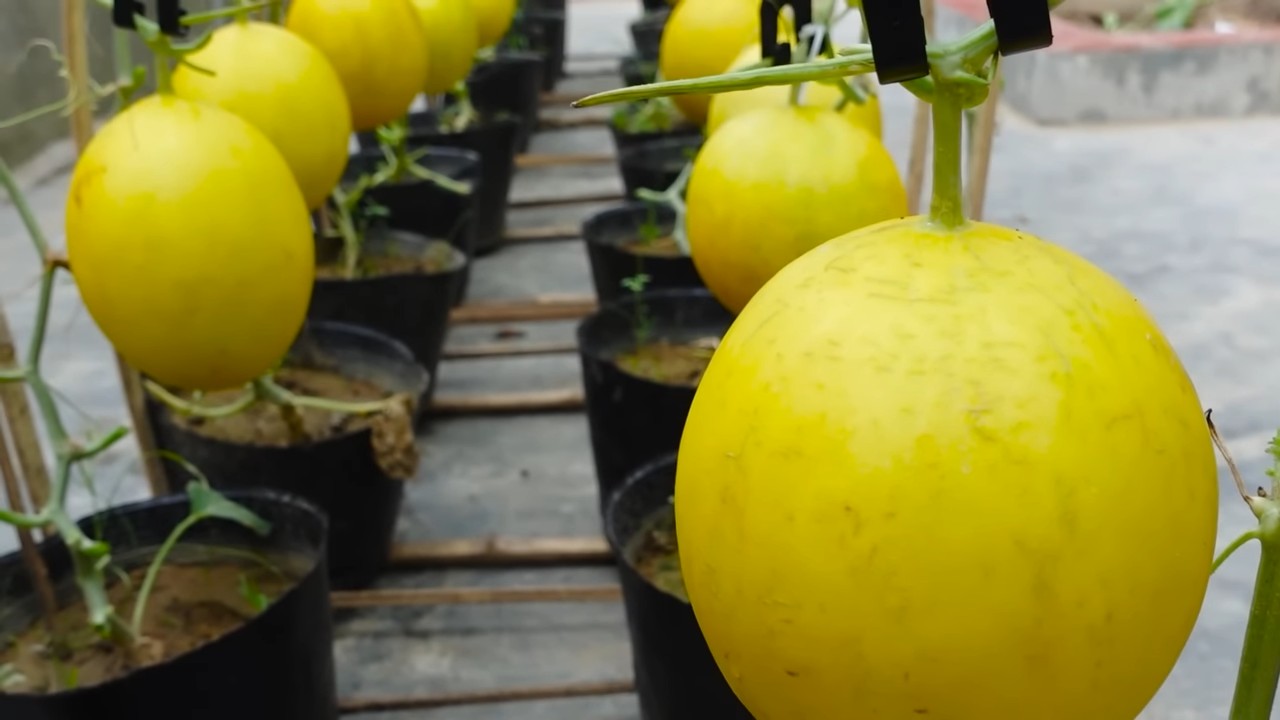
Growing Giant Melons: My Foolproof DIY Guide
Okay, so you want to grow melons that are the envy of the neighborhood? I get it! There’s something incredibly satisfying about harvesting a massive, juicy melon that you nurtured from a tiny seed. I’ve spent years experimenting, and I’m going to share my secrets for growing truly impressive melons. This isn’t just about getting *a* melon; it’s about getting a *giant* melon.
Choosing the Right Variety
First things first, not all melons are created equal. Some varieties are genetically predisposed to be larger than others. Here are a few of my favorites for size:
* **Watermelons:** ‘Carolina Cross’ (can reach over 200 lbs!), ‘Charleston Gray’ (classic, elongated shape, good for size), ‘Black Diamond’ (dark rind, sweet red flesh, gets quite large).
* **Cantaloupes:** ‘Honey Rock’ (smaller than watermelons, but can still get impressively large with proper care), ‘Athena’ (disease resistant and produces good-sized melons).
* **Honeydew:** ‘Honeycrisp’ (not just an apple! This honeydew is known for its sweetness and size).
Choosing the right variety is half the battle! Don’t expect a tiny ‘Sugar Baby’ watermelon to suddenly balloon to 100 pounds.
Preparing the Soil: The Foundation for Success
Melons are heavy feeders, meaning they need a lot of nutrients to grow big and strong. The soil preparation is absolutely crucial. I can’t stress this enough!
* **Sunlight:** Melons need at least 6-8 hours of direct sunlight per day. Choose a location that gets plenty of sun.
* **Soil Type:** Melons prefer well-drained, sandy loam soil. Heavy clay soil will need amending.
* **Soil pH:** Aim for a soil pH between 6.0 and 6.8. You can test your soil with a kit from your local garden center.
* **Nutrient Richness:** This is where the magic happens. Melons need a lot of nitrogen early on for leafy growth, then phosphorus and potassium for fruit development.
Step-by-Step Soil Preparation:
1. **Amend the Soil:** At least a month before planting, dig in plenty of organic matter. I like to use a combination of compost, well-rotted manure, and peat moss. This will improve drainage, aeration, and nutrient content. Aim for a depth of at least 12 inches.
2. **Add Fertilizer:** Incorporate a slow-release fertilizer specifically formulated for vegetables. Follow the instructions on the package. I also like to add bone meal (for phosphorus) and wood ash (for potassium).
3. **Create Mounds or Rows:** Melons do well when planted on slightly raised mounds or rows. This improves drainage and warms the soil faster. Make the mounds or rows about 12 inches high and 3-4 feet wide.
4. **Black Plastic Mulch (Optional but Recommended):** Laying down black plastic mulch over the prepared soil has several benefits. It warms the soil, suppresses weeds, and helps retain moisture. Secure the edges of the plastic with soil or rocks.
Starting Seeds Indoors (Recommended)
While you can direct sow melon seeds, starting them indoors gives you a head start and allows you to select the strongest seedlings.
* **Timing:** Start seeds about 4-6 weeks before the last expected frost in your area.
* **Containers:** Use peat pots or biodegradable containers. This will minimize root disturbance when transplanting.
* **Seed Starting Mix:** Use a high-quality seed starting mix.
* **Warmth:** Melons need warm temperatures to germinate. Use a heat mat to keep the soil temperature between 80-90°F (27-32°C).
* **Light:** Once the seeds germinate, provide plenty of light. A grow light is ideal, but a sunny windowsill can also work.
* **Watering:** Keep the soil consistently moist, but not soggy.
Step-by-Step Seed Starting:
1. **Sow Seeds:** Plant 2-3 seeds per pot, about ½ inch deep.
2. **Water Gently:** Water the soil gently to avoid disturbing the seeds.
3. **Cover with Plastic Wrap:** Cover the pots with plastic wrap to create a humid environment.
4. **Place on Heat Mat:** Place the pots on a heat mat in a warm location.
5. **Remove Plastic Wrap:** Once the seeds germinate, remove the plastic wrap.
6. **Thin Seedlings:** Once the seedlings have their first true leaves, thin them to one strong seedling per pot.
7. **Harden Off:** Before transplanting, gradually acclimate the seedlings to outdoor conditions. This process, called “hardening off,” involves exposing the seedlings to increasing amounts of sunlight and wind over a period of 7-10 days.
Transplanting Seedlings
Transplanting is a delicate process, so handle the seedlings with care.
* **Timing:** Transplant seedlings after the last expected frost and when the soil has warmed to at least 60°F (15°C).
* **Spacing:** Space watermelon plants 3-5 feet apart, cantaloupe and honeydew plants 2-3 feet apart.
* **Watering:** Water the seedlings thoroughly after transplanting.
Step-by-Step Transplanting:
1. **Dig Holes:** Dig holes slightly larger than the peat pots or biodegradable containers.
2. **Plant Seedlings:** Gently remove the seedlings from their containers and plant them in the holes. If using peat pots, make sure to tear off the top portion of the pot to prevent it from wicking moisture away from the roots.
3. **Water Thoroughly:** Water the seedlings thoroughly after planting.
4. **Mulch:** Apply a layer of mulch around the plants to help retain moisture and suppress weeds. Straw, wood chips, or shredded leaves work well.
Watering and Fertilizing: Keeping Your Melons Happy
Consistent watering and fertilization are essential for growing large melons.
* **Watering:** Melons need consistent moisture, especially during fruit development. Water deeply and regularly, especially during dry spells. Aim for at least 1 inch of water per week. Drip irrigation is ideal, as it delivers water directly to the roots and minimizes leaf wetness, which can lead to disease.
* **Fertilizing:** Continue to fertilize throughout the growing season. Use a balanced fertilizer (e.g., 10-10-10) early on, then switch to a fertilizer higher in phosphorus and potassium (e.g., 5-10-10) once the fruits start to develop. I also like to use liquid seaweed fertilizer every few weeks.
Watering and Fertilizing Schedule:
1. **Early Growth:** Water deeply and regularly. Fertilize with a balanced fertilizer every 2-3 weeks.
2. **Flowering:** Continue to water deeply and regularly. Switch to a fertilizer higher in phosphorus and potassium.
3. **Fruit Development:** Water deeply and regularly. Fertilize with a fertilizer higher in phosphorus and potassium every 2-3 weeks. Supplement with liquid seaweed fertilizer.
Pruning and Training: Focusing the Plant’s Energy
Pruning and training can help direct the plant’s energy into producing fewer, but larger, melons.
* **Pruning:** Remove any suckers (small shoots that grow from the base of the plant) to encourage the plant to focus its energy on the main vines.
* **Training:** Train the vines to grow in a specific direction. This can help prevent overcrowding and improve air circulation.
* **Fruit Thinning:** This is crucial for growing giant melons. Once the plant has set several fruits, select the one or two most promising fruits and remove the rest. This will allow the plant to focus all of its energy on growing those selected fruits.
Step-by-Step Pruning and Training:
1. **Remove Suckers:** Regularly remove any suckers that grow from the base of the plant.
2. **Train Vines:** Train the vines to grow in a specific direction. You can use stakes or trellises to support the vines.
3. **Fruit Thinning:** Once the plant has set several fruits, select the one or two most promising fruits and remove the rest. Choose fruits that are well-shaped and free from blemishes.
Protecting Your Melons: Pests and Diseases
Melons are susceptible to various pests and diseases. Here’s how to protect your crop:
* **Pests:** Common melon pests include aphids, squash bugs, vine borers, and cucumber beetles. Use insecticidal soap or neem oil to control aphids and squash bugs. Wrap the base of the stems with aluminum foil to deter vine borers. Handpick cucumber beetles or use row covers to protect young plants.
* **Diseases:** Common melon diseases include powdery mildew, downy mildew, and fusarium wilt. Choose disease-resistant varieties. Provide good air circulation. Avoid overhead watering. Use a fungicide if necessary.
Pest and
Conclusion
So, there you have it! Growing large melons doesn’t have to be a gamble with nature. By implementing this simple yet effective DIY trick, you’re essentially giving your melon plants a targeted boost, ensuring they receive the nutrients and support they need to reach their full, glorious potential. We’ve walked you through the process, highlighting the key steps and explaining the science behind why it works. This isn’t just about bigger melons; it’s about healthier plants, increased yields, and the immense satisfaction of harvesting a truly impressive fruit that you nurtured yourself.
Think of the possibilities! Imagine slicing into a perfectly ripe, juicy watermelon that you grew, knowing you played a direct role in its size and sweetness. Picture the envy of your neighbors as they admire your prize-winning cantaloupe. This DIY method empowers you to take control of your melon-growing journey and achieve results that might have seemed impossible before.
But don’t just take our word for it. We encourage you to try this DIY melon growing trick for yourself. Experiment with different melon varieties. Perhaps you want to try it on honeydew melons, or maybe even some of the more exotic varieties like Galia melons. The core principle remains the same: providing targeted support and nutrition to the developing fruit.
Consider variations on the theme. If you’re using a liquid fertilizer, you could adjust the concentration based on the specific needs of your melon variety. Some gardeners have even experimented with adding small amounts of Epsom salts to the fertilizer mix to provide an extra boost of magnesium, which is known to be beneficial for fruit development. Always research the specific needs of your chosen melon variety before making any significant changes to the feeding regimen.
Another variation to consider is the support system itself. While pantyhose works well, you could also use netting or even create a small sling out of burlap. The key is to provide adequate support without restricting the melon’s growth. Ensure the support system is strong enough to handle the weight of a large melon, especially as it nears maturity.
Remember to monitor your plants closely throughout the growing season. Look for signs of pests or diseases and take appropriate action to protect your investment. Regular watering and proper sunlight are also essential for healthy melon growth. This DIY trick is a powerful tool, but it’s just one piece of the puzzle.
We are confident that this DIY trick will significantly improve your melon-growing success. But the real magic happens when you share your experiences with others. We want to hear your stories! Did you notice a significant increase in melon size? Did you experiment with different variations? What challenges did you encounter, and how did you overcome them?
Share your photos, tips, and insights in the comments section below. Let’s create a community of melon-growing enthusiasts who are passionate about achieving exceptional results. Your feedback will not only help other gardeners but also contribute to our collective knowledge of this effective DIY method.
So, go ahead, give it a try! Unleash your inner melon grower and prepare to be amazed by the results. We can’t wait to hear about your success stories. Happy growing!
Frequently Asked Questions (FAQ)
What exactly is the DIY trick, and why does it work?
The DIY trick involves providing targeted support and nutrition to developing melons. Specifically, it entails using a support system, such as pantyhose or netting, to cradle the growing melon and prevent it from breaking off the vine due to its weight. It also involves strategically fertilizing the melon directly, rather than relying solely on the plant’s root system. This works because it ensures the melon receives a concentrated dose of nutrients precisely where it needs them most, promoting rapid growth and increased size. The support system also prevents the melon from touching the ground, reducing the risk of rot and pest infestations.
What type of fertilizer should I use for this DIY trick?
A balanced liquid fertilizer with an NPK ratio (Nitrogen, Phosphorus, Potassium) that is slightly higher in phosphorus and potassium is generally recommended. Phosphorus promotes root and fruit development, while potassium enhances fruit quality and sweetness. Look for a fertilizer specifically formulated for fruits and vegetables. Avoid using fertilizers that are excessively high in nitrogen, as this can promote leafy growth at the expense of fruit production. Organic options, such as compost tea or fish emulsion, can also be effective, but be sure to dilute them properly to avoid burning the plant. Always follow the manufacturer’s instructions for dilution rates.
How often should I fertilize the melon directly?
Fertilize the melon directly every 7-10 days, starting when the melon is about the size of a tennis ball. Avoid over-fertilizing, as this can lead to nutrient imbalances and potentially harm the plant. Observe the plant closely for any signs of nutrient deficiencies or toxicities, such as yellowing leaves or stunted growth. Adjust the frequency and concentration of fertilization accordingly. Remember, less is often more when it comes to fertilizer.
What if I don’t have pantyhose? What else can I use for support?
Pantyhose is a popular choice because it’s stretchy, breathable, and readily available. However, you can use other materials as well. Netting, burlap, or even old t-shirts can be repurposed to create a support sling. The key is to choose a material that is strong enough to support the weight of the melon and that won’t restrict its growth. Make sure the material is also breathable to prevent moisture buildup, which can lead to rot.
Will this DIY trick work for all types of melons?
This DIY trick can be beneficial for most types of melons, including watermelons, cantaloupes, honeydew melons, and Galia melons. However, the specific needs of each melon variety may vary. Research the specific requirements of your chosen melon variety to ensure you are providing the optimal growing conditions. Some melon varieties may be more susceptible to certain pests or diseases, so it’s important to be vigilant and take appropriate action to protect your plants.
What are some common mistakes to avoid when using this DIY trick?
One common mistake is over-fertilizing, which can lead to nutrient imbalances and harm the plant. Another mistake is using a support system that is too tight or restrictive, which can hinder the melon’s growth. It’s also important to choose a support system that is strong enough to handle the weight of the melon, especially as it nears maturity. Neglecting to monitor the plant for pests and diseases is another common mistake. Regular inspection and prompt action are essential for maintaining healthy plants and maximizing yields.
How do I know when my melon is ripe and ready to harvest?
Determining ripeness varies depending on the melon variety. For watermelons, look for a dull rind, a yellowish spot on the underside where it rested on the ground, and a hollow sound when you thump it. Cantaloupes are ripe when they slip easily from the vine with gentle pressure. Honeydew melons are ripe when they turn a creamy yellow color and have a slightly waxy feel. Research the specific indicators of ripeness for your chosen melon variety to ensure you harvest it at the peak of flavor.
Can I use this trick in a container garden?
Yes, this trick can be adapted for container gardening. Choose a large container that is at least 24 inches in diameter to provide ample space for the roots to grow. Use a high-quality potting mix that is well-draining. Provide a sturdy trellis or support system for the vines to climb. Water regularly and fertilize as needed. Be mindful that container-grown melons may require more frequent watering and fertilization than those grown in the ground.
What if my melon starts to rot while it’s still growing?
If you notice signs of rot, such as soft spots or discoloration, remove the affected area immediately. Improve air circulation around the melon by pruning away any excess foliage. Ensure the melon is not touching the ground. Consider applying a fungicide to prevent the spread of the rot. In severe cases, it may be necessary to remove the affected melon entirely to prevent the disease from spreading to other plants.
How can I protect my melons from pests and diseases?
Implement preventative measures, such as crop rotation, proper spacing, and good sanitation practices. Inspect your plants regularly for signs of pests or diseases. Use organic pest control methods, such as insecticidal soap or neem oil, to control common pests like aphids and squash bugs. Apply a fungicide to prevent fungal diseases like powdery mildew and downy mildew. Choose disease-resistant melon varieties whenever possible.

Leave a Comment