
Grow Leeks at Home? Absolutely! Imagine stepping into your backyard and harvesting fresh, flavorful leeks, ready to elevate your culinary creations. Forget those bland, overpriced leeks from the grocery store. This isn’t just about gardening; it’s about reclaiming control over your food and experiencing the pure joy of nurturing something from seed to table.
Leeks, a member of the onion family, have a rich history dating back to ancient Egypt, where they were revered for their medicinal properties and culinary versatility. The Romans, known for their sophisticated palates, spread the love of leeks throughout Europe. Today, they remain a staple in cuisines worldwide, adding a delicate oniony flavor to soups, stews, and countless other dishes.
But why should you learn to grow leeks at home? Well, for starters, homegrown leeks taste infinitely better! Plus, you’ll save money, reduce your carbon footprint, and gain a rewarding new hobby. Many people are intimidated by gardening, thinking it’s too complicated or time-consuming. But trust me, growing leeks is surprisingly easy, even for beginners. In this article, I’m going to share some simple, effective DIY tricks and hacks that will have you harvesting a bountiful crop of leeks in no time. Get ready to unleash your inner gardener and enjoy the delicious rewards!
Growing Leeks at Home: A Beginner’s Guide
Hey there, fellow gardening enthusiasts! Ever thought about growing your own leeks? They’re surprisingly easy to cultivate, and nothing beats the flavor of freshly harvested, homegrown leeks in your soups, stews, and gratins. I’m going to walk you through the whole process, from starting seeds to harvesting your delicious leeks. Let’s get started!
Choosing Your Leek Variety
First things first, let’s talk about leek varieties. There are a bunch to choose from, and the best one for you will depend on your climate and when you want to harvest. Here are a few popular options:
* ‘Musselburgh’: A classic, reliable variety known for its cold hardiness. Perfect for overwintering in milder climates.
* ‘Giant Musselburgh’: As the name suggests, this one grows big! Expect thick, substantial leeks.
* ‘Autumn Giant’: A good choice for autumn harvests. It matures relatively quickly.
* ‘Bandit’: A newer variety with good disease resistance and a mild flavor.
* ‘King Richard’: A very early variety, great if you want to harvest leeks in the summer.
I personally love ‘Musselburgh’ because it’s so dependable, but feel free to experiment and find your favorite!
Starting Leek Seeds Indoors (Recommended)
While you *can* sow leek seeds directly into the ground, I highly recommend starting them indoors. This gives them a head start and protects them from pests and harsh weather, especially if you live in a colder climate.
What You’ll Need:
* Leek seeds (of course!)
* Seed starting trays or small pots
* Seed starting mix (a fine, well-draining soil)
* Watering can or spray bottle
* Grow lights (optional, but highly recommended)
* A warm, bright location
Step-by-Step Instructions:
1. Sow the Seeds: Fill your seed starting trays or pots with seed starting mix. Gently press the soil down. Sow the leek seeds about ¼ inch deep and ½ inch apart. You can sow multiple seeds per cell or pot, and then thin them out later.
2. Water Gently: Water the soil gently using a watering can or spray bottle. You want to moisten the soil without disturbing the seeds.
3. Provide Warmth and Light: Leek seeds need warmth to germinate. Aim for a temperature of around 65-70°F (18-21°C). Place the trays or pots in a warm, bright location. If you don’t have a naturally sunny spot, use grow lights. I find that grow lights make a huge difference in the success of my seedlings.
4. Keep the Soil Moist: Keep the soil consistently moist, but not soggy. Check the soil daily and water as needed.
5. Thin the Seedlings (If Necessary): Once the seedlings have emerged and have a few true leaves (the leaves that look like miniature leek leaves), thin them out if you sowed multiple seeds per cell or pot. Choose the strongest seedling in each cell and snip off the others at the soil line. Don’t pull them out, as this can disturb the roots of the remaining seedling.
6. Harden Off the Seedlings: Before transplanting the seedlings outdoors, you need to “harden them off.” This means gradually exposing them to outdoor conditions over a period of about a week. Start by placing the trays or pots outdoors in a sheltered location for a few hours each day, gradually increasing the amount of time they spend outside. This will help them acclimate to the sun, wind, and temperature changes.
Preparing the Garden Bed
While your leek seedlings are growing indoors, it’s time to prepare the garden bed. Leeks need well-drained, fertile soil that’s rich in organic matter.
What You’ll Need:
* Garden fork or tiller
* Compost or well-rotted manure
* All-purpose fertilizer (optional)
* Rake
Step-by-Step Instructions:
1. Choose a Sunny Location: Leeks need at least 6 hours of sunlight per day. Choose a location in your garden that gets plenty of sun.
2. Prepare the Soil: Use a garden fork or tiller to loosen the soil to a depth of at least 12 inches. Remove any rocks, weeds, or debris.
3. Amend the Soil: Incorporate a generous amount of compost or well-rotted manure into the soil. This will improve drainage, fertility, and water retention. I usually add a few inches of compost to my garden beds.
4. Add Fertilizer (Optional): If your soil is particularly poor, you can add an all-purpose fertilizer according to the package directions.
5. Rake the Soil Smooth: Rake the soil smooth to create a level planting surface.
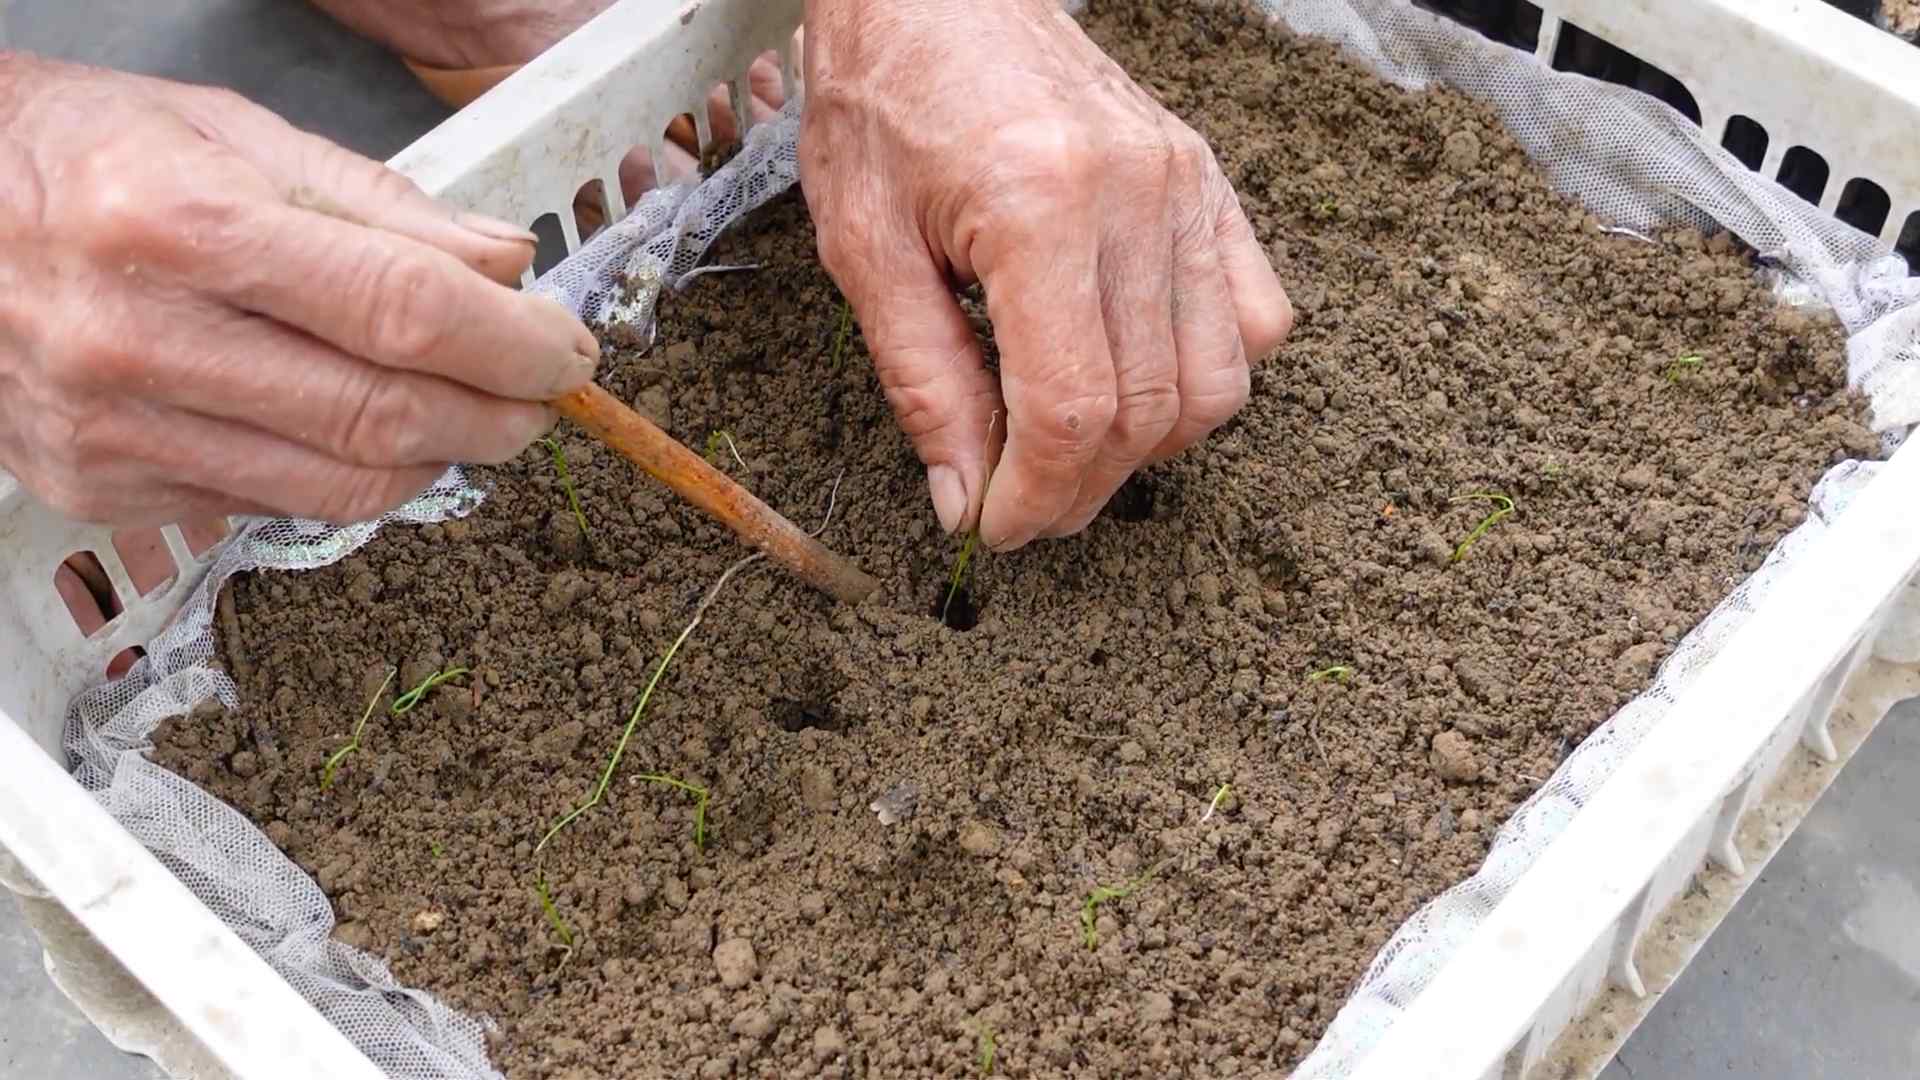
Transplanting Leek Seedlings Outdoors
Once your leek seedlings are about 6-8 inches tall and have been hardened off, they’re ready to be transplanted outdoors.
What You’ll Need:
* Leek seedlings
* Trowel or dibber
* Watering can
* Mulch (optional)
Step-by-Step Instructions:
1. Dig the Holes: Dig holes that are about 6 inches deep and 6 inches apart. You can plant leeks in rows that are about 12 inches apart.
2. Prepare the Seedlings: Gently remove the leek seedlings from their trays or pots. If the roots are tightly bound, gently loosen them with your fingers.
3. Plant the Seedlings: Place each seedling in a hole, making sure that the base of the plant is about 2 inches below the soil surface. This will encourage the development of a long, white shank (the edible part of the leek).
4. Backfill the Holes: Backfill the holes with soil, gently firming the soil around the seedlings.
5. Water Thoroughly: Water the seedlings thoroughly after planting.
6. Mulch (Optional): Apply a layer of mulch around the leeks to help retain moisture, suppress weeds, and regulate soil temperature. Straw, shredded leaves, or wood chips are all good options.
Caring for Your Leeks
Leeks are relatively low-maintenance plants, but they do need some care to thrive.
Watering: Water your leeks regularly, especially during dry periods. Aim to keep the soil consistently moist, but not soggy.
Weeding: Keep the garden bed free of weeds, as weeds can compete with leeks for nutrients and water.
Fertilizing: Leeks are heavy feeders, so they benefit from regular fertilization. You can side-dress them with compost or an all-purpose fertilizer every few weeks.
Hilling: To encourage the development of a longer, whiter shank, you can “hill” the leeks. This involves gradually mounding soil around the base of the plants as they grow. Start hilling when the leeks are about 8 inches tall, and continue to hill them every few weeks until the soil is about 6 inches high around the base of the plants.
Pest and Disease Control: Leeks are generally resistant to pests and diseases, but they can be susceptible to onion thrips and leek moth. Check your plants regularly for signs of infestation or disease, and take appropriate action if necessary. Insecticidal soap or neem oil can be effective for controlling onion thrips. Row covers can help prevent leek moth infestations.
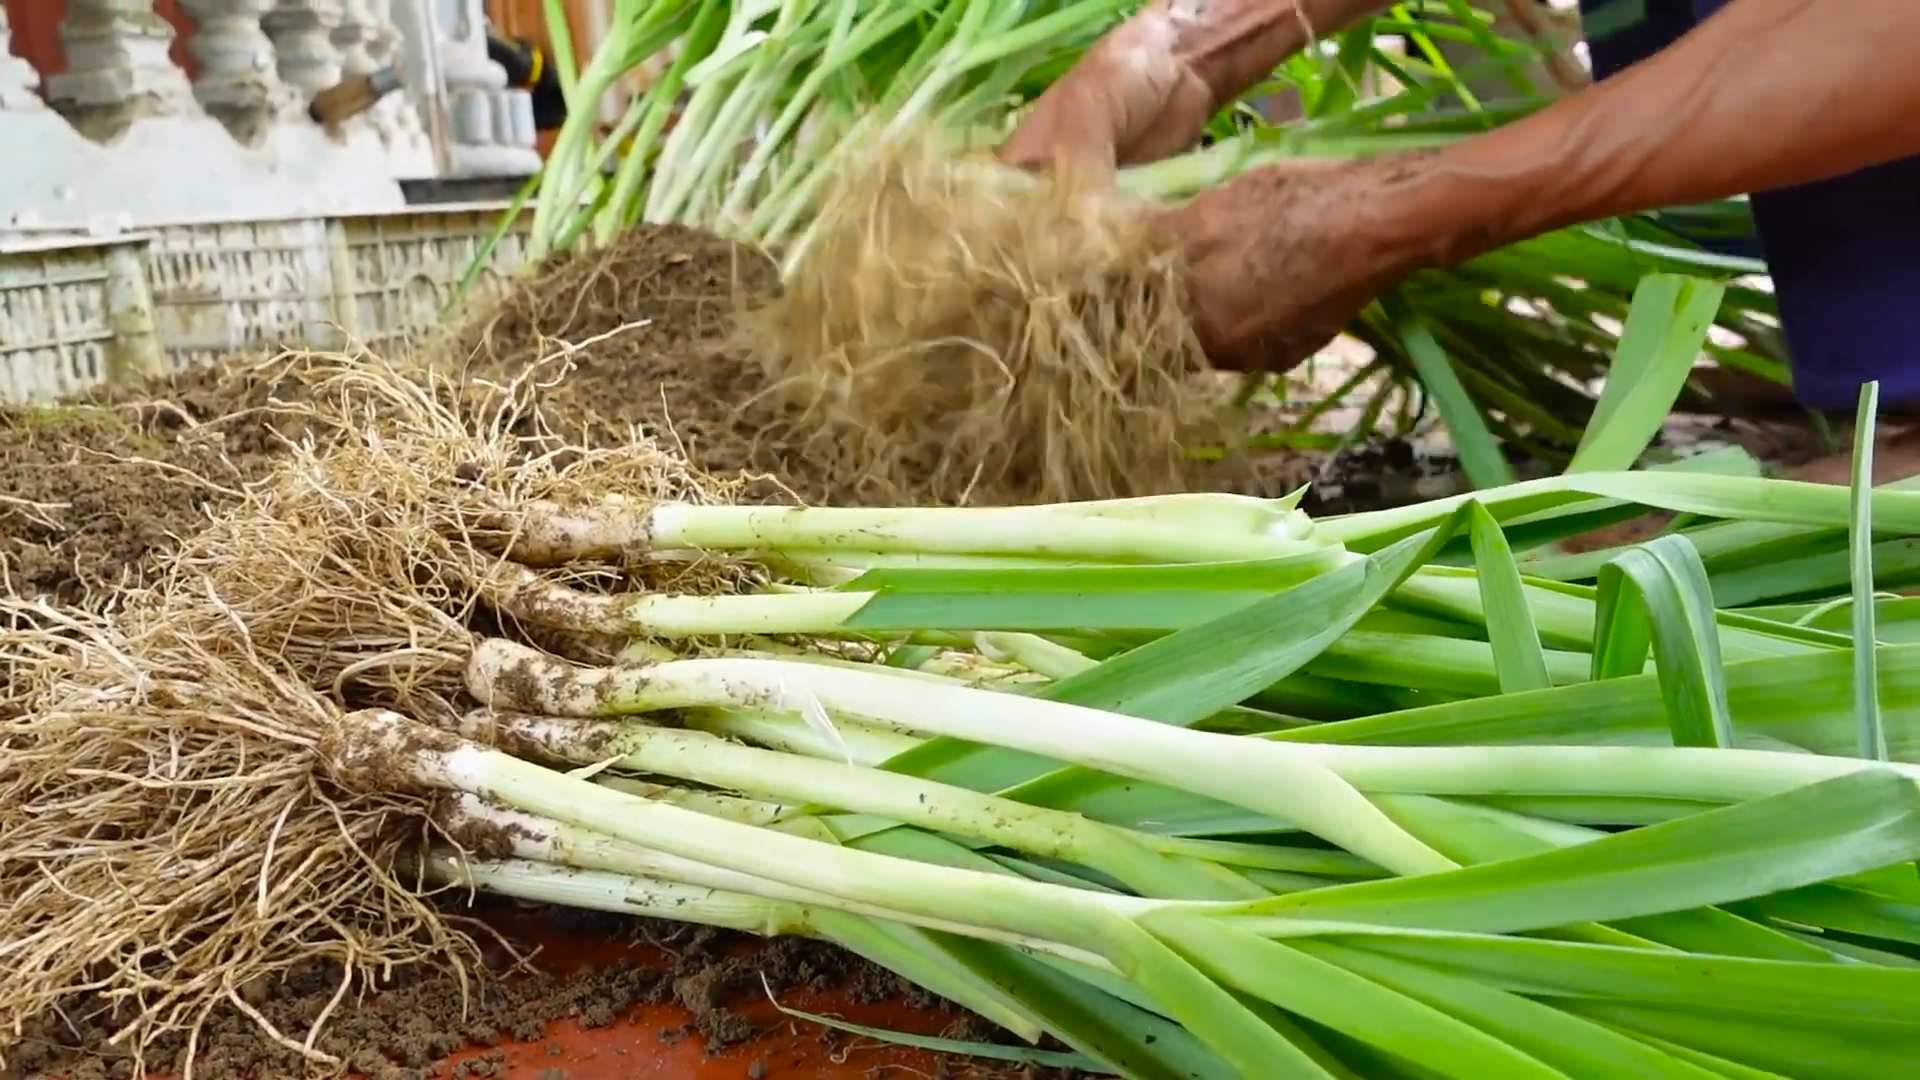
Harvesting Your Leeks
Leeks can be harvested at any size, but they’re usually ready to harvest when they’re about 1-2 inches in diameter. The time to harvest depends on the variety and when you planted them. Generally, you can start harvesting leeks about 100-120 days after sowing the seeds.
Step-by-Step Instructions:
1. Loosen the Soil: Use a garden fork or trowel to loosen the soil around the base of the leek.
2. Pull the Leek: Gently pull the leek out of the ground.
3. Clean the Leek: Remove any excess soil from the leek.
4. Trim the Roots and Leaves: Trim the roots and the top of the leaves.
5. Wash the Leek: Wash the leek thoroughly to remove any remaining soil.
Storing Your Leeks
Freshly harvested leeks can be stored in the refrigerator for up to 2 weeks. To store them, wrap them loosely in plastic wrap or place them in a plastic bag. You can also freeze leeks for longer storage. To freeze them, blanch them in boiling water for 2 minutes, then plunge them into ice water to stop the cooking process. Drain the leeks thoroughly and then freeze them in a single layer on a baking sheet. Once they’re frozen, transfer them to
Conclusion
So, there you have it! Growing leeks at home is not only achievable but also incredibly rewarding. From the satisfaction of nurturing a plant from seed to the unparalleled flavor of freshly harvested leeks in your favorite dishes, this DIY project is a game-changer for any home cook or gardening enthusiast. Forget those bland, often overpriced leeks from the supermarket. With a little patience and these simple steps, you can cultivate a continuous supply of these versatile vegetables right in your own backyard or even on your balcony.
What makes this DIY trick a must-try? It’s the combination of factors: the cost savings, the superior flavor, the control over growing conditions (ensuring organic, pesticide-free produce), and the sheer joy of connecting with nature. Imagine the pride you’ll feel when you serve a leek and potato soup made with leeks you grew yourself!
But the fun doesn’t stop there. Feel free to experiment with different varieties of leeks. ‘Giant Musselburgh’ is a classic choice known for its large size and mild flavor, while ‘Bandit’ offers a quicker growing time. You can also adjust the planting density to influence the size of the leeks – closer spacing will result in thinner leeks, while wider spacing allows them to bulk up.
Consider companion planting to further enhance your leek-growing experience. Carrots and onions are excellent companions, as they deter leek moths and onion flies, respectively. Marigolds can also help repel nematodes.
Don’t be afraid to get creative with your leek harvest. Beyond soups and stews, leeks are delicious grilled, sautéed, or even pickled. Try adding them to quiches, frittatas, or pasta dishes for a burst of flavor.
We wholeheartedly encourage you to embark on this DIY adventure and grow leeks at home. It’s a simple, sustainable, and satisfying way to elevate your culinary creations and connect with the natural world. Once you’ve tasted the difference between homegrown leeks and store-bought ones, you’ll never go back!
And most importantly, we want to hear about your experience! Share your tips, tricks, and triumphs in the comments below. Let us know which varieties you tried, what challenges you faced, and what delicious dishes you created with your homegrown leeks. Your feedback will not only inspire others but also help us refine and improve this guide for future gardeners. Happy growing!
Frequently Asked Questions (FAQ)
What is the best time of year to start growing leeks?
The timing depends on your climate. In colder regions with short growing seasons, it’s best to start leek seeds indoors 8-10 weeks before the last expected frost. This allows the seedlings to develop a strong root system before being transplanted outdoors. In milder climates, you can sow seeds directly into the garden in early spring or even late summer for a fall or winter harvest. For a continuous supply, consider succession planting, sowing seeds every few weeks.
How much sunlight do leeks need?
Leeks thrive in full sun, which means they need at least 6-8 hours of direct sunlight per day. If you’re growing them indoors, use grow lights to supplement natural sunlight, especially during the shorter days of winter. Insufficient sunlight can result in leggy, weak plants.
What kind of soil is best for growing leeks?
Leeks prefer well-drained, fertile soil that is rich in organic matter. Amend your soil with compost or well-rotted manure before planting to improve drainage and nutrient content. A slightly acidic to neutral soil pH (around 6.0 to 7.0) is ideal. Avoid heavy clay soils, as they can become waterlogged and hinder root development. If you have clay soil, consider growing leeks in raised beds or containers.
How often should I water leeks?
Leeks need consistent moisture, especially during their early growth stages. Water deeply and regularly, ensuring the soil remains consistently moist but not waterlogged. Avoid overhead watering, as this can increase the risk of fungal diseases. Mulching around the plants can help retain moisture and suppress weeds. During hot, dry weather, you may need to water more frequently.
How do I prevent leek rust?
Leek rust is a common fungal disease that can affect leeks. To prevent it, ensure good air circulation around the plants by spacing them adequately. Avoid overhead watering and remove any infected leaves promptly. Crop rotation can also help prevent the buildup of fungal spores in the soil. Some gardeners use copper-based fungicides as a preventative measure, but always follow the instructions on the product label carefully. Choosing rust-resistant varieties is also a good strategy.
When and how should I harvest leeks?
Leeks can be harvested at any size, depending on your preference. However, they are typically ready to harvest when they are about 1 inch in diameter and 6-8 inches long. To harvest, loosen the soil around the base of the leek with a garden fork and gently pull it out of the ground. You can also use a trowel to dig around the leek and lift it out. If you only need a few leeks, you can harvest them as needed, leaving the rest to continue growing.
Can I grow leeks in containers?
Yes, leeks can be successfully grown in containers. Choose a container that is at least 12 inches deep and wide to allow for adequate root development. Use a high-quality potting mix that is well-draining and rich in organic matter. Ensure the container has drainage holes to prevent waterlogging. Water regularly and fertilize every few weeks with a balanced liquid fertilizer.
How do I blanch leeks?
Blanching leeks produces a longer, whiter stem, which is considered more desirable by some. To blanch leeks, gradually mound soil around the stems as they grow, burying them up to the base of the leaves. You can also use cardboard tubes or plastic pipes to exclude light from the stems. Start blanching when the leeks are about 6 inches tall and continue until harvest.
What are some common pests that affect leeks?
Common pests that can affect leeks include leek moths, onion flies, and thrips. Leek moths lay their eggs on the leaves, and the larvae tunnel into the stems, causing damage. Onion flies lay their eggs at the base of the plants, and the maggots feed on the roots. Thrips are tiny insects that suck sap from the leaves, causing them to become distorted and discolored. Use insect netting to protect your leeks from these pests. You can also use organic insecticides, such as neem oil or insecticidal soap, to control infestations.
How do I store harvested leeks?
Freshly harvested leeks can be stored in the refrigerator for up to two weeks. Wrap them loosely in plastic wrap or place them in a plastic bag. You can also store them in a cool, dark place, such as a root cellar, for several months. To freeze leeks, blanch them for a few minutes, then cool them in ice water. Drain well and freeze in freezer bags or containers. Frozen leeks can be stored for up to a year.

Leave a Comment