
Grow Onions Easily, even if you think you have a brown thumb! Have you ever dreamed of snipping fresh, flavorful onions right from your own backyard? Imagine the taste of homemade salsa, bursting with the zest of homegrown goodness. Or perhaps a hearty stew, enriched by the subtle sweetness of freshly harvested onions. This isn’t just a culinary fantasy; it’s an achievable reality with a few simple tricks and DIY hacks.
Onions have a rich history, dating back thousands of years, with evidence suggesting their cultivation in ancient Egypt and beyond. They weren’t just a food source; they were also valued for their medicinal properties and even used in religious ceremonies. Today, the humble onion remains a staple in cuisines worldwide, adding depth and complexity to countless dishes.
But let’s face it, sometimes growing onions can feel a bit daunting. Maybe you’ve struggled with stunted growth, pest infestations, or simply haven’t known where to start. That’s where this DIY guide comes in! I’m here to share my favorite secrets and simple methods to help you grow onions easily and successfully, no matter your gardening experience. We’ll cover everything from choosing the right varieties to preparing your soil and protecting your precious plants. Get ready to unlock the secrets to a bountiful onion harvest and elevate your cooking with the freshest, most flavorful ingredients imaginable!
Grow Onions Easily: A Beginner’s Guide to Bountiful Bulbs
Hey there, fellow gardening enthusiasts! I’m so excited to share my tried-and-true method for growing onions – and trust me, it’s easier than you think! Forget those expensive grocery store onions; with a little patience and these simple steps, you’ll be harvesting your own delicious, homegrown onions in no time.
What You’ll Need: The Onion Grower’s Toolkit
Before we dive in, let’s gather our supplies. Here’s what you’ll need to get started:
* Onion Sets or Seeds: I personally prefer onion sets for beginners because they’re already partially grown, giving you a head start. You can find these at most garden centers. Seeds are a great option too, but require more patience and starting indoors. Choose your variety based on your climate and desired onion type (yellow, red, white, sweet, etc.).
* Well-Draining Soil: Onions need soil that drains well to prevent rot. Amend your garden soil with compost or other organic matter to improve drainage and fertility.
* Compost or Aged Manure: Onions are heavy feeders, so enriching the soil with compost or aged manure is crucial for healthy growth.
* Gardening Gloves: Protect your hands from dirt and potential irritants.
* Trowel or Small Shovel: For planting the onion sets or seedlings.
* Watering Can or Hose: For regular watering.
* Fertilizer (Optional): A balanced fertilizer can give your onions an extra boost, but it’s not always necessary if your soil is already rich in nutrients. Look for a fertilizer with a higher phosphorus content to encourage root development.
* Mulch (Optional): Mulch helps retain moisture, suppress weeds, and regulate soil temperature. Straw, shredded leaves, or wood chips work well.
* Row Covers (Optional): To protect young plants from pests and harsh weather.
Step-by-Step Guide to Planting Onion Sets
Okay, let’s get our hands dirty! This section focuses on planting onion sets, which is my recommended method for beginners.
1. Prepare the Soil: This is the most important step! Onions need loose, well-draining soil that’s rich in organic matter. Start by clearing the area of any weeds, rocks, or debris. Then, dig down about 12 inches and amend the soil with plenty of compost or aged manure. I usually aim for a ratio of about 1 part compost to 3 parts soil. Mix it in thoroughly to create a nice, fluffy bed for your onions.
2. Create Planting Rows: Use your trowel or shovel to create rows in your prepared soil. Space the rows about 12-18 inches apart. This will give your onions enough room to grow and allow for good air circulation.
3. Plant the Onion Sets: Now for the fun part! Take your onion sets and gently push them into the soil, pointy side up. Plant them about 1 inch deep, leaving about 4-6 inches between each set within the row. You want the top of the set to be just barely covered with soil. Don’t push them in too deep, or they might rot.
4. Water Thoroughly: After planting, give your onion sets a good watering. This will help settle the soil around the roots and get them off to a good start. Water deeply, making sure the soil is moist but not soggy.
5. Mulch (Optional): If you’re using mulch, now’s the time to apply it. Spread a layer of mulch around the onion plants, being careful not to cover the base of the stems. Mulch will help retain moisture, suppress weeds, and regulate soil temperature.
Step-by-Step Guide to Planting Onion Seeds
If you’re feeling adventurous, or prefer to start from seed, here’s how to do it:
1. Start Seeds Indoors (Recommended): Onion seeds need a long growing season, so starting them indoors 8-10 weeks before the last expected frost is ideal. Use seed starting trays or small pots filled with seed starting mix.
2. Sow the Seeds: Sow the seeds about ¼ inch deep and lightly cover them with soil. Gently water the soil to moisten it.
3. Provide Light and Warmth: Place the seed trays in a warm location (around 70-75°F) and provide plenty of light. A sunny windowsill or grow lights work well. Keep the soil consistently moist, but not soggy.
4. Harden Off Seedlings: Once the seedlings are a few inches tall and the weather outside is consistently warm, it’s time to “harden them off.” This means gradually exposing them to outdoor conditions to acclimate them to the sun, wind, and temperature changes. Start by placing them outside for a few hours each day, gradually increasing the time over a week or two.
5. Prepare the Soil (Same as Onion Sets): Follow the same soil preparation steps as outlined for onion sets. Onions need loose, well-draining soil that’s rich in organic matter.
6. Transplant Seedlings: Once the seedlings are hardened off and the soil is prepared, it’s time to transplant them into the garden. Gently remove the seedlings from their trays or pots and plant them about 1 inch deep, spacing them 4-6 inches apart within the row. Rows should be 12-18 inches apart.
7. Water Thoroughly: After transplanting, water the seedlings thoroughly to help them establish their roots.
8. Mulch (Optional): Apply mulch around the seedlings to retain moisture, suppress weeds, and regulate soil temperature.
Caring for Your Onions: The Key to a Successful Harvest
Now that your onions are planted, it’s time to focus on their care. Here’s what you need to do to keep them happy and healthy:
* Watering: Onions need consistent moisture, especially during bulb formation. Water deeply whenever the top inch of soil feels dry. Avoid overwatering, as this can lead to rot.
* Weeding: Keep the area around your onions free of weeds. Weeds compete with onions for nutrients and water, so regular weeding is essential.
* Fertilizing (Optional): If your soil is lacking in nutrients, you can fertilize your onions every few weeks with a balanced fertilizer. Follow the instructions on the fertilizer package. I like to use a liquid fertilizer diluted in water for easy application.
* Pest Control: Keep an eye out for common onion pests like onion maggots and thrips. If you notice any signs of infestation, take action immediately. Insecticidal soap or neem oil can be effective treatments. Row covers can also help prevent pest problems.
* Bolting: Sometimes, onions will “bolt,” which means they send up a flower stalk. This is usually caused by stress, such as extreme temperature fluctuations. If your onions bolt, it’s best to harvest them immediately, as the bulb will become tough and less flavorful.
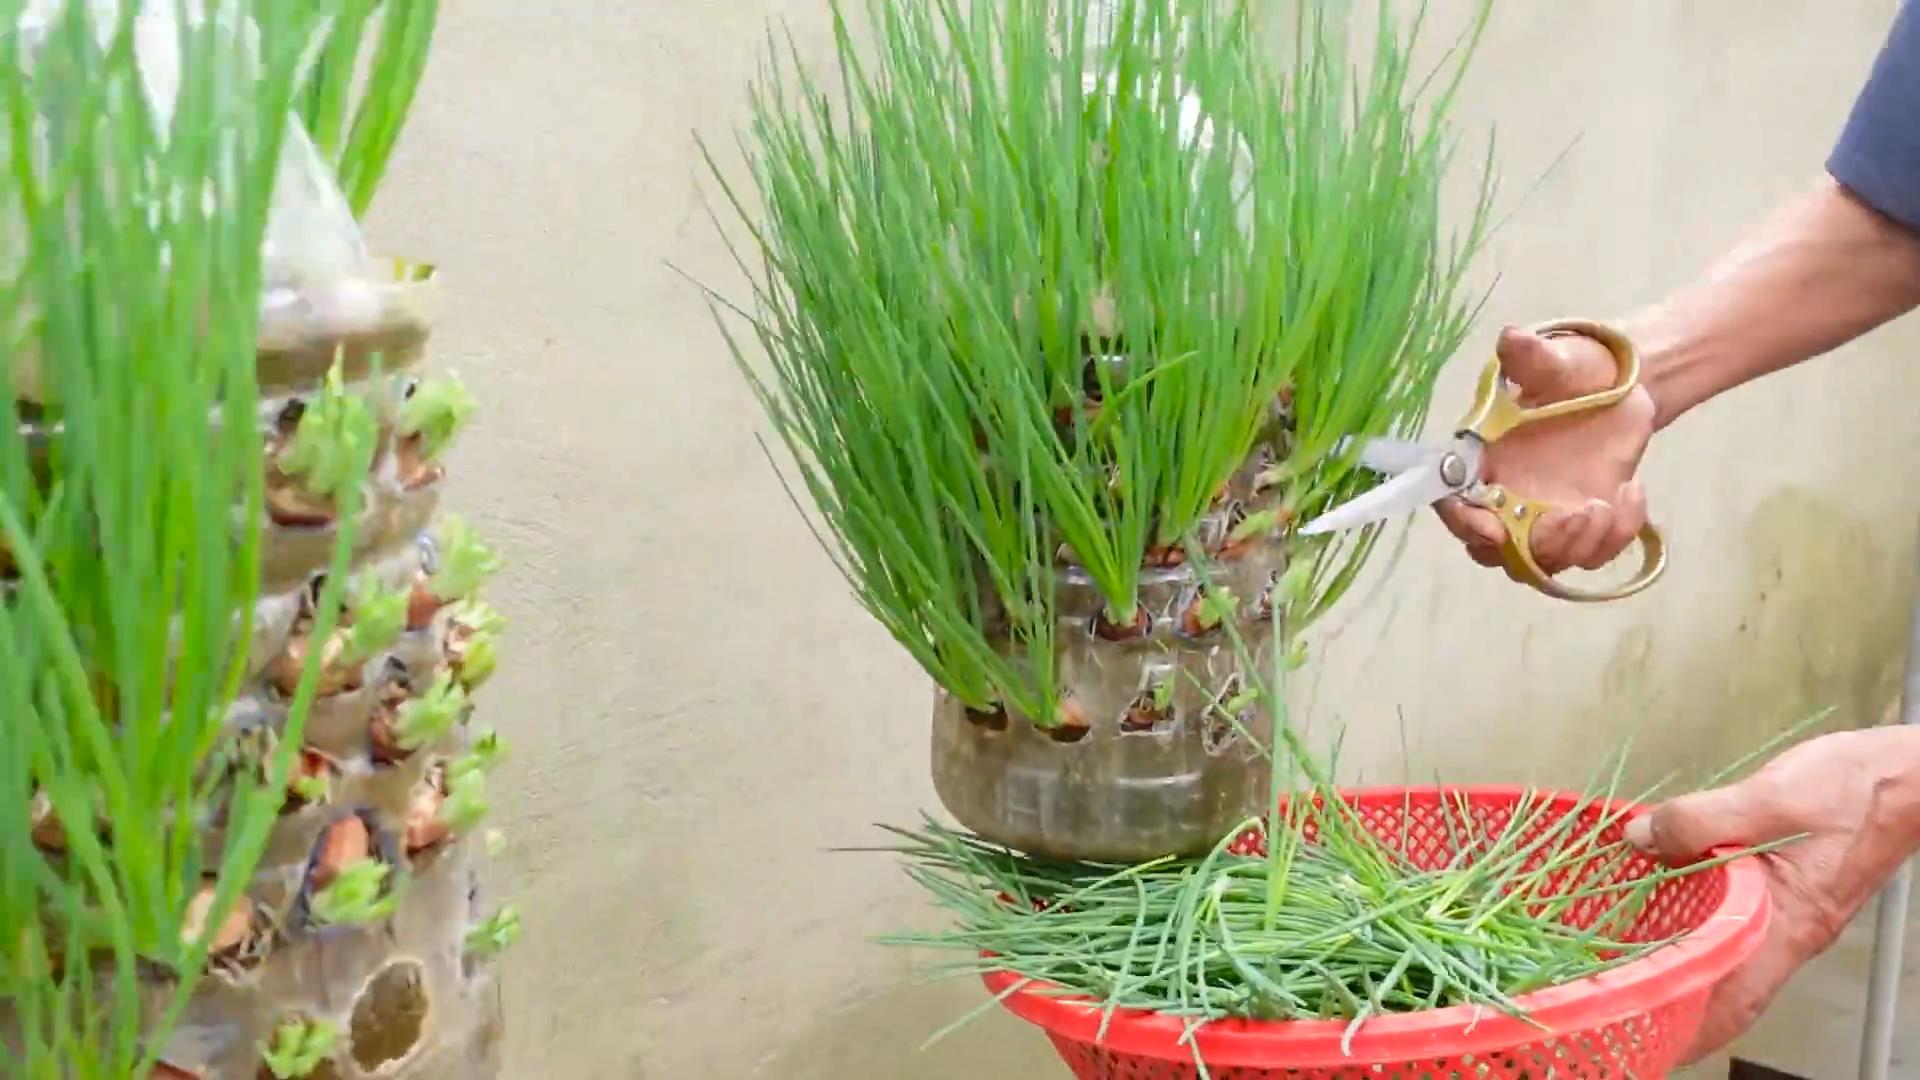
Harvesting Your Onions: The Sweet Reward
After months of care and patience, it’s finally time to harvest your onions! Here’s how to know when they’re ready:
* The Tops Fall Over: This is the most obvious sign that your onions are ready to harvest. When the tops of the plants start to turn yellow and fall over, it’s time to get your trowel ready.
* Bulbs are Large and Firm: The bulbs should be large and firm to the touch. Gently dig around the base of the plant to check the size of the bulb.
* Harvest on a Dry Day: It’s best to harvest your onions on a dry day to prevent rot.
To harvest, gently loosen the soil around the onion with a trowel or shovel. Then, carefully pull the onion out of the ground, being careful not to damage the bulb.
Curing and Storing Your Onions: Preserving Your Harvest
After harvesting, you’ll need to cure your onions to help them store properly. Here’s how:
1. Dry the Onions: Spread the onions out in a single layer in a well-ventilated area, such as a garage or shed. Allow them to dry for 2-3 weeks, or until the necks are completely dry and the outer skins are papery.
2. Trim the Roots and Tops: Once the onions are cured, trim the roots and tops, leaving about 1-2 inches of the neck.
3. Store in a Cool, Dry Place: Store the cured onions in a cool, dry, and well-ventilated place, such as a pantry or basement. You can store them in mesh bags or crates. Avoid storing them in plastic bags, as this can trap moisture and lead to rot.
With proper curing and storage, your homegrown onions can last for several months!
Troubleshooting: Common Onion Growing Problems
Even with the best care, you might encounter some problems while growing onions.
Conclusion
So, there you have it! Growing onions easily at home, without the fuss and expense of traditional methods, is entirely within your reach. This simple DIY trick, using readily available materials and minimal effort, unlocks a world of fresh, flavorful onions right at your fingertips. Forget complicated gardening setups or endless trips to the grocery store – this method is all about simplicity, sustainability, and delicious results.
Why is this a must-try? Because it’s efficient, cost-effective, and incredibly rewarding. Imagine the satisfaction of harvesting your own onions, knowing exactly where they came from and how they were grown. Think of the money you’ll save by reducing your reliance on store-bought produce. And consider the environmental impact of reducing transportation and packaging waste. This isn’t just about growing onions; it’s about embracing a more sustainable and self-sufficient lifestyle.
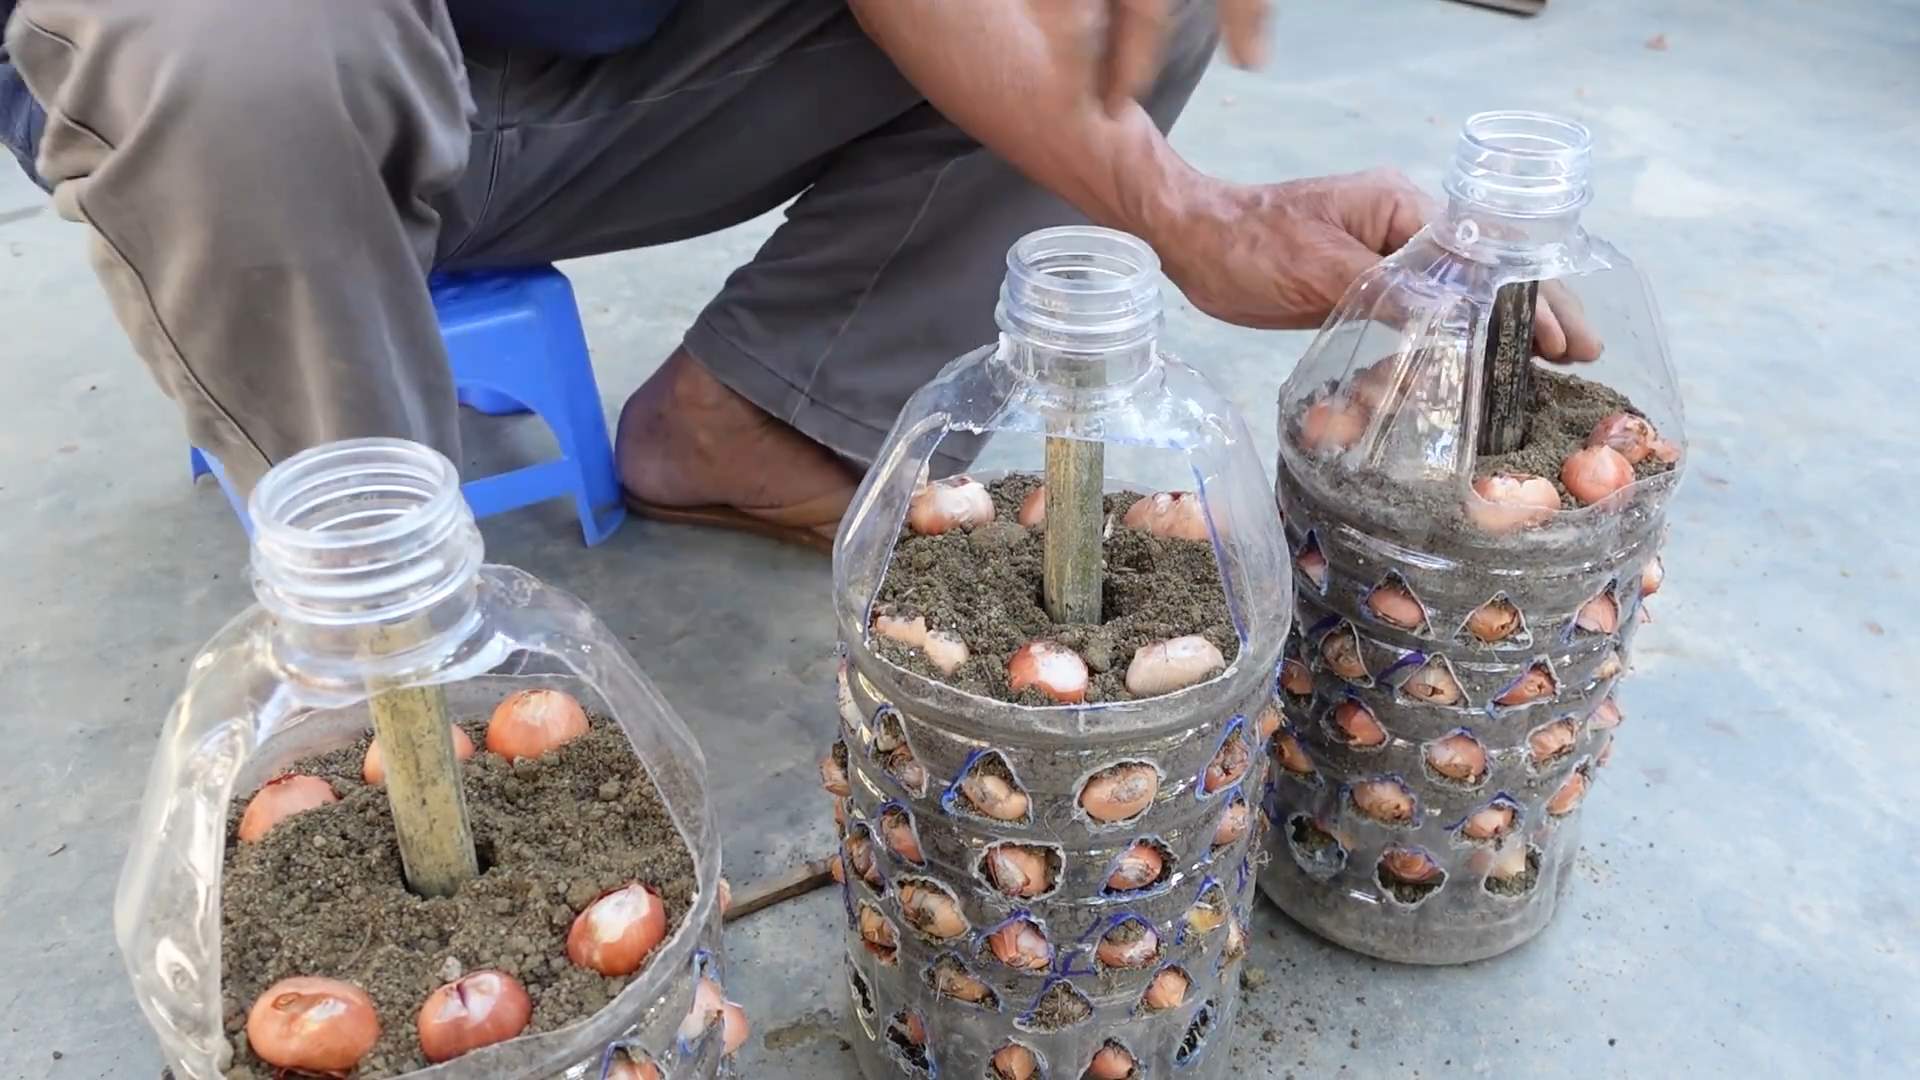
But the beauty of this DIY onion-growing trick lies in its adaptability. Feel free to experiment with different varieties of onions to discover your favorites. Try using different containers, from repurposed plastic bottles to old yogurt containers, to find what works best for your space. You can even add companion plants, like carrots or chamomile, to your onion patch to deter pests and enhance growth.
Don’t be afraid to get creative and personalize your onion-growing experience!
And the best part? This method is incredibly forgiving. Even if you’re a complete beginner, you can achieve success with a little patience and attention. The key is to provide your onions with adequate sunlight, water, and well-draining soil. Monitor their growth, adjust your watering schedule as needed, and celebrate the small victories along the way.
We’ve shown you how to grow onions easily, now it’s your turn to put this knowledge into practice. Gather your supplies, follow the steps outlined in this article, and embark on your own onion-growing adventure. We’re confident that you’ll be amazed by the results.
But don’t just take our word for it. Try it for yourself and see the difference! We encourage you to share your experiences, tips, and photos with us in the comments below. Let’s create a community of home gardeners who are passionate about growing their own food and sharing their knowledge with others. Together, we can make a difference, one onion at a time.
So, what are you waiting for? Get started today and experience the joy of growing your own delicious, homegrown onions!
Frequently Asked Questions (FAQ)
What kind of onions work best with this DIY method?
While you can technically grow any type of onion using this method, some varieties tend to be more successful than others, especially for beginners. Green onions (scallions) are incredibly easy and fast-growing, making them a great starting point. Shallots also perform well and offer a milder flavor. For bulb onions, consider varieties like ‘Walla Walla Sweet’ or ‘Red Burgundy,’ which are known for their adaptability and relatively short growing season. Experimenting with different varieties is part of the fun, so don’t be afraid to try others and see what thrives in your specific climate and growing conditions. Remember to choose varieties that are well-suited to your local climate for the best results.
How much sunlight do my onions need?
Onions are sun-loving plants and require at least 6-8 hours of direct sunlight per day to thrive. Insufficient sunlight can lead to stunted growth, weak bulbs, and a higher susceptibility to pests and diseases. If you’re growing your onions indoors or in a partially shaded area, consider supplementing with grow lights to ensure they receive adequate light. Position your containers in the sunniest spot in your home or garden, and rotate them regularly to ensure even exposure to sunlight on all sides. Observe your plants closely and adjust their location as needed to maximize their access to sunlight.
How often should I water my onions?
Maintaining consistent moisture is crucial for healthy onion growth, but overwatering can be just as detrimental as underwatering. The ideal watering schedule will depend on factors such as your climate, soil type, and the size of your containers. As a general rule, water your onions deeply whenever the top inch of soil feels dry to the touch. Avoid letting the soil dry out completely, but also be careful not to saturate it, as this can lead to root rot. During hot, dry weather, you may need to water more frequently, while during cooler, wetter periods, you can reduce the frequency. Monitor the moisture level of the soil regularly and adjust your watering schedule accordingly.
What kind of soil should I use for growing onions?
Onions prefer well-draining, fertile soil that is rich in organic matter. A good potting mix specifically formulated for vegetables is an excellent choice. You can also amend your existing garden soil with compost, aged manure, or other organic materials to improve its drainage, fertility, and water-holding capacity. Avoid using heavy clay soils, as they tend to retain too much moisture and can suffocate the roots. Before planting, loosen the soil thoroughly and remove any rocks or debris that could impede root growth. A slightly acidic to neutral soil pH (around 6.0 to 7.0) is ideal for onions.
Can I grow onions indoors using this method?
Yes, you can absolutely grow onions indoors using this DIY method, especially green onions. However, it’s important to provide them with adequate sunlight or supplemental grow lights to ensure they thrive. Choose a sunny windowsill or a location where they can receive at least 6-8 hours of direct light per day. You may also need to adjust your watering schedule, as indoor environments tend to be drier than outdoor ones. Consider using a well-draining potting mix and containers with drainage holes to prevent overwatering. With a little care and attention, you can enjoy fresh, homegrown onions even if you don’t have a garden.
How long does it take to grow onions using this method?
The time it takes to grow onions will vary depending on the variety, growing conditions, and your desired size. Green onions can be harvested in as little as 3-4 weeks, while bulb onions may take several months to mature. Be patient and monitor your plants regularly. You’ll know your onions are ready to harvest when the tops begin to turn yellow and fall over. At this point, you can gently pull them from the soil and allow them to cure in a warm, dry place for a few days before storing them.
What are some common problems I might encounter when growing onions, and how can I fix them?
Some common problems that can affect onions include pests like onion maggots and thrips, diseases like downy mildew and onion rot, and nutrient deficiencies. To prevent these problems, choose disease-resistant varieties, practice crop rotation, and maintain good soil drainage. Regularly inspect your plants for signs of pests or diseases and take action promptly if you notice any problems. Organic pest control methods, such as insecticidal soap or neem oil, can be effective for controlling many common pests. Ensure your onions receive adequate nutrients by fertilizing them regularly with a balanced fertilizer.
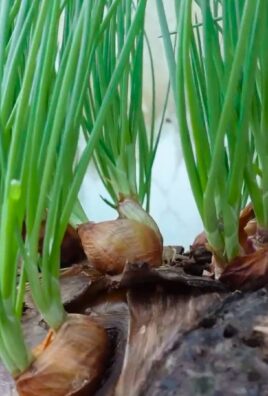
Can I use onion scraps to regrow new onions?
Yes! This is a fantastic way to reduce waste and get even more out of your onions. You can regrow onions from the base of the onion (the part with the roots) by placing it in water until roots develop, then planting it in soil. You can also use onion tops (the green part) to regrow green onions. Simply place the cut end of the green onion in water, and it will start to regrow. Once it has grown a few inches, you can plant it in soil. This is a great way to have a continuous supply of fresh green onions.
Leave a Comment