
Grow Peanuts Foam Box: Ever dreamt of harvesting your own crunchy, delicious peanuts right from your backyard, or even your balcony? I know I have! It sounds like a lot of work, right? Well, what if I told you there’s a super simple, space-saving, and surprisingly effective way to do it using something you probably already have lying around – a foam box!
Growing peanuts has a rich history, dating back thousands of years in South America. They weren’t just a snack; they were a vital source of protein and oil. Now, you can tap into that agricultural heritage, even in a small space. Forget sprawling fields; we’re bringing peanut farming to the urban jungle!
Why this DIY trick? Because let’s face it, traditional gardening can be intimidating. Soil quality, pests, space limitations – it all adds up. But this method simplifies everything. Using a foam box to grow peanuts offers excellent drainage, temperature control, and portability. Plus, it’s a fantastic way to recycle and reduce waste. Imagine the satisfaction of cracking open your own homegrown peanuts, knowing you nurtured them from seed to snack, all within the confines of a repurposed foam box. Let’s get started and unlock the secrets to a bountiful peanut harvest!
Growing Peanuts in a Foam Box: A DIY Guide
Hey there, fellow gardening enthusiasts! Ever thought about growing your own peanuts? It’s surprisingly easy and rewarding, and you don’t even need a huge garden. I’m going to walk you through how to grow peanuts in a foam box – a perfect solution for small spaces or if you just want to try something a little different. Trust me, there’s nothing quite like harvesting your own homegrown peanuts!
Choosing the Right Foam Box and Preparing It
First things first, we need to get our container ready. The foam box is key to this project.
* Size Matters: You’ll need a foam box that’s at least 12 inches deep and wide. Peanuts need room to spread their roots and develop those delicious pods. A box around 18 inches deep and 24 inches wide is ideal for a good yield.
* Drainage is Crucial: Peanuts don’t like soggy feet, so drainage is super important.
* Insulation Benefits: Foam boxes provide excellent insulation, which can help regulate soil temperature, especially in areas with fluctuating weather.
Step-by-Step: Preparing Your Foam Box
1. Find Your Foam Box: Check with local grocery stores, pharmacies, or even fish markets. They often have foam boxes they’re willing to give away. Just make sure it’s clean and free of any lingering odors.
2. Drill Drainage Holes: This is the most important step! Using a drill with a ½-inch drill bit, create at least 6-8 drainage holes evenly spaced across the bottom of the box. More is better than not enough.
3. Line the Bottom (Optional): While not strictly necessary, lining the bottom of the box with landscape fabric can help prevent soil from washing out through the drainage holes. Cut a piece of fabric slightly larger than the bottom of the box and place it inside.
4. Clean the Box: Give the inside of the box a good wipe down with a damp cloth to remove any dirt or debris.
Selecting Peanut Seeds and Starting Them
Now for the fun part – choosing your peanut seeds!
* Seed Selection: You can use raw, unsalted peanuts from the grocery store, but I’ve had the best luck with seeds specifically sold for planting. These are usually treated to prevent disease and have a higher germination rate. Look for varieties like ‘Virginia,’ ‘Spanish,’ or ‘Valencia.’
* Starting Indoors (Optional): Starting your peanut seeds indoors can give them a head start, especially if you live in a cooler climate.
Step-by-Step: Starting Peanut Seeds
1. Soak the Seeds: Place your peanut seeds in a bowl of lukewarm water and let them soak for 24 hours. This helps soften the shells and encourages germination.
2. Prepare Seed Trays: Fill seed trays or small pots with a good quality seed-starting mix.
3. Plant the Seeds: Plant each peanut seed about 1 inch deep in the soil.
4. Water Gently: Water the soil gently, making sure it’s moist but not waterlogged.
5. Provide Warmth and Light: Place the seed trays in a warm location with plenty of sunlight or under grow lights.
6. Wait for Germination: Peanut seeds typically germinate in 7-10 days. Keep the soil consistently moist during this time.
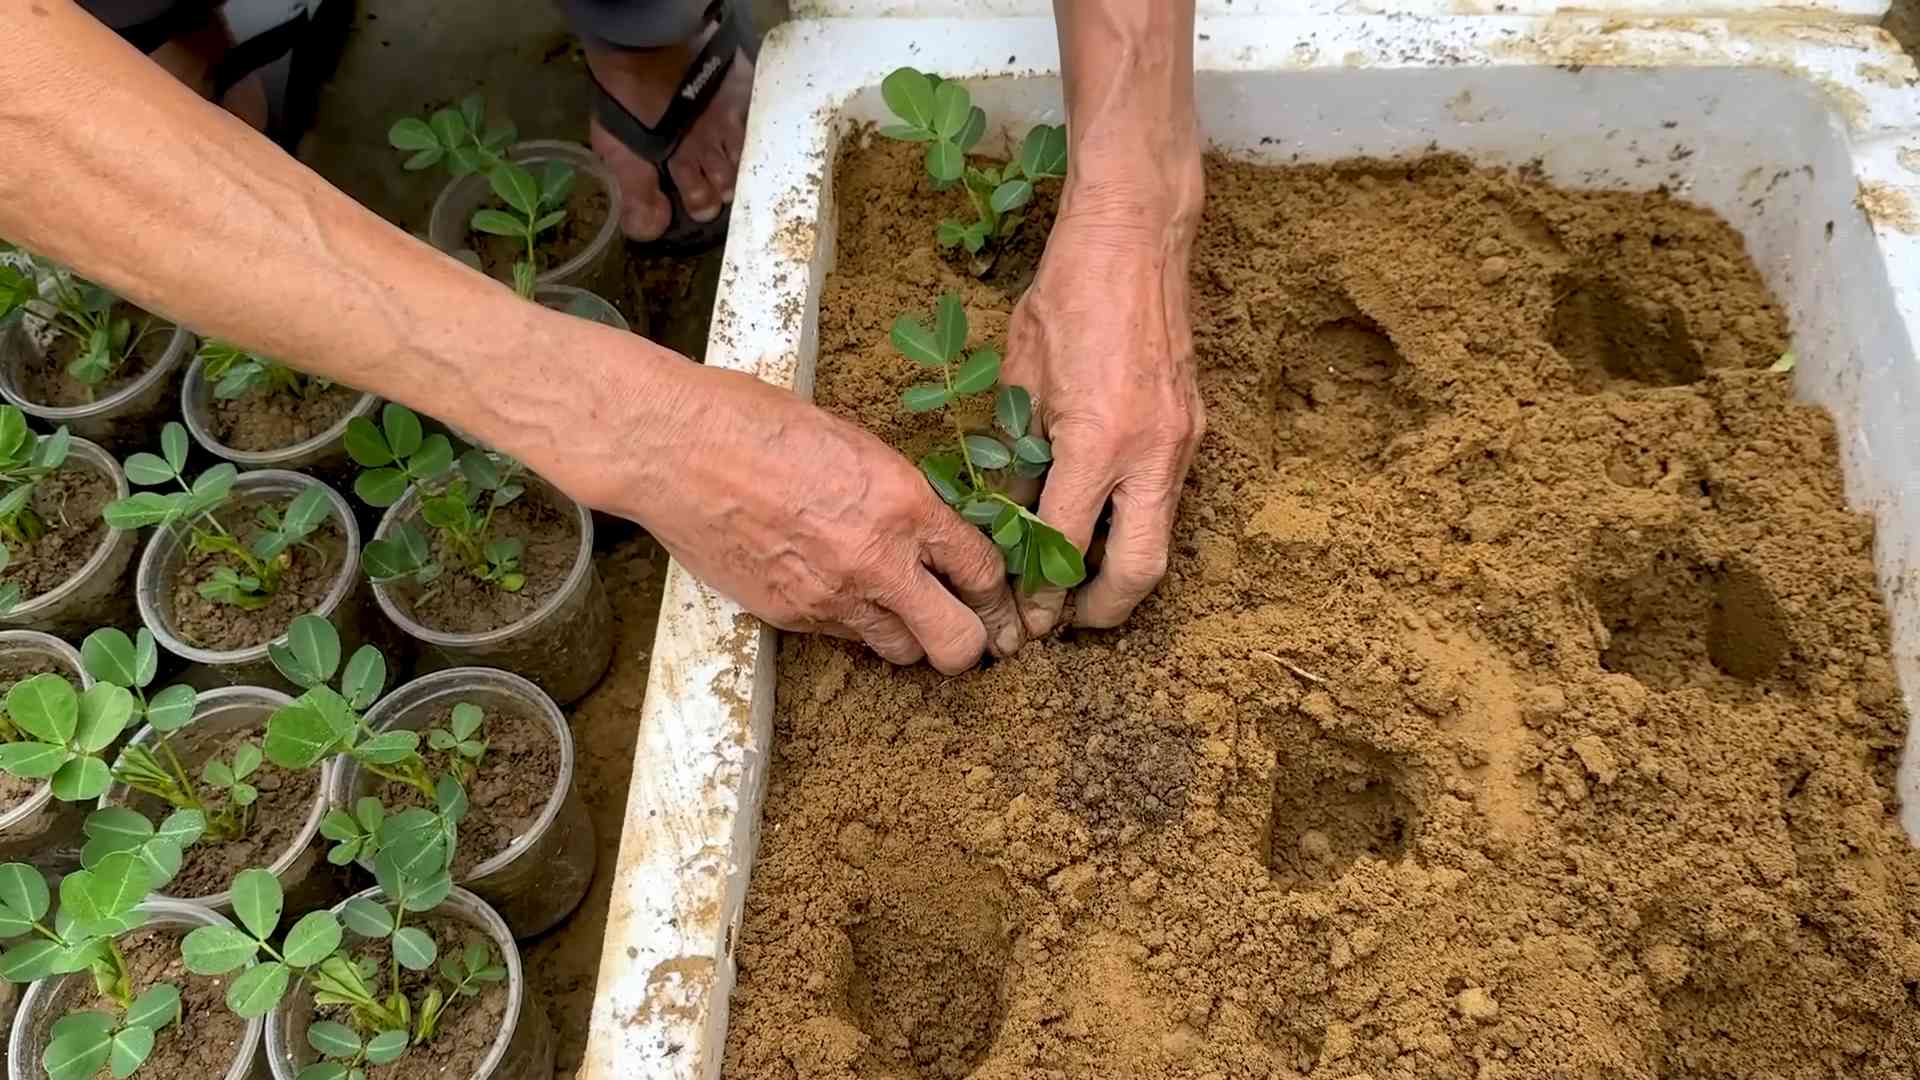
Planting and Caring for Your Peanut Plants
Once your peanut seedlings have sprouted and have a few sets of leaves, it’s time to transplant them into your foam box.
* Timing is Key: Wait until the danger of frost has passed and the soil has warmed up before transplanting. Peanuts are warm-weather plants and don’t tolerate cold temperatures.
* Soil Preparation: Peanuts prefer well-draining, sandy loam soil.
Step-by-Step: Planting and Caring for Peanuts
1. Prepare the Soil: Fill your foam box with a mixture of potting soil, compost, and sand. This will provide good drainage and nutrients for your peanut plants. I usually go for a 60% potting soil, 20% compost, and 20% sand mix.
2. Transplant Seedlings: Gently remove the peanut seedlings from their seed trays or pots, being careful not to damage the roots. Plant them about 6-8 inches apart in the foam box.
3. Water Thoroughly: Water the newly transplanted seedlings thoroughly.
4. Sunlight is Essential: Place the foam box in a location that receives at least 6-8 hours of direct sunlight per day.
5. Watering Regularly: Water your peanut plants regularly, especially during dry spells. The soil should be consistently moist but not waterlogged.
6. Fertilizing (Optional): You can fertilize your peanut plants every few weeks with a balanced fertilizer. Follow the instructions on the fertilizer package. I like to use a liquid seaweed fertilizer diluted to half strength.
7. Hilling the Plants: As your peanut plants grow, you’ll notice small, peg-like structures forming at the base of the plant. These pegs are what will eventually develop into peanut pods. To encourage pod development, gently hill the soil around the base of the plants, covering the pegs. This helps protect them and provides a dark, moist environment for them to grow.
8. Weed Control: Keep the area around your peanut plants free of weeds. Weeds can compete with your peanut plants for nutrients and water.
9. Watch for Pests and Diseases: Keep an eye out for any signs of pests or diseases. Common peanut pests include aphids and spider mites. Diseases can include leaf spot and root rot. Treat any problems promptly with appropriate organic pesticides or fungicides.
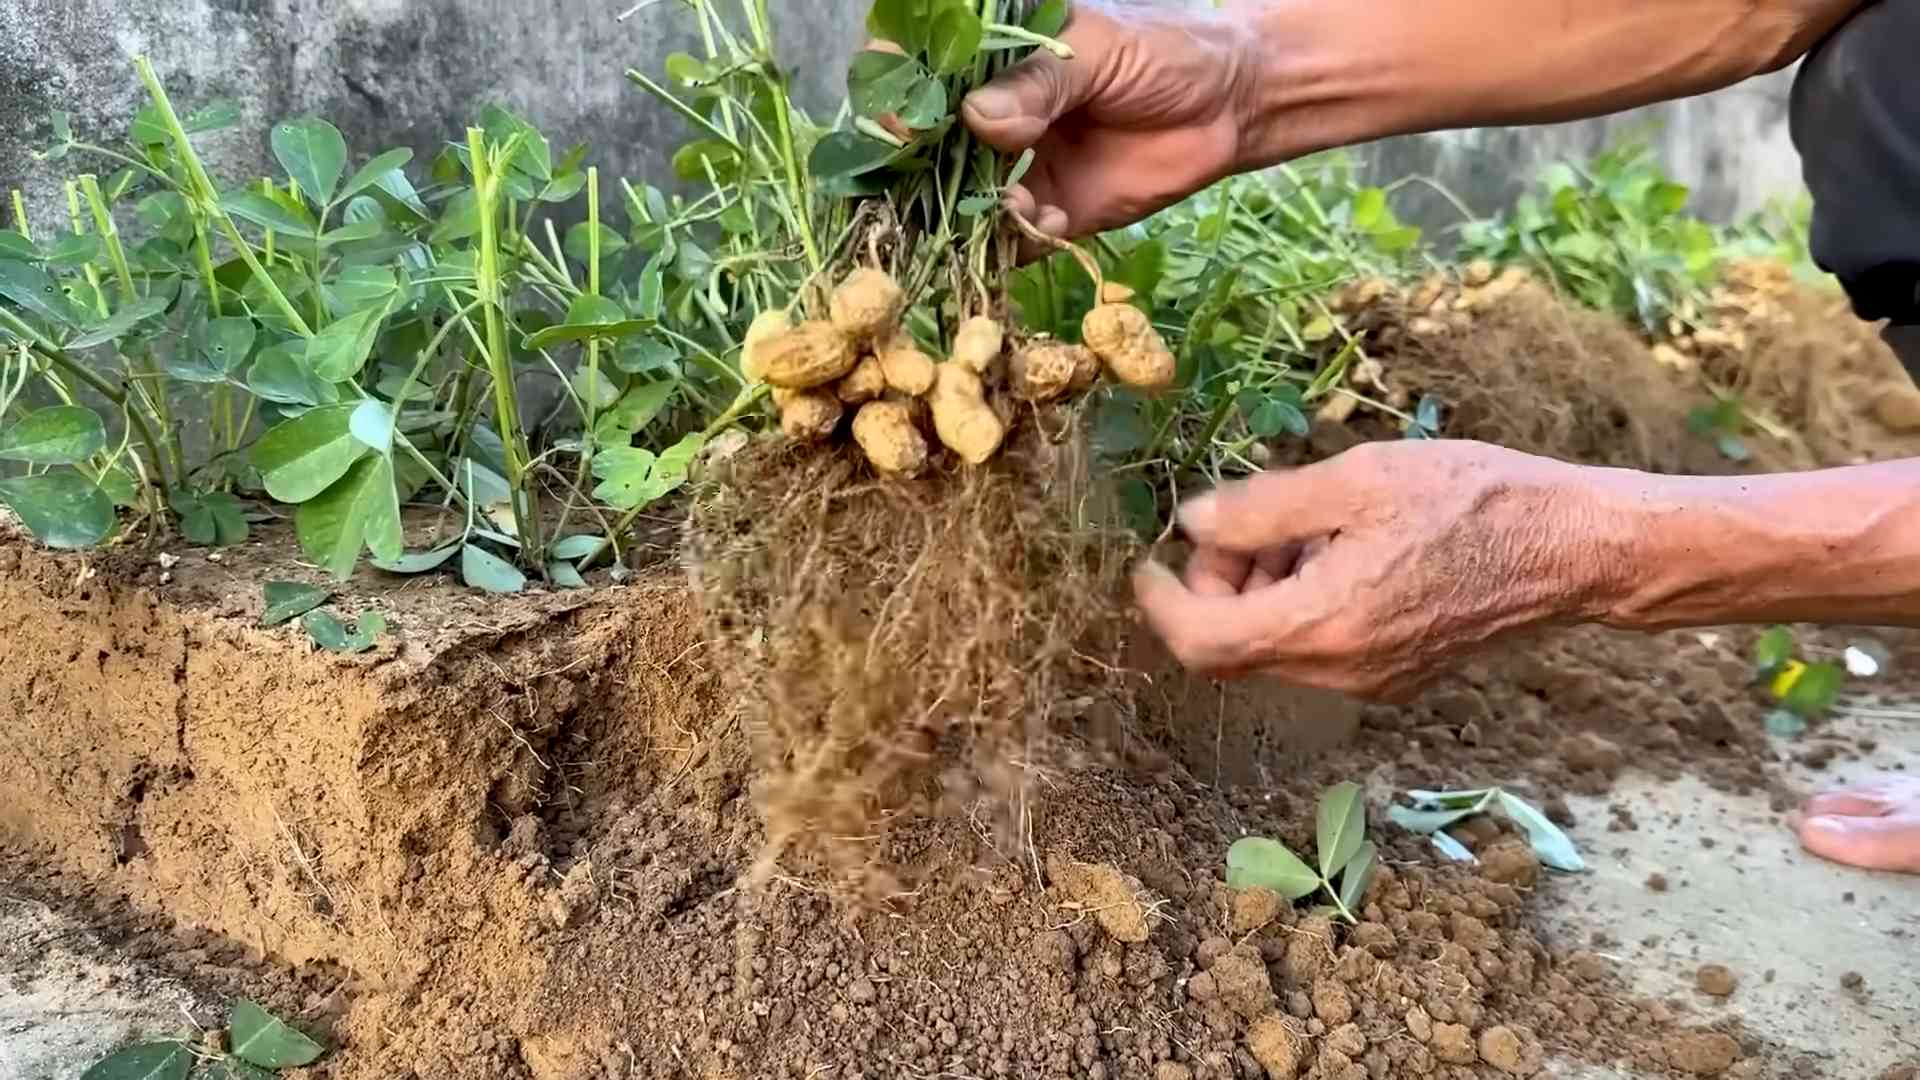
Harvesting Your Peanuts
The most exciting part! Knowing when to harvest is crucial for getting the best flavor and yield.
* Timing is Everything: Peanuts typically take about 120-150 days to mature.
* Signs of Maturity: The leaves will start to turn yellow and brown, and the plants will begin to look a little tired.
Step-by-Step: Harvesting Peanuts
1. Test Dig: Before harvesting the entire crop, dig up a few plants to check the peanuts. The shells should be well-formed and the kernels inside should be plump and fully developed.
2. Dig Up the Plants: Once you’re satisfied that the peanuts are ready, carefully dig up the entire plant. Use a garden fork or shovel to loosen the soil around the plant and then gently lift it out of the foam box.
3. Shake Off Excess Soil: Shake off any excess soil from the roots and peanuts.
4. Curing the Peanuts: This is an important step for developing the flavor and preventing mold.
5. Hang to Dry: Hang the entire plant upside down in a well-ventilated area for 2-4 weeks. This allows the peanuts to dry and cure properly. You can hang them in a garage, shed, or even a covered porch.
6. Remove the Peanuts: Once the plants are dry, remove the peanuts from the vines.
7. Further Drying (Optional): You can further dry the peanuts by spreading them out in a single layer on a screen or tray for a few days.
8. Roasting (Optional): Roasting your peanuts enhances their flavor. Preheat your oven to 350°F (175°C). Spread the peanuts out in a single layer on a baking sheet and roast for 20-25 minutes, or until they are golden brown and fragrant.
9. Storage: Store your dried peanuts in an airtight container in a cool, dry place. They should last for several months.
Troubleshooting
Even with the best planning, things can sometimes go wrong. Here are a few common issues and how to address them:
* Poor Germination: If your peanut seeds aren’t germinating, make sure the soil is warm enough and consistently moist. You can also try scarifying the seeds by gently scratching the outer shell with sandpaper before soaking them.
* Yellowing Leaves: Yellowing leaves can be a sign of nutrient deficiency. Try fertilizing your plants with a balanced fertilizer.
* Pests: If you notice pests on your peanut plants, try spraying them with insecticidal soap or neem oil.
* Root Rot: Root rot is caused by overwatering. Make sure your foam box has good drainage and avoid overwatering your plants.
Growing peanuts in a foam box is a fun and rewarding experience. With a little bit of care and attention, you can enjoy a bountiful harvest of homegrown peanuts. Happy gardening!
Conclusion
So, there you have it! Growing peanuts in a foam box isn’t just a quirky gardening experiment; it’s a surprisingly effective and rewarding way to cultivate your own delicious, homegrown snacks. We’ve walked you through the process, highlighting the benefits of this method – from its space-saving nature to its ability to provide a controlled environment that fosters healthy peanut development.
Why is this DIY trick a must-try? Because it democratizes peanut cultivation! You don’t need acres of farmland or specialized equipment. A simple foam box, readily available and often repurposed, becomes your miniature peanut plantation. It’s an accessible project for apartment dwellers, balcony gardeners, and anyone with limited outdoor space who dreams of harvesting their own peanuts. Furthermore, the foam box provides excellent insulation, helping to maintain a consistent soil temperature, which is crucial for peanut germination and growth, especially in regions with fluctuating climates. This controlled environment minimizes the risk of frost damage and extends the growing season, giving you a higher chance of a successful harvest.
But the benefits extend beyond practicality. There’s a unique satisfaction in nurturing a plant from seed to harvest, and growing peanuts in a foam box offers a hands-on, educational experience. It’s a fantastic project for families, teaching children about plant life cycles, sustainable gardening practices, and the origins of their food. Plus, the taste of freshly harvested, homegrown peanuts is simply unparalleled – a burst of earthy sweetness that you won’t find in store-bought varieties.
Ready to take your peanut growing to the next level? Consider these variations:
* Experiment with different peanut varieties: Try Virginia peanuts for larger kernels, Spanish peanuts for a sweeter flavor, or Runner peanuts for a classic taste. Each variety has slightly different growing requirements, so do your research and choose one that suits your climate and preferences.
* Enhance your soil mix: While the basic mix we suggested works well, you can enrich it further with compost, worm castings, or other organic amendments. These additions will provide extra nutrients and improve soil drainage, leading to even healthier peanut plants.
* Explore vertical growing: If space is truly limited, consider adapting the foam box method to a vertical growing system. You can create a tiered structure using multiple foam boxes, maximizing your peanut yield in a small footprint.
* Add companion plants: Marigolds, basil, and other herbs can be planted alongside your peanuts to deter pests and attract beneficial insects. This natural pest control method will help keep your peanut plants healthy and thriving.
We wholeheartedly encourage you to try this DIY trick and experience the joy of growing your own peanuts in a foam box. It’s a rewarding, sustainable, and delicious endeavor that will connect you with nature and provide you with a bounty of homegrown goodness. Don’t be afraid to experiment, adapt the method to your specific needs, and most importantly, have fun!
Once you’ve harvested your first crop, we’d love to hear about your experience. Share your photos, tips, and stories in the comments section below. Let’s build a community of foam box peanut growers and inspire others to embrace this simple yet effective gardening technique. Your insights could help fellow gardeners overcome challenges and achieve even greater success. So, get your foam box ready, plant those peanut seeds, and prepare to be amazed by the magic of homegrown peanuts! Let’s all become experts in the art of **grow peanuts foam box** style!
Frequently Asked Questions (FAQ)
What kind of foam box should I use?
Ideally, you should use a food-grade foam box, like the kind used to transport fruits or vegetables. These are generally safe and won’t leach harmful chemicals into the soil. Avoid using foam boxes that have been used to store chemicals or other potentially toxic substances. The size of the box will depend on how many peanut plants you want to grow. A box that’s at least 12 inches deep and 18 inches wide should be sufficient for a few plants. Make sure the box has drainage holes to prevent waterlogging. If it doesn’t, you can easily drill some yourself.
How often should I water my peanut plants in a foam box?
Watering frequency depends on several factors, including the weather, the type of soil you’re using, and the size of your foam box. As a general rule, water your peanut plants when the top inch of soil feels dry to the touch. Avoid overwatering, as this can lead to root rot. During hot, dry weather, you may need to water daily, while during cooler, wetter periods, you may only need to water every few days. The best way to determine if your plants need water is to check the soil moisture regularly.
What kind of fertilizer should I use for peanuts grown in a foam box?
Peanuts are legumes, which means they can fix nitrogen from the air, so they don’t require a lot of nitrogen fertilizer. However, they do benefit from phosphorus and potassium. Use a fertilizer that’s low in nitrogen and higher in phosphorus and potassium. A balanced fertilizer with an NPK ratio of 5-10-10 or 6-12-12 is a good choice. You can also use organic fertilizers like bone meal (for phosphorus) and wood ash (for potassium). Apply the fertilizer according to the package directions, being careful not to over-fertilize.
How long does it take for peanuts to mature in a foam box?
Peanuts typically take 120-150 days to mature, depending on the variety and the growing conditions. You’ll know your peanuts are ready to harvest when the leaves start to turn yellow and the plants begin to die back. You can also dig up a few plants to check the peanuts. The shells should be fully formed and the kernels should be plump and well-developed.
What are some common pests and diseases that affect peanut plants in a foam box?
Common pests that can affect peanut plants include aphids, spider mites, and leafhoppers. You can control these pests with insecticidal soap or neem oil. Diseases that can affect peanut plants include leaf spot and root rot. To prevent these diseases, make sure your plants have good air circulation and avoid overwatering. If you notice any signs of disease, remove the affected leaves or plants immediately.
Can I reuse the soil from my foam box after harvesting peanuts?
It’s generally not recommended to reuse the soil from your foam box after harvesting peanuts, especially if you suspect any diseases or pests were present. Peanuts can deplete certain nutrients from the soil, so it’s best to start with fresh soil for your next crop. If you do want to reuse the soil, you can amend it with compost and other organic matter to replenish the nutrients. You should also sterilize the soil to kill any potential pathogens.
Is it possible to grow peanuts indoors in a foam box?
While it’s possible to grow peanuts indoors in a foam box, it’s more challenging than growing them outdoors. Peanut plants need a lot of sunlight, so you’ll need to provide them with supplemental lighting if you’re growing them indoors. You’ll also need to ensure that the plants have good air circulation and that the temperature is warm enough. Indoor peanut growing requires more attention and effort, but it can be done with the right setup and care.
How do I cure my peanuts after harvesting them from the foam box?
Curing is an essential step in preparing your homegrown peanuts for storage and consumption. After harvesting, gently shake off any excess soil from the peanut pods. Spread the peanuts in a single layer on a screen or wire rack in a well-ventilated area. Allow the peanuts to dry for several weeks, turning them occasionally to ensure even drying. The peanuts are properly cured when the shells are brittle and the kernels are loose inside. Curing helps to reduce moisture content, preventing mold growth and extending the shelf life of your peanuts.
What is the best way to store peanuts after curing?
Once your peanuts are fully cured, store them in an airtight container in a cool, dry, and dark place. Properly stored peanuts can last for several months. You can also freeze peanuts for longer storage. To freeze peanuts, place them in freezer bags or airtight containers and store them in the freezer for up to a year.
Can I roast my homegrown peanuts after curing them?
Absolutely! Roasting your homegrown peanuts is a delicious way to enjoy your harvest. Preheat your oven to 350°F (175°C). Spread the peanuts in a single layer on a baking sheet. Roast for 15-20 minutes, or until the peanuts are lightly browned and fragrant. Be sure to check them frequently to prevent burning. Let the peanuts cool completely before shelling and enjoying. You can also add salt or other seasonings to the peanuts before roasting for extra flavor.

Leave a Comment