
Grow wheatgrass without soil? Sounds like something out of a sci-fi movie, right? But trust me, it’s totally doable, and I’m here to show you how! Forget messy soil and complicated setups. We’re diving into a super simple, clean, and efficient way to cultivate this nutritional powerhouse right in your own home.
Wheatgrass has been a health food staple for decades, with roots tracing back to ancient civilizations who recognized its potent benefits. From boosting immunity to detoxifying the body, this vibrant green grass is packed with vitamins, minerals, and antioxidants. Traditionally, growing wheatgrass involved soil, which could be messy and attract unwanted pests. But not anymore!
In today’s fast-paced world, who has time for complicated gardening? That’s where this DIY trick comes in. Learning how to grow wheatgrass without soil is perfect for apartment dwellers, busy professionals, or anyone who wants a hassle-free way to enjoy fresh, nutrient-rich wheatgrass. Imagine having a constant supply of this superfood right at your fingertips, ready to be juiced, blended into smoothies, or even added to salads. Plus, it’s a fantastic way to add a touch of green to your indoor space and boost your overall well-being. So, let’s get started and unlock the secrets to soil-free wheatgrass cultivation!
Growing Wheatgrass Without Soil: A Simple DIY Guide
Hey there, fellow green thumbs! Ever wanted to grow your own wheatgrass but dreaded the mess of soil? Well, I’ve got fantastic news for you! You can absolutely grow lush, vibrant wheatgrass without any soil at all. It’s easier than you think, and I’m going to walk you through the whole process, step-by-step. Get ready for some serious green goodness!
What You’ll Need
Before we dive in, let’s gather our supplies. This is a pretty low-cost project, which is always a win in my book!
* Wheatgrass Seeds: Make sure you get seeds specifically for growing wheatgrass, not for planting in a field. You can find these at most health food stores or online. I usually buy organic to avoid any unwanted chemicals.
* Growing Trays: You’ll need at least two trays – one with drainage holes and one without. The tray without holes will act as a reservoir for water. I like using shallow plastic trays, but you can also repurpose containers you already have. Just make sure they’re clean!
* Sprouting Jar or Container: A wide-mouth mason jar works perfectly. You’ll also need some cheesecloth or a sprouting lid to cover the jar.
* Water: Filtered water is best, but tap water that’s been sitting out for a while to let the chlorine dissipate will also work.
* Spray Bottle: For misting the wheatgrass.
* Hydrogen Peroxide (3%): This is optional, but I like to use it to prevent mold growth.
* Clean Towel or Paper Towels: For covering the trays during the initial sprouting phase.
Phase 1: Sprouting the Seeds
This is arguably the most crucial part of the process. Proper sprouting ensures a healthy and abundant crop of wheatgrass. Trust me, I’ve learned this the hard way!
1. Rinse the Seeds: Place about 1/2 cup to 1 cup of wheatgrass seeds (depending on the size of your tray) in your sprouting jar. Rinse them thoroughly with cool water, removing any debris or floating seeds. I usually rinse them a couple of times until the water runs clear.
2. Soak the Seeds: Fill the jar with fresh, cool water, ensuring the seeds are completely submerged. They’ll expand quite a bit, so don’t overcrowd them. Cover the jar with cheesecloth or a sprouting lid and secure it with a rubber band.
3. Soaking Time: Let the seeds soak for 8-12 hours, or even overnight. I usually soak them before I go to bed and then drain them in the morning.
4. Drain and Rinse: After soaking, drain the water completely. Rinse the seeds again with cool water.
5. Sprouting Position: Invert the jar and prop it up at an angle so any excess water can drain out. I usually use a bowl or a dish rack to hold the jar in place.
6. Rinse Regularly: Rinse the seeds 2-3 times a day for the next 2-3 days. This is super important to keep them moist and prevent mold. Make sure to drain the water thoroughly after each rinse.
7. Observe the Sprouts: You’ll start to see tiny white sprouts emerging from the seeds. This is a sign that they’re ready to move to the next phase.
Phase 2: Planting the Sprouts in the Tray
Now that our seeds have sprouted, it’s time to give them a place to grow!
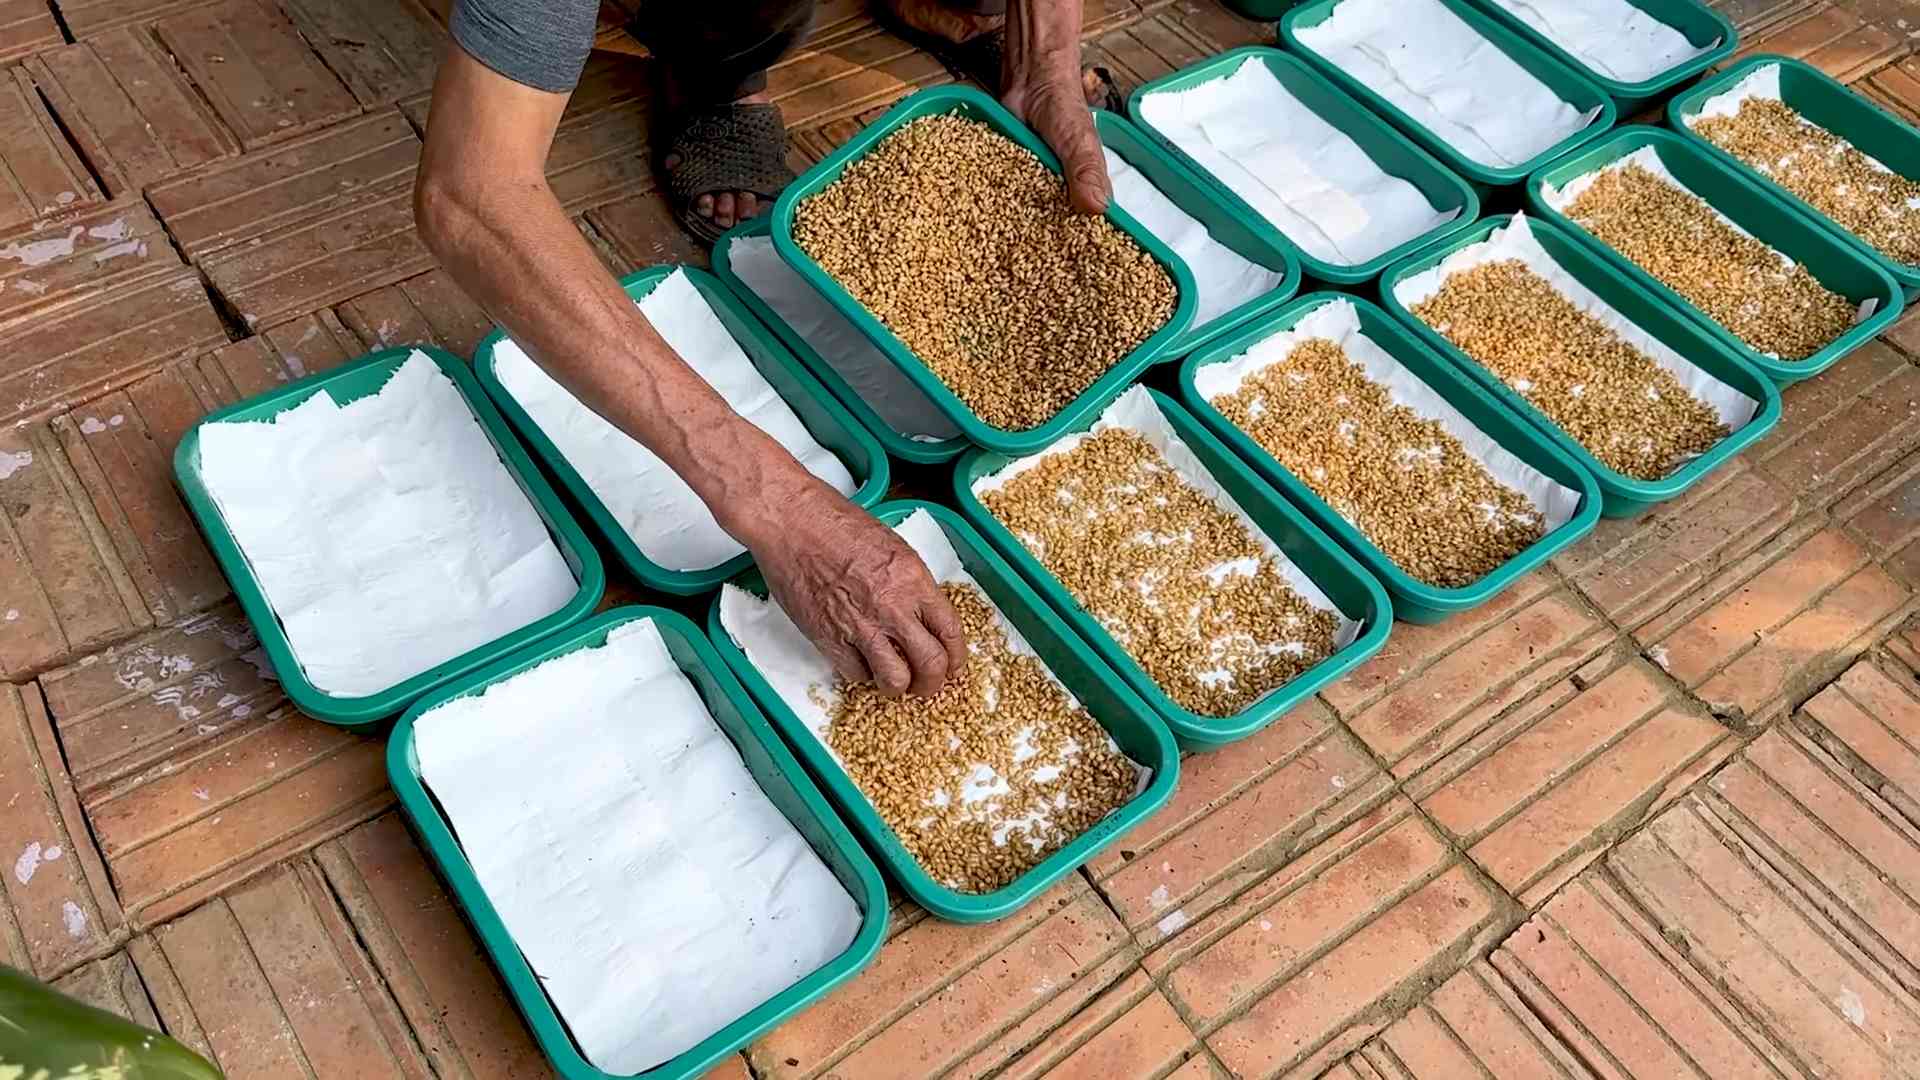
1. Prepare the Tray: Take your growing tray with drainage holes and place it inside the tray without holes (the reservoir).
2. Spread the Sprouts: Evenly distribute the sprouted seeds across the bottom of the growing tray. Don’t overcrowd them too much, but aim for a fairly dense layer. I like to gently pat them down to ensure good contact.
3. Water the Sprouts: Gently mist the sprouts with water using your spray bottle. You want to moisten them thoroughly, but avoid creating standing water.
4. Cover the Tray: Cover the tray with a damp towel or a few layers of damp paper towels. This will help keep the sprouts moist and dark, which encourages them to grow.
5. Darkness is Key: Place the tray in a dark, cool place for the first 2-3 days. This mimics the conditions underground and helps the sprouts develop strong roots. I usually put mine in a cupboard or a closet.
6. Maintain Moisture: Check the tray daily and mist the sprouts with water as needed to keep the towel or paper towels damp.
Phase 3: Growing the Wheatgrass
This is where the magic happens! Get ready to watch your wheatgrass flourish.
1. Introduce Light: After 2-3 days in the dark, remove the towel or paper towels and move the tray to a location with indirect sunlight. Direct sunlight can scorch the young wheatgrass. A windowsill that gets morning sun is ideal.
2. Watering Schedule: Continue to mist the wheatgrass with water 1-2 times a day, or as needed to keep the sprouts moist. You can also add water to the reservoir tray to allow the wheatgrass to absorb water from the bottom. Just make sure the water level doesn’t reach the bottom of the growing tray, as this can lead to mold.
3. Hydrogen Peroxide (Optional): If you’re concerned about mold, you can add a small amount of hydrogen peroxide (about 1 teaspoon per cup of water) to your spray bottle. This will help prevent mold growth without harming the wheatgrass.
4. Rotate the Tray: Rotate the tray regularly to ensure that all sides of the wheatgrass receive equal light. This will help it grow evenly.
5. Monitor Growth: Watch your wheatgrass grow! It should reach a height of 4-6 inches in about 7-10 days.
Phase 4: Harvesting and Enjoying Your Wheatgrass
The moment you’ve been waiting for!
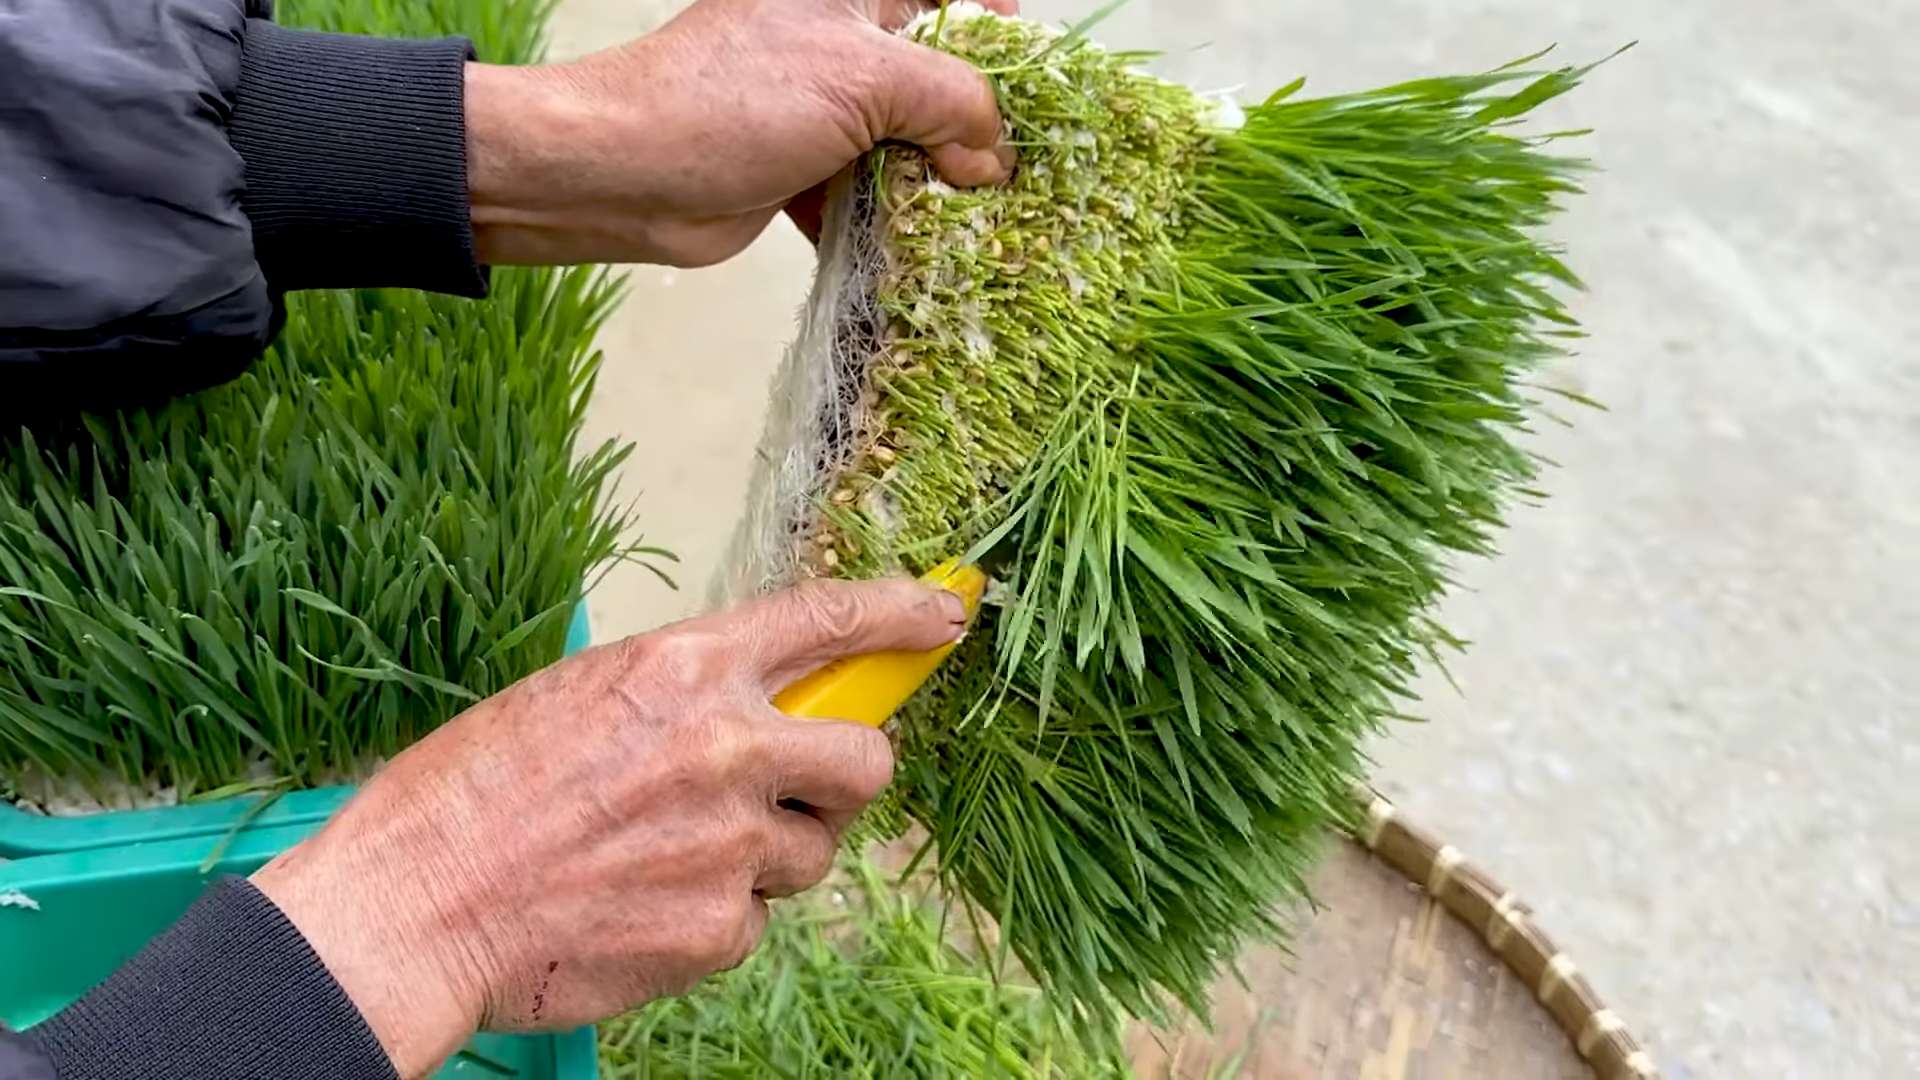
1. Harvest Time: Once the wheatgrass reaches a height of 4-6 inches, it’s ready to harvest.
2. Cutting the Wheatgrass: Use clean scissors or a sharp knife to cut the wheatgrass just above the seed level.
3. Rinse and Enjoy: Rinse the harvested wheatgrass with cool water. You can juice it, add it to smoothies, or even feed it to your pets (if they’re into that sort of thing!).
4. Second Harvest (Optional): You can often get a second harvest from the same tray of wheatgrass. Just continue to water it and provide it with light. However, the second harvest will usually be less abundant and less nutritious than the first.
5. Composting: After the second harvest, the wheatgrass will likely be exhausted. You can compost the remaining roots and seeds.
Troubleshooting Tips
Even with the best instructions, things can sometimes go awry. Here are a few common issues and how to address them:
* Mold: Mold is a common problem when growing wheatgrass. To prevent mold, make sure to rinse the seeds and sprouts thoroughly, provide good air circulation, and avoid overwatering. If you see mold, you can try spraying the affected area with a solution of hydrogen peroxide and water.
* Slow Growth: Slow growth can be caused by a number of factors, including insufficient light, inadequate watering, or poor seed quality. Make sure your wheatgrass is getting enough light and water, and consider trying a different brand of seeds.
* Uneven Growth: Uneven growth is usually caused by uneven light exposure. Rotate the tray regularly to ensure that all sides of the wheatgrass receive equal light.
* Yellowing: Yellowing can be a sign of overwatering or underwatering. Adjust your watering schedule accordingly. It can also be a sign of nutrient deficiency, but this is less common when growing wheatgrass without soil.
Why Grow Wheatgrass Without Soil?
You might be wondering, why go through all this trouble to grow wheatgrass without soil? Here are a few reasons why I love this method:
* Less Mess: No soil means no dirt to clean up! This is a huge plus for me, as I’m not the tidiest gardener.
* Reduced Risk of Pests and Diseases: Soil can harbor pests and diseases that can harm your wheatgrass. Growing without soil eliminates this risk.
* Faster Growth: Some people find that wheatgrass grows faster when grown without soil.
* Nutrient-Rich: Wheatgrass is packed with vitamins, minerals, and antioxidants. It’s a great way to boost your health!
* It’s Fun! I find the whole process of growing wheatgrass to be incredibly rewarding. It’s a great way to connect with nature and enjoy the fruits (or rather, grasses) of your labor.
So there you have it! A complete
Conclusion
So, there you have it! Growing wheatgrass without soil is not only possible, it’s surprisingly easy, incredibly rewarding, and a fantastic way to bring a vibrant, healthy boost into your life. We’ve walked through the simple steps, highlighting the benefits of this soilless method – from its cleanliness and reduced risk of mold to its speed and overall convenience. This isn’t just about growing wheatgrass; it’s about embracing a sustainable, accessible, and ultimately more enjoyable way to cultivate your own superfood.
Why is this DIY trick a must-try? Because it democratizes access to fresh, nutrient-rich wheatgrass. You don’t need a green thumb, a sprawling garden, or even a bag of soil to reap the rewards. Imagine starting your day with a shot of freshly grown wheatgrass, knowing you nurtured it from seed to sprout with your own hands, in your own home, without the mess and hassle of traditional methods. The taste is noticeably cleaner, the process is incredibly satisfying, and the health benefits are undeniable.
But the beauty of this method lies in its adaptability. Feel free to experiment! Try different containers – glass jars, plastic trays, even repurposed containers can work wonders. Play around with the sprouting time to achieve your preferred level of sweetness and intensity. Consider adding a diluted organic fertilizer solution after the initial sprouting phase to further boost growth and nutrient content. You can even experiment with different types of seeds, although wheatgrass is the star of the show here.
Don’t be afraid to get creative and personalize your wheatgrass growing experience.
Ultimately, the goal is to make this process your own. This soilless method is a gateway to a healthier lifestyle, a more sustainable approach to food cultivation, and a deeper connection to the natural world. It’s a small change that can have a big impact, and we wholeheartedly encourage you to give it a try.
Now, it’s your turn! We’ve provided you with the knowledge and the inspiration; all that’s left is for you to take the plunge. Start small, experiment, and most importantly, have fun! We’re confident that you’ll be amazed at how easy and rewarding it is to grow your own wheatgrass without soil.
We can’t wait to hear about your experiences! Share your photos, tips, and questions in the comments below. Let’s build a community of soilless wheatgrass growers and inspire others to embrace this simple yet powerful DIY trick. Together, we can unlock the potential of fresh, homegrown wheatgrass and cultivate a healthier, more sustainable future. So go ahead, give it a shot, and let us know how it goes! Your journey to fresh, homegrown wheatgrass starts now!
Frequently Asked Questions (FAQ)
What kind of wheatgrass seeds should I use?
The best wheatgrass seeds to use are hard red winter wheat berries. These are readily available online or at health food stores. Make sure they are specifically labeled for sprouting or growing wheatgrass, as some wheat berries are treated with chemicals that are not safe for consumption. Organic wheatgrass seeds are always a good choice to minimize exposure to pesticides and herbicides. Avoid using wheat berries intended for milling into flour, as they may not germinate as effectively.
How often should I water the wheatgrass?
Watering frequency is crucial for successful soilless wheatgrass growth. In the initial sprouting phase (days 1-3), keep the seeds consistently moist but not waterlogged. Mist them thoroughly at least twice a day, or even more frequently in dry climates. Once the sprouts emerge (day 4 onwards), continue to mist them regularly, ensuring the roots are always damp. You might need to water them more often as the wheatgrass grows taller and the weather gets warmer. The key is to maintain a humid environment without allowing standing water to accumulate, which can lead to mold growth.
How long does it take to grow wheatgrass without soil?
Generally, it takes about 7-10 days to grow wheatgrass without soil to a harvestable height. The exact time can vary depending on factors such as temperature, humidity, and the quality of the seeds. You’ll know it’s ready to harvest when the blades are about 4-7 inches tall and have developed a vibrant green color. The taste will also become sweeter as the wheatgrass matures.
How do I harvest the wheatgrass?
Harvesting wheatgrass is simple. Use clean scissors or a sharp knife to cut the blades close to the base, just above the root mat. Avoid pulling the wheatgrass out by the roots, as this can disrupt the remaining growth. Harvest only what you need at the time, as freshly cut wheatgrass is best.
Can I regrow wheatgrass after harvesting?
Yes, you can usually get a second harvest from your wheatgrass. After the first harvest, continue to water and care for the remaining root mat. You may notice new shoots emerging within a few days. However, the second harvest will typically be less dense and may not be as flavorful as the first. After the second harvest, it’s best to start a new batch of wheatgrass for optimal results.
What if mold starts to grow?
Mold is a common concern when growing wheatgrass, especially in humid environments. To prevent mold, ensure good air circulation around your growing container. Avoid overwatering, and make sure the seeds are not too densely packed. If you notice any mold growth, immediately remove the affected areas. You can also try spraying the wheatgrass with a diluted solution of hydrogen peroxide (3%) to kill the mold. If the mold infestation is severe, it’s best to discard the entire batch and start over with fresh seeds and a clean container.
What are the benefits of growing wheatgrass without soil?
Growing wheatgrass without soil offers several advantages. It’s cleaner and less messy than traditional soil-based methods, reducing the risk of soilborne diseases and pests. It’s also faster, as the seeds germinate and grow more quickly in a soilless environment. Additionally, it’s more sustainable, as it eliminates the need for soil, which is a valuable resource. Finally, it’s more convenient, as you can easily grow wheatgrass indoors, regardless of the weather or your gardening experience.
Can I use tap water to grow wheatgrass?
While tap water can be used, it’s generally recommended to use filtered or purified water for growing wheatgrass. Tap water often contains chlorine and other chemicals that can inhibit germination and growth. If you must use tap water, let it sit out for 24 hours to allow the chlorine to evaporate before using it to water your wheatgrass.
How do I store harvested wheatgrass?
Freshly harvested wheatgrass is best consumed immediately for optimal nutrient content. However, if you need to store it, wrap it in a damp paper towel and place it in a sealed plastic bag in the refrigerator. It will typically stay fresh for up to a week.
Is wheatgrass safe for everyone to consume?
While wheatgrass is generally safe for most people, some individuals may experience mild side effects such as nausea, diarrhea, or headaches, especially when first starting to consume it. It’s always best to start with a small amount and gradually increase your intake as your body adjusts. People with wheat allergies or celiac disease should avoid wheatgrass, as it may contain gluten. Consult with your doctor or a qualified healthcare professional if you have any concerns about consuming wheatgrass.

Leave a Comment