
Backyard Tomato Growing Easy Way – that’s what we all crave, isn’t it? Imagine biting into a sun-warmed, juicy tomato, bursting with flavor, knowing you grew it yourself, just steps from your back door. Forget those bland, store-bought imposters! This isn’t just about growing tomatoes; it’s about connecting with nature, saving money, and experiencing the pure joy of nurturing life.
For centuries, tomatoes have held a special place in our hearts and cuisines. Originating in South America, they were initially met with suspicion in Europe, but eventually, their vibrant color and delicious taste won everyone over. Now, they’re a staple in gardens worldwide, and I’m here to show you how to make backyard tomato growing easy way, even if you think you have a “brown thumb.”
Let’s face it, gardening can seem intimidating. We’ve all seen those picture-perfect gardens and wondered how they do it. But the truth is, with a few clever tricks and DIY hacks, anyone can enjoy a bountiful tomato harvest. This article is your guide to simplifying the process, avoiding common pitfalls, and maximizing your yield. I’ll share my favorite tips and techniques, so you can enjoy fresh, delicious tomatoes all season long. Get ready to transform your backyard into a tomato paradise!
DIY Backyard Tomato Growing: The Easiest Way to Bountiful Harvests!
Okay, tomato lovers, let’s get down to business! I’m going to share my super-simple, almost foolproof method for growing tons of delicious tomatoes right in your backyard. Forget complicated gardening techniques – this is all about maximizing your yield with minimal effort. Trust me, even if you think you have a black thumb, you can do this!
Choosing the Right Tomato Variety
Before we even think about digging, let’s talk tomatoes. Not all tomatoes are created equal, and choosing the right variety for your climate and space is crucial.
* Determinate vs. Indeterminate: This is the big one!
* Determinate tomatoes grow to a certain size and then produce all their fruit at once. They’re great for canning or making sauce because you’ll have a big harvest all at the same time. Think Roma or Celebrity.
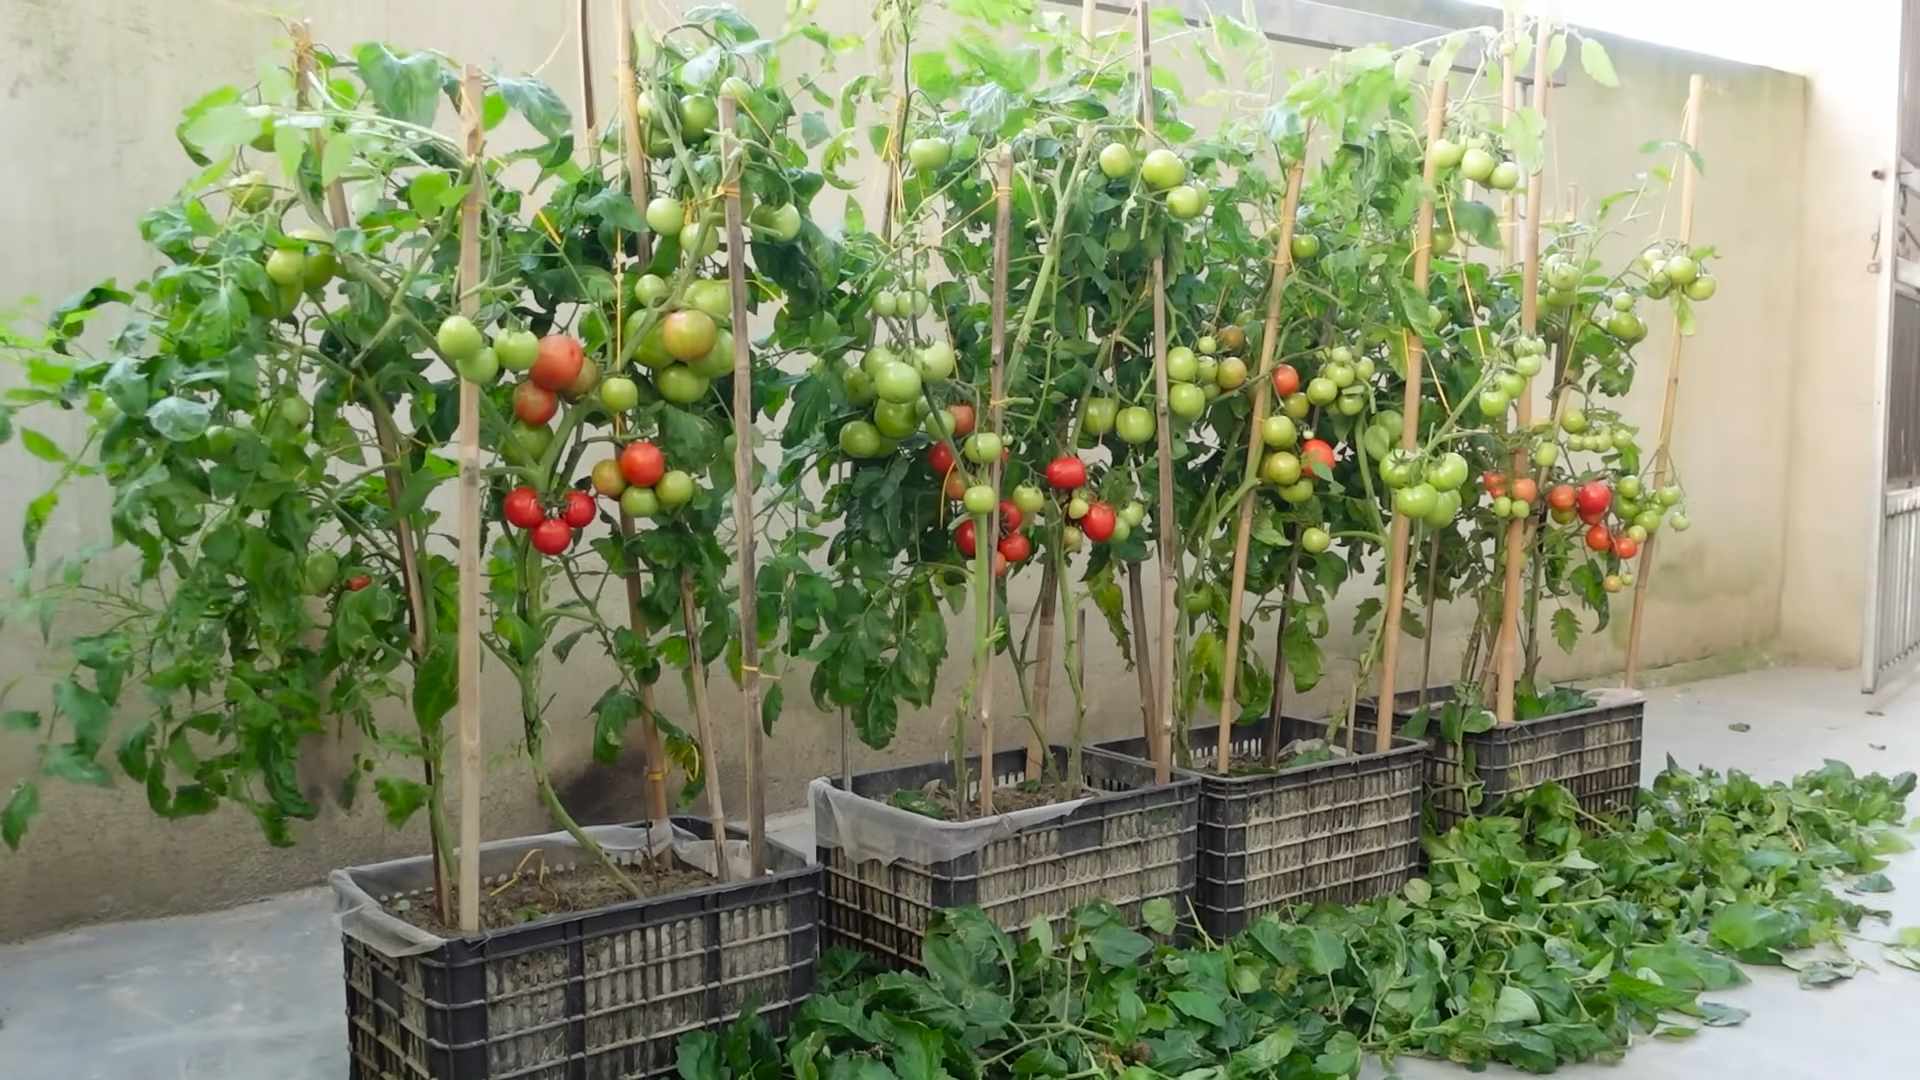
* Indeterminate tomatoes keep growing and producing fruit throughout the season. They need staking or caging, but they’ll give you a steady supply of tomatoes for months. Think cherry tomatoes, beefsteaks, or Early Girl.
* Consider your climate: If you live in a short-season area, choose early-maturing varieties. If you have long, hot summers, you can go for later-maturing types.
* Think about your space: If you’re growing in containers, choose compact or dwarf varieties.
* Pick what you like to eat! Don’t grow a bunch of beefsteaks if you only like cherry tomatoes.
I personally love growing a mix of cherry tomatoes (Sungold are my absolute favorite!), Roma tomatoes for sauce, and a few beefsteaks for slicing.
Preparing Your Tomato Growing Area
Now that we’ve got our tomato varieties picked out, let’s get our growing area ready. This is where the “easy” part really kicks in.
* Sunlight is Key: Tomatoes need at least 6-8 hours of direct sunlight per day. Choose a spot in your yard that gets plenty of sunshine.
* Soil Matters: Tomatoes love rich, well-drained soil. If your soil is heavy clay or sandy, you’ll need to amend it.
* Amend with Compost: This is the magic ingredient! Compost adds nutrients, improves drainage, and helps retain moisture. I add a generous amount of compost to my tomato beds every year.
* Consider Raised Beds: If your soil is really poor, raised beds are a great option. You can fill them with a high-quality soil mix.
* Spacing is Important: Give your tomato plants enough room to grow. Determinate varieties need about 2-3 feet of space between plants, while indeterminate varieties need 3-4 feet.
Planting Your Tomato Seedlings
Okay, time to get our hands dirty!
1. Dig a Hole: Dig a hole that’s deep enough to bury the bottom two-thirds of the tomato seedling’s stem. Yes, you read that right! Tomatoes will grow roots along the buried stem, making them stronger and more productive.
2. Remove Lower Leaves: Gently remove the leaves from the bottom two-thirds of the stem.
3. Plant Deep: Place the seedling in the hole and backfill with soil, gently patting it down.
4. Water Thoroughly: Water the newly planted seedling deeply. This helps settle the soil and encourages root growth.
5. Add a Support System: Immediately after planting, add a stake, cage, or trellis to support your tomato plant. Indeterminate varieties absolutely need support, and even determinate varieties can benefit from it. I prefer using tomato cages because they’re easy to set up and provide good support.
Watering and Fertilizing Your Tomato Plants
Watering and fertilizing are crucial for healthy tomato plants and a bountiful harvest.
* Watering:
* Water deeply and infrequently: Water your tomato plants deeply whenever the top inch of soil feels dry. Avoid watering shallowly, as this encourages shallow root growth.
* Water at the base of the plant: Avoid getting the leaves wet, as this can lead to fungal diseases.
* Mulch: Add a layer of mulch around your tomato plants to help retain moisture and suppress weeds. Straw, wood chips, or even shredded leaves work well.
* Fertilizing:
* Start with a balanced fertilizer: When you plant your tomato seedlings, add a balanced fertilizer to the planting hole. Look for a fertilizer with an NPK ratio of around 10-10-10.
* Side-dress with fertilizer: About a month after planting, side-dress your tomato plants with fertilizer. This means sprinkling fertilizer around the base of the plant and gently working it into the soil.
* Use a tomato-specific fertilizer: Once your tomato plants start producing fruit, switch to a tomato-specific fertilizer. These fertilizers are higher in phosphorus and potassium, which are essential for fruit development.
* Don’t over-fertilize: Too much fertilizer can lead to lush foliage but fewer tomatoes. Follow the instructions on the fertilizer package carefully.
I like to use a slow-release fertilizer at planting and then supplement with a liquid tomato fertilizer every few weeks.
Pruning Your Tomato Plants (If Necessary)
Pruning can help improve air circulation, reduce disease, and encourage fruit production. However, it’s not always necessary, and some people prefer to let their tomato plants grow naturally.
* Suckers: Suckers are small shoots that grow in the “armpit” between the main stem and a branch. Removing suckers can help improve air circulation and direct the plant’s energy towards fruit production.
* How to prune suckers: Pinch off the suckers when they’re small, about 2-3 inches long.
* Which suckers to prune: Focus on pruning suckers that grow below the first flower cluster.
* Determinate vs. Indeterminate:
* Determinate tomatoes: Generally, you don’t need to prune determinate tomatoes as much. Just remove any dead or diseased leaves.
* Indeterminate tomatoes: Pruning indeterminate tomatoes can help improve air circulation and encourage fruit production.
I usually prune the suckers on my indeterminate tomato plants, but I don’t prune my determinate tomatoes very much.
Dealing with Pests and Diseases
Unfortunately, tomatoes are susceptible to a variety of pests and diseases. But don’t worry, there are things you can do to protect your plants.
* Common Pests:
* Aphids: These tiny insects suck the sap from tomato plants. You can control aphids with insecticidal soap or by spraying them with a strong stream of water.
* Tomato Hornworms: These large caterpillars can quickly defoliate a tomato plant. Hand-picking them off the plants is the most effective way to control them.
* Whiteflies: These tiny white insects suck the sap from tomato plants. You can control whiteflies with insecticidal soap or by using yellow sticky traps.
* Common Diseases:
* Early Blight: This fungal disease causes dark spots on the leaves. Remove infected leaves and spray the plant with a fungicide.
* Septoria Leaf Spot: This fungal disease causes small, circular spots on the leaves. Remove infected leaves and spray the plant with a fungicide.
* Blossom End Rot: This condition causes the bottom of the tomato to rot. It’s usually caused by calcium deficiency. Make sure your soil has enough calcium and water your plants regularly.
* Prevention is Key:
* Choose disease-resistant varieties: When you’re selecting tomato varieties, look for those that are resistant to common diseases.
* Practice good sanitation: Remove any dead or diseased leaves from your tomato plants.
* Water properly: Avoid getting the leaves wet when you water.
* Provide good air circulation: Space your tomato plants properly and prune them if necessary.
I always try to prevent pests and diseases by choosing disease-resistant varieties and practicing good sanitation. If I do have a problem, I try to use organic solutions whenever possible.
Harvesting Your Tomatoes
This is the best part! Harvesting your own homegrown tomatoes is incredibly rewarding.
* When to Harvest: Tomatoes are ripe when they’re fully colored and slightly soft to the touch.
* How to Harvest: Gently twist the tomato off the vine.
* Store Properly: Store your tomatoes at room temperature. Refrigerating them can make them lose their flavor.
I love eating my homegrown tomatoes fresh off the vine, but they’re also great in salads, sandwiches, sauces, and so much more!
Troubleshooting Common Tomato Problems
Even with the best care, you might encounter some problems along the way. Here are a few common issues and how to fix them:

Conclusion
So, there you have it! This simple, yet incredibly effective, DIY trick is a game-changer for anyone looking to maximize their backyard tomato growing efforts. Forget complicated setups and expensive equipment. This method focuses on harnessing the natural power of the soil and optimizing the plant’s environment for robust growth and abundant yields.
Why is this a must-try? Because it’s accessible, affordable, and delivers tangible results. You’ll witness healthier plants, reduced disease susceptibility, and a significantly larger harvest of delicious, homegrown tomatoes. Imagine biting into a sun-ripened tomato, bursting with flavor, knowing you cultivated it yourself using this straightforward technique. That’s the reward waiting for you.
But don’t just take our word for it. The beauty of this method lies in its adaptability. Feel free to experiment with variations to suit your specific needs and growing conditions. For instance, if you live in an area with particularly poor soil, consider amending it with additional compost or well-rotted manure before planting. You could also try using different types of mulch, such as straw or wood chips, to further suppress weeds and retain moisture.
Another exciting variation is to incorporate companion planting. Basil, for example, is known to deter pests and improve the flavor of tomatoes. Marigolds are also excellent companions, attracting beneficial insects and repelling harmful nematodes. Experiment with different combinations to discover what works best in your garden.
Furthermore, consider the specific tomato varieties you’re growing. Determinate varieties, which grow to a certain size and then stop, may benefit from a slightly different approach than indeterminate varieties, which continue to grow and produce fruit throughout the season. Adjust your watering and feeding schedule accordingly to ensure optimal growth for each type.
This DIY approach to backyard tomato growing isn’t just about producing more tomatoes; it’s about connecting with nature, learning about the growing process, and enjoying the satisfaction of harvesting your own food. It’s a sustainable and rewarding way to enhance your gardening experience.
We wholeheartedly encourage you to try this DIY trick in your own backyard. We are confident that you’ll be amazed by the results. And most importantly, we want to hear about your experience! Share your successes, your challenges, and any variations you’ve tried in the comments below. Let’s create a community of tomato-growing enthusiasts, sharing knowledge and helping each other achieve bountiful harvests. Your insights could be invaluable to other gardeners. So, grab your gardening gloves, get your hands dirty, and get ready to enjoy the most delicious tomatoes you’ve ever tasted! Happy growing!
Frequently Asked Questions (FAQ)
What type of soil is best for this DIY tomato growing method?
The ideal soil for tomatoes is well-draining, loamy soil that is rich in organic matter. However, this DIY method is designed to improve even less-than-ideal soil conditions. Before planting, amend your soil with plenty of compost, well-rotted manure, or other organic matter to improve its structure, drainage, and nutrient content. A soil test can also be helpful to determine any specific nutrient deficiencies that need to be addressed. If your soil is heavy clay, consider adding sand or perlite to improve drainage. If your soil is very sandy, add organic matter to help it retain moisture.
How often should I water my tomato plants using this method?
Watering frequency depends on several factors, including the weather, soil type, and the size of your plants. Generally, you should water deeply and less frequently, rather than shallowly and more often. Aim to keep the soil consistently moist, but not waterlogged. A good rule of thumb is to water when the top inch of soil feels dry to the touch. During hot, dry weather, you may need to water daily. Using mulch around your plants will help retain moisture and reduce the need for frequent watering. When watering, try to avoid wetting the foliage, as this can increase the risk of disease. Water at the base of the plant, directing the water towards the roots.
What kind of fertilizer should I use for my tomato plants?
Tomatoes are heavy feeders and require a balanced fertilizer to thrive. Look for a fertilizer that is specifically formulated for tomatoes, or one that has a balanced NPK ratio (nitrogen, phosphorus, and potassium). A good starting point is a fertilizer with a ratio of 5-10-5 or 10-10-10. Apply fertilizer according to the package directions, typically every 2-3 weeks during the growing season. You can also supplement with organic fertilizers, such as compost tea or fish emulsion. Avoid over-fertilizing, as this can lead to excessive foliage growth and reduced fruit production.
How do I protect my tomato plants from pests and diseases?
Prevention is key when it comes to pests and diseases. Start by choosing disease-resistant tomato varieties. Practice good garden hygiene by removing any diseased leaves or debris from around your plants. Ensure good air circulation by spacing your plants properly and pruning excess foliage. Monitor your plants regularly for signs of pests or diseases. Common tomato pests include aphids, tomato hornworms, and whiteflies. Common tomato diseases include early blight, late blight, and blossom end rot. If you detect pests or diseases, take action promptly. Organic pest control methods include using insecticidal soap, neem oil, or introducing beneficial insects. For diseases, you may need to use a fungicide.
Can I use this DIY method for growing tomatoes in containers?
Yes, this DIY method can be adapted for growing tomatoes in containers. Choose a large container that is at least 18 inches in diameter and depth. Use a high-quality potting mix that is well-draining and contains plenty of organic matter. Follow the same steps as for growing tomatoes in the ground, including amending the soil, providing support, and watering and fertilizing regularly. Container-grown tomatoes may dry out more quickly than those grown in the ground, so be sure to monitor the soil moisture closely.
What kind of support should I use for my tomato plants?
Tomato plants, especially indeterminate varieties, need support to prevent them from sprawling on the ground and becoming susceptible to disease. Common support options include stakes, cages, and trellises. Stakes are a simple and inexpensive option, but they require regular tying to keep the plants upright. Cages provide more support and allow the plants to grow naturally. Trellises are a good option for growing tomatoes in a limited space. Choose a support system that is sturdy enough to support the weight of the mature plants and their fruit. Install the support system at the time of planting to avoid disturbing the roots later.
What is blossom end rot, and how can I prevent it?
Blossom end rot is a common tomato problem that is caused by a calcium deficiency. It appears as a dark, leathery spot on the bottom of the tomato fruit. Blossom end rot is often caused by inconsistent watering, which prevents the plant from absorbing calcium properly. To prevent blossom end rot, ensure consistent watering, especially during fruit development. Amend your soil with calcium-rich materials, such as bone meal or crushed eggshells. You can also use a calcium spray on the foliage. Avoid over-fertilizing with nitrogen, as this can interfere with calcium uptake.
How do I know when my tomatoes are ripe?
The color of the tomato is the best indicator of ripeness. Tomatoes will turn from green to their mature color, which can be red, yellow, orange, or even purple, depending on the variety. The tomato should also feel slightly soft to the touch, but not mushy. Gently twist the tomato from the vine. If it comes off easily, it is ripe. The aroma of the tomato will also be stronger when it is ripe.
What are some good companion plants for tomatoes?
Companion planting can help improve the health and yield of your tomato plants. Some good companion plants for tomatoes include basil, marigolds, onions, garlic, carrots, and parsley. Basil is said to improve the flavor of tomatoes and repel pests. Marigolds attract beneficial insects and repel nematodes. Onions and garlic deter pests. Carrots improve soil drainage. Parsley attracts beneficial insects. Avoid planting tomatoes near brassicas, such as cabbage and broccoli, as they can compete for nutrients.
How can I extend the tomato growing season?
There are several ways to extend the tomato growing season. Start your seeds indoors 6-8 weeks before the last expected frost. Use row covers or cold frames to protect your plants from frost in the spring and fall. Choose early-maturing tomato varieties. Use black plastic mulch to warm the soil and promote early growth. Prune your plants to encourage fruit production. Harvest your tomatoes regularly to encourage the plant to produce more fruit.

Leave a Comment