
Growing cherry tomatoes at home can be incredibly rewarding! Imagine popping juicy, sun-ripened bursts of flavor straight from your own backyard – that’s the magic we’re about to unlock. But let’s be honest, sometimes getting those tiny tomatoes to thrive can feel like a real challenge. Have you ever dreamed of a bountiful harvest, only to be met with spindly plants and a handful of lackluster fruit? Don’t worry, you’re not alone!
The history of tomatoes is fascinating, originating in South America and gradually making their way into cuisines worldwide. For centuries, gardeners have been perfecting the art of cultivating these vibrant fruits. Today, with space at a premium and a desire for fresh, healthy food, growing cherry tomatoes at home is more popular than ever.
That’s why I’ve put together this collection of DIY tricks and hacks to help you achieve tomato-growing success, no matter your experience level. We’ll cover everything from choosing the right varieties and preparing your soil to clever pest control and maximizing your yield. These simple, effective techniques will empower you to create a thriving cherry tomato garden, even if you’re short on space or time. Get ready to enjoy the sweet taste of homegrown goodness!
DIY: Saftige Kirschtomaten selbst ziehen – So geht’s!
Ich liebe den Geschmack von frisch geernteten Kirschtomaten, direkt von der Pflanze in den Mund! Und das Beste daran? Es ist super einfach, sie selbst anzubauen, auch wenn du keinen riesigen Garten hast. In diesem Artikel zeige ich dir Schritt für Schritt, wie du deine eigenen, köstlichen Kirschtomaten ziehen kannst. Egal ob auf dem Balkon, der Terrasse oder im Garten – mit meinen Tipps klappt es garantiert!
Was du brauchst:
* Samen: Kaufe qualitativ hochwertige Kirschtomaten-Samen. Es gibt unzählige Sorten, von süßen gelben bis hin zu aromatischen roten. Wähle die, die dir am besten schmecken!
* Anzuchterde: Diese Erde ist nährstoffarm und locker, ideal für die Keimung der Samen.
* Anzuchttöpfe oder -schalen: Kleine Töpfe oder Schalen mit Drainagelöchern sind perfekt für die Anzucht.
* Pflanztöpfe oder -kübel: Größere Töpfe (mindestens 10 Liter Volumen) für die ausgewachsenen Pflanzen.
* Tomatenerde: Nährstoffreiche Erde, die speziell auf die Bedürfnisse von Tomaten abgestimmt ist.
* Pflanzstäbe oder Rankgitter: Kirschtomatenpflanzen brauchen Unterstützung, um nicht umzuknicken.
* Gießkanne oder Sprühflasche: Zum sanften Bewässern der Pflanzen.
* Dünger: Flüssigdünger oder Langzeitdünger für Tomaten, um die Pflanzen mit ausreichend Nährstoffen zu versorgen.
* Ein sonniger Standort: Tomaten lieben die Sonne!
Phase 1: Die Anzucht (ca. 6-8 Wochen vor dem letzten Frost)
Die Anzucht ist der erste und wichtigste Schritt. Hier legst du den Grundstein für eine reiche Ernte. Ich beginne meistens im März oder April mit der Anzucht, damit die Pflanzen nach den Eisheiligen (Mitte Mai) ins Freie können.
1. Vorbereitung der Anzuchttöpfe: Fülle die Anzuchttöpfe oder -schalen mit Anzuchterde. Drücke die Erde leicht an.
2. Aussaat der Samen: Lege 2-3 Samen pro Topf auf die Erde. Bedecke die Samen mit einer dünnen Schicht Erde (ca. 0,5 cm).
3. Bewässerung: Befeuchte die Erde vorsichtig mit einer Sprühflasche. Die Erde sollte feucht, aber nicht nass sein.
4. Abdeckung: Decke die Anzuchttöpfe mit Frischhaltefolie oder einem transparenten Deckel ab. Das sorgt für ein feuchtwarmes Klima, das die Keimung fördert.
5. Standort: Stelle die Anzuchttöpfe an einen warmen und hellen Ort. Eine Fensterbank mit Südausrichtung ist ideal.
6. Regelmäßige Kontrolle: Kontrolliere die Erde regelmäßig und halte sie feucht. Lüfte die Anzuchttöpfe täglich, um Schimmelbildung zu vermeiden.
7. Keimung: Nach ca. 1-2 Wochen sollten die ersten Keimlinge zu sehen sein. Entferne die Abdeckung, sobald die Keimlinge aus der Erde kommen.
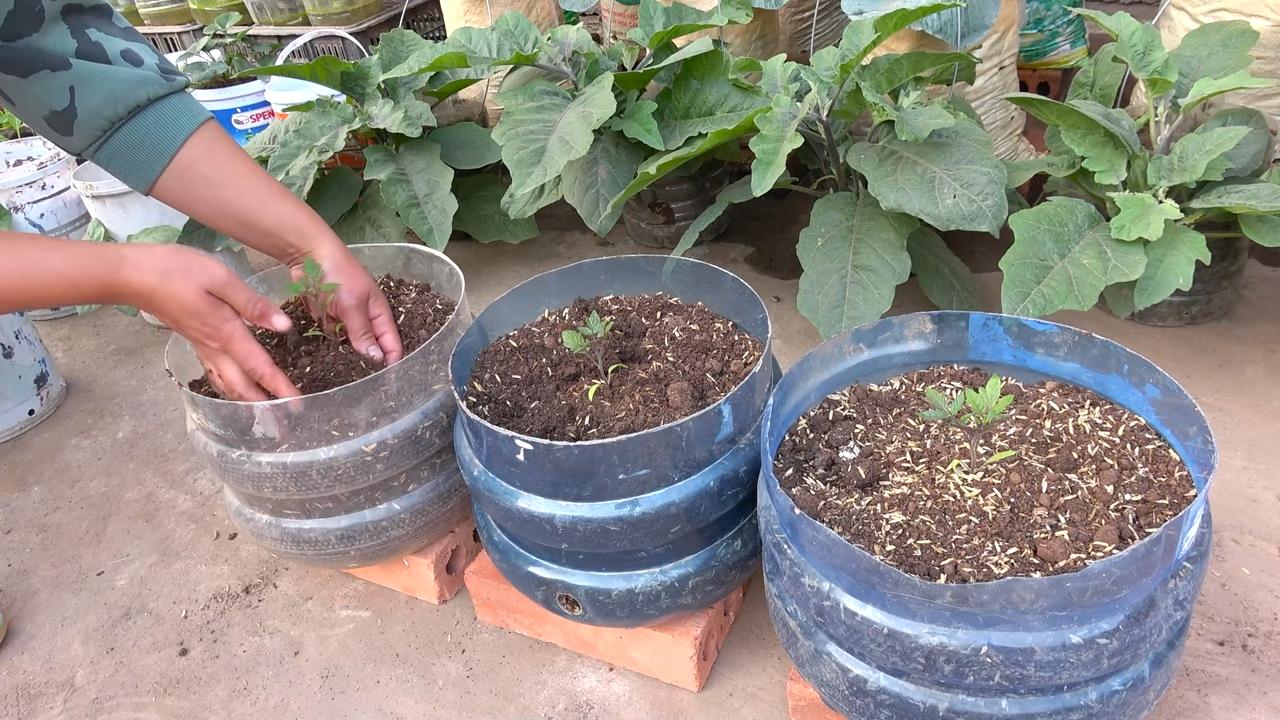
8. Pikieren: Sobald die Keimlinge ihre ersten richtigen Blätter (nach den Keimblättern) entwickelt haben, ist es Zeit zum Pikieren. Das bedeutet, dass du die stärksten Pflanzen in separate Töpfe umpflanzt.
* Fülle kleine Töpfe mit Anzuchterde.
* Löse die Keimlinge vorsichtig aus den Anzuchttöpfen.
* Setze jeden Keimling in einen separaten Topf.
* Bedecke die Wurzeln mit Erde und drücke sie leicht an.
* Gieße die Pflanzen vorsichtig.
Phase 2: Die Pflege der Jungpflanzen
Nach dem Pikieren brauchen die Jungpflanzen weiterhin viel Licht und Aufmerksamkeit.
1. Standort: Stelle die pikierten Pflanzen an einen hellen und warmen Ort.
2. Bewässerung: Gieße die Pflanzen regelmäßig, aber vermeide Staunässe. Die Erde sollte immer leicht feucht sein.
3. Düngen: Beginne nach ca. 2 Wochen mit dem Düngen. Verwende einen Flüssigdünger für Tomaten und halte dich an die Dosierungsanleitung.
4. Drehen: Drehe die Pflanzen regelmäßig, damit sie gleichmäßig wachsen und sich nicht zum Licht neigen.
5. Abhärten: Bevor du die Pflanzen ins Freie pflanzt, solltest du sie abhärten. Das bedeutet, dass du sie für einige Tage stundenweise nach draußen stellst, um sie an die Sonne und den Wind zu gewöhnen.
Phase 3: Das Auspflanzen ins Freie (nach den Eisheiligen)
Nach den Eisheiligen (Mitte Mai) ist die Gefahr von Frost vorbei und du kannst deine Kirschtomatenpflanzen ins Freie pflanzen.
1. Vorbereitung der Pflanzgefäße: Fülle die Pflanztöpfe oder -kübel mit Tomatenerde.
2. Pflanzen: Grabe ein Loch, das groß genug für den Wurzelballen der Pflanze ist. Setze die Pflanze in das Loch und bedecke die Wurzeln mit Erde. Drücke die Erde leicht an.
3. Pflanzabstand: Achte auf einen ausreichenden Pflanzabstand (ca. 50-60 cm), damit die Pflanzen genügend Platz zum Wachsen haben.
4. Stütze: Setze einen Pflanzstab oder ein Rankgitter neben die Pflanze, um sie zu stützen.
5. Bewässerung: Gieße die Pflanzen nach dem Einpflanzen gründlich.
Phase 4: Die Pflege der Tomatenpflanzen im Freien
Jetzt beginnt die eigentliche Arbeit, aber keine Sorge, es ist nicht viel!
1. Standort: Stelle die Töpfe an einen sonnigen und windgeschützten Ort.
2. Bewässerung: Gieße die Pflanzen regelmäßig, besonders an heißen Tagen. Gieße am besten morgens, damit die Blätter bis zum Abend abtrocknen können. Vermeide es, die Blätter zu gießen, da dies Pilzkrankheiten fördern kann.
3. Düngen: Dünge die Pflanzen regelmäßig mit einem Tomatendünger. Halte dich an die Dosierungsanleitung.
4. Ausgeizen: Entferne regelmäßig die Seitentriebe (Geiztriebe), die in den Blattachseln wachsen. Das fördert das Wachstum der Haupttriebe und sorgt für eine bessere Ernte.
5. Anbinden: Binde die Pflanzen regelmäßig an den Pflanzstab oder das Rankgitter, damit sie nicht umknicken.
6. Kontrolle: Kontrolliere die Pflanzen regelmäßig auf Schädlinge und Krankheiten. Bei Bedarf kannst du biologische Schädlingsbekämpfungsmittel einsetzen.
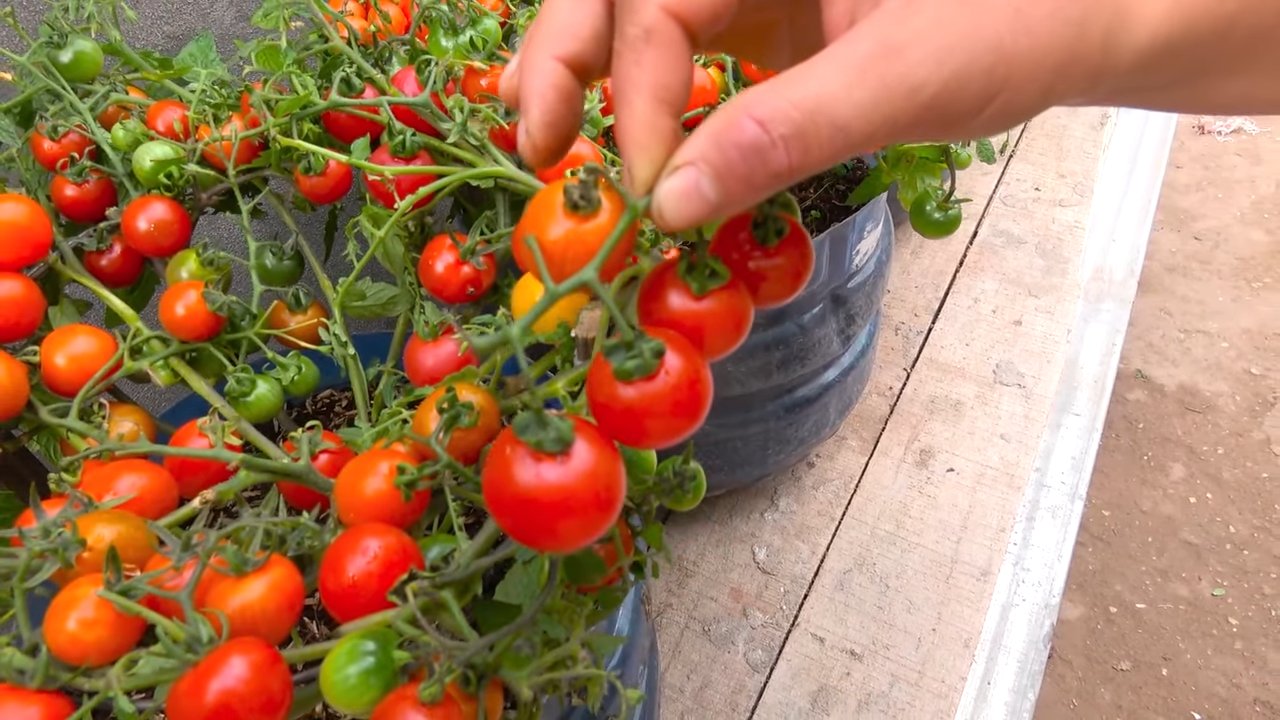
7. Ernte: Die Erntezeit beginnt in der Regel im Juli oder August. Ernte die Kirschtomaten, sobald sie reif und rot sind.
Zusätzliche Tipps für eine reiche Ernte:
* Mulchen: Bedecke die Erde um die Pflanzen mit Mulch (z.B. Stroh oder Rasenschnitt). Das hält die Erde feucht und unterdrückt Unkraut.
* Regenschutz: Wenn du in einer Region mit viel Regen wohnst, solltest du die Pflanzen mit einem Regenschutz versehen. Das schützt die Blätter vor Pilzkrankheiten.
* Sortenwahl: Wähle Sorten, die resistent gegen Krankheiten sind.
* Bodenverbesserung: Verbessere den Boden vor dem Pflanzen mit Kompost oder Hornspänen.
Häufige Probleme und Lösungen:
* Blattläuse: Sprühe die Pflanzen mit einer Seifenlauge ab.
* Braunfäule: Entferne befallene Blätter und Früchte. Sorge für eine gute Belüftung der Pflanzen.
* Pilzkrankheiten: Vermeide es, die Blätter zu gießen. Sorge für eine gute Belüftung der Pflanzen.
Mit diesen Tipps und Tricks kannst du ganz einfach deine eigenen, köstlichen Kirschtomaten ziehen. Ich wünsche dir viel Erfolg und eine reiche Ernte
Conclusion
So, there you have it! Growing cherry tomatoes at home, especially using this simple DIY trick, is more than just a gardening project; it’s an investment in fresh flavor, a boost to your well-being, and a rewarding experience from seed to table. We’ve shown you how to bypass some of the common pitfalls and unlock a bountiful harvest of these sweet, juicy gems. Forget those bland, store-bought tomatoes that lack personality. With a little effort and this easy method, you’ll be enjoying sun-ripened cherry tomatoes bursting with flavor, perfect for salads, snacking, or adding a vibrant touch to your favorite dishes.
The beauty of this DIY approach lies in its adaptability. Feel free to experiment with different varieties of cherry tomatoes. Try growing yellow pear tomatoes for a touch of sweetness, or perhaps some black cherry tomatoes for a deeper, more complex flavor. You can also adjust the soil mix to suit your specific climate and growing conditions. If you live in a particularly hot area, consider adding some extra perlite to improve drainage and prevent the soil from overheating. Conversely, if you live in a cooler climate, you might want to use a darker-colored container to help absorb more heat.
Don’t be afraid to get creative with your support system, either. While we’ve suggested using stakes or cages, you could also try training your cherry tomato plants to grow along a trellis or even in hanging baskets. Just remember to provide adequate support as the plants grow and the fruits begin to ripen.
Beyond the practical benefits, growing your own cherry tomatoes offers a unique connection to nature. There’s something incredibly satisfying about nurturing a plant from a tiny seed to a thriving, fruit-bearing vine. It’s a reminder of the simple pleasures in life and a chance to slow down and appreciate the natural world around us. Plus, it’s a fantastic way to get kids involved in gardening and teach them about where their food comes from.
We wholeheartedly encourage you to give this DIY trick a try. It’s easier than you might think, and the rewards are well worth the effort. Imagine the satisfaction of harvesting your own homegrown cherry tomatoes and sharing them with friends and family. Picture the vibrant colors and delicious flavors adding a touch of sunshine to your meals.
But don’t just take our word for it. We want to hear about your experiences! Share your photos, tips, and stories with us in the comments section below. Let us know what varieties of cherry tomatoes you’re growing, what challenges you’ve faced, and what successes you’ve achieved. Together, we can create a community of passionate gardeners who are dedicated to growing the best possible cherry tomatoes at home. So, grab your seeds, get your hands dirty, and get ready to enjoy the taste of homegrown goodness! Happy gardening!
Frequently Asked Questions (FAQ)
What are the best varieties of cherry tomatoes to grow at home?
The best variety really depends on your personal taste and growing conditions. However, some popular and reliable choices include ‘Sungold’ (known for its exceptional sweetness), ‘Sweet Million’ (a prolific producer), ‘Black Cherry’ (for a rich, complex flavor), and ‘Yellow Pear’ (a unique shape and mild taste). Consider your local climate and disease resistance when making your selection. Look for varieties that are specifically bred for container gardening if you have limited space.
How much sunlight do cherry tomato plants need?
Cherry tomato plants need at least 6-8 hours of direct sunlight per day to thrive. Without enough sunlight, they will become leggy, produce fewer flowers, and ultimately yield fewer fruits. If you don’t have a sunny spot in your garden, consider using grow lights to supplement the natural sunlight.
What kind of soil is best for growing cherry tomatoes?
Cherry tomatoes prefer well-draining soil that is rich in organic matter. A good potting mix specifically formulated for vegetables is a great option. You can also amend your existing garden soil with compost, aged manure, or other organic materials to improve its fertility and drainage. Avoid using heavy clay soil, as it can become waterlogged and suffocate the roots.
How often should I water my cherry tomato plants?
Water your cherry tomato plants deeply and regularly, especially during hot, dry weather. The frequency of watering will depend on the weather, the type of soil, and the size of the container. As a general rule, aim to keep the soil consistently moist but not waterlogged. Check the soil moisture level by sticking your finger into the soil about an inch deep. If it feels dry, it’s time to water. Avoid overhead watering, as this can promote fungal diseases. Instead, water at the base of the plant.
Do cherry tomato plants need fertilizer?
Yes, cherry tomato plants are heavy feeders and benefit from regular fertilization. Use a balanced fertilizer specifically formulated for tomatoes, following the instructions on the package. You can also use organic fertilizers such as compost tea or fish emulsion. Fertilize your plants every 2-3 weeks during the growing season.
How do I prevent pests and diseases from attacking my cherry tomato plants?
Prevention is key when it comes to pests and diseases. Start by choosing disease-resistant varieties of cherry tomatoes. Provide good air circulation around your plants by spacing them properly and pruning away any crowded foliage. Water at the base of the plant to avoid wetting the leaves. Regularly inspect your plants for signs of pests or diseases, such as aphids, whiteflies, or fungal spots. If you spot any problems, take action immediately by using organic pest control methods or fungicides.
When should I harvest my cherry tomatoes?
Cherry tomatoes are ready to harvest when they are fully colored, slightly soft to the touch, and easily detach from the vine. The exact color will depend on the variety you are growing. Taste one to make sure it’s ripe before harvesting the rest. Harvest your tomatoes regularly to encourage continued production.
Can I grow cherry tomatoes indoors?
Yes, you can grow cherry tomatoes indoors, but you will need to provide them with adequate light and warmth. Use grow lights to supplement the natural sunlight, and maintain a consistent temperature of around 70-75 degrees Fahrenheit. Choose a compact variety of cherry tomato that is well-suited for container gardening.
What if my cherry tomato plant is flowering but not producing fruit?
There are several reasons why your cherry tomato plant might be flowering but not producing fruit. One common cause is lack of pollination. Tomatoes are self-pollinating, but they often need a little help from the wind or insects to transfer the pollen. You can manually pollinate your plants by gently shaking the flowers or using a small brush to transfer pollen from one flower to another. Other possible causes include high temperatures, lack of water, or nutrient deficiencies.
How do I store my harvested cherry tomatoes?
Store your harvested cherry tomatoes at room temperature for the best flavor. Avoid refrigerating them, as this can make them mealy and less flavorful. If you have a large harvest, you can preserve your cherry tomatoes by canning them, freezing them, or drying them. You can also make them into sauces, salsas, or other delicious dishes.

Leave a Comment