
Growing flavorful chili at home is easier than you might think, and trust me, the rewards are fiery! Forget those bland, store-bought peppers – imagine plucking vibrant, intensely flavored chilies straight from your own garden. For centuries, chili peppers have been a staple in cuisines around the world, adding a kick to everything from ancient Aztec stews to modern-day curries. Their journey from the Americas to global kitchens is a testament to their enduring appeal.
But let’s be honest, sometimes growing your own can feel a little daunting. That’s where these DIY tricks and hacks come in! I’m going to share some simple, yet effective methods to help you cultivate a thriving chili pepper patch, even if you’re a complete beginner. We’ll cover everything from choosing the right varieties for your climate to maximizing flavor through clever watering techniques.
Why do you need these DIY tricks? Because growing flavorful chili isn’t just about planting a seed and hoping for the best. It’s about understanding the plant’s needs and providing the right environment for it to flourish. With a little know-how, you can unlock the secrets to producing chilies that are bursting with heat and flavor, far surpassing anything you can find at the grocery store. So, grab your gardening gloves, and let’s get started on this exciting journey to chili pepper perfection!
Growing Flavorful Chili Peppers: A DIY Guide to Spice Up Your Garden
Okay, chili pepper enthusiasts, gather ’round! I’m going to walk you through everything you need to know to grow the most flavorful, fiery chili peppers right in your own backyard (or even on your balcony!). Forget those bland, store-bought peppers – we’re talking about homegrown heat that will elevate your cooking to a whole new level.
Choosing Your Chili Pepper Varieties
Before we get our hands dirty, let’s talk about pepper personalities. There are *so* many varieties, each with its own unique flavor profile and heat level. Here’s a quick rundown to get you started:
* Mild & Sweet: Poblano, Anaheim, Banana Pepper. Great for stuffing, roasting, or adding a subtle kick to dishes.
* Medium Heat: Jalapeño, Serrano. Versatile peppers perfect for salsas, pickling, or adding a noticeable warmth.
* Hot & Fiery: Cayenne, Thai Chili, Scotch Bonnet. These are for the heat seekers! Use sparingly in sauces, curries, or chili oil.
* Extreme Heat: Habanero, Ghost Pepper, Carolina Reaper. Proceed with caution! These peppers pack a serious punch and are best used by experienced chili lovers.
My personal favorites? I love growing Jalapeños for everyday use, Cayennes for drying and making chili flakes, and a few Habaneros for when I’m feeling brave.
Getting Started: Seeds vs. Seedlings
You have two main options for starting your chili pepper journey: seeds or seedlings.
* Seeds: Starting from seed gives you the widest variety to choose from and is generally more cost-effective. However, it requires more time and effort, as you’ll need to start them indoors several weeks before the last frost.
* Seedlings: Buying seedlings from a nursery is a quicker and easier option, especially if you’re short on time or don’t have a dedicated indoor growing space. Just make sure to choose healthy-looking plants with vibrant green leaves.
I usually start my peppers from seed because I enjoy the process and love having access to a wider range of varieties. But if you’re a beginner or just want a head start, seedlings are a great choice.
Starting Chili Peppers from Seed (Indoor)
If you’re going the seed route, here’s how to get those little guys germinating:
1. Gather Your Supplies:
* Chili pepper seeds
* Seed starting trays or small pots
* Seed starting mix (a light, well-draining soil)
* Spray bottle
* Heat mat (optional, but recommended)
* Grow light (optional, but recommended)
* Clear plastic dome or plastic wrap
2. Sow the Seeds:
* Moisten the seed starting mix with the spray bottle. It should be damp but not soggy.
* Fill the seed starting trays or pots with the moistened mix.
* Sow the seeds about ¼ inch deep, placing 2-3 seeds per cell or pot.
* Gently cover the seeds with more seed starting mix.
* Lightly mist the surface with the spray bottle.
3. Create a Humid Environment:
* Cover the seed starting trays or pots with a clear plastic dome or plastic wrap to create a humid environment. This helps the seeds germinate.
4. Provide Warmth and Light:
* Place the seed starting trays or pots on a heat mat to maintain a soil temperature of around 80-85°F (27-29°C). This is the ideal temperature for chili pepper seed germination.
* If you’re using a grow light, position it a few inches above the seed starting trays or pots and keep it on for 14-16 hours per day. If you don’t have a grow light, place the trays or pots in a sunny window, but be aware that the seedlings may become leggy (tall and spindly) if they don’t receive enough light.
5. Monitor and Water:
* Check the seed starting trays or pots daily and mist the soil with the spray bottle as needed to keep it moist. Don’t let the soil dry out completely.
* Once the seeds germinate (usually within 7-14 days), remove the plastic dome or plastic wrap.
6. Thin the Seedlings:
* Once the seedlings have developed their first true leaves (the second set of leaves that appear after the cotyledons, or seed leaves), thin them to one seedling per cell or pot. Choose the strongest, healthiest-looking seedling and snip off the others at the soil line with scissors.
7. Harden Off the Seedlings:
* Before transplanting the seedlings outdoors, you’ll need to harden them off. This process gradually acclimates the seedlings to outdoor conditions, preventing them from being shocked by the sun, wind, and temperature changes.
* Start by placing the seedlings outdoors in a sheltered location for 1-2 hours per day, gradually increasing the amount of time they spend outdoors each day over the course of a week or two.
* Also, gradually expose the seedlings to more direct sunlight each day.
* If the weather is particularly harsh (e.g., strong winds, heavy rain), bring the seedlings back indoors.
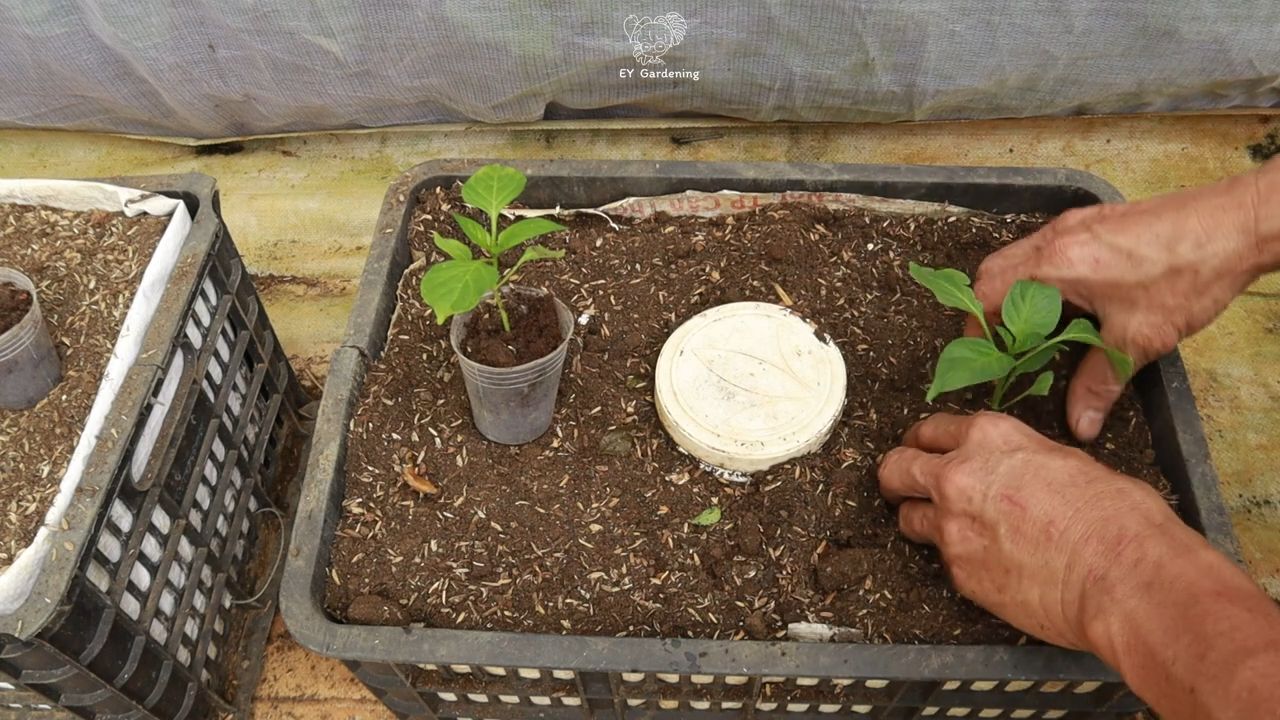
Transplanting Chili Peppers Outdoors
Once the danger of frost has passed and the soil has warmed up, it’s time to transplant your chili pepper seedlings outdoors.
1. Choose a Sunny Location:
* Chili peppers need at least 6-8 hours of direct sunlight per day to thrive. Choose a location in your garden that receives plenty of sun.
2. Prepare the Soil:
* Chili peppers prefer well-drained soil that is rich in organic matter. Amend the soil with compost or well-rotted manure before planting.
3. Dig the Holes:
* Dig holes that are slightly larger than the root balls of the seedlings. Space the holes about 18-24 inches apart.
4. Transplant the Seedlings:
* Gently remove the seedlings from their pots or trays.
* Loosen the roots slightly before planting.
* Place the seedlings in the holes and backfill with soil.
* Water the seedlings thoroughly.
5. Mulch the Plants:
* Apply a layer of mulch around the plants to help retain moisture, suppress weeds, and regulate soil temperature.
Caring for Your Chili Pepper Plants
Now that your chili pepper plants are in the ground, here’s how to keep them happy and healthy:
* Watering: Water regularly, especially during hot, dry weather. Chili peppers need consistent moisture, but avoid overwatering, which can lead to root rot.
* Fertilizing: Fertilize every 2-3 weeks with a balanced fertilizer or a fertilizer specifically formulated for peppers and tomatoes.
* Pruning: Pruning is optional, but it can help to improve air circulation and encourage bushier growth. Remove any suckers (small shoots that grow from the base of the plant) and any yellowing or diseased leaves.
* Pest and Disease Control: Keep an eye out for common pests such as aphids, spider mites, and whiteflies. Treat infestations with insecticidal soap or neem oil. Prevent fungal diseases by providing good air circulation and avoiding overhead watering.
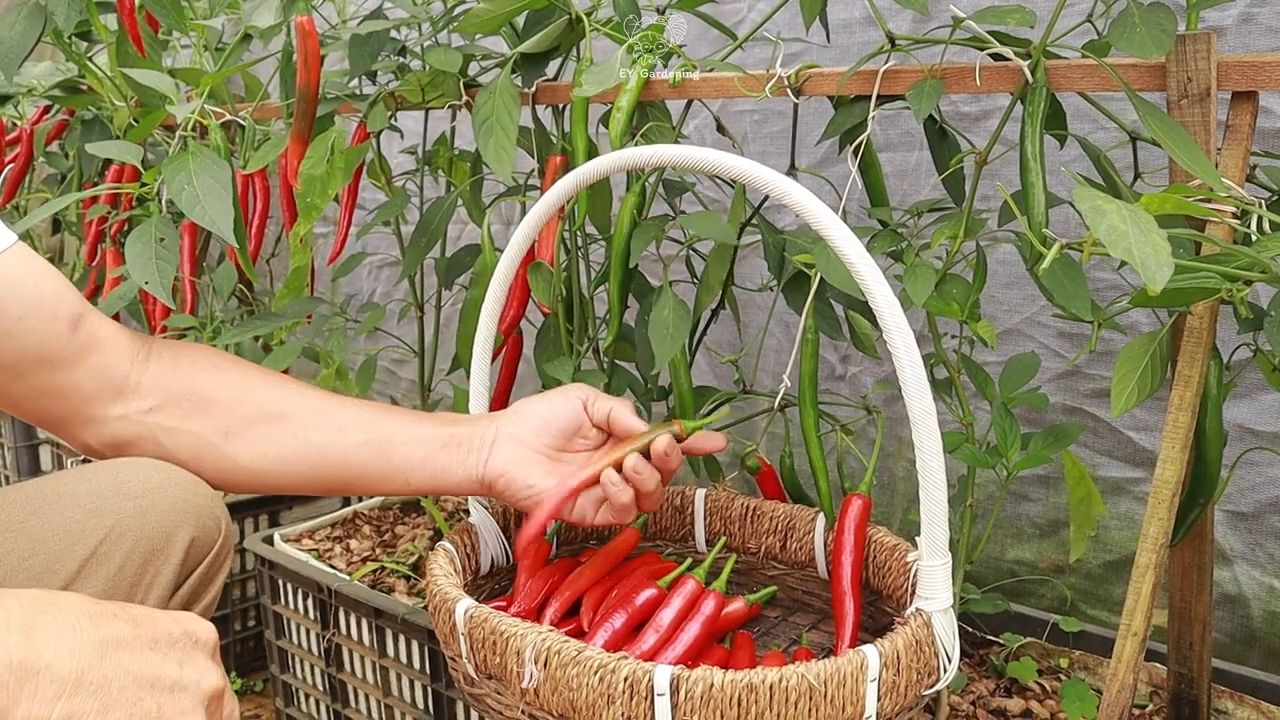
Harvesting Your Chili Peppers
The moment we’ve all been waiting for! Harvesting your homegrown chili peppers is incredibly rewarding.
* When to Harvest: The best time to harvest chili peppers depends on the variety and your personal preference. Generally, peppers are ready to harvest when they have reached their mature size and color.
* How to Harvest: Use pruning shears or scissors to cut the peppers from the plant, leaving a small stem attached.
A little tip: The longer you leave the peppers on the plant, the hotter they will become.
Drying and Storing Chili Peppers
If you have a bumper crop of chili peppers, you can dry them for long-term storage.
1. Stringing: Thread the peppers onto a string using a needle. Hang the string of peppers in a warm, dry, well-ventilated place until they are completely dry.
2. Dehydrator: Use a food dehydrator to dry the peppers. Follow the manufacturer’s instructions for drying times and temperatures.
3. Oven: Spread the peppers on a baking sheet and dry them in a low oven (around 170°F or 77°C) for several hours, or until they are completely dry.
Once the peppers are dry, store them in an airtight container in a cool, dark place. You can also grind them into chili powder or flakes.
Troubleshooting Common Chili Pepper Problems
Even with the best care, you might encounter some problems along the way. Here
Conclusion
So, there you have it! Transforming ordinary chili peppers into flavor powerhouses with this simple DIY trick is not just a fun experiment; it’s a game-changer for your culinary creations. We’ve explored how to unlock a depth of flavor that store-bought chili powder simply can’t match, and the best part? You’re in complete control.
Why is this a must-try? Because it elevates your dishes from good to extraordinary. Imagine the rich, smoky heat infusing your favorite chili recipe, the vibrant kick adding complexity to your tacos, or the subtle warmth enhancing your homemade sauces. This isn’t just about adding spice; it’s about adding layers of flavor that will tantalize your taste buds and impress your guests.
But the beauty of this DIY chili enhancement lies in its versatility. Feel free to experiment with different types of chili peppers to create your own signature blend. Want a milder heat? Opt for ancho or poblano peppers. Craving intense fire? Incorporate some habaneros or scotch bonnets, but remember to handle them with care! You can also play around with the roasting time to achieve your desired level of smokiness. A longer roast will result in a deeper, more intense flavor, while a shorter roast will preserve more of the pepper’s natural sweetness.
Consider adding other spices to your blend for even more complexity. A pinch of cumin, coriander, or smoked paprika can complement the chili peppers beautifully. You could even incorporate dried herbs like oregano or thyme for an earthy note. The possibilities are endless!
Don’t be afraid to get creative and tailor this DIY chili trick to your own preferences. That’s the joy of cooking, after all – experimenting, learning, and discovering new flavors.
We wholeheartedly encourage you to try this DIY chili enhancement. It’s a simple, rewarding process that will transform the way you cook with chili peppers. Once you’ve experienced the difference, you’ll never go back to store-bought chili powder again.
And most importantly, we want to hear about your experience! Share your creations, your variations, and your tips in the comments below. Let’s build a community of chili enthusiasts and inspire each other to create even more delicious and flavorful dishes. What kind of chili did you use? What other spices did you add? What dishes did you use your homemade chili enhancement in? We’re eager to learn from your experiences and celebrate your culinary successes. So go ahead, unleash your inner chili master and share your story!
Frequently Asked Questions (FAQ)
What types of chili peppers work best for this DIY trick?
The beauty of this method is its versatility. You can use virtually any type of dried chili pepper, depending on your desired level of heat and flavor profile. For a mild and fruity flavor, ancho peppers are a great choice. For a smoky and slightly sweet flavor, try guajillo peppers. If you’re looking for more heat, consider using chipotle peppers (smoked jalapeños) or even a small amount of habaneros or scotch bonnets (use caution!). Experimenting with different combinations of chili peppers is highly encouraged to create your own unique blend. Remember to always wear gloves when handling hot peppers, and avoid touching your face.
How long should I roast the chili peppers?
The roasting time will depend on the type of chili peppers you’re using and your desired level of smokiness. Generally, you’ll want to roast them for about 5-10 minutes per side, or until they become fragrant and slightly pliable. Keep a close eye on them to prevent burning, as burnt chili peppers will have a bitter taste. If you want a deeper, more intense smoky flavor, you can roast them for a longer period of time, but be sure to monitor them closely.
Can I use fresh chili peppers instead of dried ones?
While you can technically use fresh chili peppers, it’s not recommended for this particular DIY trick. Fresh chili peppers contain a lot of moisture, which will prevent them from roasting properly and achieving the desired smoky flavor. Dried chili peppers have a more concentrated flavor and are easier to roast evenly. If you do want to use fresh chili peppers, you’ll need to dry them first, either in a dehydrator or by hanging them in a well-ventilated area for several weeks.
How should I store my homemade chili enhancement?
To preserve the flavor and freshness of your homemade chili enhancement, store it in an airtight container in a cool, dark, and dry place. A spice jar or a resealable bag works well. Properly stored, it should last for several months. Be sure to label the container with the date you made it.
Can I add other spices to my chili enhancement blend?
Absolutely! Adding other spices is a great way to customize your chili enhancement and create your own unique flavor profile. Some popular additions include cumin, coriander, smoked paprika, garlic powder, onion powder, oregano, and thyme. Experiment with different combinations and amounts to find what you like best.
What’s the best way to grind the roasted chili peppers?
A spice grinder or a coffee grinder (dedicated solely to spices) works best for grinding the roasted chili peppers into a fine powder. You can also use a mortar and pestle, but it will require more effort. If you don’t have a spice grinder or mortar and pestle, you can use a food processor, but be careful not to over-process the peppers, as this can release too much oil and create a paste.
How can I adjust the heat level of my chili enhancement?
The heat level of your chili enhancement will depend on the type of chili peppers you use. If you want a milder heat, use ancho or poblano peppers. For more heat, use chipotle peppers or a small amount of habaneros or scotch bonnets. You can also adjust the heat level by adding or removing the seeds and membranes from the chili peppers before roasting them. The seeds and membranes contain most of the capsaicin, which is the compound that gives chili peppers their heat.
What dishes can I use my homemade chili enhancement in?
The possibilities are endless! You can use your homemade chili enhancement in chili, tacos, enchiladas, soups, stews, sauces, rubs, marinades, and even sprinkled on top of eggs or popcorn. It’s a versatile ingredient that can add a kick of flavor to almost any dish.
What if my chili peppers burn during roasting?
If your chili peppers burn during roasting, unfortunately, there’s not much you can do to salvage them. Burnt chili peppers will have a bitter taste that will ruin your chili enhancement. It’s best to discard them and start over with a fresh batch. To prevent burning, keep a close eye on the chili peppers while they’re roasting and adjust the oven temperature or roasting time as needed.
Is it necessary to wear gloves when handling chili peppers?
Yes, it’s highly recommended to wear gloves when handling chili peppers, especially hot ones. Chili peppers contain capsaicin, which can irritate the skin and cause a burning sensation. Wearing gloves will protect your hands from the capsaicin. If you don’t have gloves, you can wash your hands thoroughly with soap and water after handling chili peppers, but avoid touching your face or eyes.

Leave a Comment