
Growing Gourds in Bags: Unlock a world of creative possibilities right in your backyard! Have you ever dreamt of crafting your own unique birdhouses, whimsical decorations, or even musical instruments? Gourds, with their fascinating shapes and textures, offer endless DIY potential. But what if you lack a sprawling garden? Don’t worry, I’m here to tell you that you can absolutely cultivate these amazing plants even in limited spaces, and that’s where the magic of growing gourds in bags comes in!
Gourds have a rich history, dating back thousands of years. Ancient civilizations across the globe, from Africa to the Americas, relied on them for everything from containers and utensils to ceremonial objects. Their versatility and durability made them invaluable. Today, we can tap into that same resourcefulness, but with a modern twist.
Many people are intimidated by the idea of growing gourds, thinking they require vast amounts of space and specialized knowledge. But the truth is, with a few simple tricks, anyone can successfully cultivate these fascinating plants. This DIY guide will show you how to bypass the space constraints and potential soil issues by growing gourds in bags. I’ll walk you through every step, from selecting the right varieties to providing the perfect growing conditions, ensuring you’ll be harvesting your own beautiful gourds in no time. Get ready to unleash your inner artist and gardener!
Growing Gourds in Bags: A DIY Guide to Vertical Gardening
Hey there, fellow gardening enthusiasts! I’m so excited to share my experience with growing gourds in bags – it’s a fantastic way to maximize space, add a unique touch to your garden, and get a bountiful harvest of these fascinating fruits. Forget sprawling vines taking over your entire yard; this method lets you grow gourds vertically, saving space and creating a stunning visual display. Let’s dive in!
Choosing Your Gourds and Preparing for Planting
Before we get our hands dirty, let’s talk about selecting the right gourd variety and getting everything ready. Not all gourds are created equal, and some are better suited for container gardening than others.
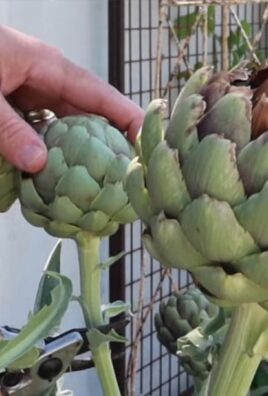
* **Gourd Variety Selection:** I’ve had the most success with smaller to medium-sized gourds like birdhouse gourds, bottle gourds, and dipper gourds. Larger varieties can become too heavy for the bags, so stick with the more manageable types. Consider the final use of your gourds too – are you planning on crafting birdhouses, bowls, or decorative items? This will help you choose the perfect variety.
* **Seed Starting (Optional but Recommended):** While you can directly sow gourd seeds into the bags, I highly recommend starting them indoors about 4-6 weeks before the last expected frost. This gives them a head start and increases your chances of a successful harvest.
* **Materials:** You’ll need seed starting trays or small pots, seed starting mix, and a heat mat (optional but helpful).
* **Process:** Moisten the seed starting mix and fill your trays or pots. Plant 2-3 seeds per cell or pot, about ½ inch deep. Gently water and place them on a heat mat if you have one. Keep the soil consistently moist but not soggy. Once the seedlings emerge and have a couple of true leaves, thin them to one plant per cell or pot.
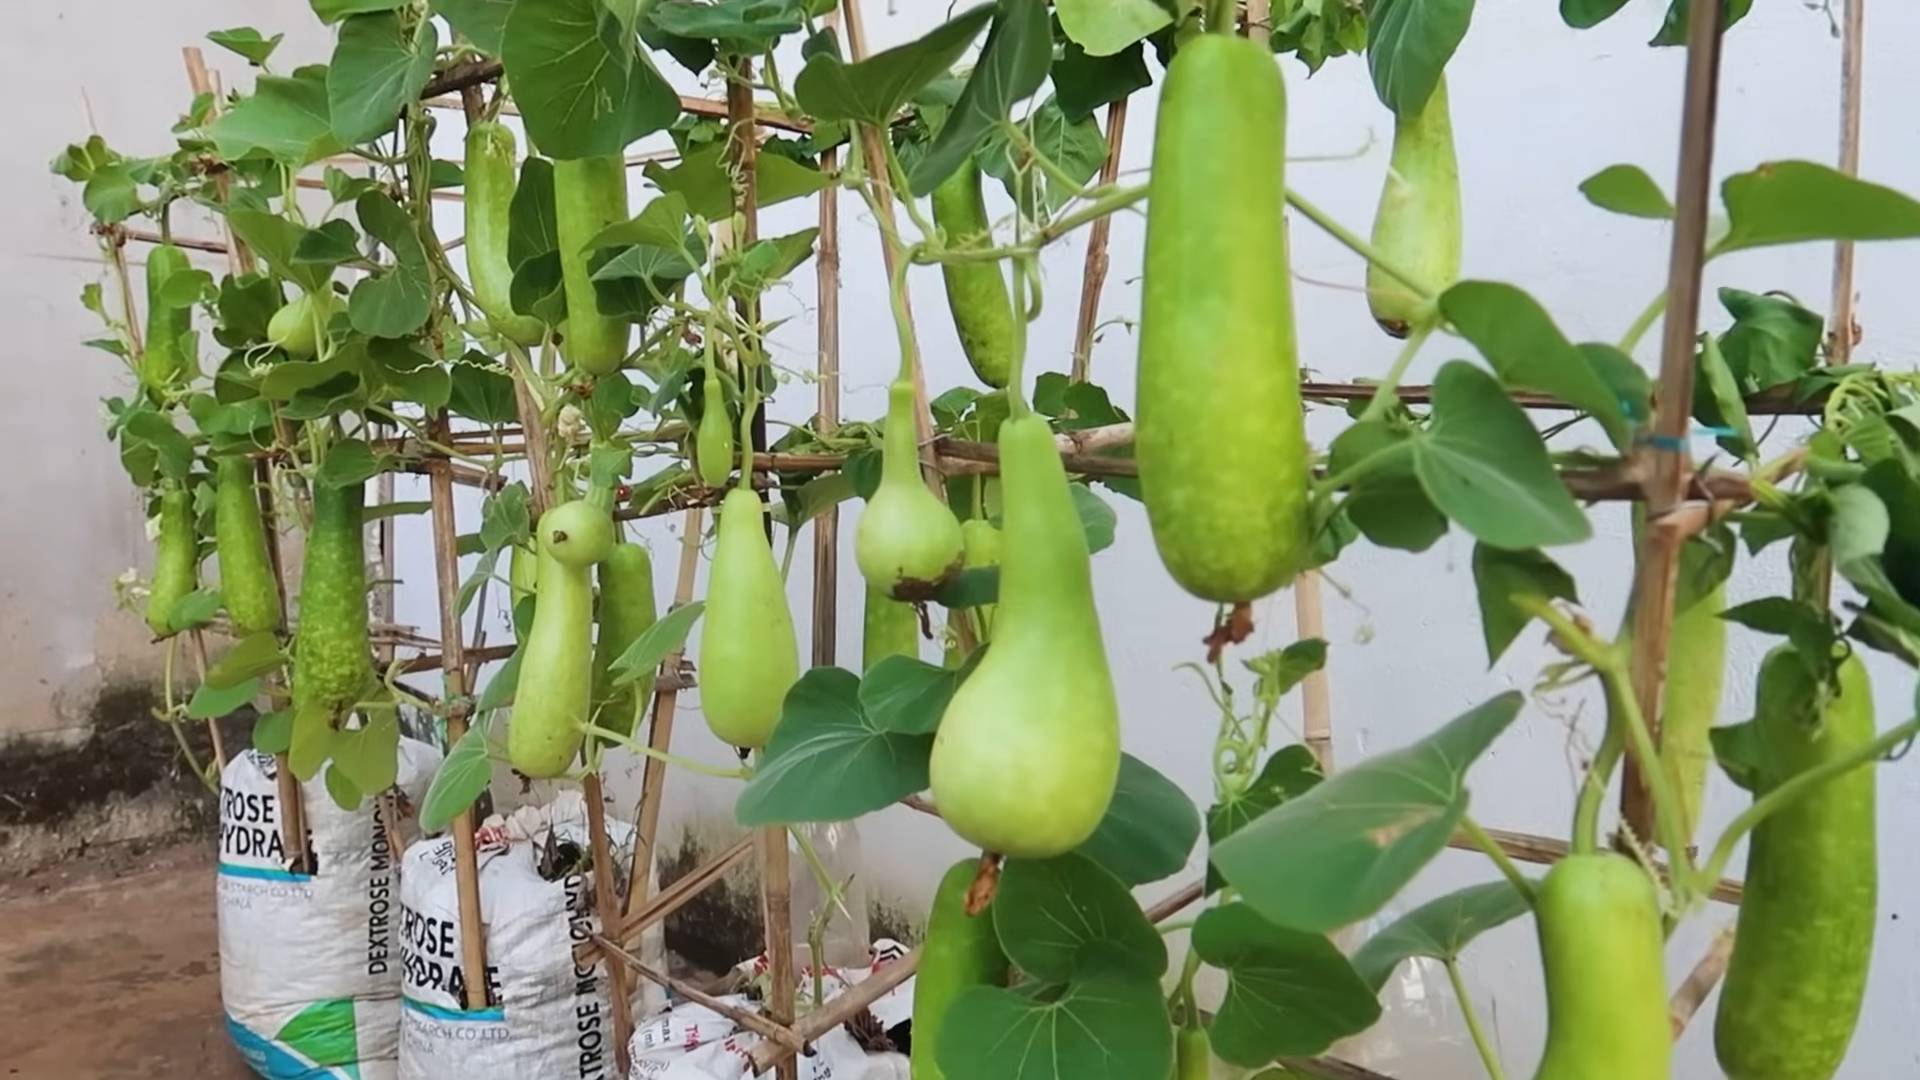
* **Bag Selection:** Choose sturdy, woven polypropylene bags. These are often used for animal feed or landscaping materials. Look for bags that are at least 18 inches in diameter and 24 inches tall. The larger the bag, the more room the roots will have to grow. Make sure the bags are clean and free of any debris.
* **Drainage is Key:** Gourds need well-draining soil, so it’s crucial to create drainage holes in the bottom of the bags. I usually poke several holes (about ½ inch in diameter) using a drill or a sharp knife. Don’t skip this step!
Preparing the Soil and Planting Your Gourds
Now for the fun part – getting our hands dirty! The right soil mix is essential for healthy gourd growth.
* **Soil Mix Recipe:** I’ve found that a mix of equal parts compost, potting soil, and perlite or vermiculite works wonders. The compost provides nutrients, the potting soil provides structure, and the perlite or vermiculite improves drainage and aeration. Avoid using garden soil, as it can be too heavy and compact in containers.
* **Filling the Bags:** Fill the bags about ¾ full with your soil mix. Gently tamp down the soil to remove any air pockets.
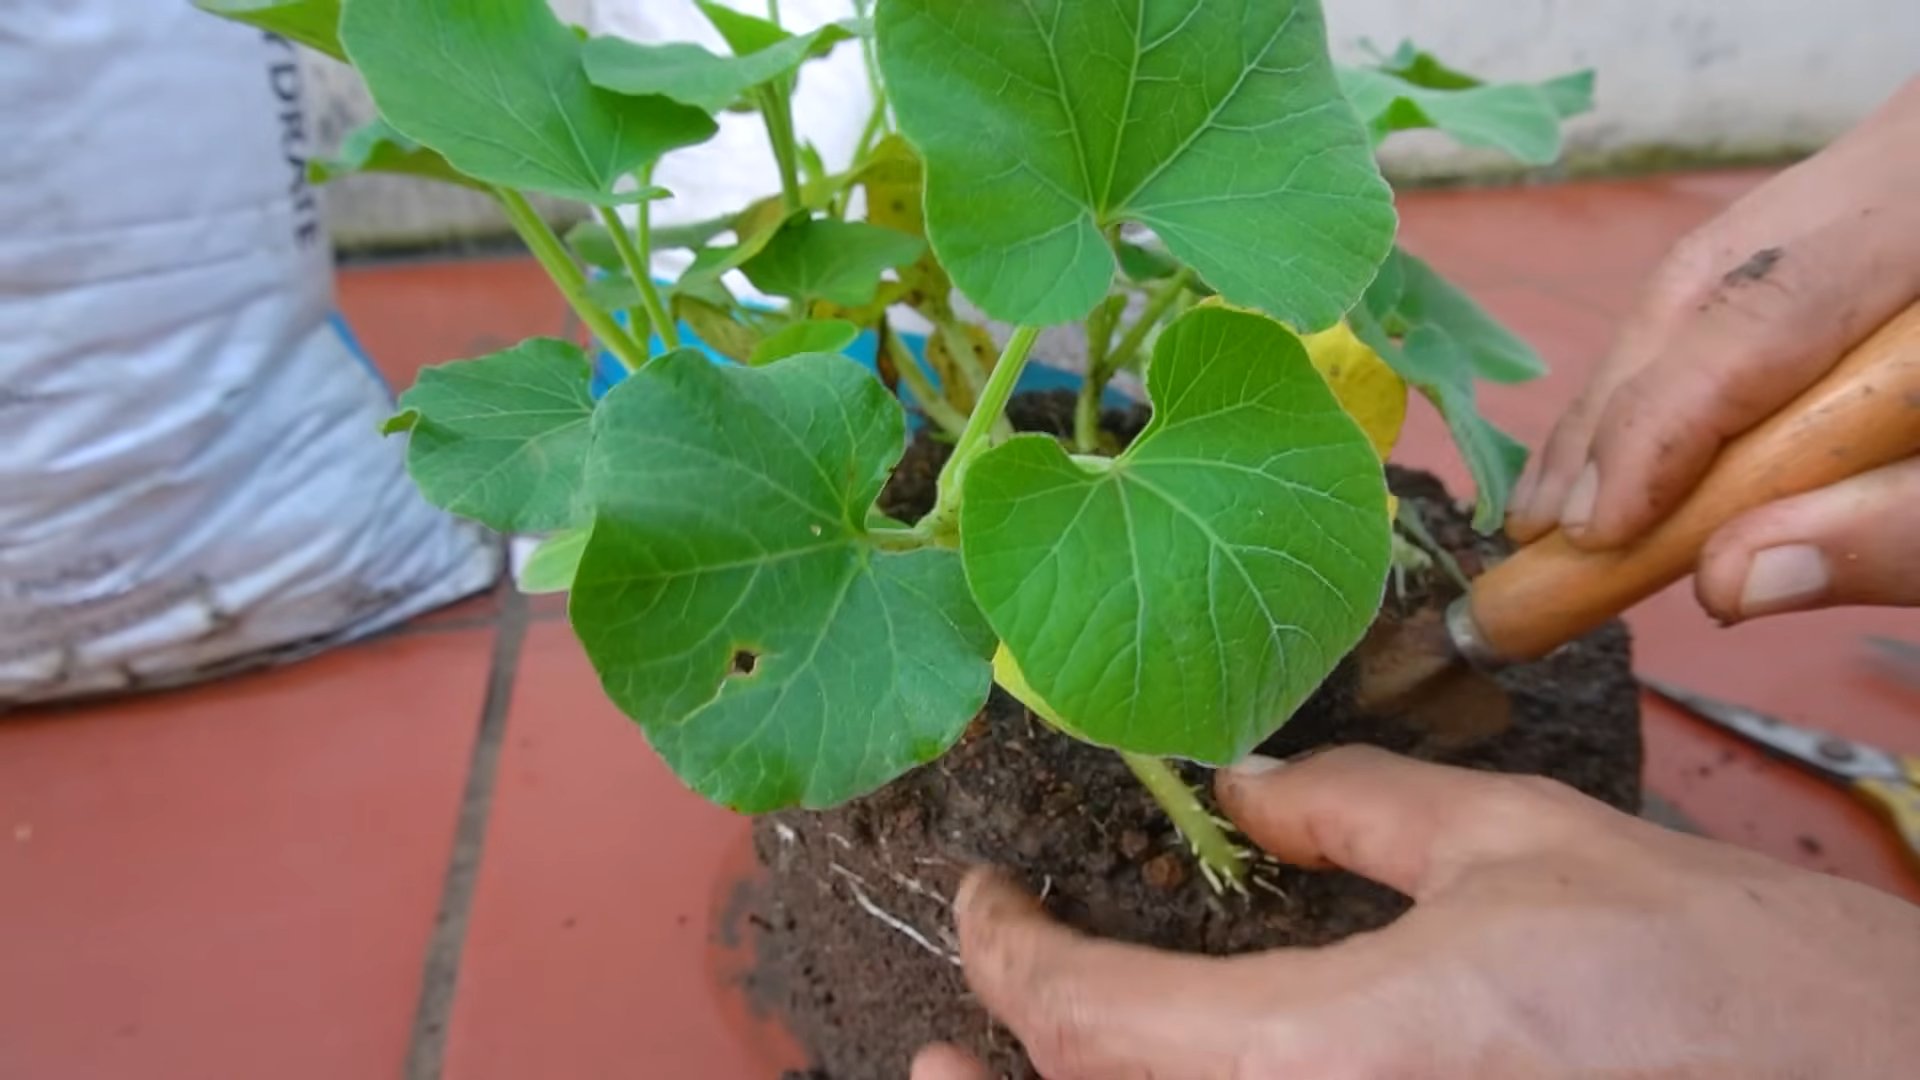
* **Planting Seedlings (or Direct Sowing):** If you started your seeds indoors, carefully transplant the seedlings into the bags. Dig a hole in the center of the bag large enough to accommodate the root ball. Gently remove the seedling from its container and place it in the hole. Backfill with soil and gently firm around the base of the plant. If you’re direct sowing, plant 3-4 seeds per bag, about ½ inch deep. Once the seedlings emerge, thin them to the strongest plant.
* **Watering After Planting:** Water the bags thoroughly after planting, making sure the soil is evenly moist.
Setting Up Your Vertical Support System
Gourds are vines, so they need a strong support system to climb. This is where the “vertical” part of our gardening comes in!
* **Choosing a Support Structure:** There are several options for supporting your gourd vines. I’ve used trellises, fences, and even sturdy tomato cages with great success. The key is to choose a structure that is strong enough to support the weight of the mature vines and gourds.
* **Installing the Support:** Position the support structure behind the bags. Make sure it’s securely anchored in the ground or attached to a wall or fence.
* **Training the Vines:** As the gourd vines grow, gently train them to climb the support structure. You can use plant ties or twine to secure the vines to the support. Be patient and consistent with this process, as it will help the vines grow in the direction you want them to.
Caring for Your Growing Gourds
Once your gourds are planted and supported, it’s time to provide them with the care they need to thrive.
* **Watering:** Gourds need consistent moisture, especially during hot weather. Water deeply whenever the top inch of soil feels dry to the touch. Avoid overwatering, as this can lead to root rot.
* **Fertilizing:** Gourds are heavy feeders, so regular fertilization is essential. I like to use a balanced liquid fertilizer every 2-3 weeks. You can also amend the soil with compost tea or worm castings for an extra boost of nutrients.
* **Sunlight:** Gourds need at least 6-8 hours of sunlight per day to produce a good harvest. Choose a location that receives plenty of sun.
* **Pest and Disease Control:** Keep an eye out for common gourd pests like squash bugs, squash vine borers, and aphids. You can use insecticidal soap or neem oil to control these pests. Powdery mildew can also be a problem, especially in humid climates. Improve air circulation around the plants and use a fungicide if necessary.
* **Pollination:** Gourds have separate male and female flowers. Bees and other pollinators are essential for transferring pollen from the male flowers to the female flowers. If you’re not seeing a lot of bee activity, you may need to hand-pollinate the flowers. To do this, use a small paintbrush to collect pollen from the male flowers and transfer it to the female flowers. Female flowers have a small gourd-like structure at the base of the flower.
Harvesting and Curing Your Gourds
The moment we’ve all been waiting for – harvesting our beautiful gourds!
* **When to Harvest:** Gourds are typically ready to harvest in the fall, after the vines have died back and the gourds have turned a hard, tan color. The stem connecting the gourd to the vine should also be dry and brown.
* **Harvesting Technique:** Use pruning shears or a sharp knife to cut the gourds from the vine, leaving a few inches of stem attached. Handle the gourds carefully to avoid bruising or damaging them.
* **Curing Process:** Curing is essential for preserving your gourds and preventing them from rotting.
1. **Cleaning:** Gently wash the gourds with soapy water to remove any dirt or debris.
2. **Drying:** Place the gourds in a well-ventilated area, such as a garage or shed. Avoid direct sunlight, as this can cause the gourds to crack.
3. **Air Circulation:** Elevate the gourds on racks or pallets to allow for good air circulation.
4. **Turning:** Turn the gourds every few days to ensure even drying.
5. **Patience is Key:** The curing process can take several weeks or even months, depending on the size of the gourds and the humidity levels. You’ll know the gourds are fully cured when they are lightweight and the seeds rattle inside.
* **Troubleshooting Curing Issues:**
* **Mold:** If you notice mold growing on the gourds, wipe it off with a solution of bleach and water (1 part bleach to 10 parts water).
* **Soft Spots:** Discard any gourds that develop soft spots, as they are likely rotting.
Creative Uses for Your Homegrown Gourds
Now that you have a collection of beautiful, cured gourds, it’s time to get creative!
* **Birdhouses:** Birdhouse gourds are perfect for creating natural birdhouses. Simply drill an entrance hole and a drainage hole, and hang the gourd from a tree branch.
* **Bowls and Utensils:** Bottle gourds can be used to make bowls, dippers, and other utensils.
* **Decorative Items:** Gourds can be painted, carved, or decorated in countless ways. Use them to create unique centerpieces, ornaments, or wall art.
* **Musical Instruments:** Some gourds can be used to make musical instruments like rattles or drums.
* **Gifts:** Handcrafted gourd items make thoughtful and unique gifts for friends and family.
Growing gourds in bags is a rewarding and space-saving way to enjoy these fascinating fruits. With a little planning and care, you can create a stunning vertical garden and harvest a bounty of gourds for crafting, decorating, and more. Happy gardening!
Conclusion
So, there you have it! Growing gourds in bags is not just a viable option; it’s a game-changer for gardeners with limited space, challenging soil, or a desire for greater control over their growing environment. We’ve explored the ins and outs of this method, from selecting the right bag size and soil mix to providing adequate support and addressing potential challenges. But why is this DIY trick a must-try?
First and foremost, it democratizes gourd growing. No longer are these fascinating fruits relegated to sprawling gardens. Anyone with a sunny balcony, patio, or even a small deck can successfully cultivate gourds. The portability of bags allows you to chase the sun, protect your plants from unexpected frosts, and even move them indoors during extreme weather events. This level of control is simply unmatched by traditional in-ground planting.
Secondly, growing gourds in bags offers superior drainage and aeration compared to many garden soils. This is crucial for preventing root rot and promoting healthy growth. By crafting your own soil mix, you can tailor it specifically to the needs of your gourd varieties, ensuring they receive the perfect balance of nutrients and moisture.
Thirdly, the contained environment of a bag minimizes weed competition and reduces the risk of soilborne diseases. This translates to less time spent weeding and more time enjoying the fruits (or rather, gourds!) of your labor.
But the beauty of this method lies in its adaptability. Feel free to experiment with different bag sizes and materials. Burlap bags offer a rustic aesthetic and excellent breathability, while heavy-duty plastic bags provide superior moisture retention. Consider adding slow-release fertilizer to your soil mix for sustained nutrient delivery. You can also try companion planting herbs like basil or marigolds around the base of your gourds to deter pests.
For those aiming for truly impressive specimens, consider using larger grow bags (20 gallons or more) and providing a sturdy trellis system. This will allow your gourds to reach their full potential and create a stunning visual display. If you’re growing ornamental gourds, try training them up arches or pergolas for a whimsical touch.
Ultimately, the success of growing gourds in bags hinges on your willingness to experiment and adapt. Pay close attention to your plants’ needs, adjust your watering and feeding schedule accordingly, and don’t be afraid to try new things.
We wholeheartedly encourage you to give this DIY trick a try. It’s a rewarding and surprisingly simple way to cultivate these unique and versatile plants. And most importantly, we want to hear about your experience! Share your photos, tips, and challenges in the comments below. Let’s build a community of gourd-growing enthusiasts and learn from each other’s successes and failures. Your insights could inspire others to embark on their own gourd-growing adventures. So, grab some bags, mix some soil, and get ready to experience the joy of growing gourds in a whole new way! Let’s see those beautiful, homegrown gourds!
Frequently Asked Questions (FAQ)
What size bag is best for growing gourds?
The ideal bag size depends on the type of gourd you’re growing. For smaller ornamental gourds, a 10-gallon bag may suffice. However, for larger varieties like birdhouse gourds or dipper gourds, a 20-gallon or even larger bag is recommended. The larger the bag, the more room the roots have to grow, resulting in a healthier and more productive plant. Consider the mature size of the gourd variety when selecting your bag size. A good rule of thumb is to err on the side of larger rather than smaller.
What kind of soil mix should I use?
A well-draining and nutrient-rich soil mix is crucial for growing gourds in bags. A good starting point is a mix of equal parts potting soil, compost, and perlite or vermiculite. The potting soil provides a base for the mix, the compost adds essential nutrients, and the perlite or vermiculite improves drainage and aeration. You can also add a slow-release fertilizer to the mix to provide sustained nutrient delivery throughout the growing season. Avoid using garden soil, as it can be too heavy and compact, leading to drainage problems.
How often should I water my gourds in bags?
Watering frequency depends on several factors, including the weather, the size of the bag, and the type of gourd you’re growing. Generally, you should water your gourds when the top inch of soil feels dry to the touch. During hot, dry weather, you may need to water daily. Be sure to water deeply, allowing the water to drain out of the bottom of the bag. Avoid overwatering, as this can lead to root rot. A good way to check if your gourds need water is to stick your finger into the soil. If it feels dry an inch or two down, it’s time to water.
Do gourds grown in bags need support?
Yes, most gourd varieties require support, especially as the fruits begin to develop. The weight of the gourds can easily topple the plants, so providing a sturdy trellis, fence, or other support structure is essential. You can train the vines to climb the support structure using twine or plant ties. Make sure the support is strong enough to handle the weight of the mature gourds. For smaller ornamental gourds, a simple tomato cage may suffice. For larger varieties, a more robust trellis system is recommended.
How do I prevent pests and diseases when growing gourds in bags?
Growing gourds in bags can actually help minimize pest and disease problems compared to in-ground planting. However, it’s still important to take preventative measures. Start by using a high-quality soil mix and providing adequate drainage. Avoid overwatering, as this can create a favorable environment for fungal diseases. Inspect your plants regularly for signs of pests or diseases. If you spot any problems, address them promptly using organic pest control methods or fungicides. Companion planting herbs like basil or marigolds around the base of your gourds can also help deter pests.
Can I grow different varieties of gourds in the same bag?
While it’s technically possible to grow different varieties of gourds in the same bag, it’s generally not recommended. Different varieties may have different growth habits and nutrient requirements, which can lead to competition and reduced yields. It’s best to grow each variety in its own separate bag to ensure optimal growth and development.
How do I harvest and cure my gourds?
Harvesting and curing are crucial steps in preserving your gourds. Harvest your gourds when the stems have dried and turned brown. Cut the gourds from the vine, leaving a few inches of stem attached. Wash the gourds with soapy water and allow them to dry completely. Place the gourds in a well-ventilated area, such as a garage or shed, to cure. The curing process can take several weeks or even months, depending on the size and thickness of the gourds. During this time, the gourds will dry out and harden. Once they are fully cured, they can be decorated, painted, or used for various crafts.
What are some creative ways to use gourds grown in bags?
The possibilities are endless! Ornamental gourds can be used for fall decorations, centerpieces, and crafts. Birdhouse gourds can be transformed into functional birdhouses. Dipper gourds can be used as ladles or scoops. Gourds can also be painted, carved, or decorated with various materials to create unique works of art. Let your imagination run wild and explore the many creative ways to use your homegrown gourds.
Is growing gourds in bags a good way to start growing gourds?
Absolutely! Growing gourds in bags is an excellent way for beginners to get started with gourd cultivation. It offers greater control over the growing environment, minimizes weed competition, and reduces the risk of soilborne diseases. The portability of bags also allows you to move your plants around to find the perfect spot. It’s a relatively low-maintenance and rewarding way to experience the joy of growing your own gourds.
Leave a Comment