
Growing Luffa at Home might sound like an exotic endeavor reserved for seasoned gardeners, but I’m here to tell you it’s surprisingly achievable – and incredibly rewarding! Imagine the satisfaction of exfoliating with a sponge you nurtured from a tiny seed. Forget those mass-produced, chemically treated sponges from the store; you can have your own sustainable, all-natural loofah, grown right in your backyard!
The luffa, also known as the sponge gourd, has a rich history, particularly in Asian cultures where it’s been cultivated for centuries not only for its fibrous interior but also for its edible young fruits and flowers. It’s a testament to resourceful living, utilizing every part of the plant. But why should you bother with growing luffa at home? Well, beyond the eco-friendly aspect, it’s a fantastic conversation starter, a fun project for the whole family, and a great way to connect with nature. Plus, let’s be honest, who wouldn’t want to brag about growing their own bath sponges?
This DIY guide will walk you through every step of the process, from selecting the right seeds to harvesting and curing your luffa sponges. I’ll share my tried-and-true tips and tricks to ensure you have a bountiful harvest. So, get ready to roll up your sleeves and discover the joy of growing luffa at home – it’s easier than you think!
Growing Your Own Luffa Sponges: A Beginner’s Guide
Hey there, fellow DIY enthusiasts! Have you ever thought about growing your own sponges? I’m talking about luffa sponges, the natural, exfoliating wonders that are so much better for the environment (and your skin!) than those synthetic ones. It might sound intimidating, but trust me, growing luffa at home is surprisingly rewarding and a whole lot of fun. I’m going to walk you through everything you need to know, from seed to scrub!
What You’ll Need
Before we dive in, let’s gather our supplies. Here’s a list of what you’ll need to successfully grow luffa:
* Luffa Seeds: You can find these online or at your local garden center. Make sure they are specifically labeled “luffa” or “loofah.”
* Seed Starting Trays or Small Pots: For starting your seeds indoors.
* Seed Starting Mix: A light, well-draining mix is crucial for germination.
* Larger Pots (Optional): If you’re starting indoors and need to transplant before the last frost.
* Well-Draining Soil: Luffa loves rich, fertile soil. Amend your garden soil with compost or aged manure.
* Trellis or Support Structure: Luffa vines are vigorous climbers and need something to grow on. Think sturdy trellises, fences, or even a pergola.
* Watering Can or Hose: For regular watering.
* Fertilizer: A balanced fertilizer to promote healthy growth and fruit production.
* Sharp Knife or Pruning Shears: For harvesting your luffa.
* Gloves: To protect your hands during harvesting and processing.
Starting Your Luffa Seeds
Luffa has a long growing season, so starting your seeds indoors is highly recommended, especially if you live in a cooler climate. I usually start mine about 6-8 weeks before the last expected frost.
1. Soak the Seeds: To help speed up germination, soak your luffa seeds in warm water for 24 hours. This softens the hard outer shell and allows moisture to penetrate.
2. Prepare Your Seed Starting Trays: Fill your seed starting trays or small pots with seed starting mix. Moisten the mix thoroughly.
3. Plant the Seeds: Plant the seeds about 1/2 inch deep in the soil. I usually plant 2-3 seeds per cell or pot to increase the chances of germination.
4. Provide Warmth: Luffa seeds need warmth to germinate. The ideal temperature is between 70-80°F (21-27°C). You can use a heat mat or place the trays in a warm location.
5. Keep the Soil Moist: Water gently to keep the soil consistently moist, but not waterlogged.
6. Wait for Germination: Germination usually takes 7-14 days. Be patient!
7. Thin the Seedlings: Once the seedlings emerge and have a few true leaves, thin them to one plant per cell or pot. Choose the strongest, healthiest seedling.
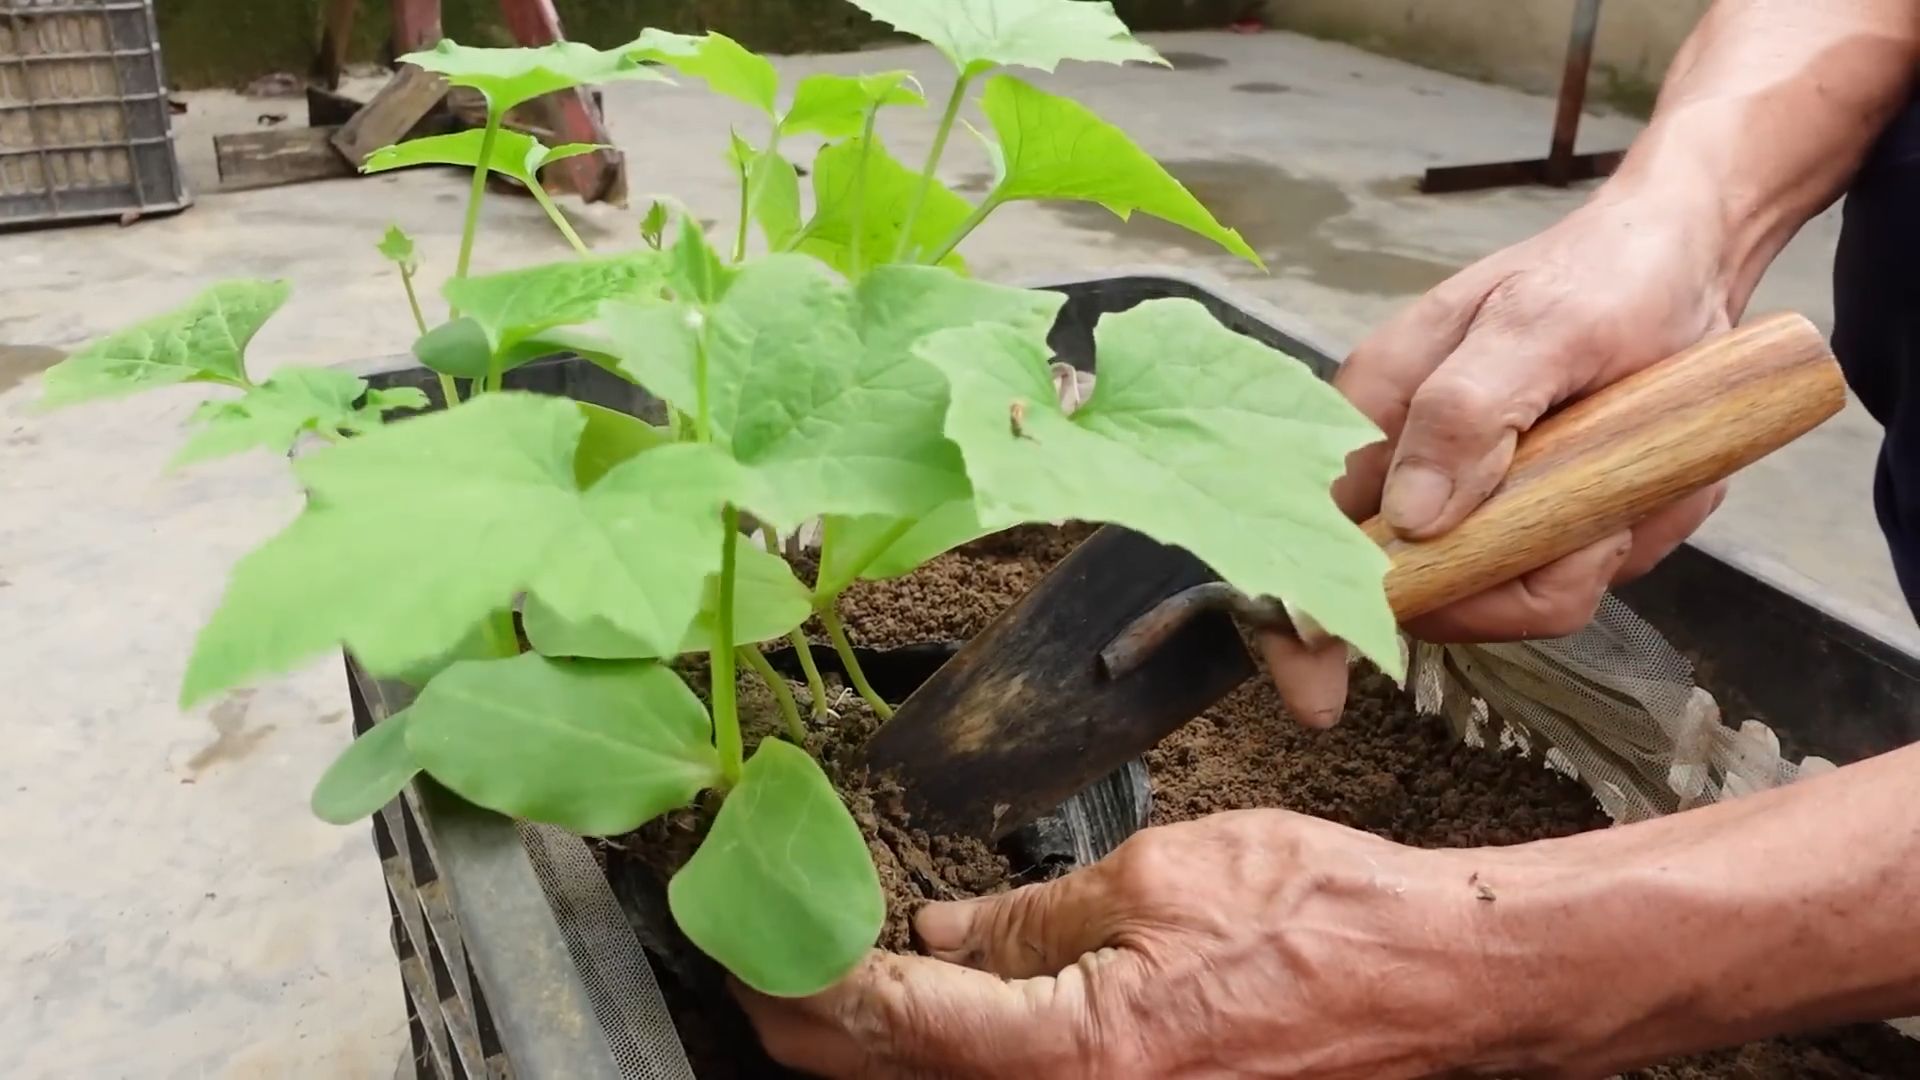
Transplanting Your Luffa Seedlings
Once the danger of frost has passed and the soil has warmed up, it’s time to transplant your luffa seedlings outdoors.
1. Harden Off the Seedlings: Before transplanting, you need to “harden off” the seedlings. This means gradually exposing them to outdoor conditions to acclimate them. Start by placing them outside for a few hours each day, increasing the time each day for about a week.
2. Choose a Sunny Location: Luffa needs at least 6-8 hours of sunlight per day. Choose a location in your garden that receives plenty of sun.
3. Prepare the Soil: Luffa loves rich, well-draining soil. Amend your garden soil with compost or aged manure to improve its fertility and drainage.
4. Dig Holes: Dig holes that are slightly larger than the root balls of your seedlings. Space the holes about 2-3 feet apart.
5. Transplant the Seedlings: Gently remove the seedlings from their pots and place them in the holes. Backfill with soil and water thoroughly.
6. Provide Support: Luffa vines are vigorous climbers and need a sturdy trellis or support structure to grow on. Install the trellis or support structure near the seedlings.
Caring for Your Luffa Plants
Now that your luffa plants are in the ground, it’s time to provide them with the care they need to thrive.
1. Water Regularly: Luffa needs consistent watering, especially during hot, dry weather. Water deeply and regularly, ensuring the soil stays moist but not waterlogged.
2. Fertilize: Fertilize your luffa plants every 2-3 weeks with a balanced fertilizer. Follow the instructions on the fertilizer package.
3. Prune the Vines: Pruning can help encourage fruit production. You can prune the side shoots to encourage the plant to focus its energy on the main vine and developing fruits.
4. Control Pests and Diseases: Luffa is generally pest and disease resistant, but keep an eye out for common garden pests like aphids and squash bugs. Treat any infestations promptly.
5. Pollination: Luffa flowers are pollinated by insects. If you’re not seeing much fruit production, you can try hand-pollinating the flowers. Use a small paintbrush to transfer pollen from the male flowers to the female flowers. The female flowers have a small luffa fruit behind the flower.
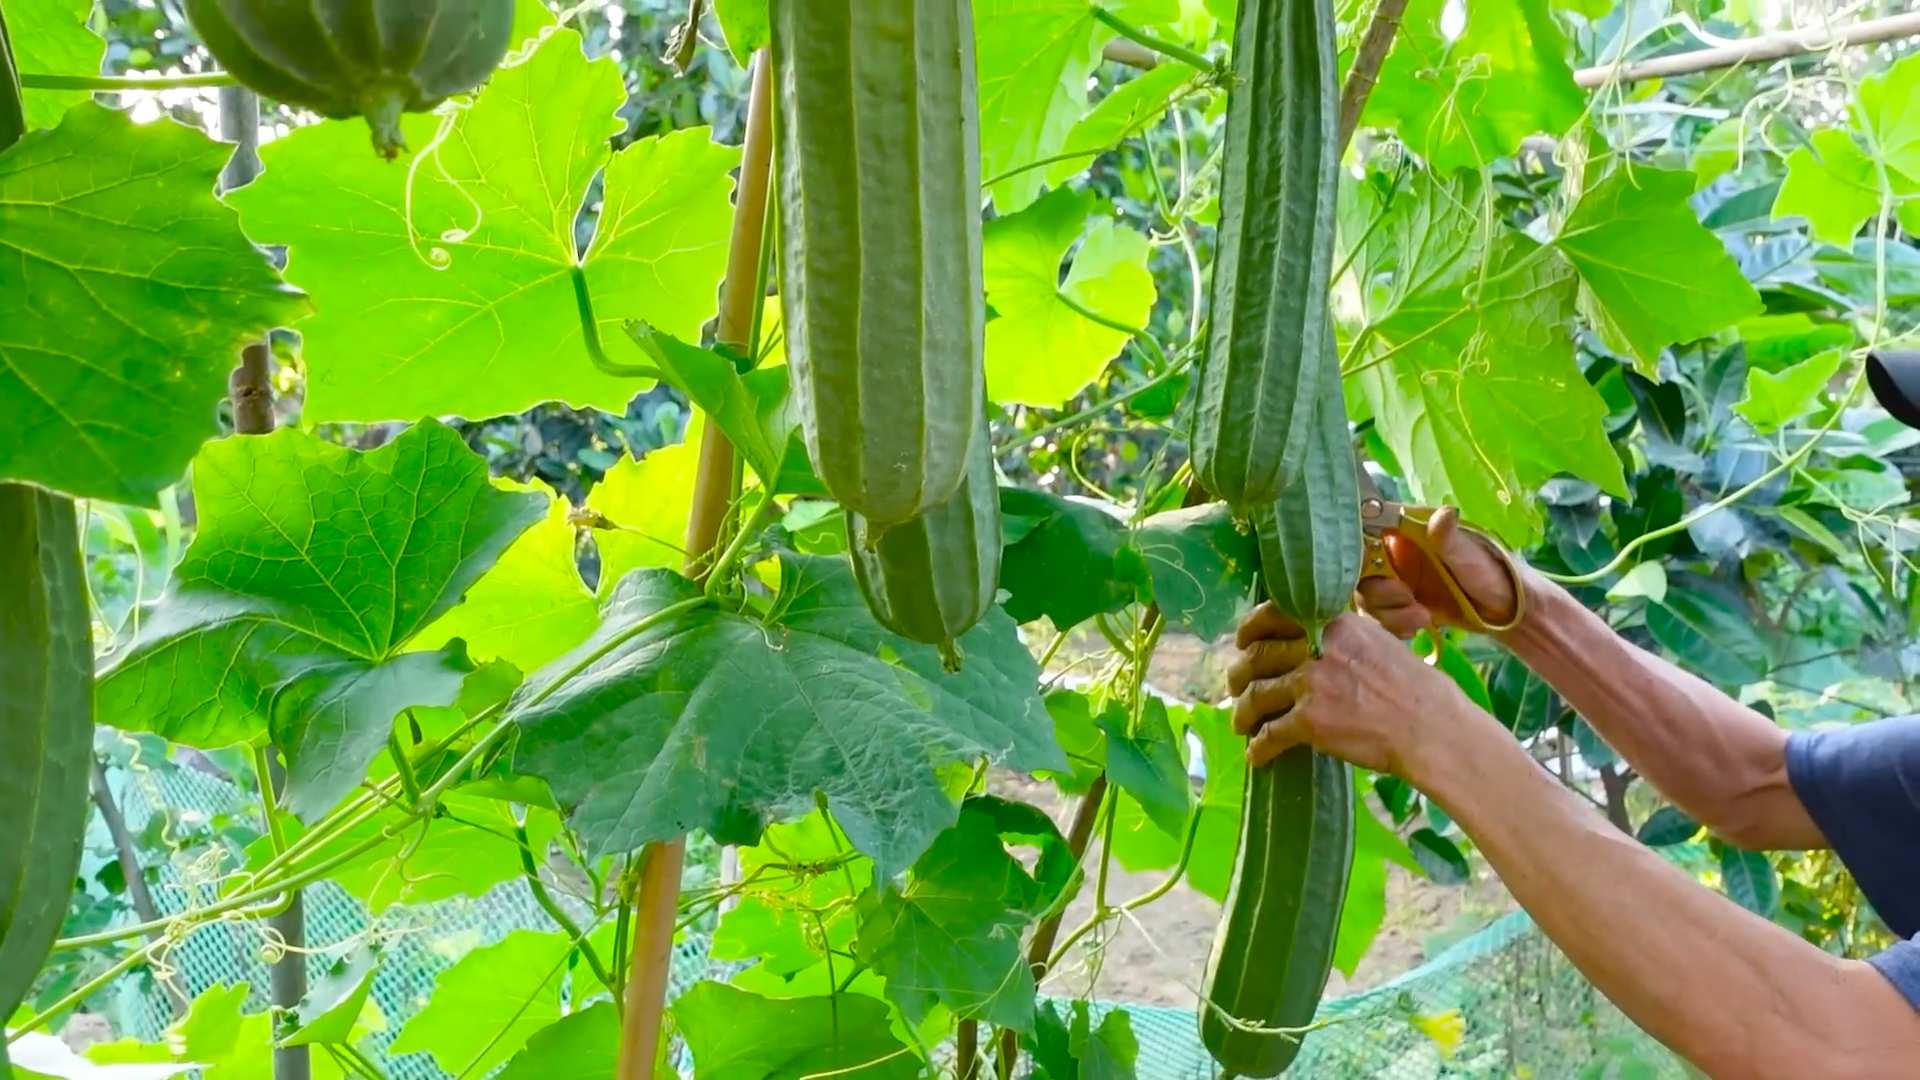
Harvesting Your Luffa Sponges
This is the exciting part! Harvesting your own luffa sponges is so satisfying.
1. Wait for Maturity: The luffa fruits are ready to harvest when they turn yellow or brown and the skin becomes dry and brittle. You should be able to easily press your fingernail into the skin.
2. Cut the Luffa: Use a sharp knife or pruning shears to cut the luffa from the vine. Leave a few inches of stem attached.
3. Peel the Skin: This can be a bit messy, but it’s part of the fun! You can peel the skin off by hand, or you can soak the luffa in water for a few days to soften the skin. I usually use gloves for this step.
4. Remove the Seeds: Once the skin is removed, shake out the seeds. You can save these seeds for planting next year.
5. Wash the Luffa: Rinse the luffa thoroughly with water to remove any remaining pulp or debris.
6. Dry the Luffa: Hang the luffa in a well-ventilated area to dry completely. This may take several weeks. Make sure it’s completely dry to prevent mold growth.
Processing Your Luffa Sponges
Once your luffa is dry, you can process it to make it ready for use.
1. Cut to Size: Use a sharp knife or saw to cut the luffa into the desired size and shape. I like to cut mine into smaller pieces for use in the shower.
2. Remove the Seeds (Again!): You might find some seeds that you missed during the initial cleaning. Remove any remaining seeds.
3. Soak and Soften: Soak the luffa in warm water for a few minutes to soften it before use.
4. Enjoy Your Homemade Luffa Sponge! You can use your luffa sponge for exfoliating your skin, washing dishes, or even as a natural scrubber for cleaning around the house.
Tips and Tricks for Growing Luffa
Here are a few extra tips and tricks that I’ve learned over the years:
* Choose the Right Variety: There are different varieties of luffa, so choose one that is well-suited to your climate.
* Provide Plenty of Water: Luffa needs consistent watering, especially during hot, dry weather.
* Fertilize Regularly: Fertilize your luffa plants every 2-3 weeks to promote healthy growth and fruit production.
* Protect from Frost: Luffa is sensitive to frost, so protect your plants if frost is predicted.
* Be Patient: Luffa has a long growing season, so be patient and don’t give up!
Troubleshooting Common Luffa Problems
Even with the best care, you might encounter some problems while growing luffa. Here are a few common issues and how to address them:
* Poor Germination: If your luffa seeds aren’t germinating, make sure they are getting enough warmth and moisture. You can also try scarifying the seeds by gently rubbing them with sandpaper before soaking them.
* Slow Growth: If your luffa plants are growing slowly, make sure they
Conclusion
So, there you have it! Growing your own luffa sponges at home is not just a fun gardening project; it’s a sustainable and rewarding way to produce a versatile and eco-friendly cleaning tool. From seed to scrub, the entire process connects you with nature and provides a tangible sense of accomplishment. Forget those mass-produced, plastic-filled sponges that end up polluting our landfills. Embrace the natural power of the luffa and experience the satisfaction of using a product you nurtured from the very beginning.
This DIY trick is a must-try for several compelling reasons. First, it’s incredibly cost-effective. Once you have the seeds, the primary investment is your time and a little bit of garden space. Compared to the ongoing expense of buying sponges, growing your own luffa is a significant money-saver in the long run. Second, it’s environmentally responsible. By choosing a natural, biodegradable sponge, you’re reducing your reliance on plastic and contributing to a healthier planet. Third, it’s a fantastic learning experience. From understanding the plant’s growth cycle to mastering the harvesting and processing techniques, you’ll gain valuable gardening knowledge. Finally, it’s simply a cool and unique project that will impress your friends and family. Imagine telling them you grew the sponge they’re using to wash dishes!
But the beauty of growing luffa doesn’t stop there. There are so many ways to customize your experience. Consider experimenting with different varieties of luffa seeds to see which ones thrive best in your climate. You can also adjust the size of your luffa sponges by harvesting them at different stages of maturity. For a softer sponge, harvest earlier; for a more abrasive scrub, let them mature longer.
Furthermore, think about incorporating companion planting techniques to enhance the growth of your luffa vines. Planting basil or marigolds nearby can help deter pests and attract beneficial insects. You can also use the luffa vines themselves as a natural trellis for other climbing plants, creating a beautiful and functional garden space.
Beyond the traditional use as a bath and kitchen sponge, luffa has a surprising number of other applications. Smaller, softer luffa pieces can be used as gentle exfoliators for your face. Larger, more robust pieces can be used for scrubbing floors or even as packing material. Get creative and explore the many possibilities!
We encourage you to embark on this exciting gardening adventure and discover the joy of growing your own luffa. Don’t be afraid to experiment, learn from your mistakes, and adapt the process to suit your specific needs and preferences. The most important thing is to have fun and enjoy the process.
Once you’ve harvested your first crop of luffa sponges, we’d love to hear about your experience! Share your tips, tricks, and photos on social media using [Your Hashtag Here]. Let’s build a community of luffa growers and inspire others to embrace this sustainable and rewarding DIY project. We are confident that you will find that growing **luffa** at home is a worthwhile and enriching experience.
Frequently Asked Questions (FAQ)
What is the best time of year to plant luffa seeds?
Luffa requires a long growing season, typically 150-200 days of warm weather. Therefore, it’s best to start your luffa seeds indoors 6-8 weeks before the last expected frost in your area. This will give them a head start and ensure they have enough time to mature before the first frost in the fall. If you live in a region with a very short growing season, you may need to start them even earlier. Once the soil has warmed up to at least 70°F (21°C), you can transplant the seedlings outdoors.
How much space does a luffa vine need?
Luffa vines are vigorous growers and require plenty of space to spread out. Each vine can easily grow 15-30 feet long, so it’s essential to provide them with a sturdy trellis or support s
So, there you have it! Growing your own luffa sponges at home is not just a fun gardening project; it’s a sustainable and rewarding way to produce a versatile and eco-friendly cleaning tool. From seed to scrub, the entire process connects you with nature and provides a tangible sense of accomplishment. Forget those mass-produced, plastic-filled sponges that end up polluting our landfills. Embrace the natural power of the luffa and experience the satisfaction of using a product you nurtured from the very beginning.
This DIY trick is a must-try for several compelling reasons. First, it’s incredibly cost-effective. Once you have the seeds, the primary investment is your time and a little bit of garden space. Compared to the ongoing expense of buying sponges, growing your own luffa is a significant money-saver in the long run. Second, it’s environmentally responsible. By choosing a natural, biodegradable sponge, you’re reducing your reliance on plastic and contributing to a healthier planet. Third, it’s a fantastic learning experience. From understanding the plant’s growth cycle to mastering the harvesting and processing techniques, you’ll gain valuable gardening knowledge. Finally, it’s simply a cool and unique project that will impress your friends and family. Imagine telling them you grew the sponge they’re using to wash dishes!
But the beauty of growing luffa doesn’t stop there. There are so many ways to customize your experience. Consider experimenting with different varieties of luffa seeds to see which ones thrive best in your climate. You can also adjust the size of your luffa sponges by harvesting them at different stages of maturity. For a softer sponge, harvest earlier; for a more abrasive scrub, let them mature longer.
Furthermore, think about incorporating companion planting techniques to enhance the growth of your luffa vines. Planting basil or marigolds nearby can help deter pests and attract beneficial insects. You can also use the luffa vines themselves as a natural trellis for other climbing plants, creating a beautiful and functional garden space.
Beyond the traditional use as a bath and kitchen sponge, luffa has a surprising number of other applications. Smaller, softer luffa pieces can be used as gentle exfoliators for your face. Larger, more robust pieces can be used for scrubbing floors or even as packing material. Get creative and explore the many possibilities!
We encourage you to embark on this exciting gardening adventure and discover the joy of growing your own luffa. Don’t be afraid to experiment, learn from your mistakes, and adapt the process to suit your specific needs and preferences. The most important thing is to have fun and enjoy the process.
Once you’ve harvested your first crop of luffa sponges, we’d love to hear about your experience! Share your tips, tricks, and photos on social media using [Your Hashtag Here]. Let’s build a community of luffa growers and inspire others to embrace this sustainable and rewarding DIY project. We are confident that you will find that growing **luffa** at home is a worthwhile and enriching experience.
Frequently Asked Questions (FAQ)
What is the best time of year to plant luffa seeds?
Luffa requires a long growing season, typically 150-200 days of warm weather. Therefore, it’s best to start your luffa seeds indoors 6-8 weeks before the last expected frost in your area. This will give them a head start and ensure they have enough time to mature before the first frost in the fall. If you live in a region with a very short growing season, you may need to start them even earlier. Once the soil has warmed up to at least 70°F (21°C), you can transplant the seedlings outdoors.
How much space does a luffa vine need?
Luffa vines are vigorous growers and require plenty of space to spread out. Each vine can easily grow 15-30 feet long, so it’s essential to provide them with a sturdy trellis or support structure. A good rule of thumb is to space the plants 2-3 feet apart along the trellis. Make sure the trellis is strong enough to support the weight of the mature vines and the heavy luffa gourds. Consider using a cattle panel, a sturdy fence, or a custom-built trellis.
What kind of soil is best for growing luffa?
Luffa plants thrive in well-drained, fertile soil that is rich in organic matter. Before planting, amend the soil with compost, aged manure, or other organic materials to improve its drainage and nutrient content. Luffa prefers a slightly acidic to neutral soil pH, ideally between 6.0 and 7.0. You can test your soil pH using a home testing kit or by sending a sample to your local agricultural extension office. If your soil is too alkaline, you can amend it with sulfur or peat moss.
How often should I water my luffa plants?
Luffa plants need consistent moisture, especially during hot, dry weather. Water deeply and regularly, ensuring that the soil stays consistently moist but not waterlogged. Avoid overhead watering, as this can increase the risk of fungal diseases. Instead, water at the base of the plants using a soaker hose or drip irrigation system. Mulching around the plants can also help to retain moisture and suppress weeds.
How do I know when my luffa is ready to harvest?
The best time to harvest your luffa is when the skin turns yellow or brown and becomes dry and brittle. The gourd should also feel lightweight and hollow when you tap it. If you wait too long, the luffa will become too fibrous and difficult to process. To harvest, simply cut the luffa from the vine, leaving a few inches of stem attached.
What is the best way to process a luffa sponge?
After harvesting, you’ll need to process the luffa to remove the skin and seeds. The easiest way to do this is to soak the luffa in water for a few days until the skin softens. Then, you can peel off the skin by hand. Once the skin is removed, shake out the seeds and rinse the luffa thoroughly. You can then dry the luffa in the sun or in a well-ventilated area. Once it’s completely dry, it’s ready to use!
How can I prevent pests and diseases from affecting my luffa plants?
Luffa plants can be susceptible to various pests and diseases, including squash bugs, vine borers, and powdery mildew. To prevent these problems, practice good garden hygiene by removing any dead or diseased leaves and debris. You can also use organic pest control methods, such as insecticidal soap or neem oil, to control pests. To prevent powdery mildew, ensure good air circulation around the plants and avoid overhead watering. Consider companion planting with herbs like basil or marigolds, which can help deter pests.
Can I save the seeds from my luffa for next year?
Yes, you can easily save the seeds from your luffa for planting next year. Simply collect the seeds from the mature luffa gourds after you’ve processed them. Spread the seeds out on a paper towel to dry completely. Once they’re dry, store them in an airtight container in a cool, dark place. Be sure to label the container with the date and variety of luffa.
Are there different varieties of luffa?
Yes, there are two main species of luffa: *Luffa aegyptiaca* (also known as *Luffa cylindrica*) and *Luffa acutangula*. *Luffa aegyptiaca* produces a smoother, more cylindrical sponge, while *Luffa acutangula* produces a ridged sponge. Both species are edible when young, but *Luffa acutangula* is more commonly grown for its edible fruits. Within each species, there are also different varieties that vary in size, shape, and texture. Experiment with different varieties to find the ones that you like best.
Leave a Comment