
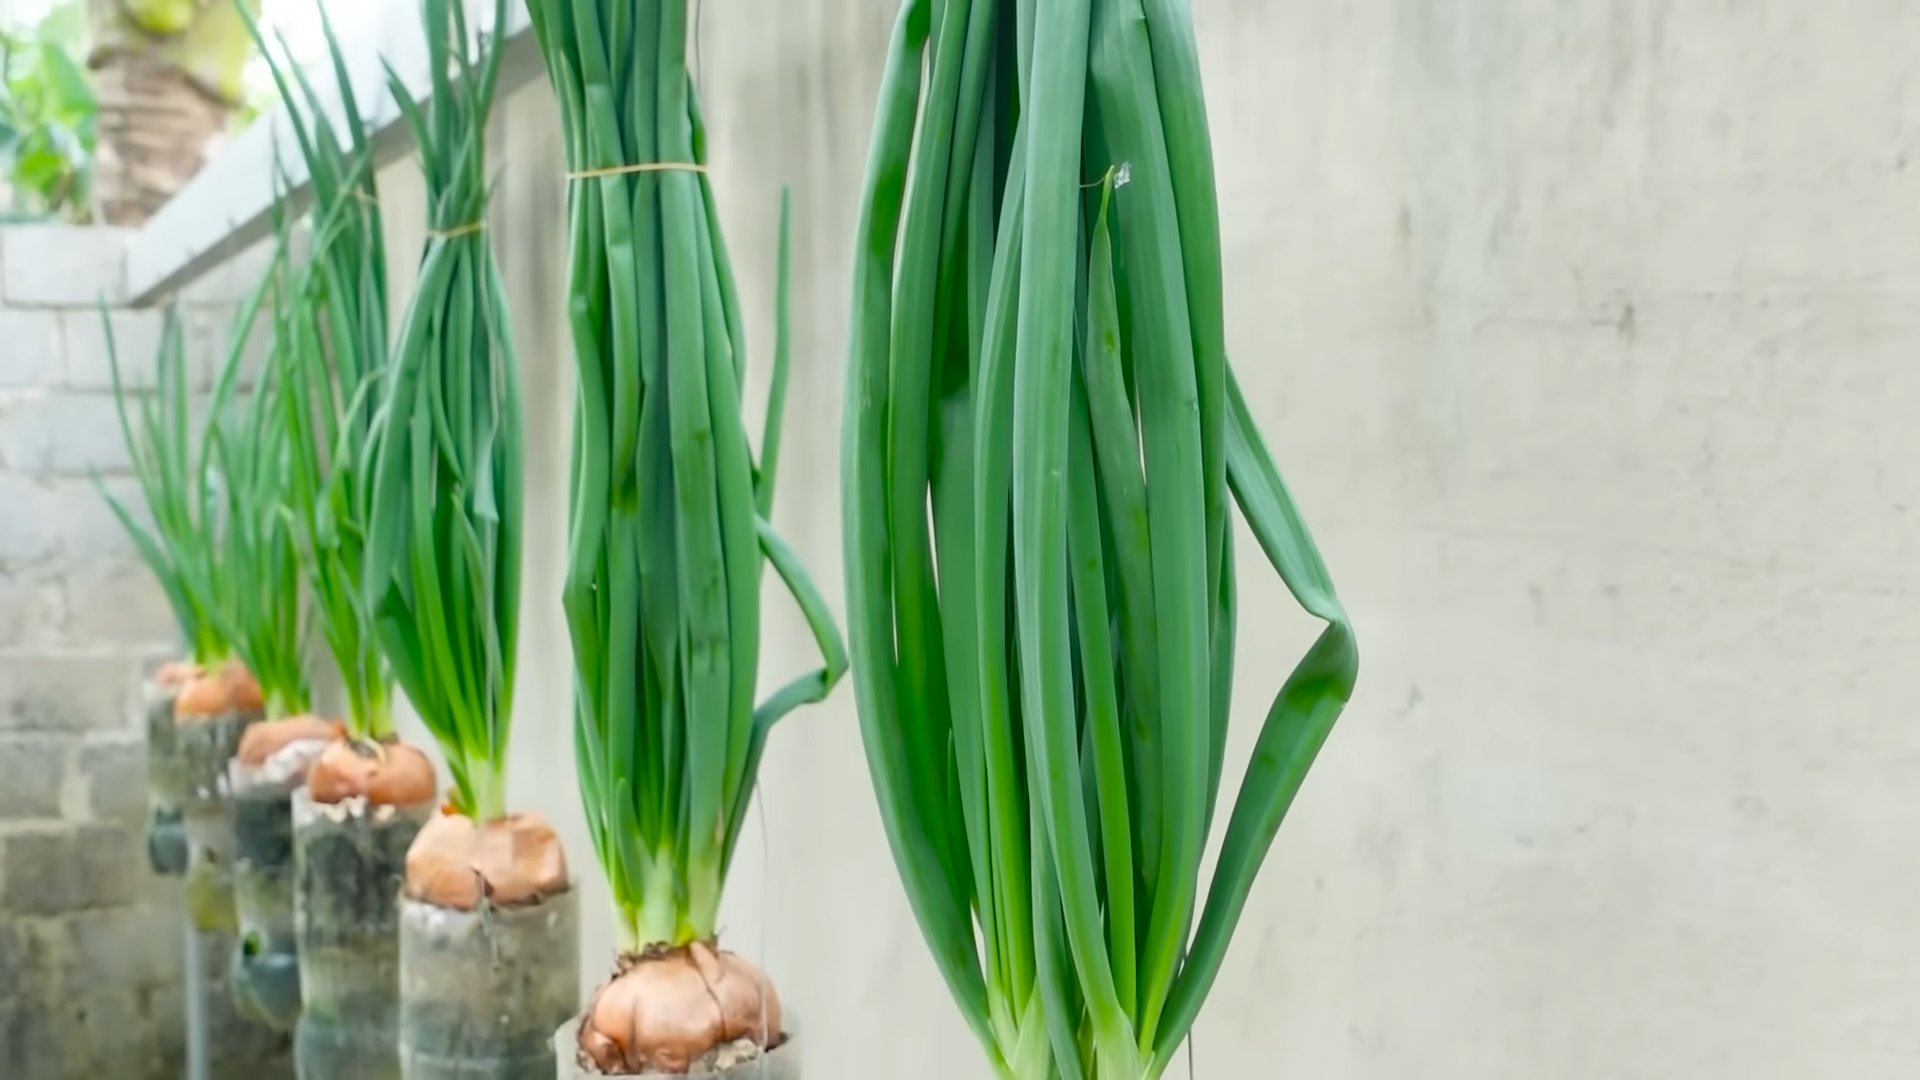
Growing onions bottle hack: Ever dreamt of a bountiful onion harvest without the back-breaking labor and endless weeding? I know I have! For centuries, onions have been a staple in cuisines worldwide, dating back to ancient Egypt where they were even revered as symbols of eternity. But let’s be honest, traditional onion farming can be tough. That’s where this game-changing DIY trick comes in.
Imagine transforming ordinary plastic bottles into mini onion greenhouses, protecting your precious seedlings from pests and the elements. This isn’t just about convenience; it’s about maximizing your yield and enjoying fresh, homegrown onions even if you have limited space.
This growing onions bottle hack is perfect for urban gardeners, beginners, or anyone looking for a sustainable and cost-effective way to cultivate these flavorful bulbs. Forget expensive gardening equipment and complicated techniques. I’m going to show you how to turn trash into treasure and unlock the secrets to a thriving onion patch, one bottle at a time. Get ready to revolutionize your gardening game!
Growing Onions Indoors: The Bottle Hack That Actually Works!
Okay, let’s be honest, who doesn’t love fresh onions? But buying them constantly can add up, and sometimes you only need a little bit. That’s where this super cool DIY onion-growing bottle hack comes in! I’m going to show you how to regrow onions from scraps using just a plastic bottle, some water, and a little patience. It’s surprisingly easy and a great way to reduce food waste and have fresh onions on hand whenever you need them.
What You’ll Need:
* A clean, empty plastic bottle (2-liter soda bottles work great, but any size will do, adjust accordingly)
* An onion bulb with the root end intact (the part you usually throw away!)
* Scissors or a craft knife
* Water
* Potting mix (optional, but recommended for better growth)
* A sunny windowsill or grow light
Preparing the Bottle:
This is where we transform the humble plastic bottle into our onion-growing vessel. Don’t worry, it’s easier than it sounds!
1. Clean the Bottle: Make sure your bottle is thoroughly cleaned and dry. Any residue inside could hinder growth or attract unwanted pests. I usually wash mine with soap and water, then rinse it really well.
2. Cut the Bottle: This is where you’ll need your scissors or craft knife. You have a couple of options here, depending on the size of your onion bulb and the bottle you’re using.
* Option 1 (Smaller Onions): Cut the bottle in half horizontally. You’ll be using the bottom half as your growing container.
* Option 2 (Larger Onions): Cut off the top third of the bottle. This will give you a deeper container for larger onion bulbs.
I prefer option 2 because it gives the roots more room to grow, but either will work. Just be careful when cutting!
3. (Optional) Add Drainage Holes: If you’re planning on using potting mix (which I highly recommend!), you’ll want to add some drainage holes to the bottom of the bottle. This prevents the roots from sitting in soggy soil, which can lead to rot. You can use a nail or a small screwdriver to poke a few holes in the bottom.
Preparing the Onion Bulb:
Now, let’s get that onion ready to sprout!
1. Choose the Right Onion: The key to success is starting with a healthy onion bulb. Look for one that has a good amount of root still attached. Even if the roots are a little dry, that’s okay, they’ll rehydrate. Avoid onions that are mushy or have signs of mold.
2. (Optional) Remove Outer Layers: If the outer layers of the onion are dry or papery, you can gently peel them away. This isn’t strictly necessary, but it can help the onion absorb water more easily.
Setting Up Your Onion Garden:
Time to put it all together! This is the fun part where you see your little onion garden come to life.
1. (Optional) Add Potting Mix: If you’re using potting mix, fill the bottom of the bottle with a few inches of soil. This will provide the onion with nutrients and support its growth. I usually use a general-purpose potting mix, but you can also use a mix specifically designed for vegetables.
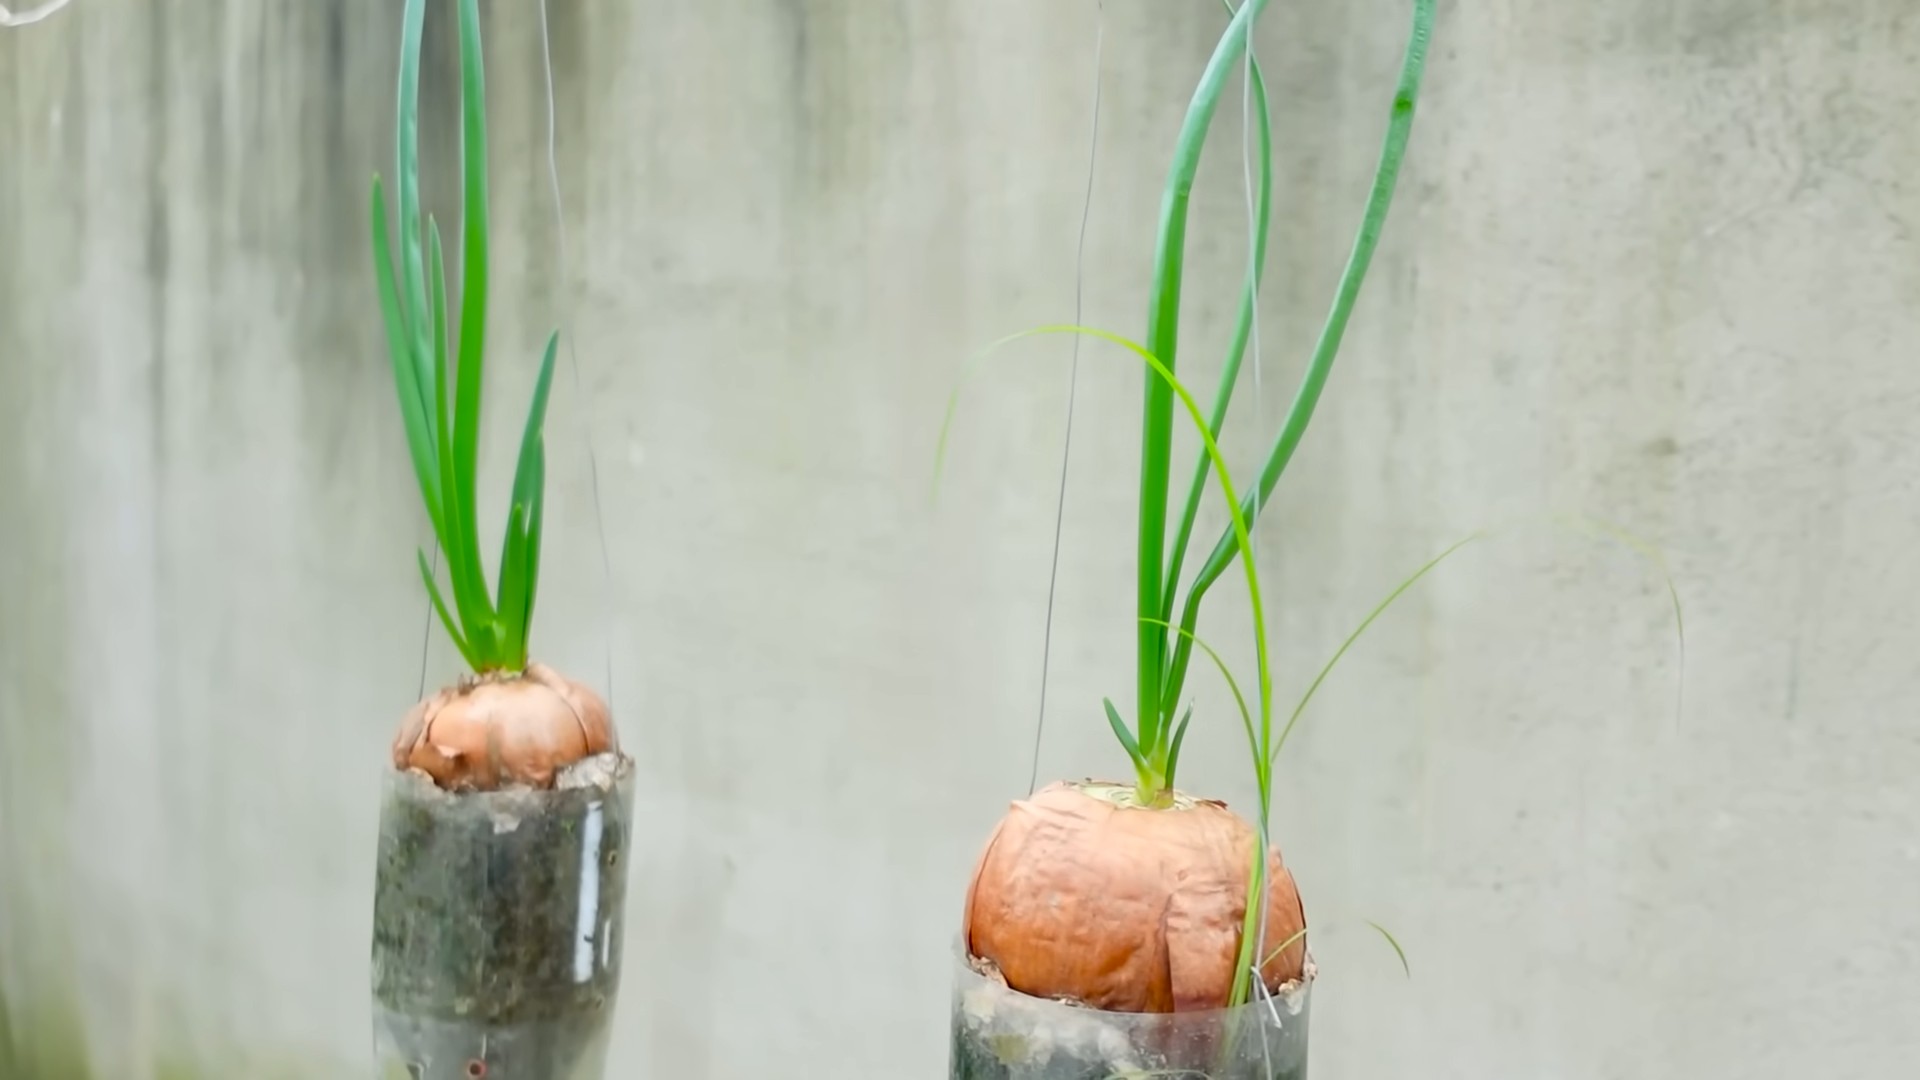
2. Position the Onion: Place the onion bulb in the bottle, root-end down. If you’re using potting mix, bury the roots slightly, but leave the top of the onion exposed. If you’re not using potting mix, simply place the onion in the bottle so that the root end is facing down.
3. Add Water: Now, carefully add water to the bottle. If you’re using potting mix, water until the soil is moist but not soggy. If you’re not using potting mix, add enough water to cover the bottom of the onion bulb, but don’t submerge the entire onion. You only want the roots to be in the water.
Caring for Your Growing Onions:
This is where the patience comes in! But trust me, it’s worth it.
1. Find a Sunny Spot: Onions need plenty of sunlight to grow. Place your bottle on a sunny windowsill or under a grow light. If you’re using a windowsill, rotate the bottle regularly to ensure that all sides of the onion get equal sunlight.
2. Water Regularly: Check the water level every day and add more water as needed to keep the roots moist. If you’re using potting mix, water when the top inch of soil feels dry to the touch.
3. Change the Water (If Not Using Potting Mix): If you’re not using potting mix, it’s important to change the water every few days to prevent the growth of bacteria and algae.
4. Watch for Growth: Within a few days, you should start to see new green shoots emerging from the top of the onion. This is a sign that your onion is happy and healthy!
5. Fertilize (Optional): If you want to give your onions an extra boost, you can add a diluted liquid fertilizer to the water every few weeks. I usually use a balanced fertilizer, but you can also use a fertilizer specifically designed for vegetables.
Harvesting Your Onions:
The best part! You have a couple of options when it comes to harvesting your onions.
1. Harvesting the Greens: You can harvest the green shoots (onion greens) as soon as they’re a few inches tall. Simply snip them off with scissors, leaving about an inch of the shoot intact. The onion will continue to grow new shoots, so you can harvest them repeatedly. These greens are great in salads, soups, and stir-fries.
2. Harvesting the Bulb: If you want to harvest the entire onion bulb, you’ll need to wait a bit longer. The bulb will continue to grow as long as it has enough water and sunlight. You’ll know it’s ready to harvest when the green shoots start to turn yellow and fall over. To harvest the bulb, simply pull it out of the bottle. If you’re using potting mix, you may need to loosen the soil around the bulb first.
Troubleshooting:
Sometimes things don’t go exactly as planned. Here are a few common problems you might encounter and how to fix them.
* Onion is Rotting: This is usually caused by overwatering or poor drainage. Make sure the roots aren’t sitting in soggy water. If you’re using potting mix, make sure you have drainage holes in the bottom of the bottle. If the onion is already rotting, you may need to start with a new bulb.
* Onion Isn’t Growing: This could be due to a lack of sunlight, water, or nutrients. Make sure the onion is getting plenty of sunlight and that the roots are kept moist. If you’re not using potting mix, consider adding a diluted liquid fertilizer to the water.
* Pests: Occasionally, you might find small pests like gnats or aphids on your onions. You can usually get rid of them by spraying the onions with a mixture of water and dish soap.
Tips for Success:
Here are a few extra tips to help you get the most out of your onion-growing bottle hack.
* Use Filtered Water: Tap water can sometimes contain chemicals that can harm your onions. Using filtered water can help promote healthier growth.
* Experiment with Different Varieties: Try growing different types of onions, such as red onions, yellow onions, or shallots. Each variety will have a slightly different flavor and growth habit.
* Start Multiple Onions: To ensure a continuous supply of fresh onions, start multiple onions at the same time. This way, you’ll always have some onions ready to harvest.
* Get Creative with Your Containers: While plastic bottles are a great option, you can also use other containers, such as glass jars or even old coffee cans. Just make sure the container is clean and has drainage holes if you’re using potting mix.
* Enjoy the Process! Growing your own onions is a fun and rewarding experience. Don’t be afraid to experiment and learn as you go.
This bottle hack is a fantastic way to reuse materials, reduce waste, and enjoy fresh onions right from your kitchen. I hope you found this guide helpful, and happy growing!
Conclusion
So, there you have it! The growing onions bottle hack – a simple, effective, and surprisingly rewarding way to cultivate fresh onions right in your own home, regardless of your garden space. This isn’t just about saving a trip to the grocery store; it’s about connecting with the food you eat, reducing waste, and experiencing the joy of nurturing something from start to finish.
Why is this DIY trick a must-try? Because it democratizes gardening. You don’t need acres of land, specialized equipment, or a green thumb passed down through generations. All you need is a plastic bottle, some soil, and a willingness to experiment. It’s a fantastic project for families, a therapeutic activity for individuals, and a conversation starter for anyone interested in sustainable living. Plus, the satisfaction of snipping fresh onion greens from your own indoor garden to add to your favorite dishes is simply unmatched.
But the beauty of this method lies in its adaptability. Feel free to experiment with different types of onions. Shallots, scallions, or even red onions can thrive using this technique. Consider adding a layer of drainage material, like pebbles or gravel, at the bottom of the bottle to prevent waterlogging. You can also explore different soil mixes to find what works best for your specific environment. For example, adding some compost to your potting mix can provide extra nutrients for your onions.
Don’t be afraid to get creative with your bottle gardens! Paint them, decorate them, or even create a vertical garden by hanging multiple bottles together. The possibilities are endless. The key is to ensure your onions receive adequate sunlight and consistent moisture.
We wholeheartedly encourage you to give this growing onions bottle hack a try. It’s a small investment of time and effort that yields a surprisingly large return in terms of fresh produce, environmental consciousness, and personal satisfaction.
And most importantly, we want to hear about your experience! Share your photos, tips, and challenges in the comments below. Let’s build a community of bottle gardeners and learn from each other. What varieties of onions did you try? What modifications did you make to the process? What were your biggest successes and setbacks? Your feedback will not only help other readers but also contribute to refining and improving this technique for everyone. Let’s grow together!
Frequently Asked Questions (FAQ)
What type of plastic bottle is best for this project?
Ideally, you should use a clear or translucent plastic bottle that is at least two liters in size. This provides enough space for the onion bulbs to grow and allows sunlight to reach the soil. Soda bottles, water bottles, or juice bottles all work well. Make sure to thoroughly clean the bottle before using it to remove any residue that could harm your onions. Avoid using bottles that have contained harsh chemicals or pesticides.
How much sunlight do the onions need?
Onions require at least 6-8 hours of direct sunlight per day to thrive. Place your bottle garden in a sunny location, such as a windowsill or balcony. If you don’t have access to enough natural light, you can supplement with a grow light. Rotate the bottle regularly to ensure that all sides of the onions receive equal exposure to sunlight.
What kind of soil should I use?
A well-draining potting mix is essential for growing onions in bottles. You can purchase a pre-made potting mix from a garden center or create your own by combining equal parts of garden soil, compost, and perlite or vermiculite. Avoid using heavy clay soil, as it can become waterlogged and suffocate the onion roots.
How often should I water the onions?
Water your onions regularly, keeping the soil consistently moist but not waterlogged. Check the soil moisture by sticking your finger into the top inch of soil. If it feels dry, it’s time to water. Avoid overwatering, as this can lead to root rot. The frequency of watering will depend on the climate, the type of soil, and the size of the bottle.
How long does it take for the onions to grow?
The time it takes for onions to grow in a bottle depends on the variety of onion, the growing conditions, and the size of the bulb you started with. Generally, you can expect to harvest green onions (scallions) within a few weeks. For larger onion bulbs, it may take several months. You can harvest the green tops of the onions as they grow, which will encourage further growth.
Can I grow onions from seed in a bottle?
Yes, you can grow onions from seed in a bottle, but it will take longer than starting with onion sets or bulbs. Sow the seeds directly into the soil in the bottle and keep the soil moist until they germinate. Once the seedlings are large enough to handle, thin them out to allow for adequate spacing.
What if my onions start to turn yellow or brown?
Yellowing or browning leaves can be a sign of several problems, including overwatering, underwatering, nutrient deficiency, or disease. Check the soil moisture and adjust your watering accordingly. If the soil is dry, water more frequently. If the soil is waterlogged, allow it to dry out before watering again. You can also fertilize your onions with a balanced liquid fertilizer to provide them with the nutrients they need. If you suspect a disease, remove any affected leaves and treat the onions with an appropriate fungicide.
Can I reuse the soil in the bottle?
It’s generally not recommended to reuse the soil in the bottle for growing onions, as it may be depleted of nutrients and harbor disease-causing organisms. However, you can amend the soil with compost or other organic matter to improve its fertility. Alternatively, you can use the old soil as a soil amendment in your garden.
What are some other plants I can grow in a bottle?
The bottle gardening technique can be used to grow a variety of other plants, including herbs, lettuce, spinach, and strawberries. Choose plants that have shallow roots and don’t require a lot of space. Be sure to provide adequate sunlight, water, and nutrients for the specific plants you are growing.
How do I prevent pests from attacking my onions?
To prevent pests from attacking your onions, keep the area around your bottle garden clean and free of debris. Inspect your onions regularly for signs of pests, such as aphids, spider mites, or thrips. If you find any pests, you can try washing them off with a strong stream of water or treating them with an insecticidal soap or neem oil. You can also introduce beneficial insects, such as ladybugs or lacewings, to help control pests.

Leave a Comment