
Growing Water Spinach at Home can seem daunting, but trust me, it’s easier than you think! Have you ever dreamt of snipping fresh, vibrant greens right from your backyard to add to your stir-fries or salads? Imagine the satisfaction of knowing exactly where your food comes from and that it’s free from harmful chemicals. That’s the magic of home gardening, and water spinach, also known as Ong Choy, is a fantastic place to start.
Water spinach has a rich history, deeply rooted in Asian cuisine and culture. For centuries, it’s been a staple in dishes across Southeast Asia, prized for its delicious flavor and nutritional benefits. But you don’t need to travel to Asia to enjoy this amazing vegetable.
In today’s world, where concerns about food security and healthy eating are on the rise, learning how to grow your own food is more important than ever. Growing Water Spinach at Home offers a sustainable and rewarding way to supplement your diet with fresh, nutritious greens. Plus, it’s a fun and engaging activity for the whole family! This DIY guide will provide you with simple, step-by-step instructions and clever hacks to ensure a bountiful harvest, even if you have limited space or gardening experience. So, let’s dive in and discover the secrets to cultivating your own thriving water spinach patch!

Growing Water Spinach (Ong Choy) at Home: A Beginner’s Guide
Hey there, fellow gardening enthusiasts! I’m so excited to share my experience with growing water spinach, also known as Ong Choy, right in my own backyard. It’s surprisingly easy, incredibly rewarding, and you get a constant supply of fresh, delicious greens. Trust me, once you taste homegrown water spinach, you’ll never want to buy it from the store again!
This guide will walk you through everything you need to know, from choosing the right container to harvesting your bounty. Let’s get started!
What You’ll Need
Before we dive into the nitty-gritty, let’s gather our supplies. Here’s a list of everything you’ll need to successfully grow water spinach at home:
* Water Spinach Seeds or Cuttings: You can find seeds online or at your local garden center. Cuttings are another great option, especially if you know someone who already grows water spinach.
* A Large Container or Tub: Water spinach loves water, so a container that can hold a good amount of it is essential. I recommend something at least 12 inches deep and wide. A plastic storage tub works perfectly!
* Potting Mix or Soil: While water spinach thrives in water, it still needs a bit of soil to get started. A good quality potting mix or garden soil will do the trick.
* Water: Obvious, right? But make sure you have access to a reliable water source.
* Fertilizer (Optional): While not strictly necessary, a balanced liquid fertilizer can help boost growth.
* Sunlight: Water spinach needs at least 6 hours of sunlight per day.
* Gardening Gloves (Optional): To keep your hands clean.
* Scissors or Pruning Shears: For harvesting.
Choosing Your Growing Method: Seeds vs. Cuttings
You have two main options for starting your water spinach: seeds or cuttings. Both methods are relatively simple, but they have their own pros and cons.
* Seeds: Starting from seeds is a great way to ensure you’re growing a specific variety of water spinach. It also allows you to control the entire growing process from the very beginning. However, seeds can take a bit longer to germinate and establish themselves.
* Cuttings: Using cuttings is a faster way to get started, as you’re essentially skipping the germination phase. If you have access to healthy water spinach plants, taking cuttings is a convenient and efficient option.
I’ve tried both methods, and honestly, I’ve had success with both. If you’re a beginner, I recommend starting with cuttings if you can find them. Otherwise, seeds are a perfectly viable option.
Growing Water Spinach from Seeds: A Step-by-Step Guide
If you’ve decided to start from seeds, here’s how to do it:
1. Soak the Seeds: Before planting, soak the water spinach seeds in water for 12-24 hours. This will help soften the seed coat and improve germination rates. I usually put them in a small bowl of water and leave them overnight.
2. Prepare Your Container: Fill your container with potting mix or garden soil, leaving about 2-3 inches of space at the top. Water the soil thoroughly until it’s evenly moist.
3. Sow the Seeds: Sprinkle the soaked seeds evenly over the surface of the soil. You don’t need to bury them too deep; just gently press them into the soil.
4. Cover with a Thin Layer of Soil: Lightly cover the seeds with a thin layer of soil or potting mix.
5. Water Gently: Water the seeds gently to avoid disturbing them. I like to use a spray bottle for this step.
6. Create a Humid Environment: To help with germination, you can cover the container with a clear plastic bag or plastic wrap. This will create a humid environment that the seeds will love. Make sure to poke a few holes in the plastic for ventilation.
7. Place in a Sunny Location: Place the container in a warm, sunny location that receives at least 6 hours of sunlight per day.
8. Keep the Soil Moist: Check the soil regularly and water as needed to keep it consistently moist. Don’t let the soil dry out completely.
9. Wait for Germination: Water spinach seeds typically germinate within 7-14 days. Once the seedlings emerge, remove the plastic bag or wrap.
10. Thin the Seedlings (If Necessary): If you have too many seedlings growing close together, you can thin them out to give them more space to grow.
Growing Water Spinach from Cuttings: A Step-by-Step Guide
If you’re using cuttings, here’s how to get them started:
1. Take Cuttings: Select healthy stems from a mature water spinach plant. Cut the stems into sections that are about 6-8 inches long. Make sure each cutting has at least a few nodes (the points where leaves grow).
2. Remove Lower Leaves: Remove the leaves from the bottom half of each cutting. This will prevent them from rotting when they’re submerged in water.
3. Root the Cuttings in Water: Place the cuttings in a glass or jar of water, making sure that the nodes are submerged.
4. Place in a Sunny Location: Place the glass or jar in a warm, sunny location.
5. Change the Water Regularly: Change the water every 1-2 days to prevent bacteria from growing.
6. Wait for Roots to Develop: Within a week or two, you should start to see roots developing from the nodes.
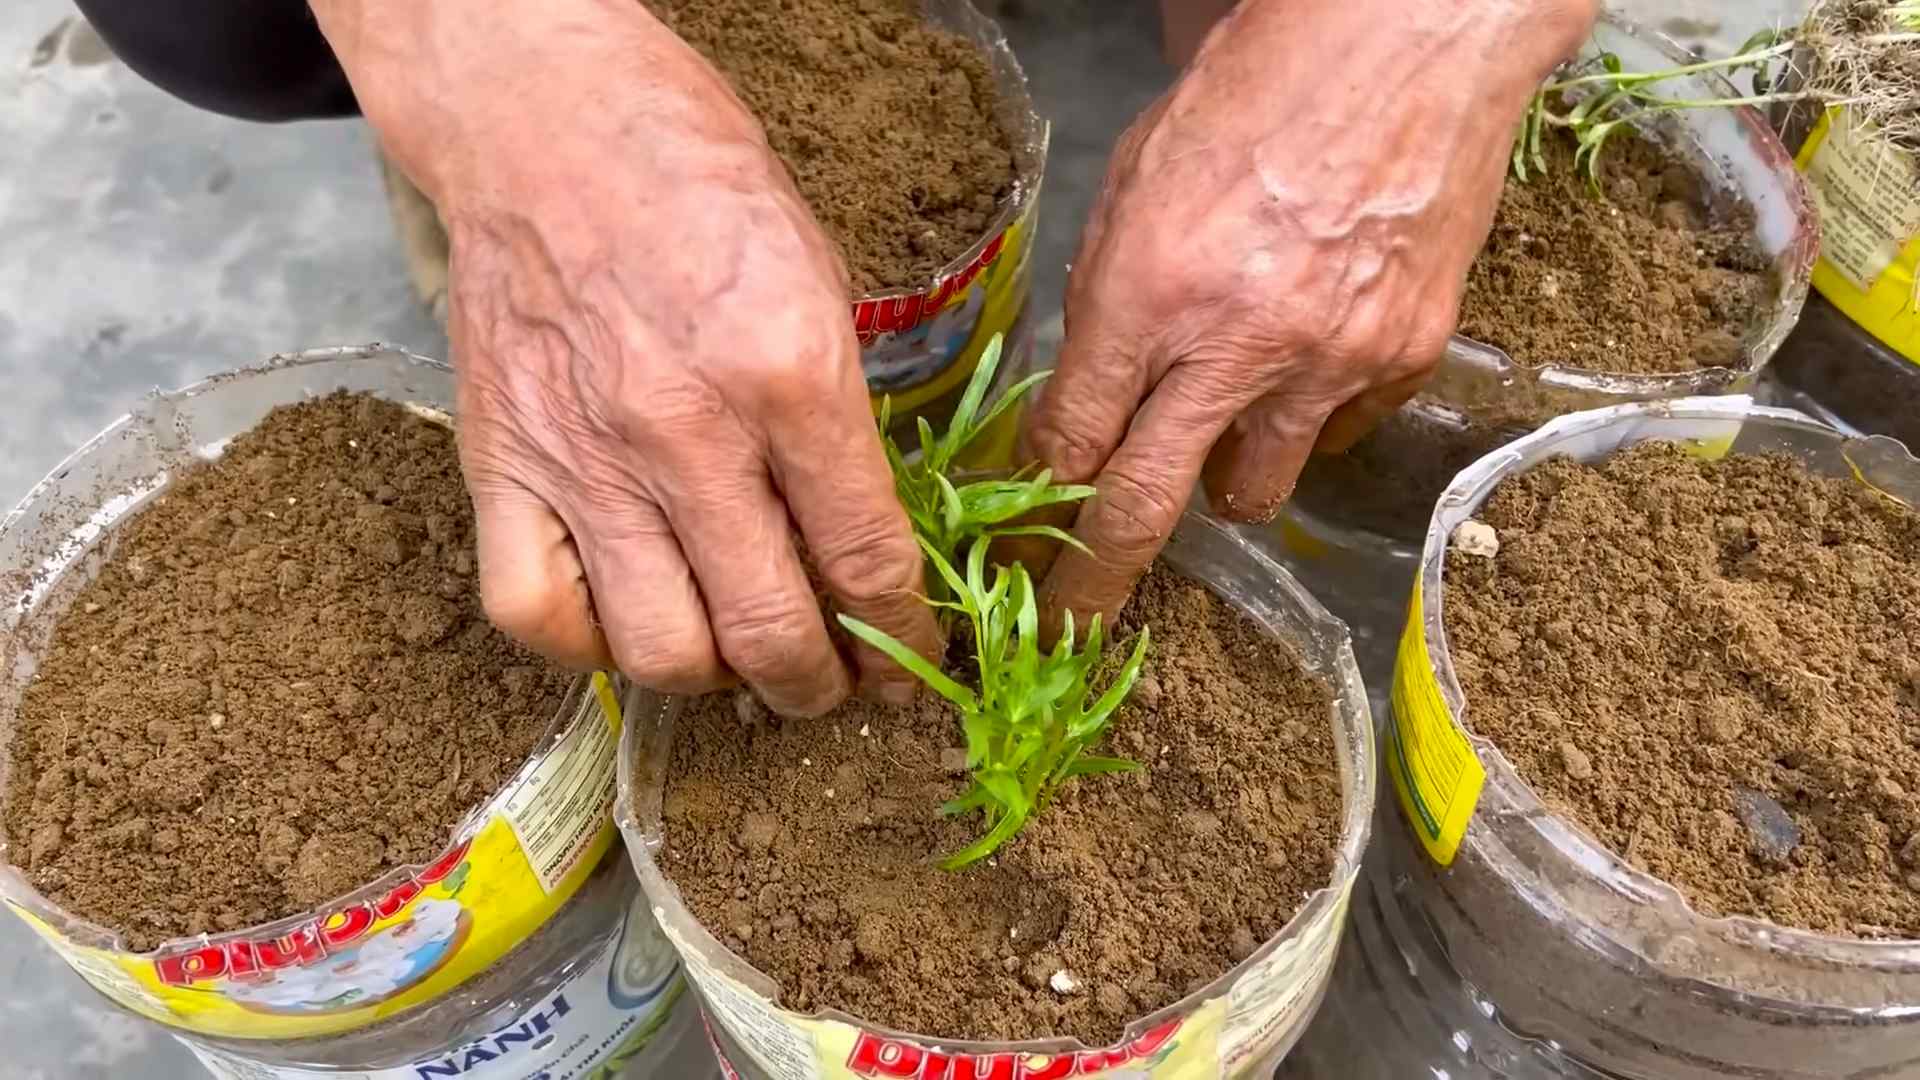
7. Plant the Cuttings: Once the roots are about an inch long, you can plant the cuttings in your prepared container.
8. Prepare Your Container: Fill your container with potting mix or garden soil, leaving about 2-3 inches of space at the top. Water the soil thoroughly until it’s evenly moist.
9. Plant the Rooted Cuttings: Gently plant the rooted cuttings in the soil, spacing them a few inches apart.
10. Water Gently: Water the cuttings gently to avoid disturbing the roots.
Maintaining Your Water Spinach
Once your water spinach plants are established, here’s how to keep them thriving:
1. Water Regularly: Water spinach loves water, so make sure to keep the soil consistently moist. In hot weather, you may need to water daily. I often just flood the container, letting the water spinach sit in a few inches of water.
2. Fertilize (Optional): If you want to boost growth, you can fertilize your water spinach plants every 2-3 weeks with a balanced liquid fertilizer. Follow the instructions on the fertilizer label.
3. Provide Sunlight: Water spinach needs at least 6 hours of sunlight per day. If you don’t have a sunny spot, you can supplement with grow lights.
4. Control Pests and Diseases: Water spinach is generally pest-resistant, but keep an eye out for aphids or other common garden pests. If you spot any pests, you can try spraying them with insecticidal soap.
5. Prune Regularly: Pruning your water spinach plants will encourage them to grow bushier and produce more leaves. Simply pinch off the tips of the stems.
Harvesting Your Water Spinach
The best part of growing water spinach is, of course, harvesting it! You can start harvesting your water spinach about 4-6 weeks after planting.
1. Harvest Regularly: Harvest your water spinach regularly to encourage continued growth.
2. Cut the Stems: Use scissors or pruning shears to cut the stems about 6-8 inches from the top.
3. Leave Some Leaves: Leave a few leaves on the plant so it can continue to grow.
4. Enjoy Your Harvest: Water spinach is delicious stir-fried, steamed, or added to soups.
Troubleshooting Common Problems
Even with the best care, you might encounter a few problems while growing water spinach. Here are some common issues and how to address them:
* Yellowing Leaves: Yellowing leaves can be a sign of nutrient deficiency. Try fertilizing your plants with a balanced liquid fertilizer.
* Slow Growth: Slow growth can be caused by a lack of sunlight or water. Make sure your plants are getting enough sunlight and that the soil is consistently moist.
* Pests: If you spot pests on your water spinach plants, try spraying them with insecticidal soap.
* Root Rot: Root rot can occur if the soil is too waterlogged. Make sure your container has good drainage.
Tips for Success
Here are a few extra tips to help you succeed with growing water spinach at home:
* Choose the Right Variety: There are several different varieties of water spinach available. Some varieties are better suited for growing in containers than others
Conclusion
So, there you have it! Growing water spinach at home is not only achievable but also incredibly rewarding. Forget those wilted, overpriced bunches at the grocery store. With a little effort and this simple DIY trick, you can have a constant supply of fresh, crisp, and vibrant water spinach right at your fingertips.
Why is this a must-try? Because it’s about more than just saving money. It’s about connecting with your food, understanding where it comes from, and enjoying the unparalleled flavor of homegrown produce. The difference in taste between store-bought and freshly harvested water spinach is truly remarkable. The homegrown variety boasts a delicate sweetness and a satisfying crunch that you simply won’t find elsewhere. Plus, you have complete control over the growing process, ensuring that your water spinach is free from harmful pesticides and chemicals.
But the benefits don’t stop there. Growing your own water spinach is also a fantastic way to reduce your carbon footprint. By eliminating the need for transportation and packaging, you’re contributing to a more sustainable food system. And let’s not forget the sheer joy of watching your plants thrive. There’s something deeply satisfying about nurturing a seed into a bountiful harvest.
Ready to take your water spinach cultivation to the next level? Consider these variations:
* Container Gardening: If you’re short on space, don’t worry! Water spinach thrives in containers. Choose a large pot or tub with drainage holes and follow the same planting instructions. This is perfect for balconies, patios, or even indoor setups with sufficient sunlight.
* Hydroponics: For the more adventurous gardener, hydroponic water spinach cultivation is an exciting option. This method involves growing plants without soil, using nutrient-rich water solutions. It can lead to faster growth and higher yields.
* Different Varieties: Explore different varieties of water spinach to find your favorite. Some varieties have broader leaves, while others have a more delicate flavor. Experiment and discover what suits your taste buds best.
* Companion Planting: Enhance your water spinach garden by incorporating companion plants. Basil, mint, and marigolds can help deter pests and attract beneficial insects.
We’re confident that you’ll be amazed by how easy and rewarding it is to grow your own water spinach. It’s a simple, sustainable, and delicious way to enhance your culinary creations.
Now, it’s your turn! We encourage you to try this DIY trick and experience the joy of homegrown water spinach for yourself. Don’t be afraid to experiment, adapt the techniques to your specific environment, and most importantly, have fun!
Once you’ve harvested your first batch, we’d love to hear about your experience. Share your photos, tips, and recipes in the comments section below. Let’s build a community of water spinach enthusiasts and inspire others to embrace the joys of homegrown food. Happy gardening!
Frequently Asked Questions (FAQ)
What is the best time of year to grow water spinach?
Water spinach thrives in warm weather, so the best time to grow it is during the late spring, summer, and early fall months. Aim for temperatures between 70°F and 85°F (21°C and 29°C) for optimal growth. In colder climates, you can start seeds indoors a few weeks before the last expected frost and transplant them outdoors once the weather warms up. You can also extend the growing season by using a greenhouse or cold frame.
How much sunlight does water spinach need?
Water spinach needs at least 6 hours of direct sunlight per day to thrive. Choose a location in your garden that receives plenty of sunlight throughout the day. If you’re growing water spinach indoors, place it near a sunny window or use grow lights to supplement natural light. Insufficient sunlight can lead to leggy growth and reduced yields.
What kind of soil is best for water spinach?
Water spinach prefers moist, fertile soil that is rich in organic matter. Amend your soil with compost or well-rotted manure before planting to improve its fertility and drainage. The ideal soil pH for water spinach is between 6.0 and 7.0. If your soil is heavy clay, consider adding sand or perlite to improve drainage.
How often should I water water spinach?
Water spinach needs consistent moisture to thrive. Water deeply and regularly, especially during hot, dry weather. The soil should be consistently moist but not waterlogged. Check the soil moisture regularly and water when the top inch feels dry to the touch. Consider using a soaker hose or drip irrigation system to provide consistent moisture to the roots.
How do I fertilize water spinach?
Water spinach is a heavy feeder and benefits from regular fertilization. Use a balanced fertilizer (e.g., 10-10-10) every 2-3 weeks during the growing season. You can also use organic fertilizers such as compost tea or fish emulsion. Avoid over-fertilizing, as this can lead to excessive foliage growth and reduced flavor.
When can I harvest water spinach?
You can start harvesting water spinach about 4-6 weeks after planting. Harvest the young, tender shoots and leaves when they are about 6-8 inches long. Cut the stems about 2 inches above the soil line to encourage new growth. Water spinach can be harvested repeatedly throughout the growing season.
How do I prevent pests and diseases?
Water spinach is generally resistant to pests and diseases, but it can be susceptible to aphids, spider mites, and fungal diseases. Inspect your plants regularly for signs of pests or diseases and take action promptly. Use organic pest control methods such as insecticidal soap or neem oil to control aphids and spider mites. Ensure good air circulation to prevent fungal diseases.
Can I grow water spinach in water only?
Yes, water spinach can be grown hydroponically in water only. This method involves suspending the roots of the plants in a nutrient-rich water solution. Hydroponic water spinach cultivation can lead to faster growth and higher yields. You can find detailed instructions and resources online for setting up a hydroponic water spinach system.
How do I store harvested water spinach?
Harvested water spinach is best used fresh, but it can be stored in the refrigerator for a few days. Wrap the leaves in a damp paper towel and store them in a plastic bag in the crisper drawer. Avoid washing the leaves before storing them, as this can promote spoilage.
Is growing water spinach at home safe?
Yes, growing water spinach at home is generally safe, but it’s important to be aware of potential risks. Ensure that you are using clean water and soil to avoid contamination. Wash the leaves thoroughly before eating them to remove any dirt or debris. If you are concerned about potential contaminants in your soil, consider growing water spinach in containers with fresh potting mix.


Leave a Comment