
Growing Watermelon in Pots might sound like a summer dream reserved for sprawling farms, but guess what? I’m here to tell you that juicy, homegrown watermelon is totally achievable, even if you’re rocking a balcony, patio, or just a small backyard! Forget the image of endless fields; we’re bringing the watermelon patch to you, one pot at a time.
Watermelons have a rich history, dating back thousands of years to Africa, where they were prized for their hydrating properties in arid climates. Over time, different varieties were cultivated and spread across the globe, becoming a symbol of summer refreshment and community gatherings. Now, we’re taking this ancient fruit and adapting it to modern, space-conscious living.
Why should you learn this DIY trick? Well, who doesn’t love the taste of a perfectly ripe, sweet watermelon? Store-bought melons often lack that intense flavor and satisfying crunch. Plus, growing watermelon in pots allows you to control the growing environment, ensuring the best possible conditions for your plant. Imagine the satisfaction of harvesting your own delicious watermelon, knowing exactly where it came from and how it was grown. It’s a fun, rewarding project that brings a touch of summer magic right to your doorstep. So, let’s dive in and discover the secrets to successful container watermelon gardening!
Growing Watermelon in Pots: A Sweet Summer Treat, Even Without a Garden!
Hey there, fellow gardening enthusiasts! Ever dreamt of biting into a juicy, homegrown watermelon but thought you needed acres of land? Well, I’m here to tell you that you can absolutely grow watermelons in pots! It’s a bit of a challenge, sure, but with the right approach, you can enjoy the sweet taste of summer, even if you only have a balcony or patio. I’ve done it myself, and I’m excited to share my secrets with you.
Choosing the Right Watermelon Variety
Not all watermelons are created equal, especially when it comes to container gardening. You’ll want to opt for smaller, bush-type varieties that are bred for compact growth. Here are a few of my favorites:
* Sugar Baby: This is a classic choice, producing small, round watermelons that are incredibly sweet. They mature relatively quickly, which is a bonus.
* Bush Sugar Baby: As the name suggests, this is a bushier version of the Sugar Baby, making it even more suitable for pots.
* Golden Midget: This variety produces small, yellow-skinned watermelons with pink flesh. They’re known for their early maturity and delicious flavor.
* Tiger Baby: A personal favorite! These are small, striped watermelons that are not only tasty but also visually appealing.
* ‘Millionaire’ Watermelon: This is a hybrid variety that produces small to medium-sized fruits. It’s known for its disease resistance and high yield.
Important Note: Always check the seed packet for the mature size of the watermelon and choose a variety that won’t outgrow your container.
Gathering Your Supplies
Before we dive into the planting process, let’s make sure you have everything you need. Here’s a checklist:
* Large Container: This is crucial! You’ll need a pot that’s at least 24 inches in diameter and 18 inches deep. The bigger, the better, as watermelons have extensive root systems. A half whiskey barrel or a large, sturdy plastic container works well.
* High-Quality Potting Mix: Don’t skimp on the soil! Use a well-draining potting mix that’s rich in organic matter. Avoid using garden soil, as it can become compacted in containers. I like to mix in some compost for added nutrients.
* Watermelon Seeds: Choose your preferred variety from the list above.
* Trellis or Support System: Even bush varieties can benefit from some support, especially as the fruits start to develop. A small trellis or tomato cage will do the trick.
* Slow-Release Fertilizer: Watermelons are heavy feeders, so a slow-release fertilizer will provide them with a steady supply of nutrients throughout the growing season.
* Watering Can or Hose: You’ll need a reliable way to water your watermelon plants.
* Gardening Gloves: To protect your hands.
* Optional: Black plastic mulch or dark-colored rocks to help retain heat and moisture.
Planting Your Watermelon Seeds
Now for the fun part! Here’s how to plant your watermelon seeds in your container:
1. Prepare the Container: Make sure your container has drainage holes. If not, drill some! Fill the container with your high-quality potting mix, leaving a few inches of space at the top.
2. Sow the Seeds: Plant 2-3 seeds per container, about 1 inch deep. Space them a few inches apart.
3. Water Gently: Water the soil thoroughly, but be careful not to overwater. You want the soil to be moist, not soggy.
4. Provide Warmth: Watermelons need warm temperatures to germinate. If you’re starting your seeds indoors, place the container in a warm location, such as on top of a refrigerator or near a sunny window. You can also use a heat mat to speed up germination.
5. Thin Seedlings: Once the seedlings emerge (usually within 7-10 days), thin them to one plant per container. Choose the strongest, healthiest seedling and snip off the others at the soil line. Don’t pull them out, as this can disturb the roots of the remaining seedling.
Caring for Your Watermelon Plants
Once your watermelon seedlings are established, it’s time to provide them with the care they need to thrive.
1. Watering: Watermelons need consistent moisture, especially during hot weather. Water deeply whenever the top inch of soil feels dry to the touch. Avoid overhead watering, as this can lead to fungal diseases. Instead, water at the base of the plant.
2. Fertilizing: As mentioned earlier, watermelons are heavy feeders. In addition to the slow-release fertilizer you added at planting time, you can also supplement with a liquid fertilizer every 2-3 weeks. Choose a fertilizer that’s high in phosphorus and potassium, which are essential for fruit development. I like to use a balanced fertilizer early on, then switch to a bloom-boosting formula once the plant starts to flower.
3. Sunlight: Watermelons need at least 6-8 hours of direct sunlight per day. Place your container in the sunniest spot you can find.
4. Support: As the watermelon vines grow, train them to climb up the trellis or support system. This will help to keep the fruits off the ground and prevent them from rotting.
5. Pollination: Watermelons require pollination to produce fruit. If you’re growing your watermelons indoors or in an area with limited bee activity, you may need to hand-pollinate the flowers. To do this, use a small paintbrush to transfer pollen from the male flowers to the female flowers. The female flowers have a small, immature watermelon at the base.
6. Pruning: While not essential, pruning can help to improve air circulation and encourage fruit production. Remove any suckers (small shoots that grow from the base of the plan
Hey there, fellow gardening enthusiasts! Ever dreamt of biting into a juicy, homegrown watermelon but thought you needed acres of land? Well, I’m here to tell you that you can absolutely grow watermelons in pots! It’s a bit of a challenge, sure, but with the right approach, you can enjoy the sweet taste of summer, even if you only have a balcony or patio. I’ve done it myself, and I’m excited to share my secrets with you.
Choosing the Right Watermelon Variety
Not all watermelons are created equal, especially when it comes to container gardening. You’ll want to opt for smaller, bush-type varieties that are bred for compact growth. Here are a few of my favorites:
* Sugar Baby: This is a classic choice, producing small, round watermelons that are incredibly sweet. They mature relatively quickly, which is a bonus.
* Bush Sugar Baby: As the name suggests, this is a bushier version of the Sugar Baby, making it even more suitable for pots.
* Golden Midget: This variety produces small, yellow-skinned watermelons with pink flesh. They’re known for their early maturity and delicious flavor.
* Tiger Baby: A personal favorite! These are small, striped watermelons that are not only tasty but also visually appealing.
* ‘Millionaire’ Watermelon: This is a hybrid variety that produces small to medium-sized fruits. It’s known for its disease resistance and high yield.
Important Note: Always check the seed packet for the mature size of the watermelon and choose a variety that won’t outgrow your container.
Gathering Your Supplies
Before we dive into the planting process, let’s make sure you have everything you need. Here’s a checklist:
* Large Container: This is crucial! You’ll need a pot that’s at least 24 inches in diameter and 18 inches deep. The bigger, the better, as watermelons have extensive root systems. A half whiskey barrel or a large, sturdy plastic container works well.
* High-Quality Potting Mix: Don’t skimp on the soil! Use a well-draining potting mix that’s rich in organic matter. Avoid using garden soil, as it can become compacted in containers. I like to mix in some compost for added nutrients.
* Watermelon Seeds: Choose your preferred variety from the list above.
* Trellis or Support System: Even bush varieties can benefit from some support, especially as the fruits start to develop. A small trellis or tomato cage will do the trick.
* Slow-Release Fertilizer: Watermelons are heavy feeders, so a slow-release fertilizer will provide them with a steady supply of nutrients throughout the growing season.
* Watering Can or Hose: You’ll need a reliable way to water your watermelon plants.
* Gardening Gloves: To protect your hands.
* Optional: Black plastic mulch or dark-colored rocks to help retain heat and moisture.
Planting Your Watermelon Seeds
Now for the fun part! Here’s how to plant your watermelon seeds in your container:
1. Prepare the Container: Make sure your container has drainage holes. If not, drill some! Fill the container with your high-quality potting mix, leaving a few inches of space at the top.
2. Sow the Seeds: Plant 2-3 seeds per container, about 1 inch deep. Space them a few inches apart.
3. Water Gently: Water the soil thoroughly, but be careful not to overwater. You want the soil to be moist, not soggy.
4. Provide Warmth: Watermelons need warm temperatures to germinate. If you’re starting your seeds indoors, place the container in a warm location, such as on top of a refrigerator or near a sunny window. You can also use a heat mat to speed up germination.
5. Thin Seedlings: Once the seedlings emerge (usually within 7-10 days), thin them to one plant per container. Choose the strongest, healthiest seedling and snip off the others at the soil line. Don’t pull them out, as this can disturb the roots of the remaining seedling.
Caring for Your Watermelon Plants
Once your watermelon seedlings are established, it’s time to provide them with the care they need to thrive.
1. Watering: Watermelons need consistent moisture, especially during hot weather. Water deeply whenever the top inch of soil feels dry to the touch. Avoid overhead watering, as this can lead to fungal diseases. Instead, water at the base of the plant.
2. Fertilizing: As mentioned earlier, watermelons are heavy feeders. In addition to the slow-release fertilizer you added at planting time, you can also supplement with a liquid fertilizer every 2-3 weeks. Choose a fertilizer that’s high in phosphorus and potassium, which are essential for fruit development. I like to use a balanced fertilizer early on, then switch to a bloom-boosting formula once the plant starts to flower.
3. Sunlight: Watermelons need at least 6-8 hours of direct sunlight per day. Place your container in the sunniest spot you can find.
4. Support: As the watermelon vines grow, train them to climb up the trellis or support system. This will help to keep the fruits off the ground and prevent them from rotting.
5. Pollination: Watermelons require pollination to produce fruit. If you’re growing your watermelons indoors or in an area with limited bee activity, you may need to hand-pollinate the flowers. To do this, use a small paintbrush to transfer pollen from the male flowers to the female flowers. The female flowers have a small, immature watermelon at the base.
6. Pruning: While not essential, pruning can help to improve air circulation and encourage fruit production. Remove any suckers (small shoots that grow from the base of the plant) and any yellowing or diseased leaves.
7. Protecting the Fruit: As the watermelons develop, you may want to protect them from pests and diseases. You can use a floating row cover to keep insects away, or you can spray the plants with an organic fungicide if necessary. You can also place a piece of cardboard or straw under the developing fruit to prevent it from touching the soil and rotting.
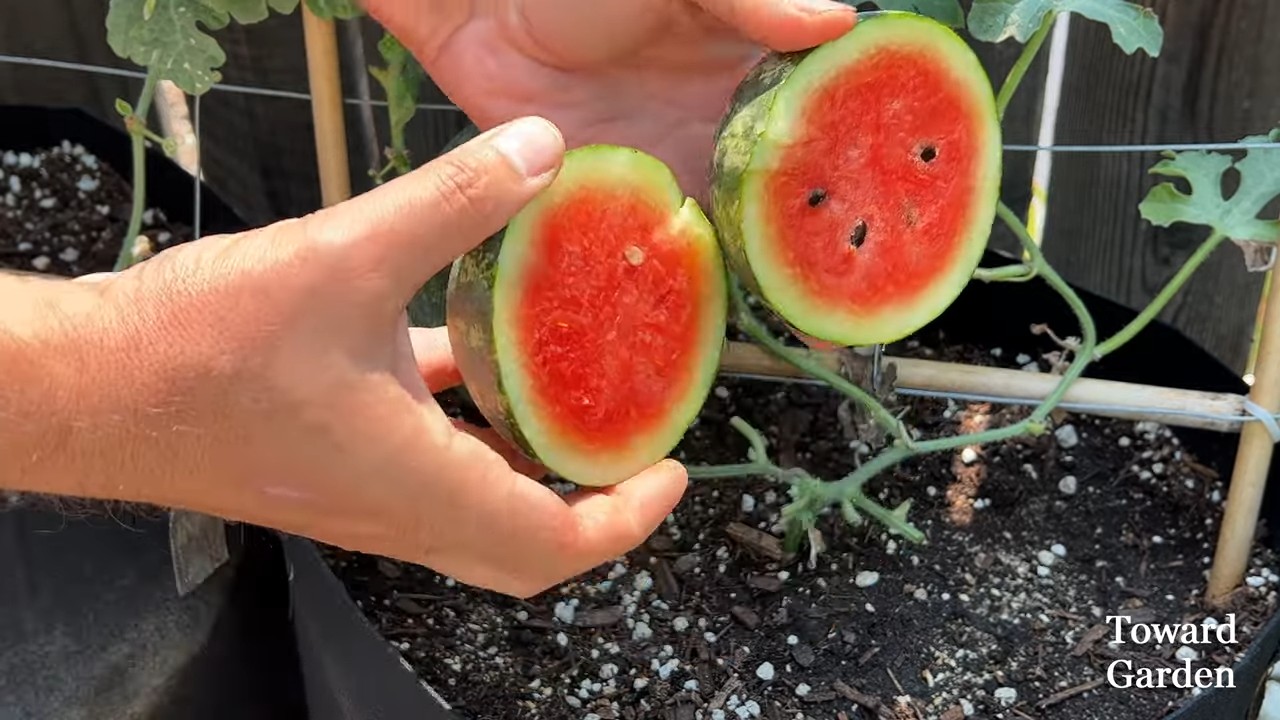
Harvesting Your Watermelons
The moment you’ve been waiting for! Here’s how to tell when your watermelons are ripe:
1. Check the Tendril: The tendril closest to the watermelon should be brown and dry.
2. Thump the Watermelon: A ripe watermelon will sound hollow when you thump it.
3. Check the Ground Spot: The spot where the watermelon rests on the ground (the ground spot) should be yellow or cream-colored.
4. Check the Days to Maturity: Refer to your seed packet for the estimated days to maturity. This is a good guideline, but it’s not always accurate.
Once you’re confident that your watermelon is ripe, use a sharp knife to cut it from the vine, leaving a few inches of stem attached.
Troubleshooting Common Problems
Even with the best care, you may encounter some problems when growing watermelons in pots. Here are a few common issues and how to address them:
* Lack of Fruit: This could be due to poor pollination, insufficient sunlight, or lack of nutrients. Make sure you’re providing your plants with adequate sunlight, water, and fertilizer. If you suspect poor pollination, try hand-pollinating the flowers.
* Blossom End Rot: This is a condition where the bottom of the watermelon rots. It’s usually caused by calcium deficiency or inconsistent watering. Make sure you’re using a potting mix that contains calcium, and water your plants regularly.
* Pests: Watermelons can be susceptible to pests such as aphids, squash bugs, and cucumber beetles. Inspect your plants regularly and treat any infestations promptly with insecticidal soap or neem oil.
* Fungal Diseases: Fungal diseases such as powdery mildew and anthracnose can affect watermelon plants. Prevent these diseases by providing good air circulation, avoiding overhead watering, and spraying the plants with an organic fungicide if necessary.
Extra Tips for Success
Here are a few extra tips to help you grow the best watermelons possible in pots:
* Use a Dark-Colored Container: Dark-colored containers absorb more heat, which can help to warm the soil and promote growth.
* Elevate the Container: Elevating the container on bricks or a plant stand can improve drainage and air circulation.
* Mulch the Soil: Mulching the soil with black plastic or dark-colored rocks can help to retain heat and moisture.
* Rotate the Watermelon: Gently rotate the watermelon every few days to ensure even ripening.
* Be Patient:

Conclusion
So, there you have it! Growing watermelons in pots might seem like a daunting task, reserved for sprawling gardens and experienced green thumbs. But as we’ve shown, with a little planning, the right techniques, and a dash of patience, you can absolutely cultivate these juicy delights right on your patio, balcony, or even a sunny windowsill. This DIY trick isn’t just about saving space; it’s about empowering you to enjoy fresh, homegrown watermelon regardless of your living situation.
Why is this a must-try? Because the satisfaction of biting into a watermelon you nurtured from seed to fruit is unparalleled. It’s a testament to your dedication and a delicious reward for your efforts. Plus, growing your own food is a fantastic way to connect with nature, reduce your carbon footprint, and ensure you’re consuming produce free from harmful pesticides.
Don’t be afraid to experiment! Consider trying different watermelon varieties suited for container gardening. Bush Sugar Baby, Yellow Doll, and even some smaller icebox watermelons are excellent choices. You can also play around with different soil mixes to find what works best for your local climate and growing conditions. Adding a trellis or support structure can help manage the vines and maximize space, especially for larger varieties.
And remember, growing watermelons in pots is a learning process. Don’t be discouraged if your first attempt isn’t perfect. Every season brings new opportunities to refine your techniques and improve your yield. The key is to observe your plants, adjust your care accordingly, and most importantly, have fun!
We wholeheartedly encourage you to give this DIY trick a try. Imagine the joy of sharing your homegrown watermelon with friends and family, knowing you cultivated it yourself. It’s a conversation starter, a source of pride, and a delicious treat all rolled into one.
So, grab your pots, seeds, and gardening gloves, and embark on this exciting adventure. We’re confident you’ll be amazed at what you can achieve. And once you’ve harvested your first watermelon, we’d love to hear about your experience! Share your photos, tips, and stories in the comments below. Let’s build a community of container watermelon growers and inspire others to embrace the joys of homegrown goodness. Let us know what worked for you, what challenges you faced, and any unique variations you discovered. Together, we can unlock the secrets to successful container watermelon gardening and enjoy the sweet taste of success!
Frequently Asked Questions (FAQ)
1. What is the best size pot for growing watermelons?
The ideal pot size for growing watermelons is at least 20 gallons, but larger is generally better. A 25-gallon or even 30-gallon pot will provide ample space for the roots to develop and support healthy growth. The bigger the pot, the more room the roots have to spread, leading to a healthier and more productive plant. Smaller pots can restrict root growth, resulting in smaller fruits or even stunted plants. Make sure the pot has adequate drainage holes to prevent waterlogging, which can lead to root rot.
2. What type of soil should I use for growing watermelons in pots?
Watermelons thrive in well-draining, nutrient-rich soil. A good potting mix should consist of a combination of peat moss, perlite, and vermiculite. You can also add compost or well-rotted manure to enrich the soil with organic matter. Avoid using garden soil, as it can be too heavy and compact, hindering drainage and root growth. The ideal pH level for watermelon soil is between 6.0 and 6.8. You can test the pH of your soil using a soil testing kit and adjust it accordingly with lime (to raise pH) or sulfur (to lower pH).
3. How often should I water my watermelon plants in pots?
Watermelon plants need consistent moisture, especially during hot weather and fruit development. Water deeply and regularly, ensuring the soil is evenly moist but not waterlogged. Check the soil moisture level daily by sticking your finger about an inch into the soil. If it feels dry, it’s time to water. During hot, dry periods, you may need to water your plants daily or even twice a day. Avoid overhead watering, as it can promote fungal diseases. Instead, water at the base of the plant, directing the water towards the roots.
4. How much sunlight do watermelons need?
Watermelons require at least 6-8 hours of direct sunlight per day to thrive. Choose a sunny location for your potted watermelons, such as a south-facing patio or balcony. If you live in a particularly hot climate, you may need to provide some afternoon shade to prevent the plants from overheating. Insufficient sunlight can lead to poor fruit production and smaller, less flavorful watermelons. If you don’t have a sunny spot, you can supplement with grow lights.
5. What kind of fertilizer should I use for watermelons in pots?
Watermelons are heavy feeders and require regular fertilization to support their growth and fruit production. Start with a balanced fertilizer (e.g., 10-10-10) when planting, and then switch to a fertilizer higher in phosphorus and potassium (e.g., 5-10-10) once the plants start to flower. Fertilize every 2-3 weeks, following the instructions on the fertilizer package. You can also supplement with organic fertilizers, such as compost tea or fish emulsion. Avoid over-fertilizing, as it can lead to excessive vegetative growth and reduced fruit production.
6. How do I pollinate my watermelon flowers?
Watermelons have separate male and female flowers. The female flowers have a small, immature fruit at the base, while the male flowers do not. Pollination is essential for fruit development. If you don’t see bees or other pollinators visiting your plants, you may need to hand-pollinate the flowers. To hand-pollinate, use a small paintbrush to collect pollen from the male flowers and transfer it to the female flowers. Do this in the morning, when the flowers are open. You can also gently rub the male flower’s stamen against the female flower’s stigma.
7. How long does it take for watermelons to mature in pots?
The time it takes for watermelons to mature depends on the variety and growing conditions. Generally, it takes 70-90 days from planting to harvest. You can tell when a watermelon is ripe by looking for several signs: the tendril closest to the fruit should be brown and dry, the bottom of the watermelon (where it rests on the ground) should be yellow, and the watermelon should sound hollow when you thump it.
8. What are some common pests and diseases that affect watermelons?
Common pests that affect watermelons include aphids, squash bugs, and vine borers. You can control these pests with insecticidal soap, neem oil, or by hand-picking them off the plants. Common diseases include powdery mildew, fusarium wilt, and anthracnose. Prevent these diseases by providing good air circulation, avoiding overhead watering, and using disease-resistant varieties. If you notice signs of disease, treat the plants with a fungicide.
9. Can I grow multiple watermelon plants in one pot?
It’s generally best to grow only one watermelon plant per pot to ensure adequate space and nutrients for each plant. Growing multiple plants in one pot can lead to competition for resources, resulting in smaller fruits and less vigorous plants. If you want to grow multiple watermelon plants, it’s best to use separate pots for each plant.
10. What are some tips for maximizing watermelon yield in pots?
To maximize watermelon yield in pots, provide your plants with plenty of sunlight, water, and nutrients. Prune the vines to encourage fruit production. Support the developing fruits with slings or netting to prevent them from breaking off the vine. Hand-pollinate the flowers if necessary. And be patient! Growing watermelons takes time and effort, but the reward of a homegrown watermelon is well worth it.

Leave a Comment