
Hanging kohlrabi bottle garden: Sounds intriguing, right? I know, it might seem a little out there, but trust me, this DIY project is a game-changer for anyone looking to maximize their gardening space and add a touch of quirky charm to their home. Forget those boring old planters – we’re about to embark on a vertical gardening adventure that’s both eco-friendly and incredibly rewarding!
The concept of vertical gardening, while seemingly modern, actually has roots stretching back centuries. Think of the Hanging Gardens of Babylon, one of the Seven Wonders of the Ancient World! While we might not be building anything quite so grand, the principle remains the same: utilizing vertical space to cultivate plants. In many cultures, especially in urban environments where land is scarce, vertical gardening has become a vital way to grow fresh produce and connect with nature.
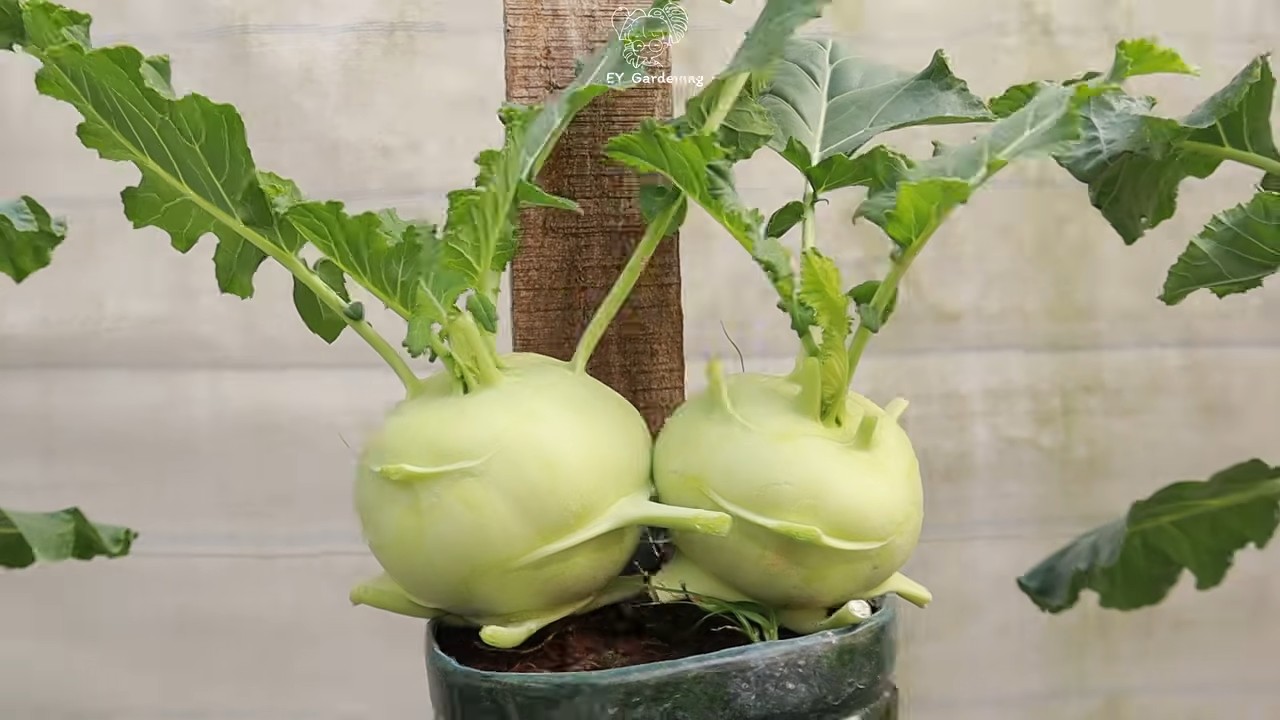
Why do you need this hanging kohlrabi bottle garden in your life? Well, for starters, it’s perfect for small spaces like balconies, patios, or even sunny windowsills. Kohlrabi, with its unique bulbous stem and leafy greens, is a nutritional powerhouse, packed with vitamins and fiber. Growing your own means you get fresh, organic produce right at your fingertips. Plus, repurposing plastic bottles is a fantastic way to reduce waste and contribute to a more sustainable lifestyle. I’m excited to show you how easy and fun it is to create your own thriving vertical garden, one bottle at a time!
Creating Your Own Hanging Kohlrabi Bottle Garden
Hey there, fellow gardening enthusiasts! I’m so excited to share this fun and eco-friendly DIY project with you: a hanging kohlrabi bottle garden! It’s a fantastic way to grow your own delicious kohlrabi, even if you’re short on space. Plus, it’s a great way to recycle those plastic bottles that might otherwise end up in the landfill. Let’s get started!
What You’ll Need
Before we dive in, let’s gather all the necessary materials. This will make the process smoother and more enjoyable.
* Plastic Bottles: You’ll need several plastic bottles, preferably 2-liter ones. The number depends on how many kohlrabi plants you want to grow. Make sure they are clean and dry.
* Kohlrabi Seeds: Choose your favorite kohlrabi variety! I personally love the ‘Early White Vienna’ for its mild flavor.
* Potting Soil: A good quality potting mix is essential for healthy kohlrabi growth.
* Scissors or Utility Knife: For cutting the plastic bottles. Be careful!
* Drill or Nail and Hammer: To create drainage holes.
* Rope or Twine: For hanging the bottles. Jute twine looks really nice and natural.
* Measuring Tape or Ruler: To ensure consistent cuts.
* Watering Can: For, well, watering!
* Gloves (Optional): To keep your hands clean.
* Safety Glasses (Optional): For eye protection when cutting.
* Small Stones or Gravel: To improve drainage at the bottom of the bottles.
Preparing the Bottles
This is where we transform those plastic bottles into mini-planters. It’s a simple process, but precision is key for a neat and functional hanging garden.
1. Clean and Dry the Bottles: Ensure all bottles are thoroughly cleaned and completely dry. Remove any labels and sticky residue. A little soap and water usually does the trick.
2. Cut the Bottles: This is the most important step. We’ll be creating two types of bottle sections: the planting container and the water reservoir.
* For the Planting Container: Measure and cut the bottle about two-thirds of the way down from the top. You want a deep enough container to hold the soil and allow the kohlrabi roots to grow.
* For the Water Reservoir: Use the bottom third of the bottle that you just cut off. This will act as a self-watering system.
3. Create Drainage Holes: In the bottom of the planting container (the top two-thirds of the bottle), carefully drill or poke several drainage holes. These holes are crucial to prevent waterlogging, which can lead to root rot. I usually make about 4-5 holes, each about ¼ inch in diameter.
4. Prepare the Water Reservoir: No need to add drainage holes to the bottom section. This section will hold the water that the plant will draw up as needed.
5. Optional: Paint or Decorate: If you want to add a personal touch, now’s the time to paint or decorate your bottles. Use weather-resistant paint and let it dry completely before moving on. I like to use spray paint for a quick and even finish.
Planting the Kohlrabi
Now for the fun part – planting our kohlrabi seeds!
1. Add Drainage Layer: Place a layer of small stones or gravel at the bottom of the planting container. This will further improve drainage and prevent the soil from clogging the drainage holes.
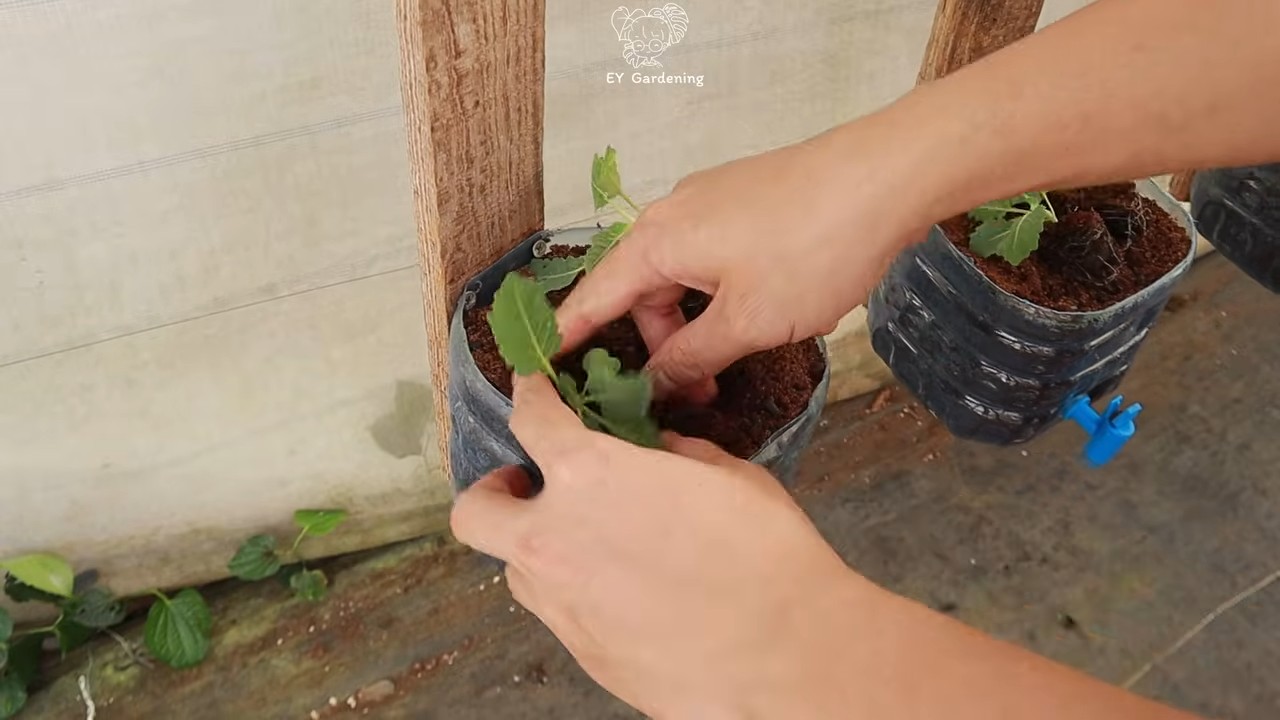
2. Fill with Potting Soil: Fill the planting container with high-quality potting soil, leaving about an inch of space at the top. Gently pat down the soil to remove any air pockets.
3. Sow the Seeds: Sow the kohlrabi seeds according to the package instructions. Generally, you’ll want to plant them about ¼ inch deep and space them about 2-3 inches apart. I usually plant 2-3 seeds per container and then thin them out later, keeping the strongest seedling.
4. Water Gently: Water the soil gently with a watering can, making sure to moisten the soil evenly. Avoid overwatering, as this can cause the seeds to rot.
5. Place the Planting Container in the Water Reservoir: Carefully place the planting container into the water reservoir. The soil should be in contact with the water in the reservoir, allowing the plant to draw up moisture as needed.
Creating the Hanging System
Time to get those bottles hanging! This is where the rope or twine comes in.
1. Drill Hanging Holes: Near the top of the planting container, drill or poke two holes on opposite sides. These holes should be large enough to thread the rope or twine through.
2. Thread the Rope or Twine: Thread the rope or twine through the holes, creating a loop for hanging. Make sure the loop is long enough to hang the bottle at a comfortable height.
3. Secure the Rope: Tie a secure knot at the end of the rope or twine to prevent it from slipping through the holes. Double-check the knot to ensure it’s strong enough to support the weight of the bottle and soil.
4. Repeat for All Bottles: Repeat steps 1-3 for all the bottles you want to hang.
5. Hang Your Garden: Find a suitable location to hang your kohlrabi bottle garden. A sunny spot with good air circulation is ideal. Make sure the location is easily accessible for watering and harvesting. I like to hang mine on my balcony railing or from a sturdy tree branch.
Caring for Your Kohlrabi
Now that your hanging kohlrabi bottle garden is set up, it’s important to provide proper care to ensure healthy growth and a bountiful harvest.
1. Watering: The beauty of this system is that it’s somewhat self-watering. Check the water level in the reservoir regularly and refill it as needed. Avoid overwatering, as this can lead to root rot. The soil should be moist but not soggy.
2. Sunlight: Kohlrabi needs at least 6 hours of sunlight per day to thrive. Make sure your hanging garden is located in a sunny spot. If you don’t have enough natural sunlight, you can supplement with grow lights.
3. Fertilizing: Feed your kohlrabi plants with a balanced liquid fertilizer every 2-3 weeks. Follow the instructions on the fertilizer package. I like to use an organic fertilizer to keep things natural.
4. Thinning: Once the seedlings have developed a few true leaves, thin them out, keeping the strongest seedling in each container. This will give the remaining plant enough space to grow.
5. Pest Control: Keep an eye out for pests such as aphids and cabbage worms. If you notice any pests, treat them with an appropriate insecticide or organic pest control method. I prefer to use neem oil, which is a natural and effective insecticide.
6. Harvesting: Kohlrabi is typically ready to harvest in about 50-60 days after planting. Harvest the bulbs when they are about 2-3 inches in diameter. You can harvest the leaves as well, which can be eaten like spinach or kale. To harvest, simply cut the bulb from the stem with a sharp knife.
Troubleshooting
Even with the best care, you might encounter some challenges along the way. Here are a few common problems and how to address them:
* Yellowing Leaves: This could be a sign of overwatering, underwatering, or nutrient deficiency. Check the soil moisture and adjust your watering schedule accordingly. Fertilize the plants with a balanced fertilizer.
* Slow Growth: This could be due to insufficient sunlight, poor soil, or pest infestation. Make sure the plants are getting enough sunlight and that the soil is well-draining and nutrient-rich. Check for pests and treat them as needed.
* Root Rot: This is caused by overwatering and poor drainage. Make sure the planting containers have adequate drainage holes and avoid overwatering. If you suspect root rot, you can try transplanting the plant into fresh soil.
* Pests: Aphids, cabbage worms, and other pests can damage kohlrabi plants. Inspect your plants regularly and treat any infestations promptly.
Enjoying Your Harvest
After all your hard work, it’s time to enjoy the fruits (or rather, vegetables) of your labor! Kohlrabi is a versatile vegetable that can be eaten raw or cooked.
* Raw: Kohlrabi can be eaten raw, sliced or grated into salads. It has a mild, slightly sweet flavor and a crisp texture.
* Cooked: Kohlrabi can be cooked in a variety of ways, such as steaming, boiling, roasting, or stir-frying. It can be used in soups, stews, and side dishes.
* Leaves: The leaves of the kohlr
Conclusion
So, there you have it! Transforming discarded plastic bottles into a vibrant, space-saving hanging kohlrabi garden is not just a fun project; it’s a sustainable solution that brings fresh, homegrown goodness right to your doorstep. We’ve walked you through the simple steps, highlighting the ease and affordability of this DIY endeavor. But why is this hanging kohlrabi bottle garden a must-try?
Firstly, it’s incredibly space-efficient. Whether you have a sprawling backyard or a tiny balcony, this vertical garden maximizes your growing potential. Secondly, it’s an eco-conscious choice. Repurposing plastic bottles reduces waste and gives them a new lease on life. Thirdly, it’s a fantastic way to enjoy fresh, organic kohlrabi without relying on store-bought produce. You control the growing environment, ensuring your kohlrabi is free from harmful pesticides and chemicals.
Beyond the basic setup, there’s plenty of room for customization. Consider painting the bottles with vibrant colors or adding decorative elements to personalize your garden. You could also experiment with different bottle sizes and arrangements to create unique visual displays. For example, try grouping bottles of similar colors together or creating a cascading effect by staggering the heights.
Looking for variations? While we’ve focused on kohlrabi, this method is easily adaptable to other leafy greens, herbs, and even strawberries. Imagine a hanging garden bursting with lettuce, spinach, basil, or plump, juicy strawberries! The possibilities are endless. Just remember to adjust the soil mix and watering schedule to suit the specific needs of your chosen plants.
Don’t be afraid to experiment with different soil compositions. A well-draining mix is crucial for preventing root rot. Consider adding perlite or vermiculite to improve drainage and aeration. You can also incorporate compost or other organic matter to enrich the soil and provide essential nutrients.
We’ve also found that adding a slow-release fertilizer to the soil mix at the time of planting can significantly boost kohlrabi growth. This ensures a steady supply of nutrients throughout the growing season.
Another tip is to rotate the bottles periodically to ensure even sunlight exposure. This will prevent the kohlrabi from leaning towards the light and promote uniform growth.
Ready to embark on your own hanging kohlrabi bottle garden adventure? We encourage you to give it a try! It’s a rewarding experience that combines creativity, sustainability, and the joy of growing your own food. And most importantly, it’s a fantastic way to enjoy fresh, delicious kohlrabi straight from your garden.
Once you’ve created your masterpiece, we’d love to see it! Share your photos and experiences with us on social media using [Your Hashtag]. Let’s inspire others to embrace this simple yet impactful DIY project and cultivate a greener, more sustainable future, one hanging kohlrabi bottle garden at a time. We are confident that you will find this method of growing kohlrabi to be both rewarding and productive.
Frequently Asked Questions (FAQ)
What type of plastic bottles are best for this project?
Ideally, you should use sturdy, food-grade plastic bottles. Look for bottles that are relatively thick and can withstand the weight of the soil and plants. Avoid using bottles that have contained harsh chemicals or cleaning products, as these could contaminate the soil and harm your plants. Clear or translucent bottles are preferable, as they allow you to monitor the soil moisture levels. Two-liter soda bottles or similar-sized water bottles work well. Remember to thoroughly clean the bottles before using them.
How do I ensure proper drainage in the bottles?
Proper drainage is crucial to prevent root rot. Before adding soil, create several drainage holes in the bottom of each bottle. You can use a drill, a nail, or even a hot glue gun to create these holes. Make sure the holes are large enough to allow excess water to drain freely. You can also add a layer of gravel or small stones to the bottom of the bottle to further improve drainage. Another tip is to avoid overwatering. Water only when the top inch of soil feels dry to the touch.
What type of soil should I use for growing kohlrabi in bottles?
A well-draining potting mix is essential for growing kohlrabi in bottles. Avoid using garden soil, as it can be too heavy and compact, leading to poor drainage and root problems. A good potting mix should contain a blend of peat moss, perlite, and vermiculite. You can also add compost or other organic matter to enrich the soil and provide essential nutrients. Look for a potting mix that is specifically formulated for vegetables or herbs.
How much sunlight does kohlrabi need?
Kohlrabi thrives in full sun, which means it needs at least six hours of direct sunlight per day. If you don’t have a sunny spot, you can supplement with artificial grow lights. Place the hanging garden in a location that receives ample sunlight throughout the day. If the leaves start to look pale or leggy, it’s a sign that the plant is not getting enough light. Rotate the bottles regularly to ensure even sunlight exposure.
How often should I water my hanging kohlrabi garden?
The frequency of watering depends on several factors, including the weather, the type of soil, and the size of the bottles. As a general rule, water when the top inch of soil feels dry to the touch. Avoid overwatering, as this can lead to root rot. When watering, water thoroughly until water drains out of the drainage holes. Check the soil moisture levels regularly, especially during hot or dry weather.
How do I fertilize my kohlrabi plants in bottles?
Kohlrabi is a heavy feeder, so it’s important to fertilize regularly. You can use a balanced liquid fertilizer or a slow-release granular fertilizer. Follow the instructions on the fertilizer packaging for application rates. Fertilize every two to three weeks during the growing season. Avoid over-fertilizing, as this can burn the roots. You can also add compost tea or other organic fertilizers to provide additional nutrients.
How do I protect my kohlrabi plants from pests and diseases?
Regularly inspect your plants for signs of pests or diseases. Common pests that affect kohlrabi include aphids, cabbage worms, and flea beetles. You can control these pests with insecticidal soap, neem oil, or by handpicking them off the plants. Diseases that can affect kohlrabi include clubroot and black rot. To prevent these diseases, use disease-resistant varieties, practice crop rotation, and avoid overwatering. Ensure good air circulation around the plants to prevent fungal diseases.
How long does it take for kohlrabi to mature?
Kohlrabi typically matures in 55-60 days from planting. You can harvest the bulbs when they are about 2-3 inches in diameter. Don’t let them get too large, as they can become tough and woody. The leaves are also edible and can be harvested at any time. To harvest the bulbs, simply cut them off at the base of the plant.
Can I grow kohlrabi in bottles during the winter?
Yes, you can grow kohlrabi in bottles during the winter, but you will need to provide adequate protection from the cold. If you live in a cold climate, you can move the hanging garden indoors or into a greenhouse. You may also need to supplement with artificial grow lights to provide sufficient light. Choose a cold-hardy variety of kohlrabi for winter growing.
What are some other plants I can grow in hanging bottles besides kohlrabi?
The hanging bottle method is versatile and can be used to grow a variety of plants. Some other good options include lettuce, spinach, herbs (such as basil, parsley, and mint), strawberries, and even small peppers. Choose plants that have shallow root systems and don’t require a lot of space. Be sure to adjust the soil mix and watering schedule to suit the specific needs of your chosen plants.

Leave a Comment