
Hanging sweet potatoes harvest – the words alone conjure images of lush vines cascading from baskets, laden with the promise of a sweet and satisfying reward! Have you ever dreamt of growing your own food, but felt limited by space or a lack of gardening experience? Well, get ready to turn that dream into reality! This DIY guide is packed with simple, yet effective tricks to maximize your yield and enjoy a bountiful hanging sweet potatoes harvest, even if you’re a complete beginner.
The practice of cultivating sweet potatoes dates back thousands of years, with roots deeply embedded in South American and Polynesian cultures. These versatile tubers were not only a vital food source but also held significant cultural and spiritual value. Today, we can tap into that rich history and adapt traditional methods to suit our modern lifestyles.
Let’s face it, gardening can sometimes feel overwhelming. Pests, diseases, and unpredictable weather can quickly derail even the most enthusiastic gardener. But fear not! This article is your secret weapon. I’m going to share some tried-and-true DIY hacks that will help you overcome common challenges, optimize your growing conditions, and ultimately, achieve a truly impressive hanging sweet potatoes harvest. So, grab your gardening gloves, and let’s get started on this exciting journey together!
DIY Hanging Sweet Potato Harvest: A Bountiful Bounty from Above!
Hey there, fellow gardening enthusiasts! I’m so excited to share this super cool and space-saving method for growing sweet potatoes: hanging them! Not only does it look amazing, but it also allows you to grow these delicious tubers even if you have limited garden space. Plus, harvesting is a breeze! Let’s dive into how you can create your own hanging sweet potato garden.
What You’ll Need:
Before we get started, let’s gather all the necessary supplies. Trust me, having everything ready beforehand will make the whole process much smoother.
* Sweet Potato Slips (Sprouts): You can either buy these online or at your local garden center. Alternatively, you can sprout your own from a sweet potato you already have! I’ll explain how to do that later.
* Large Hanging Baskets: Choose baskets that are at least 14-16 inches in diameter and depth. The bigger, the better, as sweet potatoes need room to grow. Make sure they have sturdy hanging chains or ropes.
* Potting Mix: Use a high-quality potting mix that drains well. A mix specifically formulated for vegetables is ideal.
* Slow-Release Fertilizer: Sweet potatoes are heavy feeders, so a slow-release fertilizer will provide them with the nutrients they need throughout the growing season.
* Watering Can or Hose: Essential for keeping your sweet potatoes hydrated.
* Gloves: To protect your hands from the soil.
* Optional: Landscape fabric or burlap to line the baskets. This helps retain moisture and prevent soil from washing out.
Getting Started: Sprouting Your Own Sweet Potato Slips (Optional)
If you’re feeling adventurous (and want to save some money!), you can sprout your own sweet potato slips. It’s surprisingly easy!
1. Choose a Healthy Sweet Potato: Select a firm, unblemished sweet potato from your local grocery store or farmer’s market. Organic ones are preferable to avoid any growth inhibitors.
2. Prepare the Potato: Wash the sweet potato thoroughly. You can either suspend the entire potato in water or cut it in half.
3. Suspending in Water: Insert toothpicks around the middle of the sweet potato. These will act as supports to hold the potato partially submerged in a jar or glass of water. The bottom half should be in the water, and the top half should be exposed to air.
4. Cutting in Half: If you choose to cut the potato, place the cut side down on a shallow dish filled with water.
5. Find a Sunny Spot: Place the jar or dish in a warm, sunny location.
6. Change the Water Regularly: Change the water every few days to prevent mold growth.
7. Wait Patiently: In a few weeks, you should start to see sprouts (slips) emerging from the sweet potato.
8. Harvesting the Slips: Once the slips are 6-8 inches long, gently twist them off the sweet potato. Place the slips in a glass of water to encourage root development.
9. Rooting the Slips: After a week or so, the slips should develop roots. They are now ready to be planted in your hanging baskets!
Preparing the Hanging Baskets
Now that you have your sweet potato slips (either purchased or sprouted), it’s time to prepare the hanging baskets.
1. Line the Baskets (Optional): If you’re using landscape fabric or burlap, cut it to fit the inside of the basket, leaving a few inches of overhang. This will help prevent soil from washing out and retain moisture.
2. Add Potting Mix: Fill the basket with potting mix, leaving a few inches of space at the top.
3. Incorporate Slow-Release Fertilizer: Mix the slow-release fertilizer into the top layer of the potting mix according to the package directions.
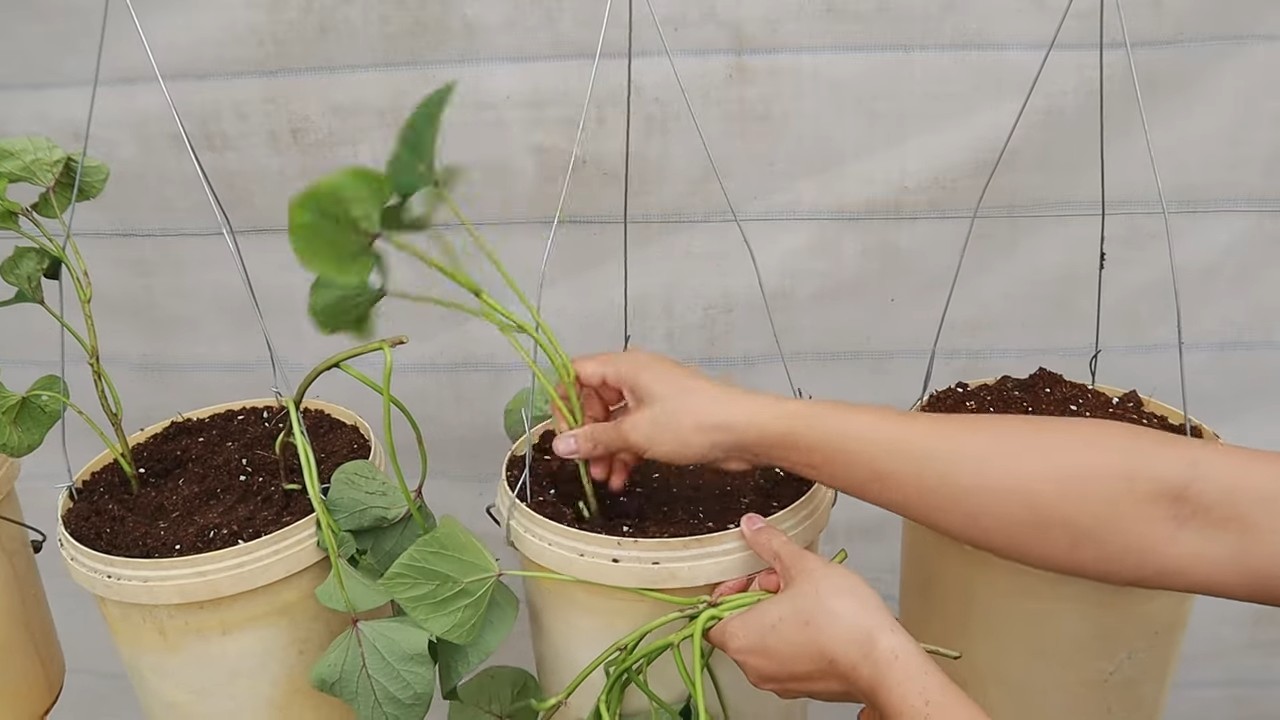
Planting the Sweet Potato Slips
This is where the magic happens!
1. Create Planting Holes: Dig small holes in the potting mix, spaced about 6-8 inches apart.
2. Plant the Slips: Gently remove the sweet potato slips from the water and plant them in the holes. Make sure the roots are covered with soil.
3. Water Thoroughly: Water the baskets thoroughly after planting.
Caring for Your Hanging Sweet Potatoes
Now that your sweet potatoes are planted, it’s important to provide them with the care they need to thrive.
1. Sunlight: Sweet potatoes need at least 6-8 hours of sunlight per day. Choose a location that receives plenty of sun.
2. Watering: Water regularly, especially during hot, dry weather. The soil should be consistently moist, but not waterlogged. Check the soil moisture by sticking your finger into the soil. If it feels dry an inch or two down, it’s time to water.
3. Fertilizing: Sweet potatoes are heavy feeders, so you may need to supplement with liquid fertilizer every few weeks. Follow the package directions for application.
4. Pruning: You can prune the vines if they become too long or unruly. This will encourage the plant to focus its energy on producing tubers.
5. Pest Control: Keep an eye out for pests such as aphids, spider mites, and sweet potato weevils. Treat any infestations promptly with insecticidal soap or other appropriate methods.
6. Support: As the vines grow, they may become heavy. You may need to provide additional support to the hanging baskets to prevent them from breaking.
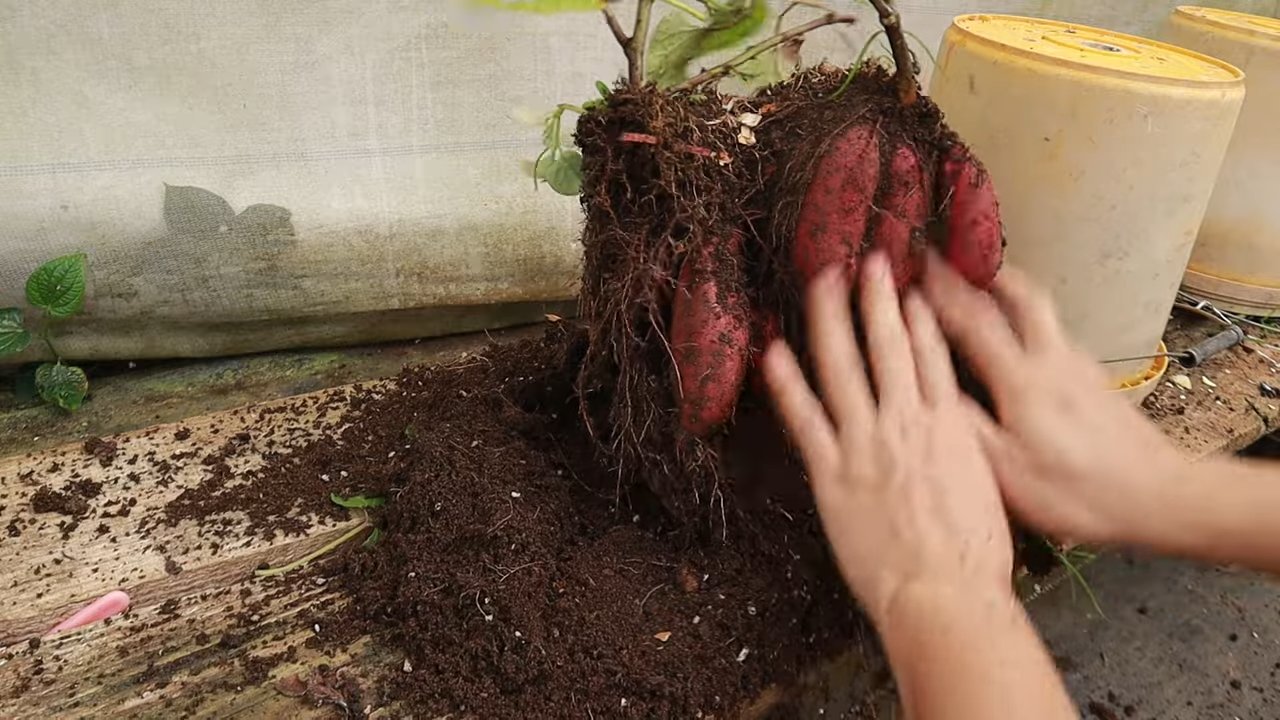
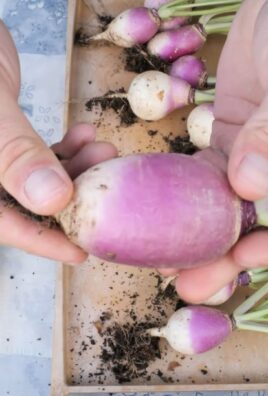
Harvesting Your Hanging Sweet Potatoes
The most rewarding part! Harvesting your own homegrown sweet potatoes is an amazing feeling.
1. Timing: Sweet potatoes typically take 90-120 days to mature. You’ll know they’re ready to harvest when the vines start to turn yellow and die back. This usually happens in the fall, before the first frost.
2. Gently Tip the Basket: Carefully tip the hanging basket onto a tarp or other protective surface.
3. Unearth the Treasure: Gently remove the soil from around the sweet potatoes. Be careful not to damage the tubers.
4. Harvesting: Carefully pull the sweet potatoes from the soil.
5. Curing: Curing sweet potatoes is essential for improving their flavor and storage life. To cure them, place them in a warm, humid location (80-85°F and 85-90% humidity) for 7-10 days. A greenhouse or enclosed porch works well.
6. Storing: After curing, store the sweet potatoes in a cool, dry, and dark place (55-60°F). They should last for several months.
Troubleshooting
Even with the best care, you might encounter some challenges. Here are a few common issues and how to address them:
* Yellowing Leaves: This could be a sign of overwatering, underwatering, or nutrient deficiency. Check the soil moisture and adjust your watering accordingly. If the soil is consistently moist, it could be a sign of root rot. Make sure your baskets have good drainage. If you suspect nutrient deficiency, fertilize with a balanced fertilizer.
* Slow Growth: This could be due to insufficient sunlight, poor soil, or lack of nutrients. Make sure your sweet potatoes are getting enough sunlight. Amend the soil with compost or other organic matter to improve its fertility. Fertilize regularly with a balanced fertilizer.
* Pests: Inspect your plants regularly for pests. Treat any infestations promptly with insecticidal soap or other appropriate methods.
* No Tubers: This could be due to a variety of factors, including insufficient sunlight, poor soil, lack of nutrients, or too much nitrogen fertilizer. Make sure your sweet potatoes are getting enough sunlight. Amend the soil with compost or other organic matter to improve its fertility. Fertilize with a balanced fertilizer, avoiding fertilizers that are high in nitrogen.
Tips for Success
Here are a few extra tips to help you succeed with your hanging sweet potato garden:
* Choose the Right Variety: Some sweet potato varieties are better suited for container growing than others. Look for varieties that are compact and produce smaller tubers. ‘Bush Porto Rico’ and ‘Georgia Jet’ are good choices.
* Use High-Quality Potting Mix: Don’t skimp on the potting mix. Use a high-quality mix that drains well and provides the nutrients your sweet potatoes need.
* Water Regularly: Sweet potatoes need consistent moisture, especially during hot, dry weather. Water deeply and regularly, but avoid overwatering.
* Fertilize Regularly: Sweet potatoes are heavy feeders, so you’ll need to fertilize them regularly. Use a slow-release fertilizer at planting time and supplement with liquid fertilizer every few weeks.
* Provide Support: As the vines grow, they may become heavy. Provide additional support to the hanging baskets to prevent them from breaking.
* Be Patient
Conclusion
So, there you have it! Transforming your sweet potato harvest into stunning, space-saving, and long-lasting hanging decorations is not just a fun DIY project; it’s a practical way to preserve your bounty and add a touch of rustic charm to your home. Forget about cluttered countertops and overflowing baskets – this method allows you to showcase your hard-earned harvest while keeping your sweet potatoes in optimal condition for enjoying later.
This DIY trick is a must-try because it offers a trifecta of benefits: preservation, decoration, and space-saving efficiency. Traditional storage methods can lead to spoilage, especially if you’ve harvested a large quantity. Hanging your sweet potatoes allows for better air circulation, preventing mold and rot, and extending their shelf life significantly. Plus, let’s be honest, a string of vibrant sweet potatoes hanging in your kitchen or pantry is far more visually appealing than a pile of them tucked away in a dark corner.
But the beauty of this project lies in its adaptability. Feel free to experiment with different varieties of sweet potatoes to create a colorful and textured display. Consider incorporating other root vegetables like garlic or onions into your hanging arrangement for added visual interest and functionality. You could even add dried herbs like rosemary or thyme to the string for a fragrant and aesthetically pleasing touch.
For a more polished look, use twine or jute rope instead of standard string. You can also paint the sweet potatoes with non-toxic paint to match your home decor. Just be sure to leave a small unpainted area around the stem to allow for proper air circulation. Another variation is to create smaller, individual hanging sweet potatoes instead of one long string. This is perfect for smaller spaces or for gifting to friends and family.
Don’t be intimidated by the process. It’s surprisingly simple and requires minimal materials. The most important thing is to handle your sweet potatoes with care to avoid bruising or damaging them. Remember to cure them properly before hanging them to ensure they last as long as possible.
We wholeheartedly encourage you to give this DIY trick a try. It’s a rewarding project that combines practicality with creativity. And most importantly, it’s a fantastic way to make the most of your sweet potato harvest.
Once you’ve created your hanging sweet potato masterpiece, we’d love to see it! Share your photos and experiences with us on social media using #HangingSweetPotatoes and #DIYHarvest. We can’t wait to see your creative interpretations and learn from your experiences. Happy harvesting and happy hanging!
Frequently Asked Questions (FAQ)
What kind of sweet potatoes are best for hanging?
Any variety of sweet potato can be used for hanging, but smaller to medium-sized sweet potatoes are generally easier to manage and create a more visually appealing display. Beauregard, Garnet, and Jewel varieties are all excellent choices. Consider using a mix of varieties for a more colorful and textured arrangement. The key is to choose sweet potatoes that are free from blemishes, cuts, or bruises, as these imperfections can lead to spoilage.
How long will hanging sweet potatoes last?
When properly cured and stored, hanging sweet potatoes can last for several months, often up to six months or even longer. The key to longevity is proper curing, which allows the skins to harden and protects the flesh from rot. Maintaining good air circulation around the sweet potatoes is also crucial. Avoid overcrowding them on the string and ensure they are not touching each other. Regularly check your hanging sweet potatoes for any signs of spoilage, such as soft spots or mold. Remove any affected sweet potatoes immediately to prevent the problem from spreading.
What is the best way to cure sweet potatoes before hanging them?
Curing is essential for extending the shelf life of your sweet potatoes. After harvesting, gently brush off any excess dirt without washing them. Place the sweet potatoes in a warm, humid environment (around 80-85°F and 85-90% humidity) for 7-10 days. A greenhouse, warm porch, or even a well-ventilated bathroom with a humidifier can work well. This process allows the skins to thicken and heal any minor wounds, preventing rot. After curing, gradually lower the temperature and humidity before hanging them.
Where is the best place to hang sweet potatoes?
The ideal location for hanging sweet potatoes is a cool, dry, and well-ventilated area. A pantry, cellar, or even a spare room can work well. Avoid areas with high humidity or direct sunlight, as these conditions can promote spoilage. The temperature should ideally be between 55-60°F (13-16°C). Ensure the area is free from pests and rodents that could damage your harvest.
How do I prevent my sweet potatoes from rotting while hanging?
Several factors can contribute to sweet potato rot. Proper curing is the most important preventative measure. Additionally, ensure good air circulation around the sweet potatoes by spacing them adequately on the string. Avoid overcrowding them. Regularly inspect your hanging sweet potatoes for any signs of spoilage, such as soft spots, mold, or unusual odors. Remove any affected sweet potatoes immediately to prevent the problem from spreading to others. Handle the sweet potatoes gently to avoid bruising them, as bruises can create entry points for bacteria and fungi.
Can I eat the sweet potatoes after they have been hanging for a while?
Yes, absolutely! As long as the sweet potatoes are firm, free from mold or soft spots, and have been stored properly, they are perfectly safe to eat. Before cooking, give them a thorough wash and check for any signs of spoilage. If they look and smell good, they are ready to be enjoyed. The hanging process actually helps to concentrate their sweetness, so you may find that they taste even better after being stored this way.
What if I don’t have a warm, humid place to cure my sweet potatoes?
If you lack a dedicated curing space, you can still cure your sweet potatoes, albeit with slightly less optimal results. Try placing them in a cardboard box lined with newspaper in a warm room, such as near a furnace or radiator. Cover the box with a damp towel to increase humidity. Monitor the temperature and humidity levels as closely as possible. While this method may not be as effective as a dedicated curing chamber, it will still help to harden the skins and extend their shelf life.
Can I add other vegetables or herbs to my hanging sweet potato display?
Absolutely! Adding other vegetables like garlic or onions can create a visually appealing and functional display. Dried herbs like rosemary, thyme, or oregano can also be incorporated for added fragrance and aesthetic appeal. Just be sure to cure and dry any additional items properly before adding them to the string to prevent mold or rot. Consider using different types of twine or rope to add texture and visual interest to your display.
What kind of string or rope should I use for hanging sweet potatoes?
Natural fibers like twine, jute rope, or cotton rope are excellent choices for hanging sweet potatoes. These materials are strong, durable, and aesthetically pleasing. Avoid using synthetic materials like nylon or plastic rope, as they can trap moisture and promote spoilage. Choose a string or rope that is thick enough to support the weight of the sweet potatoes without breaking. Ensure the string is clean and free from any contaminants that could affect the quality of your harvest.
How do I know when my sweet potatoes are properly cured?
Properly cured sweet potatoes will have a hardened skin that is resistant to scratching or bruising. The flesh will also be slightly sweeter and more flavorful. The curing process typically takes 7-10 days in a warm, humid environment. After curing, the sweet potatoes should be stored in a cool, dry, and well-ventilated area. Regularly inspect them for any signs of spoilage and remove any affected sweet potatoes immediately.
Leave a Comment