
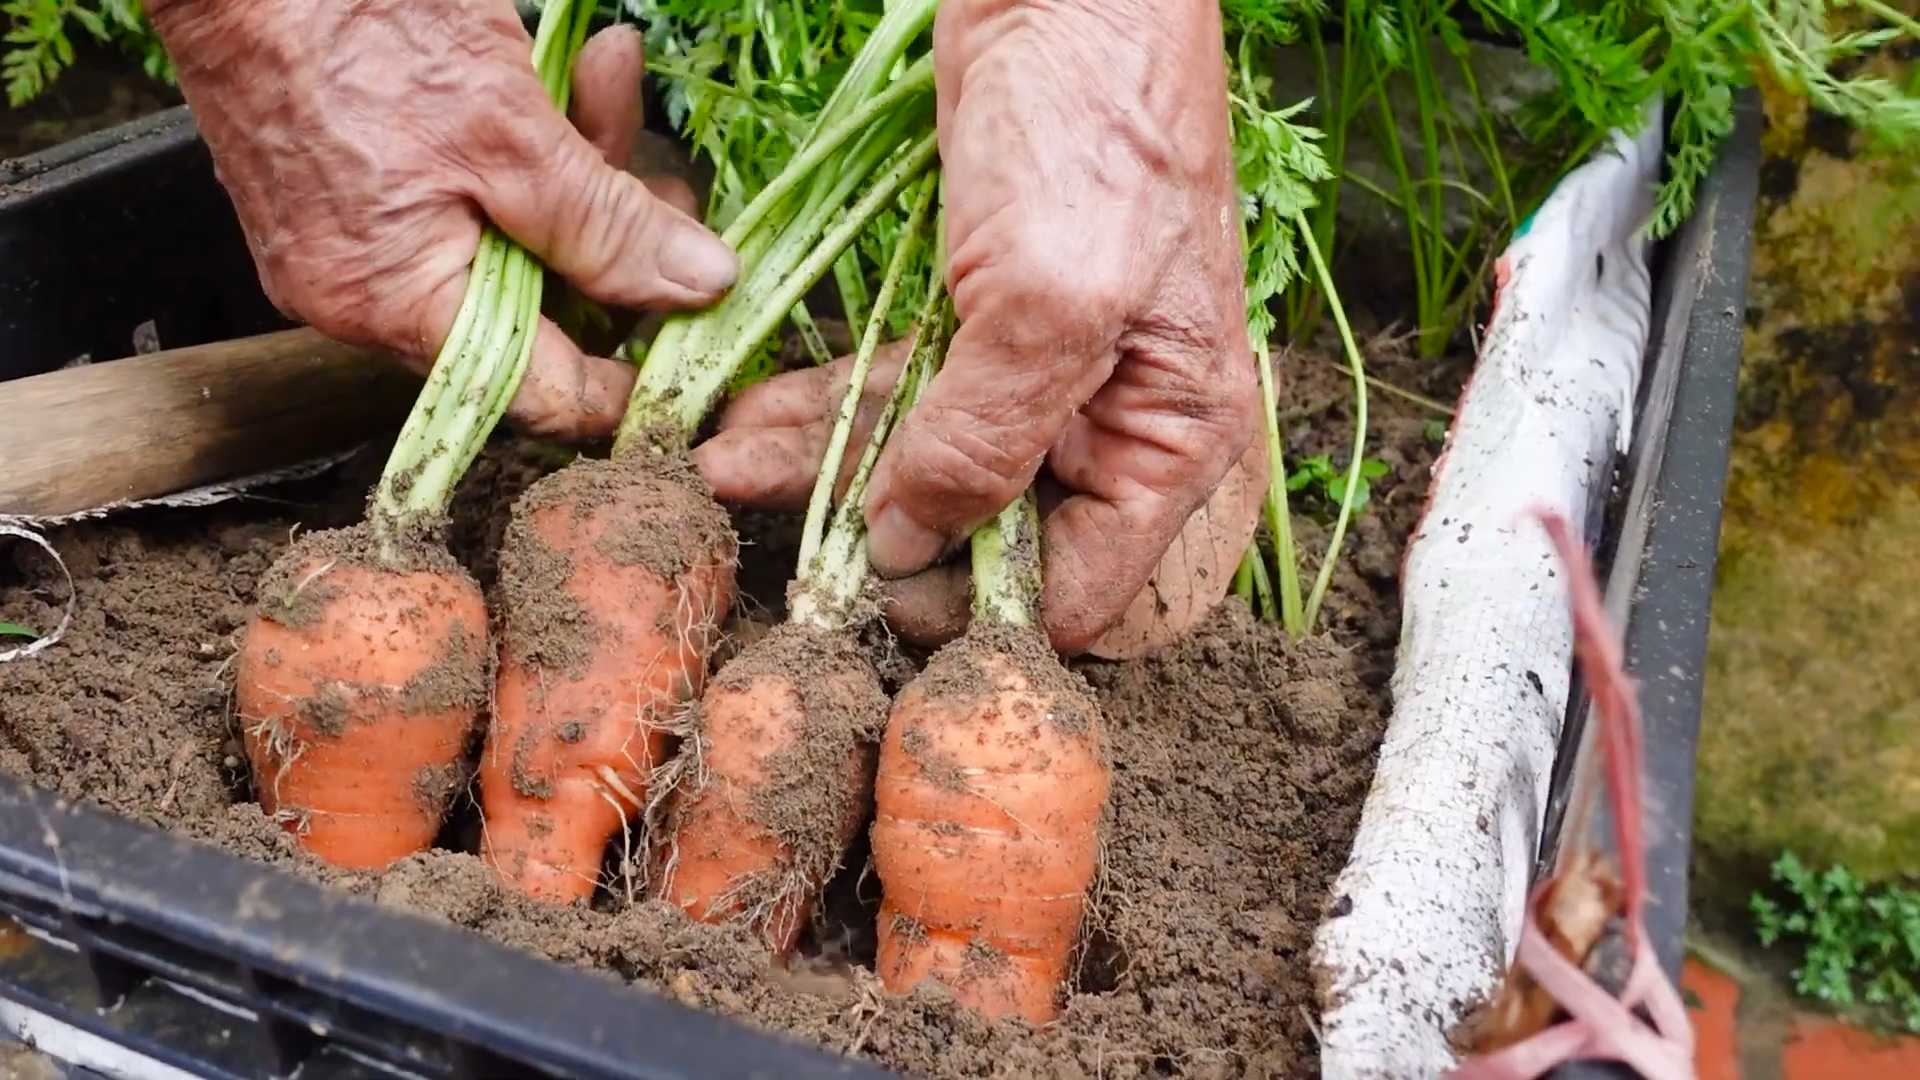
Homegrown Carrot Harvest: There’s nothing quite like the satisfaction of pulling a vibrant, orange carrot straight from your own garden. Imagine the sweet, earthy taste, knowing you nurtured it from a tiny seed to a delicious treat! For centuries, carrots have been a staple in diets across the globe, with evidence suggesting their cultivation dates back to ancient times. From vibrant orange varieties to purple and yellow heirlooms, the humble carrot boasts a rich history and a diverse range of flavors.
But let’s be honest, achieving that perfect homegrown carrot harvest isn’t always a walk in the park. We’ve all been there – tiny, stunted carrots, or worse, a tangled mess of roots! That’s why I’m so excited to share these simple, yet effective DIY tricks and hacks that will transform your carrot-growing game. Whether you’re a seasoned gardener or just starting out, these tips will help you maximize your yield and enjoy a bountiful harvest of sweet, crunchy carrots.
In this article, I’ll guide you through everything from soil preparation and seed spacing to watering techniques and pest control, ensuring you have all the knowledge you need to grow the best carrots you’ve ever tasted. Get ready to roll up your sleeves and discover the secrets to a successful homegrown carrot harvest!
Growing Carrots From Seed to Table: A DIY Guide
Okay, so you want to grow your own carrots? Awesome! There’s nothing quite like pulling a vibrant orange carrot straight from the earth and knowing you nurtured it from a tiny seed. It’s surprisingly easy, even if you don’t have a huge garden. I’m going to walk you through everything you need to know, from prepping the soil to harvesting your delicious bounty.
Choosing Your Carrot Variety
First things first, let’s talk carrots! There are tons of different varieties, and the best one for you will depend on your climate, soil, and personal preference. Here are a few popular choices:
* Nantes: These are classic, cylindrical carrots with a sweet flavor. They’re relatively short and mature quickly, making them a great option for beginners.
* Danvers: These are longer, tapered carrots, also known for their sweetness. They’re a good choice for heavier soils.
* Chantenay: These are short, stout carrots that are very tolerant of poor soil conditions. They’re a good option if your soil is rocky or compacted.
* Baby Carrots: If you’re short on space or just want a quick harvest, consider growing baby carrot varieties. They mature quickly and are perfect for snacking.
* Heirloom Varieties: Don’t be afraid to experiment with heirloom varieties like ‘Purple Haze’ or ‘Yellowstone’ for a unique and colorful harvest.
Preparing Your Carrot Patch
Carrots need loose, well-drained soil to thrive. Rocks and compacted soil can cause them to become stunted or misshapen. Here’s how to get your soil ready:
1. Choose a Sunny Spot: Carrots need at least 6 hours of sunlight per day.
2. Clear the Area: Remove any rocks, weeds, or debris from the planting area.
3. Loosen the Soil: This is the most important step! Use a garden fork or tiller to loosen the soil to a depth of at least 12 inches. Carrots need room to grow downwards.
4. Amend the Soil: Add compost or well-rotted manure to improve drainage and fertility. Carrots prefer slightly acidic soil with a pH between 6.0 and 6.8. You can test your soil pH with a simple soil testing kit.
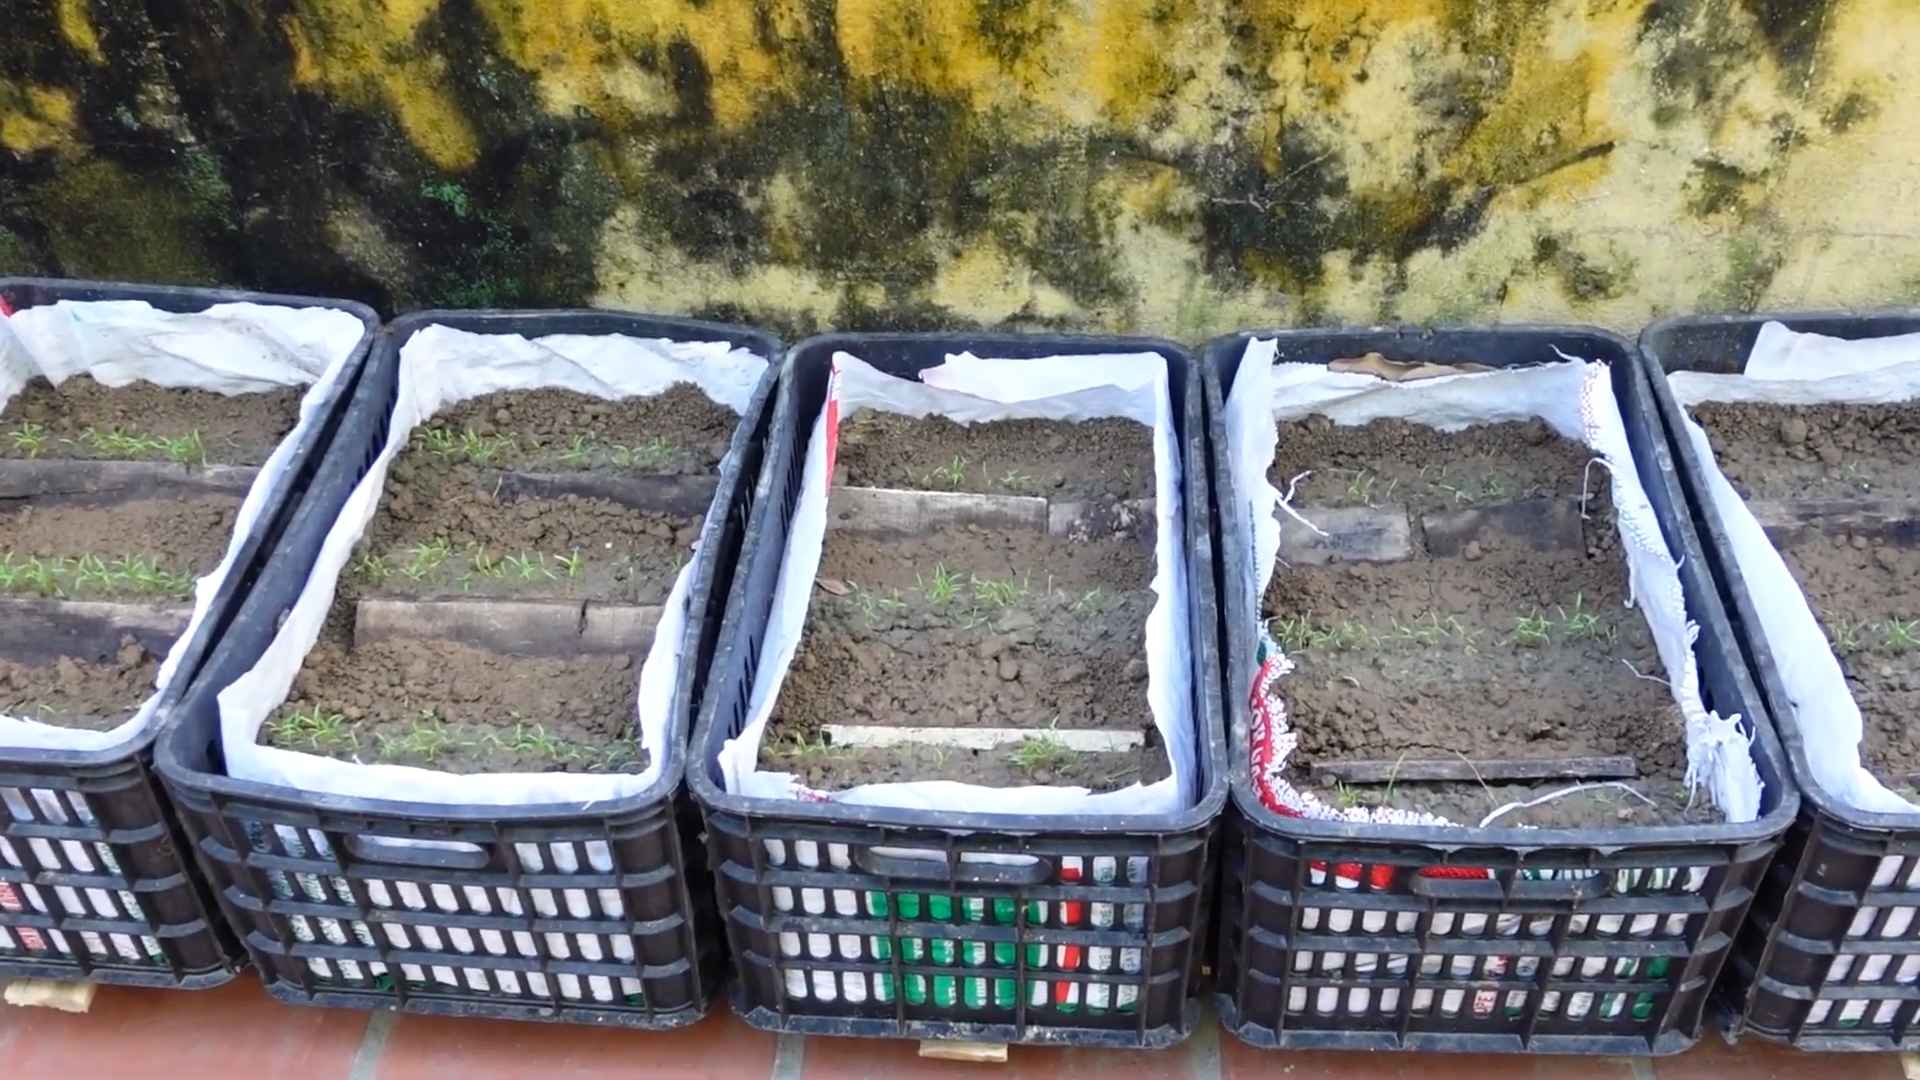
5. Create Raised Beds (Optional): If your soil is particularly heavy or poorly drained, consider creating raised beds. This will improve drainage and make it easier to control the soil quality.
Planting Your Carrot Seeds
Carrot seeds are tiny, so planting them can be a bit tricky. But don’t worry, I’ll show you how to do it right:
1. Check the Planting Time: Carrots are a cool-season crop, so you can plant them in early spring or late summer. Check your local frost dates to determine the best time to plant. I usually plant mine about 2-3 weeks before the last expected frost in spring, and again about 8-10 weeks before the first expected frost in fall.
2. Create Furrows: Use a hoe or your finger to create shallow furrows in the soil, about 1/4 to 1/2 inch deep and 1-2 inches apart.
3. Sow the Seeds: Sprinkle the carrot seeds evenly along the furrows. Don’t sow them too thickly, or you’ll have to thin them later. I like to mix the tiny seeds with sand to make them easier to handle and space out.
4. Cover the Seeds: Gently cover the seeds with a thin layer of soil.
5. Water Gently: Water the soil gently with a watering can or hose with a gentle spray nozzle. Be careful not to wash away the seeds.
6. Keep the Soil Moist: Keep the soil consistently moist until the seeds germinate. This may require watering daily, especially in warm weather.
Caring for Your Carrot Plants
Once your carrot seeds have germinated, it’s important to provide them with the right care to ensure a healthy harvest.
1. Thin the Seedlings: This is crucial! When the seedlings are about 2 inches tall, thin them to about 1-2 inches apart. This will give the carrots enough room to grow. Use small scissors to snip the unwanted seedlings at the soil line, rather than pulling them out, which can disturb the roots of the remaining plants.
2. Weed Regularly: Carrots don’t compete well with weeds, so it’s important to keep your carrot patch weed-free. Gently hand-pull any weeds that appear.
3. Water Consistently: Carrots need consistent moisture to grow properly. Water deeply whenever the top inch of soil feels dry. Avoid overwatering, which can lead to root rot.
4. Fertilize (Optional): If your soil is poor, you can fertilize your carrot plants with a balanced fertilizer. Follow the instructions on the fertilizer package. I usually use a liquid seaweed fertilizer diluted in water every few weeks.
5. Protect from Pests: Carrot rust flies and carrot weevils can be a problem. Cover your carrot patch with row covers to protect your plants from these pests. You can also use organic pest control methods, such as neem oil.
Harvesting Your Carrots
The moment you’ve been waiting for! Here’s how to harvest your carrots:
1. Check the Maturity Date: Check the seed packet for the maturity date. This will give you an idea of when your carrots will be ready to harvest.
2. Look for Size: Carrots are usually ready to harvest when they are about 1/2 to 1 inch in diameter at the top.
3. Loosen the Soil: Before pulling the carrots, loosen the soil around them with a garden fork. This will make it easier to pull them out without breaking them.
4. Pull the Carrots: Grasp the carrot tops firmly and gently pull the carrots out of the ground. If the carrots are difficult to pull, use the garden fork to loosen the soil further.
5. Wash and Store: Wash the carrots thoroughly and remove any excess soil. Store them in the refrigerator in a plastic bag or container. They should last for several weeks.
Troubleshooting Common Carrot Problems
Even with the best care, you may encounter some problems when growing carrots. Here are a few common issues and how to address them:
* Forked or Stunted Carrots: This is usually caused by rocks or compacted soil. Make sure to prepare your soil properly before planting.
* Bitter Carrots: This can be caused by hot weather or inconsistent watering. Keep the soil consistently moist and provide shade during the hottest part of the day.
* Cracked Carrots: This is usually caused by inconsistent watering. Water deeply and regularly, especially during dry spells.
* Pest Problems: As mentioned earlier, carrot rust flies and carrot weevils can be a problem. Use row covers or organic pest control methods to protect your plants.
Extra Tips for Carrot Growing Success
* Succession Planting: Plant carrots every few weeks to ensure a continuous harvest throughout the growing season.
* Companion Planting: Plant carrots with onions, garlic, or rosemary to deter pests.
* Don’t Over-Fertilize: Too much nitrogen can cause carrots to grow excessive foliage at the expense of root development.
* Enjoy Your Harvest! Carrots are delicious raw, cooked, or juiced. Enjoy the fruits (or rather, vegetables!) of your labor.
Growing your own carrots is a rewarding experience. With a little bit of effort and attention, you can enjoy fresh, delicious carrots straight from your garden. Happy gardening!
Conclusion
So, you’ve just unearthed a bounty of vibrant, earthy carrots from your own garden! Congratulations! But what to do when you’re faced with more carrots than you can possibly eat fresh in a week? The answer, my friends, lies in this simple yet transformative DIY trick: carrot top pesto.
Why is this a must-try? Because it’s the ultimate zero-waste solution for your homegrown carrot harvest. Instead of tossing those nutritious and flavorful carrot tops into the compost bin, you’re transforming them into a delicious, versatile condiment that will elevate everything from pasta and grilled chicken to sandwiches and roasted vegetables. Think of it as liquid sunshine, capturing the essence of your garden’s hard work in a jar.
Beyond the environmental benefits, carrot top pesto offers a unique flavor profile that you simply won’t find in store-bought pesto. It’s slightly peppery, a little earthy, and surprisingly bright, adding a delightful complexity to any dish. It’s also incredibly easy to customize to your own taste preferences.
Here are a few suggestions and variations to inspire you:
* **Nut Variations:** While pine nuts are traditional in pesto, feel free to experiment with other nuts like walnuts, almonds, or even sunflower seeds for a nut-free option. Toasting the nuts beforehand enhances their flavor.
* **Cheese Variations:** Parmesan cheese is a classic choice, but Pecorino Romano or Grana Padano would also work beautifully. For a vegan pesto, nutritional yeast provides a cheesy, umami flavor.
* **Herb Additions:** Boost the flavor profile by adding other fresh herbs like parsley, basil (even more basil!), or mint. A small handful can make a big difference.
* **Spice it Up:** A pinch of red pepper flakes adds a touch of heat, while a clove of garlic (or two!) intensifies the savory notes.
* **Lemon Zest:** A little lemon zest brightens the pesto and complements the earthy flavor of the carrot tops.
* **Roast Your Carrots:** Don’t forget the carrots themselves! Roasting them brings out their natural sweetness, making them a perfect accompaniment to your carrot top pesto. Toss roasted carrot slices with the pesto for a simple and satisfying side dish.
This DIY trick isn’t just about making pesto; it’s about embracing a more sustainable and creative approach to cooking. It’s about appreciating the full potential of your homegrown harvest and minimizing food waste. It’s about discovering new flavors and textures that will tantalize your taste buds.
So, go ahead, gather those carrot tops, and give this recipe a try. You won’t be disappointed. And once you’ve experienced the magic of homemade carrot top pesto, we encourage you to share your creations and variations with us! Tag us in your photos on social media and let us know what you think. We can’t wait to see what culinary masterpieces you create with your homegrown carrot harvest. Let’s celebrate the deliciousness of sustainable eating together!
Frequently Asked Questions (FAQ)
What exactly are carrot tops, and are they safe to eat?
Carrot tops are the leafy green foliage that grows above the ground on carrot plants. Yes, they are absolutely safe to eat! In fact, they are packed with nutrients, including vitamins A and C, as well as calcium and potassium. However, it’s important to note that carrot tops can have a slightly bitter taste, which is why they are often used in pesto or other recipes where their flavor can be balanced with other ingredients. Make sure to wash them thoroughly before using them to remove any dirt or debris. If you are concerned about pesticide use, opt for organic carrots or those grown in your own garden.
How do I properly wash carrot tops?
Washing carrot tops is crucial to remove any dirt, insects, or other debris. The best way to wash them is to fill a large bowl or sink with cold water. Submerge the carrot tops in the water and gently swish them around to loosen any dirt. You may need to repeat this process a few times until the water runs clear. After washing, pat the carrot tops dry with a clean towel or spin them in a salad spinner to remove excess water.
Can I use carrot tops from store-bought carrots?
While you can use carrot tops from store-bought carrots, it’s important to be aware that they may have been treated with pesticides or other chemicals. If you choose to use them, wash them very thoroughly. Organic carrots are a safer option if you’re concerned about pesticide residue. Ideally, using carrot tops from your own garden or from a local farmer’s market is the best way to ensure their quality and safety.
How long does carrot top pesto last?
Homemade carrot top pesto will typically last for about 5-7 days in the refrigerator, stored in an airtight container. To help preserve its vibrant green color, you can drizzle a thin layer of olive oil over the top before sealing the container. You can also freeze carrot top pesto for longer storage. To freeze, portion the pesto into ice cube trays or small freezer-safe containers. Once frozen, transfer the pesto cubes to a freezer bag for easy use. Frozen pesto can last for up to 3 months.
Can I make carrot top pesto without nuts?
Yes, you can definitely make carrot top pesto without nuts! Simply omit the nuts from the recipe or substitute them with sunflower seeds or pumpkin seeds for a similar texture and flavor. You can also add a tablespoon or two of nutritional yeast to provide a cheesy, umami flavor that will help compensate for the absence of nuts.
My carrot top pesto is too bitter. What can I do?
If your carrot top pesto is too bitter, there are a few things you can try to balance the flavor. First, make sure you’re using young, tender carrot tops, as older ones tend to be more bitter. You can also blanch the carrot tops in boiling water for a minute or two before using them to help reduce their bitterness. Adding more lemon juice, garlic, or Parmesan cheese can also help to mask the bitterness. Finally, consider adding a touch of sweetness, such as a teaspoon of honey or maple syrup, to balance the flavors.
What are some creative ways to use carrot top pesto?
Carrot top pesto is incredibly versatile and can be used in a variety of dishes. Here are a few ideas:
* Toss it with pasta for a quick and easy meal.
* Spread it on sandwiches or wraps for added flavor.
* Use it as a marinade for chicken, fish, or tofu.
* Stir it into soups or stews for a boost of flavor.
* Drizzle it over roasted vegetables.
* Serve it as a dip with crackers or crudités.
* Use it as a topping for pizza or flatbread.
* Mix it with cream cheese or ricotta cheese for a delicious spread.
Can I use other parts of the carrot plant besides the tops?
Yes! The entire carrot plant is edible, although some parts are more palatable than others. The carrot roots are, of course, the most commonly consumed part. The carrot greens (tops) are also delicious and nutritious, as we’ve discussed. The carrot stems are edible but can be quite tough, so they are best used in soups or stews where they can soften during cooking. Even the carrot flowers are edible and can be used as a garnish.
How can I encourage more people to use their homegrown carrot harvest sustainably?
Sharing recipes and tips like this one is a great start! Encourage friends, family, and neighbors to try new ways of using their carrot tops. Host a carrot-themed potluck where everyone brings a dish featuring different parts of the carrot plant. Educate others about the nutritional benefits of carrot tops and the importance of reducing food waste. By spreading the word and inspiring others to get creative in the kitchen, we can all contribute to a more sustainable food system.
Leave a Comment