
Indoor Spinach Growing: Imagine fresh, vibrant spinach leaves gracing your plate, harvested just moments before from your very own indoor garden! Forget those limp, pre-packaged greens from the grocery store. This isn’t just a dream; it’s an achievable reality with a few simple tricks and a little DIY spirit. For centuries, humans have cultivated crops indoors, from ancient Roman orangeries protecting citrus trees to modern-day hydroponic farms. The desire to nurture life and enjoy fresh produce, regardless of the season or climate, is deeply ingrained in our history.
But why should you embark on the journey of indoor spinach growing? Well, think about it: you control the environment, minimizing pests and diseases. You have access to incredibly fresh, nutrient-rich spinach whenever you crave it. Plus, it’s incredibly rewarding to watch those tiny seeds sprout and flourish under your care. In this article, I’m going to share some easy-to-follow DIY hacks and tips that will transform even the smallest space into a thriving indoor spinach oasis. Get ready to ditch the store-bought greens and embrace the deliciousness of homegrown, indoor spinach!
Grow Your Own Spinach Indoors: A Beginner’s Guide
Hey there, fellow plant enthusiasts! Ever dreamt of having fresh, vibrant spinach right at your fingertips, no matter the season? Well, dream no more! Growing spinach indoors is surprisingly easy and rewarding. I’m going to walk you through everything you need to know to cultivate your own little spinach haven inside your home. Get ready for some delicious, homegrown goodness!
What You’ll Need: The Essentials
Before we dive into the nitty-gritty, let’s gather our supplies. Here’s a checklist of everything you’ll need to get started:
* Spinach Seeds: Opt for varieties specifically bred for indoor growing, like ‘Bloomsdale Long Standing’ or ‘Baby’s Leaf Hybrid’. These tend to be more compact and productive in containers.
* Containers: Choose pots or containers that are at least 6 inches deep. Good drainage is crucial, so make sure your containers have drainage holes. I personally love using rectangular planters for spinach, as they allow for more even spacing.
* Potting Mix: Use a high-quality, well-draining potting mix. Avoid using garden soil, as it can compact and hinder drainage. A mix specifically formulated for vegetables is ideal.
* Grow Lights: Spinach needs plenty of light to thrive. If you don’t have a sunny windowsill that gets at least 6 hours of direct sunlight, you’ll need to invest in grow lights. Fluorescent or LED grow lights work well.
* Watering Can or Spray Bottle: For gentle and even watering.
* Optional: Seed Starting Tray: If you prefer to start your seeds indoors before transplanting.
* Optional: Liquid Fertilizer: A balanced liquid fertilizer will help your spinach plants grow strong and healthy.
Getting Started: Sowing Your Spinach Seeds
Now that we have our supplies, let’s get those seeds in the soil!
1. Prepare Your Containers: Fill your containers with potting mix, leaving about an inch of space at the top. Gently pat down the soil to create a firm, even surface.
2. Sow the Seeds: Sprinkle the spinach seeds evenly over the surface of the soil. Aim for about 1 inch spacing between seeds. You can also sow them in rows, about 2 inches apart.
3. Cover the Seeds: Lightly cover the seeds with about 1/2 inch of potting mix.
4. Water Gently: Use a watering can or spray bottle to gently moisten the soil. Be careful not to overwater, as this can cause the seeds to rot.
5. Provide Warmth: Spinach seeds germinate best in temperatures between 60-70°F (15-21°C). Place your containers in a warm location, or use a heat mat to speed up germination.
6. Wait for Germination: Keep the soil consistently moist, but not soggy. You should see seedlings emerge in about 5-10 days.
Nurturing Your Spinach: Light, Water, and Nutrients
Once your spinach seedlings have emerged, it’s time to provide them with the care they need to flourish.
1. Light: Spinach needs at least 6 hours of direct sunlight per day. If you’re using grow lights, position them about 6-12 inches above the plants and keep them on for 12-14 hours per day. I rotate my plants every few days to ensure even light exposure.
2. Watering: Water your spinach plants regularly, keeping the soil consistently moist but not soggy. Check the soil moisture by sticking your finger about an inch into the soil. If it feels dry, it’s time to water. Avoid overwatering, as this can lead to root rot.
3. Fertilizing: Feed your spinach plants with a balanced liquid fertilizer every 2-3 weeks. Follow the instructions on the fertilizer label. I usually dilute the fertilizer to half strength to avoid burning the plants.
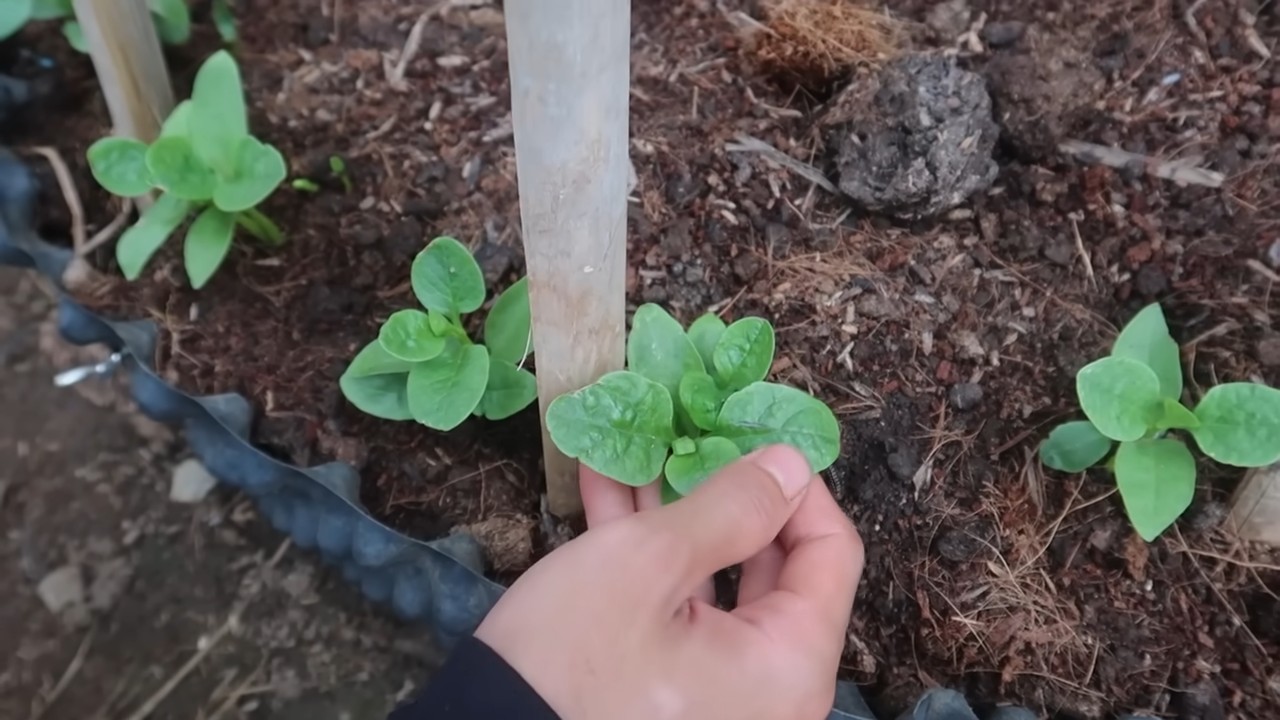
4. Thinning: Once your seedlings have developed a few true leaves, thin them out to about 2-3 inches apart. This will give them enough space to grow and prevent overcrowding. You can eat the thinned seedlings as microgreens!
5. Air Circulation: Good air circulation is important to prevent fungal diseases. Make sure your spinach plants have plenty of space around them, and consider using a small fan to improve air flow.
Dealing with Pests and Problems
While spinach is relatively easy to grow, it can be susceptible to a few pests and diseases. Here’s what to watch out for:
* Aphids: These tiny insects can suck the sap from your spinach leaves, causing them to become distorted and yellow. You can control aphids by spraying them with a strong stream of water, or by using insecticidal soap.
* Spider Mites: These tiny pests create webs on the undersides of leaves and can cause them to become speckled and yellow. You can control spider mites by spraying them with water or insecticidal soap. Increasing humidity can also help.
* Downy Mildew: This fungal disease causes yellow spots on the upper surfaces of leaves and a gray, fuzzy growth on the undersides. To prevent downy mildew, provide good air circulation and avoid overwatering. If you see signs of downy mildew, remove the affected leaves immediately.
* Bolting: Bolting is when spinach plants prematurely flower and produce seeds. This can happen when the weather is too hot or when the plants are stressed. To prevent bolting, keep your spinach plants well-watered and provide them with shade during the hottest part of the day.
Harvesting Your Spinach: The Sweet Reward
The best part of growing your own spinach is, of course, harvesting it! You can start harvesting your spinach leaves when they are about 4-6 inches long.
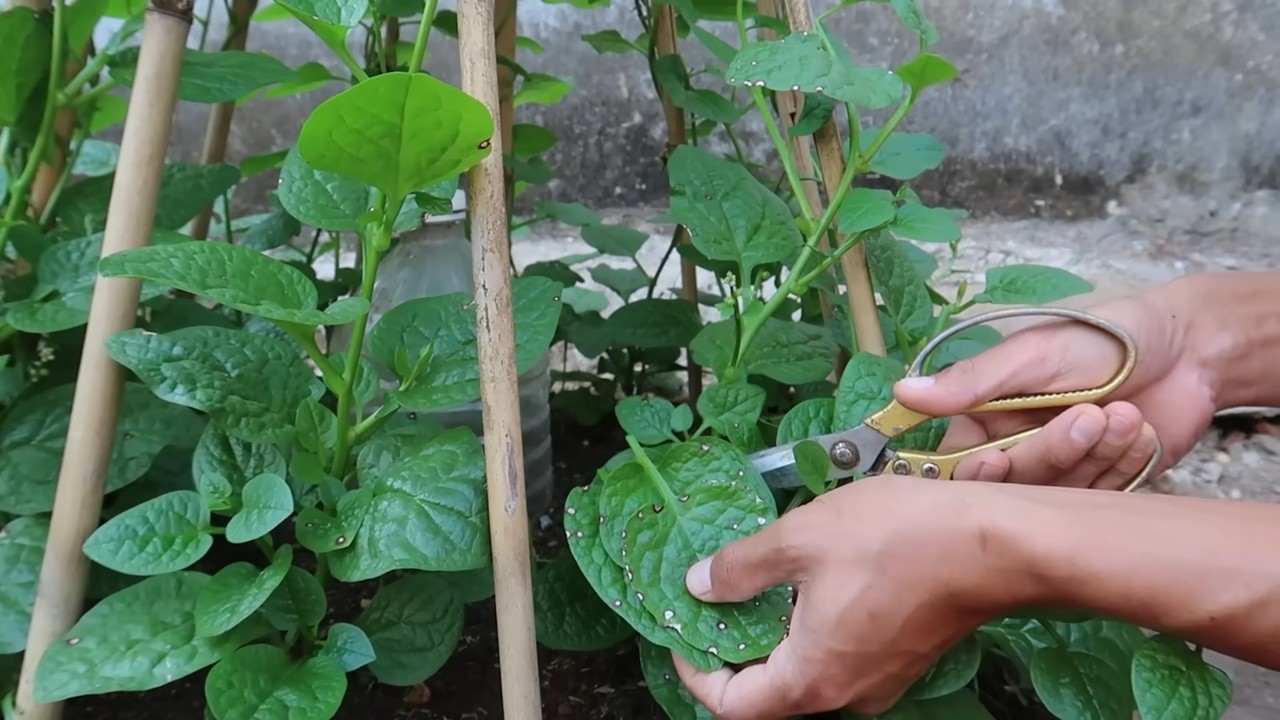
1. Harvesting Individual Leaves: The easiest way to harvest spinach is to simply snip off the outer leaves with scissors or garden shears, leaving the inner leaves to continue growing. This is known as “cut and come again” harvesting, and it allows you to harvest spinach continuously for several weeks.
2. Harvesting the Whole Plant: If you want to harvest the entire plant, simply cut it off at the base.
3. Timing is Key: Harvest your spinach in the morning, when the leaves are crisp and cool. Avoid harvesting during the hottest part of the day, as the leaves can wilt quickly.
4. Washing and Storing: Wash your harvested spinach leaves thoroughly and store them in a plastic bag in the refrigerator. They should last for about a week.
Troubleshooting: Common Issues and Solutions
Even with the best care, you might encounter a few hiccups along the way. Here are some common problems and how to fix them:
* Seeds Not Germinating: Make sure your seeds are fresh and that the soil is warm enough. Overwatering can also prevent germination.
* Yellowing Leaves: Yellowing leaves can be a sign of nutrient deficiency, overwatering, or underwatering. Check the soil moisture and fertilize your plants if necessary.
* Leggy Growth: Leggy growth is a sign that your spinach plants aren’t getting enough light. Move them to a sunnier location or provide them with grow lights.
* Slow Growth: Slow growth can be caused by a variety of factors, including nutrient deficiency, poor soil, or insufficient light. Make sure your plants are getting everything they need to thrive.
Tips and Tricks for Indoor Spinach Success
Here are a few extra tips to help you grow the best spinach possible:
* Choose the Right Variety: As I mentioned earlier, select spinach varieties that are specifically bred for indoor growing.
* Rotate Your Crops: To prevent soilborne diseases, rotate your spinach plants with other crops each season.
* Keep it Cool: Spinach prefers cooler temperatures, so try to keep your growing area between 60-70°F (15-21°C).
* Succession Planting: Sow new seeds every few weeks to ensure a continuous harvest of fresh spinach.
* Enjoy Your Harvest! Use your homegrown spinach in salads, smoothies, soups, or any other dish you like.
Beyond the Basics: Advanced Techniques
Feeling adventurous? Here are a few advanced techniques to take your indoor spinach growing to the next level:
* Hydroponics: Grow your spinach in a hydroponic system for faster growth and higher yields.
* Vertical Gardening: Maximize your growing space by growing spinach in a vertical garden.
* Companion Planting: Plant spinach alongside other beneficial plants, such as radishes or lettuce.
Conclusion
Growing spinach indoors is a fun and rewarding experience that anyone can enjoy. With a little bit of care and attention, you can have a constant supply of fresh, delicious spinach right at your fingertips. So, what are you waiting for? Get started today and enjoy the taste of homegrown goodness! Happy gardening!
Conclusion
So, there you have it! Mastering the art of indoor spinach growing is not only achievable but also incredibly rewarding. We’ve walked you through the essential steps, from selecting the right seeds and containers to providing optimal lighting and watering techniques. But why should you embark on this green adventure?
Firstly, growing your own spinach indoors guarantees a constant supply of fresh, nutritious greens, free from harmful pesticides and herbicides. Imagine the convenience of snipping off a handful of vibrant spinach leaves whenever you need them for a salad, smoothie, or side dish. No more last-minute trips to the grocery store or settling for wilted, pre-packaged spinach.
Secondly, indoor spinach growing is a fantastic way to connect with nature, even if you live in an apartment or have limited outdoor space. The simple act of nurturing a plant from seed to harvest can be incredibly therapeutic and fulfilling. Watching your spinach seedlings sprout and flourish is a constant reminder of the beauty and resilience of nature.
Thirdly, it’s a cost-effective way to enjoy fresh produce. While there’s an initial investment in seeds, containers, and potentially grow lights, the long-term savings on grocery bills can be significant. Plus, you can harvest multiple crops from a single planting, maximizing your return on investment.
But the benefits don’t stop there. Indoor spinach growing allows you to experiment with different varieties and techniques. Why not try growing baby spinach for tender, delicate leaves, or explore different container sizes and shapes to find what works best for your space? You can even experiment with companion planting, growing herbs like basil or chives alongside your spinach to enhance its flavor and deter pests.
Consider these variations to elevate your indoor spinach growing experience:
* Vertical Gardening: If you’re short on space, consider using a vertical gardening system to maximize your growing area. Wall-mounted planters or tiered shelves can create a stunning and productive indoor garden.
* Hydroponics: For a more advanced approach, explore hydroponic spinach growing. This method involves growing plants without soil, using nutrient-rich water solutions. Hydroponics can lead to faster growth and higher yields.
* Succession Planting: To ensure a continuous supply of spinach, practice succession planting. Sow new seeds every few weeks to stagger your harvests and avoid periods of scarcity.
We encourage you to take the plunge and try your hand at indoor spinach growing. It’s a simple, rewarding, and sustainable way to enjoy fresh, healthy greens all year round. Don’t be afraid to experiment, learn from your mistakes, and adapt your techniques to suit your specific environment.
And most importantly, we want to hear about your experiences! Share your tips, tricks, and photos with us in the comments section below. Let’s create a community of indoor spinach growers and learn from each other’s successes and challenges. Happy growing!
Frequently Asked Questions (FAQ)
What are the best spinach varieties to grow indoors?
While many spinach varieties can be grown indoors, some are better suited than others. Look for varieties that are compact, fast-growing, and bolt-resistant (meaning they are less likely to flower prematurely). Popular choices include ‘Baby’s Leaf Hybrid,’ ‘Space,’ ‘Bloomsdale Long Standing,’ and ‘Tyee.’ These varieties tend to thrive in the controlled environment of an indoor garden. Consider the size of your growing space when selecting a variety; smaller spaces benefit from more compact varieties. Also, read seed packet descriptions carefully to understand the specific needs of each variety.
How much light does indoor spinach need?
Spinach requires at least 6 hours of direct sunlight per day to thrive. If you don’t have a sunny windowsill, you’ll need to supplement with artificial grow lights. LED grow lights are an excellent option, as they are energy-efficient and provide the full spectrum of light that plants need. Position the grow lights a few inches above the spinach leaves and adjust the height as the plants grow. A timer can be used to automate the lighting schedule, ensuring consistent light exposure. Insufficient light can lead to leggy growth and reduced yields.
What type of soil is best for indoor spinach growing?
Spinach prefers well-draining, nutrient-rich soil with a slightly acidic to neutral pH (around 6.5 to 7.0). A good potting mix specifically formulated for vegetables is ideal. Avoid using garden soil, as it can be too heavy and may contain pests or diseases. You can also amend your potting mix with compost or other organic matter to improve its fertility and drainage. Ensure your containers have drainage holes to prevent waterlogging, which can lead to root rot.
How often should I water my indoor spinach?
Water your spinach regularly, keeping the soil consistently moist but not waterlogged. Check the soil moisture by sticking your finger about an inch into the soil. If it feels dry, it’s time to water. Water deeply, allowing the excess water to drain out of the drainage holes. Avoid overhead watering, as this can promote fungal diseases. Instead, water at the base of the plants. The frequency of watering will depend on factors such as temperature, humidity, and the size of your containers.
How do I prevent pests and diseases in my indoor spinach garden?
While indoor gardens are less susceptible to pests and diseases than outdoor gardens, they can still occur. To prevent problems, start with clean containers and fresh potting mix. Inspect your plants regularly for signs of pests or diseases, such as aphids, spider mites, or powdery mildew. If you spot any problems, address them promptly with organic pest control methods, such as insecticidal soap or neem oil. Ensure good air circulation around your plants to prevent fungal diseases. Avoid overwatering, as this can create a favorable environment for disease.
When can I harvest my indoor spinach?
You can start harvesting spinach leaves when they are about 4-6 inches long. Harvest the outer leaves first, leaving the inner leaves to continue growing. This cut-and-come-again method allows you to harvest multiple crops from a single planting. Avoid harvesting more than one-third of the plant at a time, as this can stress the plant. Harvest in the morning, when the leaves are crisp and hydrated.
How long will my indoor spinach plants last?
With proper care, your indoor spinach plants can last for several weeks or even months. However, spinach is a cool-season crop and will eventually bolt (flower) when temperatures rise. To extend the life of your plants, keep them in a cool location and provide adequate shade during hot weather. You can also try growing bolt-resistant varieties. Once your plants start to bolt, the leaves will become bitter and less palatable.
Can I grow spinach indoors year-round?
Yes, you can grow spinach indoors year-round, provided you can provide the necessary light, temperature, and humidity. During the winter months, you may need to rely more heavily on artificial grow lights. Keep the temperature between 60-70°F (15-21°C) for optimal growth. You may also need to increase the humidity by misting your plants or using a humidifier. Succession planting is key to ensuring a continuous supply of fresh spinach throughout the year.

Leave a Comment