
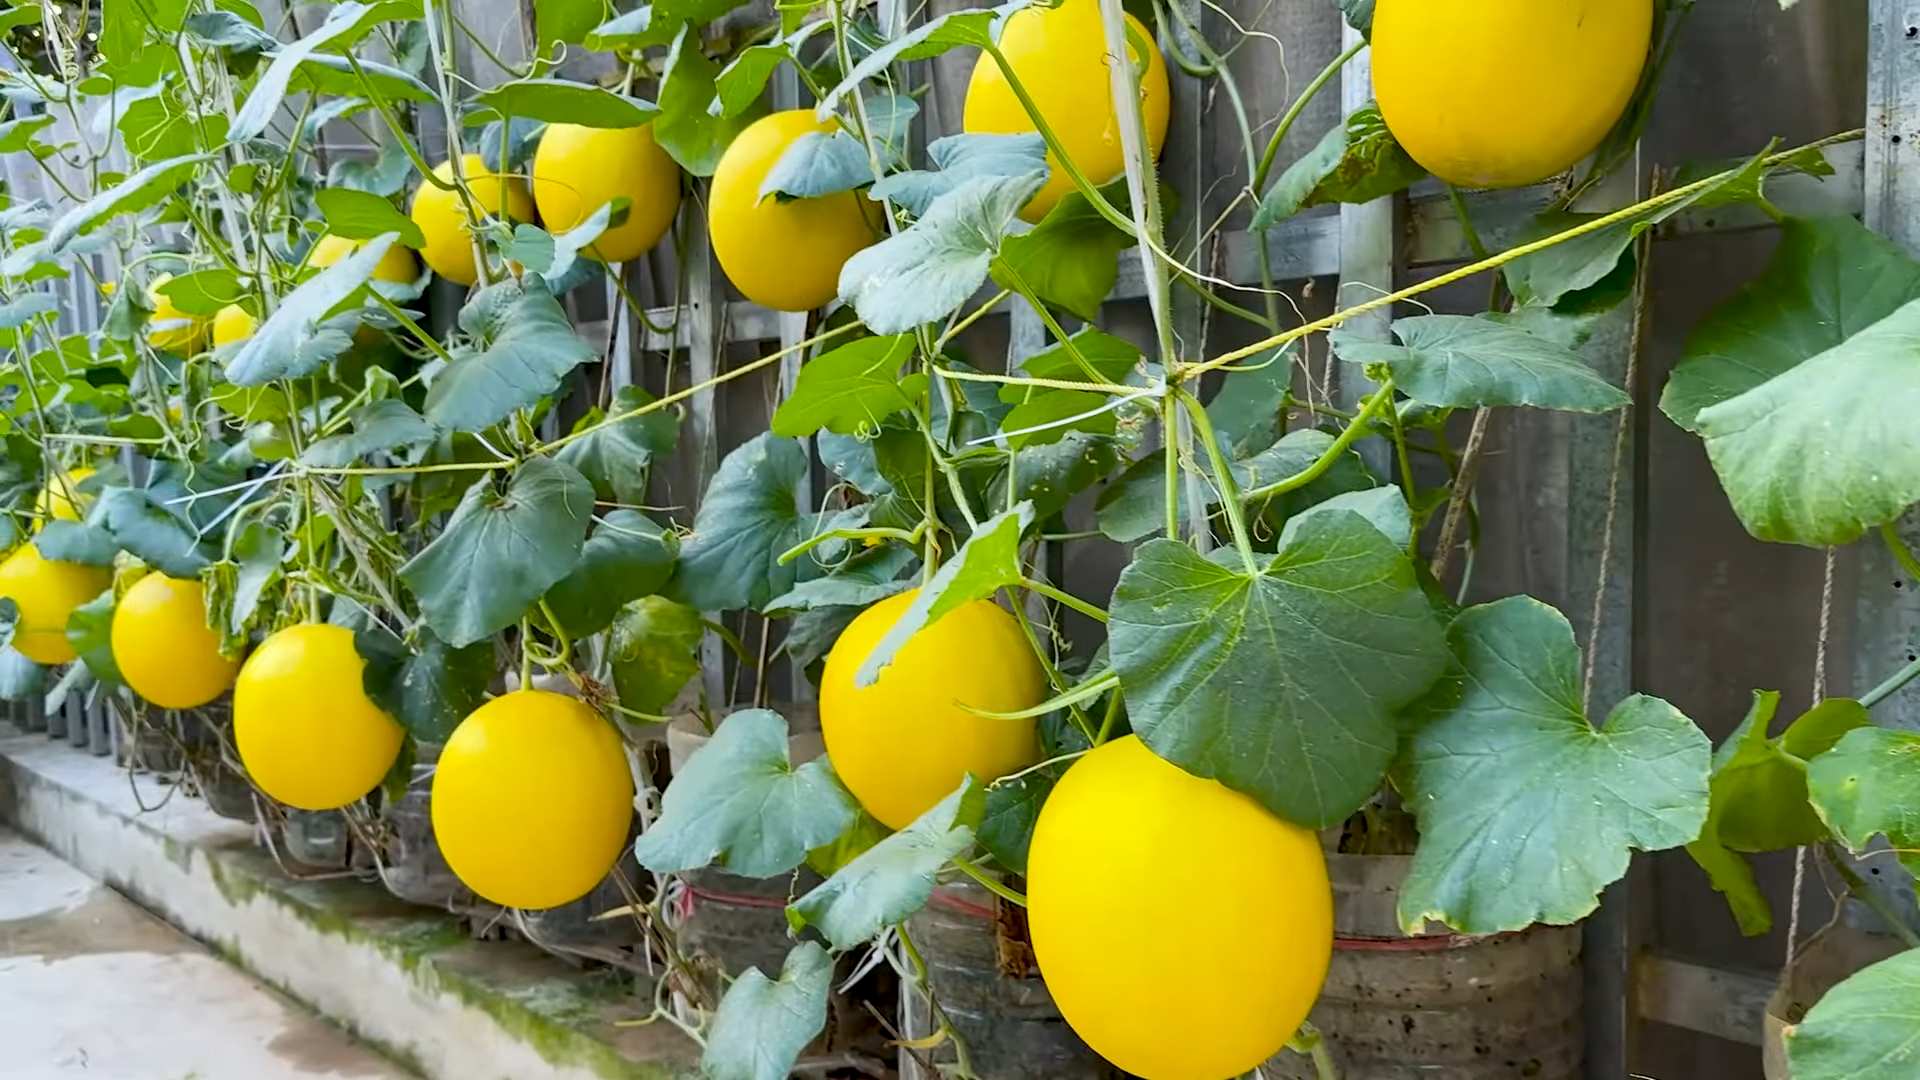
Juicier melons garden tip – who doesn’t dream of biting into a perfectly ripe, incredibly juicy melon grown right in their own backyard? I know I do! For centuries, melons have been cultivated and enjoyed across the globe, from ancient Egypt where they were buried with pharaohs, to the sun-drenched fields of Italy where they are a summer staple. But let’s be honest, achieving that level of sweetness and succulence can sometimes feel like a gamble. You nurture the plant, protect it from pests, and then… disappointment. A bland, watery melon.
That’s where this DIY article comes in! I’m going to share a simple, yet incredibly effective, juicier melons garden tip that will transform your melon-growing game. Forget complicated techniques and expensive fertilizers. This is a straightforward hack that anyone, regardless of their gardening experience, can implement. We all crave that burst of refreshing flavor, and with this trick, you’ll be well on your way to harvesting the sweetest, most satisfying melons you’ve ever tasted. Get ready to impress your friends and family with your homegrown bounty!
DIY: How to Grow the Juiciest Melons You’ve Ever Tasted!
Okay, melon lovers, gather ’round! I’m about to share my secret weapon for growing melons so juicy and flavorful, they’ll practically explode with deliciousness in your mouth. Forget those bland, watery grocery store melons. We’re talking homegrown, sun-ripened perfection. This isn’t just about planting seeds; it’s about understanding what melons crave and giving them exactly that. So, let’s dive in!
Understanding Melon Needs: The Foundation for Success
Before we get our hands dirty, let’s talk melon basics. Knowing what these guys need is half the battle.
* Sunlight: Melons are sun worshippers. They need at least 6-8 hours of direct sunlight per day. The more, the merrier!
* Warmth: These are warm-weather crops. Don’t even think about planting them until the soil has warmed up to at least 65°F (18°C).
* Well-drained soil: Melons hate soggy feet. They need soil that drains well but still retains moisture.
* Nutrients: They’re heavy feeders, meaning they need plenty of nutrients to produce those big, juicy fruits.
* Water: Consistent watering is key, especially during fruit development.
* Space: Melons need room to sprawl. Give them plenty of space to grow.
Choosing the Right Melon Variety
Not all melons are created equal! Consider your climate, space, and personal preferences when choosing a variety. Here are a few popular options:
* Watermelon: Classic summer treat. Look for varieties like ‘Sugar Baby’ (small and early) or ‘Crimson Sweet’ (larger and flavorful).
* Cantaloupe: Sweet and aromatic. ‘Hales Best Jumbo’ is a reliable choice.
* Honeydew: Mild and refreshing. ‘Honey Gold’ is a popular variety.
* Galia: A cross between cantaloupe and honeydew, known for its sweetness and crispness.
Step-by-Step Guide to Growing Juicy Melons
Alright, let’s get to the good stuff! Here’s my foolproof method for growing the juiciest melons you’ve ever tasted:
Section 1: Preparing the Soil
This is arguably the most important step. Happy soil equals happy melons!
1. Choose your location: Select a spot in your garden that gets at least 6-8 hours of direct sunlight. Make sure it’s also protected from strong winds.
2. Amend the soil: This is where the magic happens. Melons thrive in soil rich in organic matter. Dig in plenty of compost, well-rotted manure, or other organic amendments. I usually aim for a ratio of about 1/3 compost to 2/3 native soil.
3. Check the drainage: If your soil is heavy clay, consider adding sand or perlite to improve drainage. You can also create raised beds to ensure good drainage.
4. Test the pH: Melons prefer a slightly acidic to neutral soil pH (around 6.0-7.0). You can test your soil using a home test kit or send a sample to your local agricultural extension office. Amend the soil as needed to adjust the pH.
5. Add fertilizer: Melons are heavy feeders, so it’s important to add a slow-release fertilizer at planting time. Choose a fertilizer that’s high in phosphorus and potassium, which are essential for fruit development. I like to use a fertilizer with an NPK ratio of around 5-10-10.
Section 2: Planting the Melon Seeds or Transplants
Now that our soil is prepped, it’s time to get those melons in the ground!
1. Start seeds indoors (optional): If you live in a cooler climate with a short growing season, you can start melon seeds indoors 4-6 weeks before the last expected frost. Sow the seeds in peat pots or biodegradable containers to minimize root disturbance when transplanting.
2. Direct sow seeds (if weather permits): Once the soil has warmed up to at least 65°F (18°C), you can direct sow melon seeds directly into the garden. Plant the seeds about 1 inch deep and space them according to the variety’s recommendations (usually 2-3 feet apart).
3. Transplant seedlings (if started indoors): Gently remove the seedlings from their containers and plant them in the garden at the same depth they were growing in the containers. Space them according to the variety’s recommendations.
4. Water thoroughly: After planting, water the seeds or transplants thoroughly to help them settle in.
5. Mulch around the plants: Apply a layer of mulch around the plants to help retain moisture, suppress weeds, and regulate soil temperature. I like to use straw or shredded leaves.
Section 3: Caring for Your Melon Plants
This is where the consistent effort pays off. Regular care will result in bigger, juicier melons.
1. Water regularly: Melons need consistent watering, especially during fruit development. Water deeply and infrequently, allowing the soil to dry out slightly between waterings. Avoid overhead watering, as this can promote fungal diseases. Drip irrigation is ideal.
2. Fertilize regularly: Side-dress the plants with a balanced fertilizer every 2-3 weeks. You can also use a liquid fertilizer, such as fish emulsion or seaweed extract.
3. Weed regularly: Keep the garden free of weeds, which can compete with the melon plants for nutrients and water.
4. Control pests and diseases: Monitor the plants regularly for pests and diseases. Common melon pests include aphids, squash bugs, and cucumber beetles. Common diseases include powdery mildew and fusarium wilt. Take action promptly to control any problems. I prefer using organic pest control methods whenever possible.
5. Prune (optional): Some gardeners prune their melon plants to encourage fruit production. You can remove some of the side shoots to direct the plant’s energy towards developing the main fruits. However, pruning is not essential.
6. Support the fruits (optional): As the melons grow larger, you may need to support them to prevent them from rotting on the ground. You can use slings made from old pantyhose or netting to support the fruits. This is especially important for larger varieties like watermelons.
7. Protect from pests: Consider using row covers early in the season to protect young plants from pests like squash vine borers. Remove the covers once the plants start flowering to allow for pollination.
Section 4: Pollination – Helping Nature Along
Melons need pollination to set fruit. Here’s how to ensure they get it.
1. Attract pollinators: Plant flowers near your melon patch to attract bees and other pollinators. Some good choices include sunflowers, zinnias, and lavender.
2. Hand-pollinate (if necessary): If you’re not seeing a lot of bee activity, you can hand-pollinate the melon flowers. Use a small paintbrush to transfer pollen from the male flowers to the female flowers. Female flowers have a small fruit swelling at the base of the flower.
3. Be patient: It can take a few weeks for the fruits to start developing after pollination.
Section 5: Harvesting Your Juicy Melons
The moment we’ve all been waiting for! Knowing when to harvest is crucial for peak flavor.
1. Watermelon: Look for a dull thud when you thump the melon. The tendril closest to the fruit should be brown and dry. The underside of the melon (where it rests on the ground) should be yellow or cream-colored.
2. Cantaloupe: The melon should slip easily from the vine with a gentle tug. The stem end should be slightly softened and fragrant.
3. Honeydew: The melon should have a creamy yellow color and a slightly waxy feel. The blossom end should be slightly soft.
4. Galia: Similar to cantaloupe, the melon should slip easily from the vine. The skin will turn a golden yellow color.
5. Harvest in the morning: Harvest melons in the morning, when they’re at their coolest.
6. Handle with care: Melons are delicate, so handle them with care to avoid bruising.
Extra Tips for Extra Juicy Melons
These are my little secrets for taking your melon game to the next level:
* Epsom salts: Add Epsom salts to the soil around the plants every few weeks. Epsom salts provide magnesium, which is essential for chlorophyll production and fruit development. I use about a tablespoon per plant.
* Compost tea: Water the plants with compost tea every few weeks. Compost tea is a great source of nutrients and beneficial microbes.
* Reduce watering as the fruit ripens: In the final week or two before harvest, reduce watering slightly. This will concentrate the sugars in the fruit

Conclusion
So, there you have it! This simple, yet incredibly effective, DIY trick for achieving juicier melons is a game-changer for any home gardener. We’ve explored the science behind it, the ease of implementation, and the potential for truly remarkable results. Forget bland, disappointing melons – imagine sinking your teeth into a slice of perfectly ripe, intensely flavorful, and unbelievably juicy melon, all thanks to a little bit of proactive care.
This isn’t just about bigger melons; it’s about maximizing the potential of your existing plants. It’s about reducing water waste by directing moisture where it’s needed most. It’s about taking control of your garden’s output and enjoying the fruits (or rather, melons!) of your labor. And most importantly, it’s about experiencing the pure joy of growing something truly delicious and rewarding.
But don’t just take our word for it. The real magic happens when you try it yourself. Experiment with different types of melons – watermelons, cantaloupes, honeydews – and see how this technique transforms their flavor and texture. Consider variations like using different types of organic mulch to further enhance moisture retention and soil health. You could even try incorporating slow-release fertilizers directly into the watering basin for an extra boost of nutrients.
This DIY trick for juicier melons is more than just a gardening tip; it’s an invitation to connect with nature, to nurture your plants, and to savor the incredible flavors that your garden can produce.
We’re confident that once you experience the difference this technique makes, you’ll never go back to growing melons the old way. The increased sweetness, the enhanced juiciness, and the overall improved quality of your harvest will speak for themselves.
So, grab your tools, head out to your garden, and give this DIY trick a try. We’re eager to hear about your experiences! Share your photos, your tips, and your success stories in the comments below. Let’s build a community of melon-loving gardeners who are dedicated to growing the best, juiciest melons possible. Happy gardening!
Frequently Asked Questions (FAQ)
Q: What exactly does this DIY trick entail?
A: The core of the trick involves creating a small, shallow basin around the base of your melon plant. This basin acts as a reservoir, allowing you to direct water specifically to the root zone, ensuring the plant receives consistent and adequate hydration. This focused watering encourages the plant to produce larger, juicier melons. Think of it as giving your melon plant a personalized spa treatment, ensuring it gets all the hydration it needs to thrive.
Q: Why does directing water to the base of the plant make melons juicier?
A: Melons are incredibly thirsty plants, especially during their fruit development stage. When water is applied broadly across the garden, much of it is lost to evaporation or absorbed by surrounding plants. By concentrating the water at the base, you ensure that the melon plant’s roots have direct access to the moisture they need to plump up the fruit and develop its characteristic sweetness and juiciness. This targeted approach minimizes water waste and maximizes the plant’s ability to hydrate the developing melon.
Q: What kind of soil is best for growing juicy melons using this method?
A: While this trick can improve melon growth in various soil types, well-draining soil is crucial. Melons don’t like to sit in soggy soil, which can lead to root rot. Amend heavy clay soils with compost or other organic matter to improve drainage. Sandy soils, on the other hand, may benefit from the addition of organic matter to help retain moisture. The ideal soil is loamy, rich in nutrients, and drains well. Regularly testing your soil’s pH and nutrient levels will help you tailor your soil amendments for optimal melon growth.
Q: How often should I water my melon plants using this DIY trick?
A: The frequency of watering depends on several factors, including the weather, soil type, and the stage of melon development. As a general rule, water deeply and less frequently, rather than shallowly and often. Check the soil moisture level before watering. If the top inch or two of soil feels dry, it’s time to water. During hot, dry periods, you may need to water daily. As the melons ripen, you can slightly reduce watering to concentrate the sugars and enhance the flavor.
Q: Can I use this trick for all types of melons?
A: Yes, this DIY trick is beneficial for all types of melons, including watermelons, cantaloupes, honeydews, and even smaller varieties like Galia melons. The principle of directing water to the root zone applies to all melons, regardless of their size or type. However, you may need to adjust the size of the watering basin depending on the size of the plant and its root system.
Q: What are some signs that my melon plant isn’t getting enough water?
A: Signs of underwatering in melon plants include wilting leaves, stunted growth, and small, pale fruits. The leaves may also feel dry and brittle to the touch. If you notice these symptoms, increase the frequency and amount of watering. Remember to check the soil moisture level regularly to prevent underwatering.
Q: Can I overwater my melon plants using this method?
A: Yes, overwatering is possible, even with this targeted watering technique. Overwatering can lead to root rot and other fungal diseases. Avoid watering so much that the soil becomes waterlogged. Ensure that the soil drains well and that the water doesn’t pool in the basin for extended periods. If you notice yellowing leaves or signs of fungal growth, reduce watering and improve drainage.
Q: What kind of mulch should I use around my melon plants?
A: Organic mulches, such as straw, wood chips, or compost, are excellent choices for melon plants. Mulch helps retain moisture in the soil, suppress weeds, and regulate soil temperature. Apply a layer of mulch around the base of the plant, being careful not to pile it directly against the stem. As the mulch decomposes, it will also enrich the soil with nutrients.
Q: Can I use fertilizer in conjunction with this watering trick?
A: Absolutely! Fertilizing your melon plants can further enhance their growth and fruit production. Use a balanced fertilizer specifically formulated for melons or fruits and vegetables. Follow the instructions on the fertilizer package carefully. You can also incorporate slow-release fertilizers directly into the watering basin to provide a steady supply of nutrients to the plant’s roots.
Q: How long does it take to see results from this DIY trick?
A: You should start to see noticeable results within a few weeks of implementing this watering technique. The leaves will appear healthier and more vibrant, and the melons will begin to grow larger and more quickly. The ultimate test, of course, will be the taste and texture of the ripe melons. Be patient and consistent with your watering, and you’ll be rewarded with juicier, more flavorful melons.
Q: What if I don’t have a garden? Can I use this trick in containers?
A: Yes, you can definitely adapt this trick for container gardening! The principle remains the same: create a small basin around the base of the plant to direct water to the roots. Ensure your container has adequate drainage holes to prevent waterlogging. You may need to water more frequently in containers, as they tend to dry out faster than garden beds. Choose a large container that is appropriate for the size of the melon variety you are growing.
Q: Are there any other tips for growing juicier melons besides this watering trick?
A: Yes, several other factors contribute to growing juicy melons. Choose melon varieties that are known for their sweetness and juiciness. Provide your plants with plenty of sunlight (at least 6-8 hours per day). Protect your plants from pests and diseases. And finally, harvest your melons at the peak of ripeness for the best flavor and texture.

Leave a Comment